In previous installments of this series we built out a fully functional plugin dedicated to tracking Bgp Peering connections. In this post we'll add final components: object permissions and API views.
Developing NetBox Plugin tutorial series
- Developing NetBox Plugin - Part 1 - Setup and initial build
- Developing NetBox Plugin - Part 2 - Adding web UI pages
- Developing NetBox Plugin - Part 3 - Adding search panel
- Developing NetBox Plugin - Part 4 - Small improvements
- Developing NetBox Plugin - Part 5 - Permissions and API
Contents
Adding permissions
Right now all users can view, edit and delete Bgp Peering objects. In the production system we would like to be able to have more granular control over who can perform a given operation. This is where the permissions system comes in.
In our plugin we will leverage Django authentication system [1] to enable permissions for views we built out.
Adding permissions to views
Below are the changes I made to views.py to add permission handling to each of the views:
# views.py
from django.contrib.auth.mixins import PermissionRequiredMixin

...

class BgpPeeringView(PermissionRequiredMixin, View):
    """Display BGP Peering details"""

    permission_required = "netbox_bgppeering.view_bgppeering"
    ...

class BgpPeeringListView(PermissionRequiredMixin, View):
    """View for listing all existing BGP Peerings."""

    permission_required = "netbox_bgppeering.view_bgppeering"
    ...

class BgpPeeringCreateView(PermissionRequiredMixin, CreateView):
    """View for creating a new BgpPeering instance."""

    permission_required = "netbox_bgppeering.add_bgppeering"
    ...

class BgpPeeringDeleteView(PermissionRequiredMixin, DeleteView):
    """View for deleting a BgpPeering instance."""

    permission_required = "netbox_bgppeering.delete_bgppeering"
    ...

class BgpPeeringEditView(PermissionRequiredMixin, UpdateView):
    """View for editing a BgpPeering instance."""

    permission_required = "netbox_bgppeering.change_bgppeering"
    ...
I've only included bits that have changed. Below is quick breakdown of what we did:
-
We import
PermissionRequiredMixinmixin class fromdjango.contrib.auth.mixins. This class will handle permission checks logic and will plug into the NetBox's existing authorization system. -
For each view class we add
PermissionRequiredMixinto classes we subclass from. E.g.
class BgpPeeringCreateView(PermissionRequiredMixin, CreateView)
- In each of the classes we enabled for permission checks we need to specify permission, or iterable of permissions, required to access the view. To do that we use parameter
permission_required. E.g.
class BgpPeeringDeleteView(PermissionRequiredMixin, DeleteView):
    """View for deleting a BgpPeering instance."""

    permission_required = "netbox_bgppeering.delete_bgppeering"
Permission names follow the following naming convention:
<app_name>.{view|add|delete|change}_<model_name>
Example permission names:
-
Allow displaying BgpPeering instance:
netbox_bgppeering.view_bgppeering. -
Allow deleting BgpPeering instance:
netbox_bgppeering.delete_bgppeering. -
Allow modifying BgpPeering instance:
netbox_bgppeering.change_bgppeering.
After reloading NetBox try logging in as a non-privileged user and accessing BgpPeering plugin. You should get Access Denied message, like the one below:

You can now switch to admin user and log into admin panel. In the admin panel if you add new permissions in User > Permissions, you should see that netbox_bgppeering > bgp peering permission now appears on the list of available object types.

Adding permissions to Web GUI elements
We now have in place permissions that control the ability to view, add, delete, and edit Bgp Peering objects. But Web GUI elements, like the edit button, will still be shown to all users. Time to change that and make this behaviour permission dependent.
- First we set permission required to see plus,
+, button in the top plugin menu. We editnavigation.py:
# navigation.py
...
menu_items = (
    PluginMenuItem(
        ...
        buttons=(
            PluginMenuButton(
                ...
                permissions=["netbox_bgppeering.add_bgppeering"],
            ),
There's only one addition. We pass a new parameter, permissions, when creating a PluginMenuButton object. We set its value to an iterable of permissions, in our case it's just one permission: netbox_bgppeering.add_bgppeering.
After this is done only users who have Can add permission on BgpPeering objects will be able to see the + button.
- The final changes are to the templates that show
BgpPeeringrelated buttons. In our case those arebgppeering.htmlandbgppeering_list.html.
<!-- bgppeering.html -->
...
<div class="col-sm-8">
    <div class="pull-right noprint">
        {% if perms.netbox_bgppeering.change_bgppeering %}
        <a href="{% url 'plugins:netbox_bgppeering:bgppeering_edit' pk=bgppeering.pk %}" class="btn btn-warning">
            <span class="{{ icon_classes.pencil }}" aria-hidden="true"></span> Edit
        </a>
        {% endif %}
        {% if perms.netbox_bgppeering.delete_bgppeering %}
        <a href="{% url 'plugins:netbox_bgppeering:bgppeering_delete' pk=bgppeering.pk %}" class="btn btn-danger">
            <span class="{{ icon_classes.trash }}" aria-hidden="true"></span> Delete
        </a>
        {% endif %}
    </div>
</div>
...
<!-- bgppeering_list.html -->
...
<div class="pull-right noprint">
    {% if perms.netbox_bgppeering.add_bgppeering %}
    <a href="{% url 'plugins:netbox_bgppeering:bgppeering_add' %}" class="btn btn-primary">
        <span class="{{ icon_classes.plus }}" aria-hidden="true"></span> Add
    </a>
    {% endif %}
</div>
...
To check permission is set before including the element we use {% if perms.<permission_name> %} conditional.
In our case we have the below conditionals:
{% if perms.netbox_bgppeering.change_bgppeering %}to includeEditbutton.{% if perms.netbox_bgppeering.delete_bgppeering %}to includeDeletebutton.{% if perms.netbox_bgppeering.bgppeering_add %}to includeAddbutton.
If the user doesn't have one of those permissions then the corresponding button will not show in Web GUI.
And that's it. With changes to the views and Web GUI elements we have implemented a permissions system for our plugin.
Next stop, API!
Source code up to this point is in branch adding-permission if you want to check it out: https://github.com/progala/ttl255-netbox-plugin-bgppeering/tree/adding-permissions.
Adding API
Being able to interact with BgpPeering objects in Web GUI is great and useful but it's not well suited to automation. If we want to programmatically interact with our plugin we need to expose it via API. And that's what we're going to do now.
To add code handling API we need to create a new directory called api. This is where source code files related to API functionality need to go.
In case of our plugin the path that includes api directory looks like so:
../ttl255-netbox-plugin-bgppeering/netbox_bgppeering/api
In this directory we will create three source code files, serializers.py, urls.py and views.py:
├── api
│   ├── serializers.py
│   ├── urls.py
│   └── views.py
With that out of the way, let's start coding!
Building serializer for BgpPeering objects
First thing we need to do is to specify how BgpPeering model instances will be rendered into json representation.
For that purpose we will use Django REST framework [2] as well as existing NetBox serializers.
Our serializers go into the api/serializers.py file, and below is the serializer I wrote for the BgpPeering model.
# api/serializers.py

from rest_framework import serializers

from ipam.api.nested_serializers import (
    NestedIPAddressSerializer,
)
from dcim.api.nested_serializers import NestedDeviceSerializer, NestedSiteSerializer

from netbox_bgppeering.models import BgpPeering


class BgpPeeringSerializer(serializers.ModelSerializer):
    """Serializer for the BgpPeering model."""

    site = NestedSiteSerializer(
        many=False,
        read_only=False,
        required=False,
        help_text="BgpPeering Site",
    )

    device = NestedDeviceSerializer(
        many=False,
        read_only=False,
        required=True,
        help_text="BgpPeering Device",
    )

    local_ip = NestedIPAddressSerializer(
        many=False,
        read_only=False,
        required=True,
        help_text="Local peering IP",
    )

    class Meta:
        model = BgpPeering
        fields = [
            "id",
            "site",
            "device",
            "local_ip",
            "local_as",
            "remote_ip",
            "remote_as",
            "peer_name",
            "description",
        ]
Few new concepts appear here so let's dig into this code.
-
from rest_framework import serializers- We import moduleserializerswhich contains base serializer class we will use. -
Next we import nested serializers [3] for NetBox objects that we link to in our model. This will allow us to:
- Return
jsonrepresentation of those objects nested inside of BgpPeering data structure. - Use of
name,slug, etc., fields for linked objects in POST/PATCH/PUT requests. Otherwise we'd only be allowed to passidfor these.
- Return
 from ipam.api.nested_serializers import (
    NestedIPAddressSerializer,
)
from dcim.api.nested_serializers import NestedDeviceSerializer, NestedSiteSerializer
- Final import is the model that we're building a serializer for:
from netbox_bgppeering.models import BgpPeering.
With imports out of the way we can build the serializer class.
-
BgpPeeringSerializer(serializers.ModelSerializer)- I named our classBgpPeeringSerializerand I'm subclassingModelSerializerclass. That class will automatically handle serializing of most of the fields in our model, among other things. -
In internal class
Metawe specify a model that is being serialized, hereBgpPeering. Then we specify a list of fields that we want to be included when serialization takes place. Fields that don't require special treatment will be automatically rendered thanks to theBgpPeeringSerializerclass.
    class Meta:
        model = BgpPeering
        fields = [
            "id",
            "site",
            "device",
            "local_ip",
            "local_as",
            "remote_ip",
            "remote_as",
            "peer_name",
            "description",
        ]
- Finally, I'm telling the serializer class that three of the model fields need to be treated differently. Namely I want linked models to be also serialized and included in the
jsonpayload returned in the API response.
This is not required but in a lot of cases it makes sense to return these data structures nested inside of the main structure. It will help us avoid multiple API calls that would be otherwise needed to retrieve details of linked objects.
It also simplifies adding/modifying objects via API, as already mentioned.
For each of the fields that need to contain nested data we must:
- Identify the nested serializer matching model this field links to.
- Instantiate the class and assign the resulting object to the parameter named after the field.
For example below is the nested serializer we use for site field:
    site = NestedSiteSerializer(
        many=False,
        read_only=False,
        required=False,
        help_text="BgpPeering Site",
    )
When creating NestedSiteSerializer object we need to provide a few arguments [4]:
many- set it to match the relationship type set on the field in the model. We don't have any many-to-many relationships so in our casemanyis set toFalse.read_only- set it toTrueif you want the field to be read-only and not allowed as the input in API calls. In our case all custom fields can be used as input so we set it toFalse.required- specifies whether field is required. This should follow the corresponding property we set for the model field.help_text- used to give this field description that is picked up when rendering the field.
And that's it, our serializer is completed.
Building API views
With the serializer taken care of we move onto API view. This view goes into the api/views.py file and it will handle all of the different HTTP API calls.
# api/views.py

from rest_framework import mixins, viewsets

from netbox_bgppeering.models import BgpPeering
from netbox_bgppeering.filters import BgpPeeringFilter

from .serializers import BgpPeeringSerializer


class BgpPeeringView(
    mixins.CreateModelMixin,
    mixins.DestroyModelMixin,
    mixins.ListModelMixin,
    mixins.RetrieveModelMixin,
    mixins.UpdateModelMixin,
    viewsets.GenericViewSet,
):
    """Create, check status of, update, and delete BgpPeering object."""

    queryset = BgpPeering.objects.all()
    filterset_class = BgpPeeringFilter
    serializer_class = BgpPeeringSerializer
Not too much code but some new concepts, let's break it down:
viewsets.GenericViewSet- This is aViewSet[5] class that lets us combine multiple different views into one view. Normally we would have to build separate views for adding, editing, deleting, etc. objects. We then would need to separately add each of these to URL conf. WithViewSetwe need just one view and we will only need one entry in URL conf.
Next, we subclass a number of mixin classes implementing different actions that will allow us to support HTTP request methods.
mixins.CreateModelMixin- This class takes care of creating and saving a new model instance. Responds to HTTP POST.mixins.DestroyModelMixin- This class will handle deletion of model instances. Responds to HTTP DELETE.mixins.ListModelMixin- This class allows returning a list of instances in API response. Used with HTTP GET.mixins.RetrieveModelMixin- This class handles retrieval of a single model instance. Used with HTTP GET.mixins.UpdateModelMixin- Finally, this class enables edits, both merge and replace. Used with HTTP PUT and PATCH.
In the body of the class we have three attributes:
-
queryset- This is like in a normal view, we specify BgpPeering objects that are of interest. Here we want all objects to be up for grabs in API calls:queryset = BgpPeering.objects.all() -
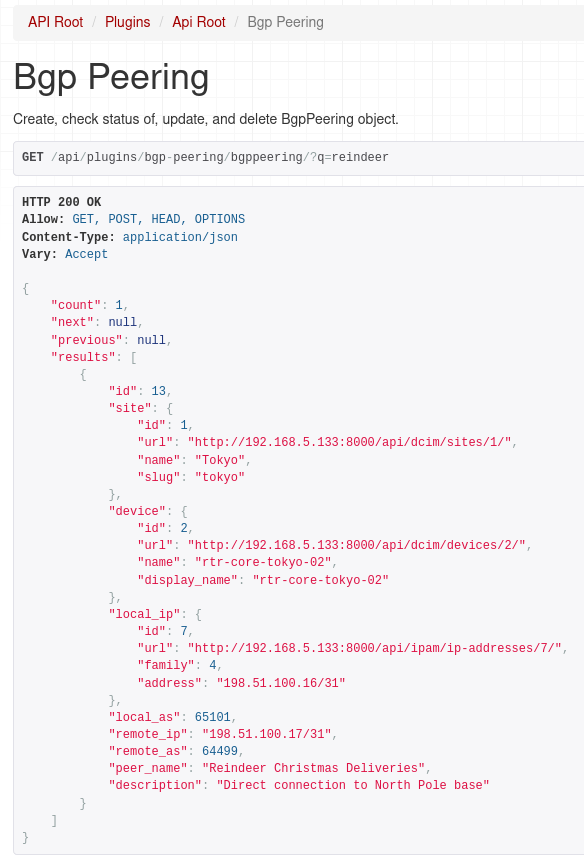
filterset_class- This specifies a filter class that can be used to apply search queries when retrieving objects via API. We're re-usingBgpPeeringFilterwhich we built for the Search Panel. This means we can filter objects through API using the same queries we used in Web GUI.filterset_class = BgpPeeringFilterFor example, if we wanted to get Bgp Peering objects that have string
primaryin description we could use general query parameterq:http://localhost:8000/api/plugins/bgp-peering/bgppeering/?q=primary -
serializer_class- Finally we have a serializer class that we just built. This will be used to render our model intojsonrepresentation.serializer_class = BgpPeeringSerializer
Defining URL for API calls
With serializer and view classes in place we just need to tie it together and expose API endpoints via URL. Code for that goes into the api/urls.py file.
# api/urls.py
from rest_framework import routers
from .views import BgpPeeringView

router = routers.DefaultRouter()

router.register(r"bgppeering", BgpPeeringView)

urlpatterns = router.urls
This is slightly different to urls.py for Web GUI views. Here we use the router class DefaultRouter [6] which comes from Django REST Framework. This will automatically handle requests to API URLs exposed by API using different HTTP methods.
What this means is that we don't have to manually create multiple URL rules. Thanks to DefaultRouter we need only one:
router.register(r"bgppeering", BgpPeeringView)
That's it. This one URL rule will handle GET, POST, etc. requests automatically.
Finally, we assign urls auto-generated by router class to urlpatterns variable. This variable is what Django uses for path mappings.
urlpatterns = router.urls
And we're done! With URLs in place we can take our API for a spin!
API usage examples
If you now navigate to the main API URL for our plugin, http://localhost:8000/api/plugins/bgp-peering/, you should see the available endpoint.
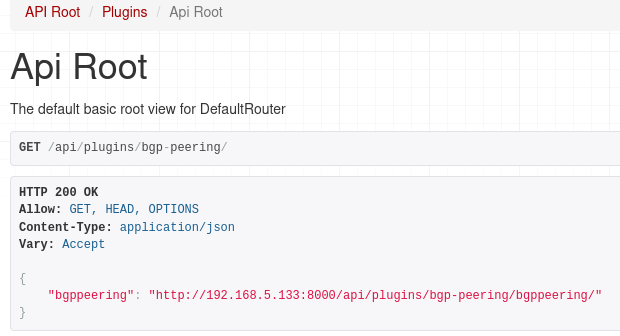
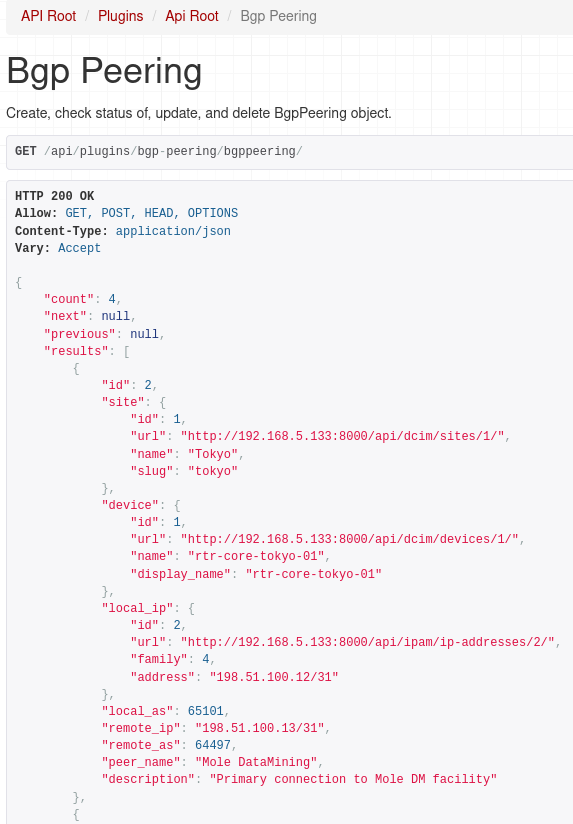
If we followed the URL for our endpoint we should get json reply with list of Bgp Peerings:
And as I mentioned earlier we can use filtering as well, here we ask for peerings that have 'reindeer' string in the peer name or description.
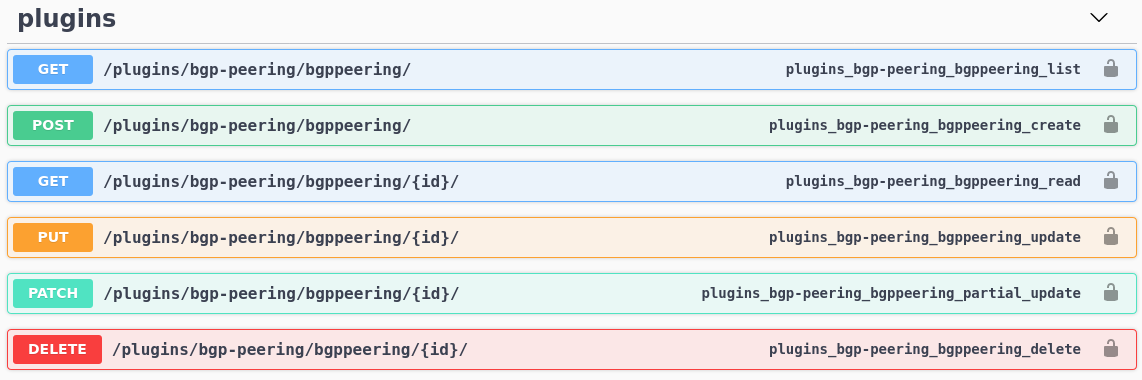
What's nice is that documentation for our API now shows up in Swagger docs:
So we can view objects, but can we add or modify them?
Let's try out other HTTP methods using Postman.
POST:

Here we're adding a new object, notice nested payload values for site, device and IP address. If we didn't define nested serializers for these models we'd have to provide id of the objects we're linking to. This will make it much easier to consume our API for Bgp Peering plugin.
For completeness we'll try out PATCH and DELETE methods as well:
PATCH:

DELETE:

Awesome, everything is working as expected!
In case you were wondering, permissions we implemented in the first part of this post are automatically applied to API views.
This is what happens when user that has read-only access to Bgp Peering objects tries to create a new one:

Conclusion
And with that we came to the end of the tutorial walking you through the development of an example NetBox plugin. During our journey we built a functional plugin that implements a custom model representing Bgp Peering record. We built Web GUI views allowing users to view, add, edit and delete objects. Next we implemented object filtering before adding permissions and API.
There's much more we could do here. We could add export/import functionality. Perhaps improving data validation and search would be a welcome addition. But I believe that what you learned here should give you a solid base that you can build on top of. Everything else is up to your imagination.Happy coding!
Resources
- NetBox docs: Plugin Development: https://netbox.readthedocs.io/en/stable/plugins/development/
- NetBox source code on GitHub: https://github.com/netbox-community/netbox
- NetBox Extensibility Overview, NetBox Day 2020: https://www.youtube.com/watch?v=FSoCzuWOAE0
- NetBox Plugins Development, NetBox Day 2020: https://www.youtube.com/watch?v=LUCUBPrTtJ4
Django authentication system: https://docs.djangoproject.com/en/3.1/topics/auth/default/ ↩︎
Django REST framework: https://www.django-rest-framework.org/ ↩︎
Django REST nested relationships: https://www.django-rest-framework.org/api-guide/relations/#nested-relationships ↩︎
Django REST serializer arguments: https://www.django-rest-framework.org/api-guide/fields/#core-arguments ↩︎
Django REST ViewSets: https://www.django-rest-framework.org/api-guide/viewsets/ ↩︎
Django REST DefaultRouter: https://www.django-rest-framework.org/api-guide/routers/#defaultrouter ↩︎
Welcome to part 4 of the tutorial on developing NetBox plugin. By now BgpPeering plugin is functional but there are few things here and there that could make it better. In this post, we'll go through many improvements that will make the plugin look better and increase its functionality.
Developing NetBox Plugin tutorial series
- Developing NetBox Plugin - Part 1 - Setup and initial build
- Developing NetBox Plugin - Part 2 - Adding web UI pages
- Developing NetBox Plugin - Part 3 - Adding search panel
- Developing NetBox Plugin - Part 4 - Small improvements
- Developing NetBox Plugin - Part 5 - Permissions and API
Contents
- Updating display name of BgpPeering objects
- Enforce the same network for local and remote IPs
- Allowing objects to be deleted
- Allowing objects to be edited
- Prettifying field labels
- Conclusion
- Resources
- BGP Peering Plugin GitHub repository
Updating display name of BgpPeering objects
We'll start improvements by changing default display name of BgpPeering objects.
Currently, when we create new objects we get a name that is not very descriptive:

Instead of BgpPeering object (28) we'd like to have something more meaningful.
We could perhaps show here device name, peer name, or even remote BGP AS number.
Unfortunately, we decided to make peer name optional so this might not be a good candidate for the display name of an object. It's possible to include it conditionally. But that would result in inconsistent naming for objects that don't have peer name defined. For the sake of consistency, I will only include the device name and the remote BGP AS number.
Essentially, I want our display name to look like so:
rtr-core-tokyo-02:3131
To do that we need to override __str__ method in BgpPeering model class contained in models.py.
# models.py
class BgpPeering(ChangeLoggedModel):
...
    def __str__(self):
        return f"{self.peer_name}:{self.remote_as}"
If we now create a new object we'll see the below in changelog:

Much better, now the BGP Peering object names mean something. We can see the local device the peering is on and the AS number of remote peer.
Enforce the same network for local and remote IPs
Local IP address is selected from the list of IP addresses available in NetBox when creating new BGP Peering. But when we add remote IP address we have to type it in manually. If you try entering remote IP that is in a network different than the one local IP is in our form will happily accept it.
It perhaps is not that much of an issue but I thought this is a good place to show you how we can add custom validation to forms.
Add validation to form class
We'll update class BgpPeeringForm in forms.py with code that performs the required validation.
To validate multiple form fields we can use method clean()[1] which comes from Django Form class.
Let's implement our check:
# forms.py

import ipaddress

class BgpPeeringForm(BootstrapMixin, forms.ModelForm):
...
    def clean(self):
        cleaned_data = super().clean()
        local_ip = cleaned_data.get("local_ip")
        remote_ip = cleaned_data.get("remote_ip")

        if local_ip and remote_ip:
            # We can trust these are valid IP addresses. Address format validation done in .super()
            if (
                ipaddress.ip_interface(str(local_ip)).network
                != ipaddress.ip_interface(str(remote_ip)).network
            ):
                msg = "Local IP and Remote IP must be in the same network."
                self.add_error("local_ip", msg)
                self.add_error("remote_ip", msg)
First, we import ipaddress library which we'll use to check if IPs belong to the same network.
Next, we go inside of clean() method.
To trigger field validation of individual fields and retrieve the results we call clean() method from the parent class.
cleaned_data = super().clean()
Now that we have validated field values in cleaned_data we can retrieve strings coming from local IP and remote IP form fields.
local_ip = cleaned_data.get("local_ip")
remote_ip = cleaned_data.get("remote_ip")
With values retrieved we write conditional to check if any of them are empty. This should never happen but we might want more processing here in the future so it's prudent to do so.
if local_ip and remote_ip:
Next, we have conditional implementing network checking logic. We use ip_interface [2] function from ipaddress module to create IPv4Interface or IPv4Interface objects from each of our IP addresses.
The interface objects have a handy network attribute that returns IP network the interface belongs to. This allows us to directly compare networks for peering IPs.
If networks are the same we take no action, i.e. form returns with no errors. However, if the networks differ we generate an error message and assign it to msg variable. We then append this error to validation results for local_ip and remote_ip form fields.
if (
    ipaddress.ip_interface(str(local_ip)).network
    != ipaddress.ip_interface(str(remote_ip)).network
):
    msg = "Local IP and Remote IP must be in the same network."
    self.add_error("local_ip", msg)
    self.add_error("remote_ip", msg)
Show errors on the form in web UI
We now have code handling validation and generating errors. We now have code handling validation and generating errors. The next step is to update the form template so that the errors show up in the web UI.
I added {% if field.errors %} block to div rendering fields in bgppeering_edit.html:
<div class="col-md-9">
    {{ field }}
    {% if field.help_text %}
    <span class="help-block">{{ field.help_text|safe }}</span>
    {% endif %}
    {% if field.errors %}
    <ul>
        {% for error in field.errors %}
        <li class="text-danger">{{ error }}</li>
        {% endfor %}
    </ul>
    {% endif %}
</div>
When form fails validation, errors for each form field will be returned in field.errors attribute [^field_erros]. We can then loop over errors and display them under a given field.
Below is an example where I entered IP addresses belonging to different networks. You can see that the form failed validation and errors are displayed under each of the fields.

Allowing objects to be deleted
We have been happily adding BGP Peerings objects but at some point, we might have to delete some of them. Unfortunately, the only way to do it right now is from the admin panel. This is less than ideal and thus we decide to implement delete functionality.
Creating delete view
There are few places we need to modify, let's start with views.py.
from django.urls import reverse_lazy
...
from django.views.generic.edit import CreateView, DeleteView

...

class BgpPeeringDeleteView(DeleteView):
    """View for deleting a BgpPeering instance"""

    model = BgpPeering
    success_url = reverse_lazy("plugins:netbox_bgppeering:bgppeering_list")
    template_name = "netbox_bgppeering/bgppeering_delete.html"
We import reverse_lazy function which will be used to return the page for the given namespace URL.
We also borrow another of Django's generic edit views, DeleteView[3], which will offload a lot of required work. This class class will handle both GET and POST methods.
- If
GETis used view will return the confirmation page. That page should contain a form that willPOSTto the URL pointing to this view. - If
POSTis used then the provided object will be deleted.
For our plugin, we will go down the route of GET followed by POST from the confirmation page form.
The actual view is relatively short:
- We define
BgpPeeringDeleteViewclass inheriting fromDeleteView. modelvariable takes model class for this view, hereBgpPeering.success_urldefines URL to which view will redirect after an object has been deleted. Here I provide a namespaced URL pointing to list view of our records.template_namepoints to the template that will be rendered when we're asked to confirm the deletion.
Next, we look at the deletion confirmation template.
Delete confirmation template
Deleting objects is a serious business so I thought that we should customize the deletion confirmation page. It will also make it look like other prompts in NetBox.
Here is our template:
# bgppeering_delete.html
{% extends 'base.html' %}
{% load form_helpers %}
{% block content %}
<div class="row">
<div class="col-md-6 col-md-offset-3">
<form action="" method="post" class="form">
{% csrf_token %}
<div class="panel panel-{{ panel_class|default:"danger" }}">
<div class="panel-heading">Delete BGP Peering?</div>
<div class="panel-body">
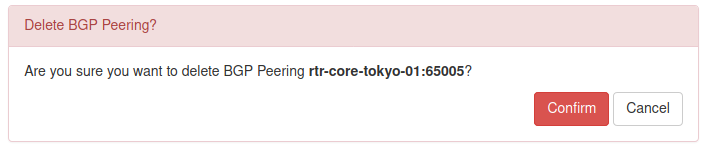
<p>Are you sure you want to delete BGP Peering <strong>{{ object }}</strong>?</p>
<div class="text-right">
<button type="submit" name="_confirm" class="btn btn-{{ button_class|default:"danger" }}">Confirm</button>
<a href="{% url 'plugins:netbox_bgppeering:bgppeering' pk=bgppeering.pk %}" class="btn btn-default">Cancel</a>
</div>
</div>
</div>
</form>
</div>
</div>
{% endblock %}
This is a pretty standard form. We have some styling to make users aware of the seriousness of the operation.
Of interest are two buttons, Confirm and Cancel.
Confirmwill submit the form to the URL pointing to our delete view. This will result in thePOSTaction triggering deletion of the object.Cancelwill take us back to the detailed view of the object instead of deleting it.
Add url to delete view
We created a delete view but there's no way to reach it currently. We need to add URL pointing to it.
Let's add the missing URL:
# urls.py
from .views import (
    BgpPeeringCreateView,
    BgpPeeringDeleteView,
    BgpPeeringListView,
    BgpPeeringView,
)


urlpatterns = [
...
    path("<int:pk>/delete/", BgpPeeringDeleteView.as_view(), name="bgppeering_delete"),
]
We added BgpPeeringDeleteView class to the import list. Then we created new entry in urlpatterns:
path("<int:pk>/delete/", BgpPeeringDeleteView.as_view(), name="bgppeering_delete")
This is like URL for a detailed view. We use pk attribute again, which is whatBgpPeeringDeleteView will need to locate the object for deletion. We name this URL bgppeering_delete to make referring to it easier.
Adding object view header and delete button
The last thing we're missing is some kind of button in UI that would allow us to delete objects. This is what we're going to do next.
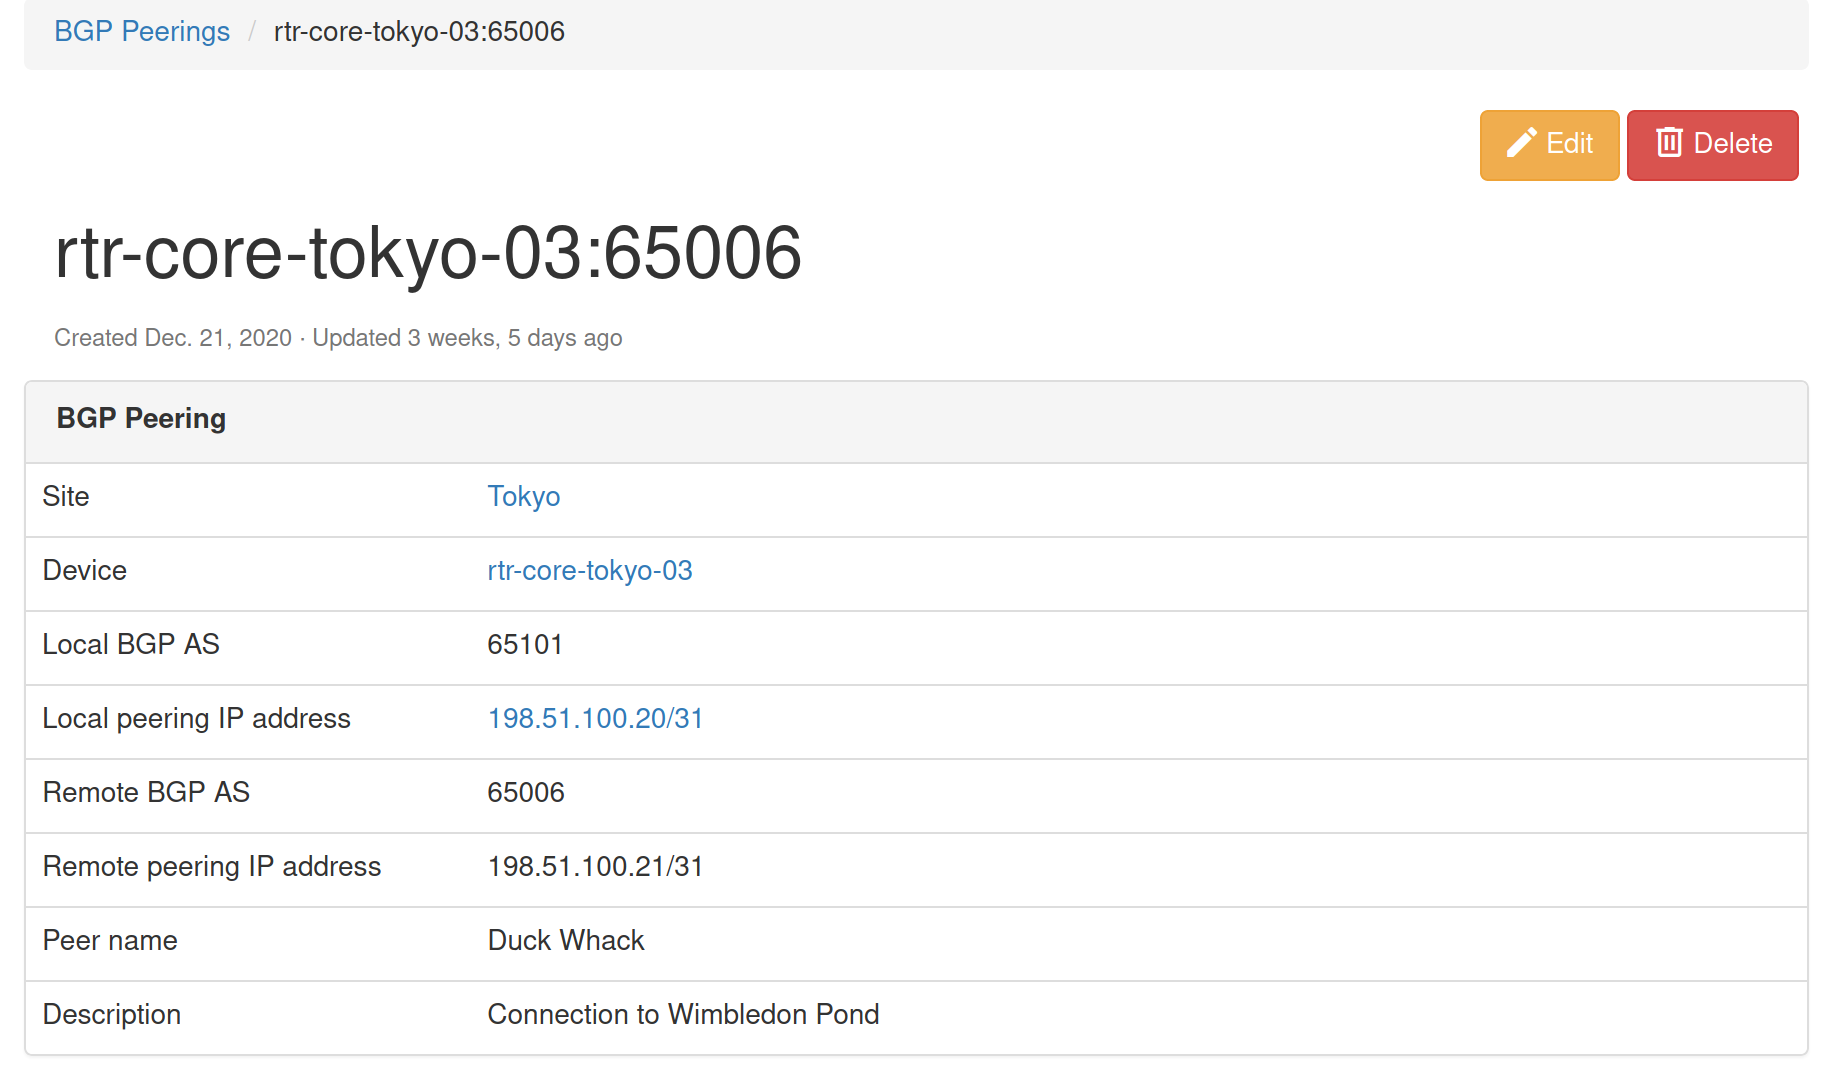
I'm going to edit the detailed object view template and add a few things:
- Breadcrumb with link to the list of objects followed by name of the current object.
- Date showing when this object was created.
- Time elapsed since this object was last updated.
- Delete object button leading to delete confirmation page.
# bgppeering.html
{% block header %}
<div class="row noprint">
<div class="col-sm-8">
<ol class="breadcrumb">
<li><a href="{% url 'plugins:netbox_bgppeering:bgppeering_list' %}">BGP Peerings</a></li>
<li>{{ bgppeering }}</li>
</ol>
</div>
</div>
<div class="col-sm-8">
<a href="{% url 'plugins:netbox_bgppeering:bgppeering_delete' pk=bgppeering.pk %}" class="btn btn-danger pull-right">
<span class="{{ icon_classes.trash }}" aria-hidden="true"></span> Delete
</a>
</div>
<div class="col-sm-8">
<h1>{% block title %}{{ bgppeering }}{% endblock %}</h1>
<p>
<small class="text-muted">Created {{ bgppeering.created }} · Updated <span
title="{{ bgppeering.last_updated }}">{{ bgppeering.last_updated|timesince }}</span> ago</small>
</p>
</div>
{% endblock %}
As you can see I'm overriding block header which comes from base.html. This block is used for elements displayed below the main menu but above the rest of the content.
Then we have 3 divs:
- Div with breadcrumb where we have URL for the page with list objects, followed by the name of the current object.
- Div with button pointing to URL responsible for deleting the object. We pass this URL the
pkvalue identifying the current object. - Div containing the name of the object, as a title. This is followed by the object creation date and time since this object was last updated.
If you were to run the code we added up to this point you should see the object details page looking like the below one:

And when we click Delete button we should be presented with the confirmation prompt:
That's pretty cool, we can now add, and delete objects. This thing is starting to look better and better.
But we're not done here. Why not add edit functionality so that we can modify existing objects?
Allowing objects to be edited
You might be happy to know that to enable editing we can reuse most of the template code used for object creation. We will need to modify it and create an edit view but it takes less work than adding object deletion.
Creating edit view
To create the edit view class I added the below code to views.py:
# views.py
from django.views.generic.edit import CreateView, DeleteView, UpdateView
...
class BgpPeeringEditView(UpdateView):
    """View for editing a BgpPeering instance."""

    model = BgpPeering
    form_class = BgpPeeringForm
    template_name = "netbox_bgppeering/bgppeering_edit.html"
We complete our collection of generic views by importing UpdateView [4]. As usual, this will do a lot of hard work for us.
Then comes our class, BgpPeeringEditView. In this class we define:
model- Model class used for this class, hereBgpPeering.form_class- Form used by the view and template. We reuse the form we built for the object creation view,BgpPeeringForm.template_name- Template used by this view, again, we reuse existing templatebgppeering_edit.html.
That was nice, we reused existing components and plugged them into edit view.
Next, we need to modify the template so it can support both creating and editing objects.
Modify object creation template
As I mentioned, we can mostly reuse the existing template, bgppeering_edit.html, with some mall modifications.
# bgppeering_edit.html
...
    {% block title %}
    {% if object.pk %}
        Editing BGP Peering - {{ object }}
    {% else %}
        Add a new BGP Peering
    {% endif %}
    {% endblock %}
...
    <div class="row">
        <div class="col-md-6 col-md-offset-3 text-right">
            {% block buttons %}
            <button type="submit" name="_create" class="btn btn-primary">Create</button>
            {% endblock %}
            {% if object.pk %}
                <button type="submit" name="_update" class="btn btn-primary">Update</button>
                <a href="{% url 'plugins:netbox_bgppeering:bgppeering' pk=bgppeering.pk %}" class="btn btn-default">Cancel</a>
            {% else %}
                <button type="submit" name="_create" class="btn btn-primary">Create</button>
                <a href="{% url 'plugins:netbox_bgppeering:bgppeering_list' %}" class="btn btn-default">Cancel</a>
            {% endif %}
        </div>
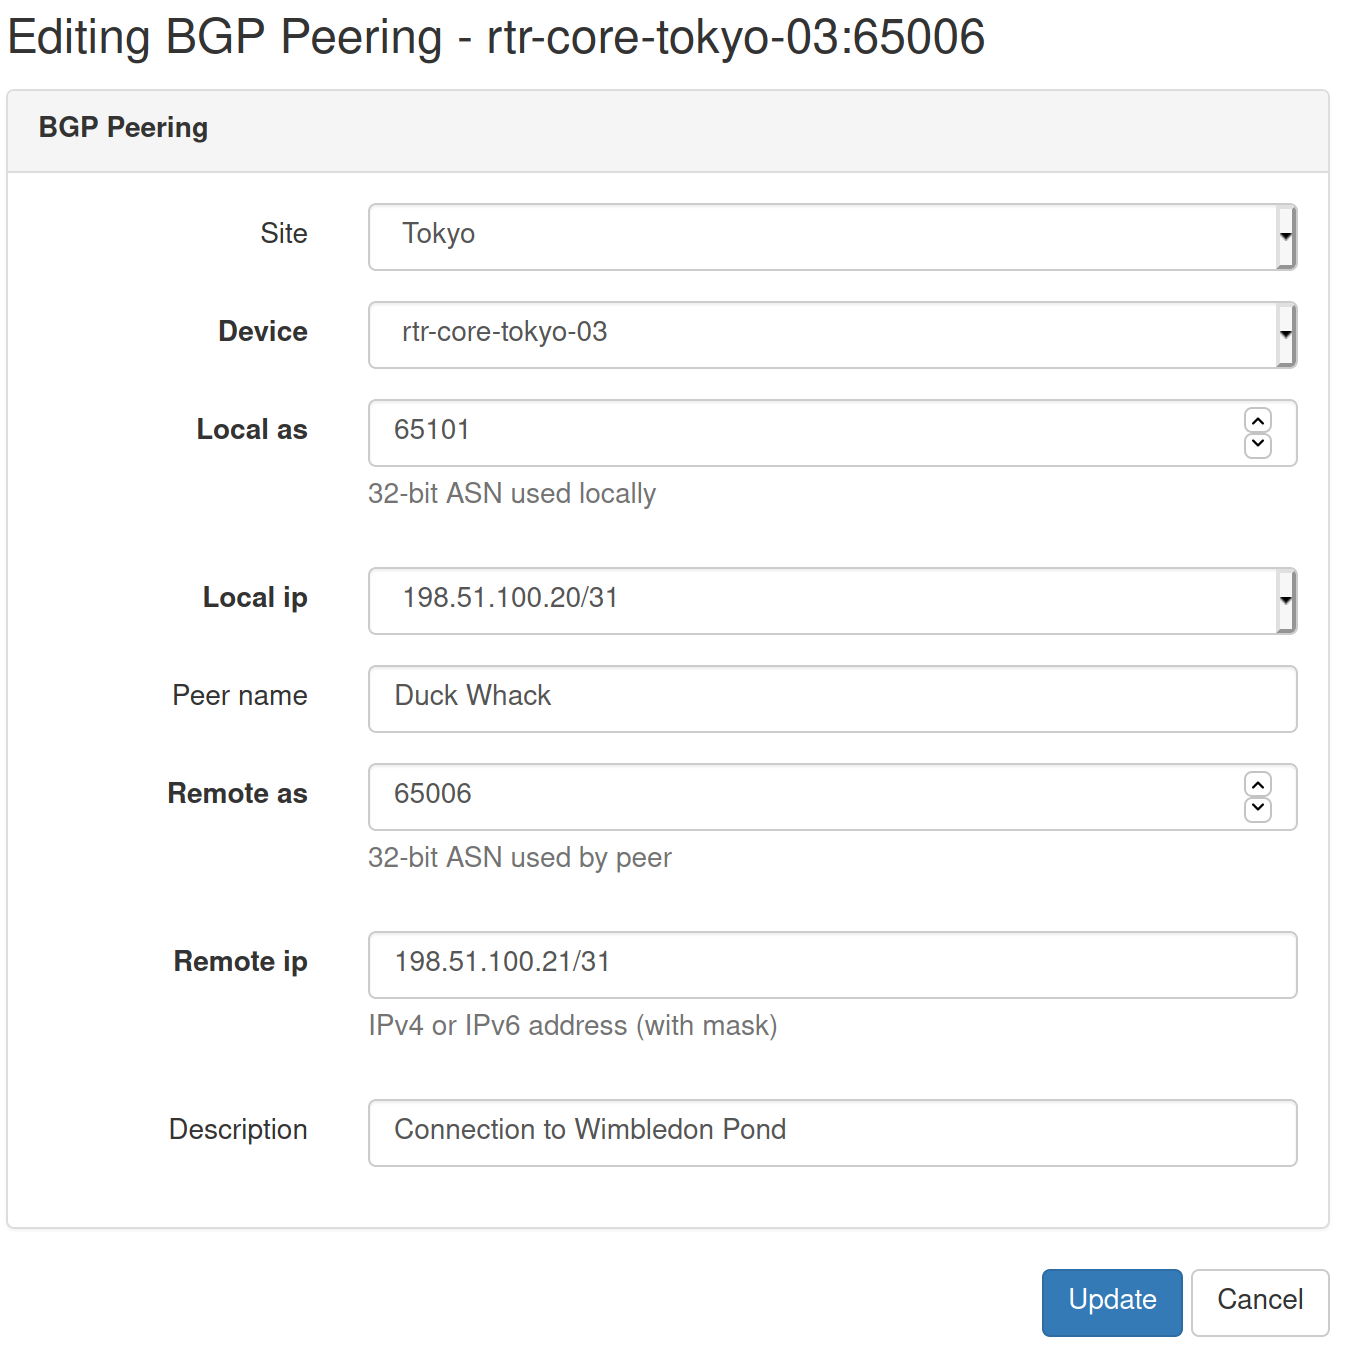
The first thing we're doing here is checking if object.pk has value. Edit view will automatically pass pk to the template. So if pk has value then we're dealing with object edit and display appropriate title. Otherwise, we display the original title for adding a new object.
Next, we modify the section showing buttons below the form. Here we also add conditional, checking if object.pk has value.
- If conditional evaluates to
Trueit means we're dealing with object edit action. We present two buttons,Updatewill save changes made to the object.Cancelwill take us back to the object details view. - If conditional evaluates to
Falsewe follow the logic we built originally, an object is either created or we're sent to the list view.
And that's it, our template now supports both object creation and editing.
Adding editing button and URL
Most of the work is done here. We should now add URL pointing to the edit view and edit button that will allow users to edit the object.
# urls.py
from .views import (
    BgpPeeringCreateView,
    BgpPeeringDeleteView,
    BgpPeeringEditView,
    BgpPeeringListView,
    BgpPeeringView,
)

urlpatterns = [
...
    path("<int:pk>/edit/", BgpPeeringEditView.as_view(), name="bgppeering_edit"),
]
This URL is similar to the one for deleting an object. We again have pk argument which we pass to class view. We use a friendly name for URL, bgppeering_edit.
Finally we will add edit button next to the delete button on object details view page:
# bgppeering_edit.html
    <div class="pull-right noprint">
        <a href="{% url 'plugins:netbox_bgppeering:bgppeering_edit' pk=bgppeering.pk %}" class="btn btn-warning">
            <span class="{{ icon_classes.pencil }}" aria-hidden="true"></span> Edit
        </a>
        <a href="{% url 'plugins:netbox_bgppeering:bgppeering_delete' pk=bgppeering.pk %}" class="btn btn-danger">
            <span class="{{ icon_classes.trash }}" aria-hidden="true"></span> Delete
        </a>
    </div>
And that's it, we should now be able to edit given object. Let's give it a try.
Here's the page with object details, notice Edit button.
And here's the edit view that we'll get after the edit button is clicked.
Another useful addition to our plugin is complete.
Prettifying field labels
Current field labels displayed in the list view and few other places are derived from model fields. Not all of them look pretty so we should work on making them look better.

Let's override default field names in model class in models.py.
# models.py
class BgpPeering(ChangeLoggedModel):
...
    local_ip = models.ForeignKey(
        to="ipam.IPAddress", on_delete=models.PROTECT, verbose_name="Local IP"
    )
    local_as = ASNField(help_text="32-bit ASN used locally", verbose_name="Local ASN")
    remote_ip = IPAddressField(
        help_text="IPv4 or IPv6 address (with mask)", verbose_name="Remote IP"
    )
    remote_as = ASNField(help_text="32-bit ASN used by peer", verbose_name="Remote ASN")
    peer_name = models.CharField(max_length=64, blank=True, verbose_name="Peer Name")
To customize the text displayed for the given field we pass the argument verbose_name [5] when creating field objects. The value of each of the arguments will be the text we want to display as the field name.
We will also do the same for the search filter. In this case, we edit form class in forms.py.
# forms.py
class BgpPeeringFilterForm(BootstrapMixin, forms.ModelForm):
...
    local_as = forms.IntegerField(
        required=False,
        label="Local ASN",
    )

    remote_as = forms.IntegerField(
        required=False,
    )
    remote_as = forms.IntegerField(required=False, label="Remote ASN")

    peer_name = forms.CharField(
        required=False,
        label="Peer Name",
    )
We add label [6] argument to each form field we want to customize.
That's it, let's see how the fields are looking like now.

Perfect, names and labels are looking better now.
We'll finish our small improvements by adding Add button to the list view in bgppeering_list.html.
# bgppeering_list.html
...
{% block content %}
<div class="pull-right noprint">
    <a href="{% url 'plugins:netbox_bgppeering:bgppeering_add' %}" class="btn btn-primary">
        <span class="{{ icon_classes.plus }}" aria-hidden="true"></span> Add
    </a>
</div>
And with this last modification we've come to an end of this post.
Source code with all the modifications we made up to this point is in branch small-improvements if you want to check it out: https://github.com/progala/ttl255-netbox-plugin-bgppeering/tree/small-improvements
Conclusion
In the previous posts of this series, we were focusing on getting the plugin off the ground. We implemented models, and several views and forms. Here we had a closer look and added improvements that make the plugin easier to use. It might not seem like much but these kinds of small additions can make our lives much easier.
The next post will be the last in the series. We'll complete our plugin by adding user permissions as well as API calls. See you next time!
Resources
- NetBox docs: Plugin Development: https://netbox.readthedocs.io/en/stable/plugins/development/
- NetBox source code on GitHub: https://github.com/netbox-community/netbox
- NetBox Extensibility Overview, NetBox Day 2020: https://www.youtube.com/watch?v=FSoCzuWOAE0
- NetBox Plugins Development, NetBox Day 2020: https://www.youtube.com/watch?v=LUCUBPrTtJ4
https://docs.djangoproject.com/en/3.1/ref/forms/api/#django.forms.Form.clean ↩︎
https://docs.python.org/3/library/ipaddress.html#ipaddress.ip_interface ↩︎
https://docs.djangoproject.com/en/3.1/ref/class-based-views/generic-editing/#django.views.generic.edit.DeleteView ↩︎
https://docs.djangoproject.com/en/3.1/ref/class-based-views/generic-editing/#django.views.generic.edit.UpdateView ↩︎
https://docs.djangoproject.com/en/3.1/topics/db/models/#verbose-field-names ↩︎
https://docs.djangoproject.com/en/3.1/ref/forms/fields/#label ↩︎
Welcome to part 3 of my tutorial walking you through process of developing NetBox plugin. In part 2 we added basic web UI views to our BgpPeering plugin. In this post we'll add search panel to list view to allow us to search/filter Bgp Peering objects.
Developing NetBox Plugin tutorial series
- Developing NetBox Plugin - Part 1 - Setup and initial build
- Developing NetBox Plugin - Part 2 - Adding web UI pages
- Developing NetBox Plugin - Part 3 - Adding search panel
- Developing NetBox Plugin - Part 4 - Small improvements
- Developing NetBox Plugin - Part 5 - Permissions and API
Contents
- Introduction
- Filter class
- Search form class
- Adding form to list view template
- Adding filtering to list view class
- Conclusion
- Resources
- BGP Peering Plugin GitHub repository
Introduction
List view we created for displaying all Bgp Peering objects in one place is very useful. However it will become difficult to find items of interest once we have more than 30-50 objects. For that purpose we should add means of filtering objects to the ones that meet certain criteria.
Other objects in NetBox already have filtering functionality and use search panel located to the right of object tables. We'll try and replicate the NetBox look and feel when upgrading our view.
In our case, I want to be able to filter Bgp Peering objects by:
site- This should be a drop-down list with NetBox defined sites.device- Again, drop-down list but with NetBox defined devices.local_as- BGP ASN used locally, it has to be an exact match.remote_as- BGP ASN used by 3rd party, it has to be an exact match.peer_name- Name of the peer, we want to allow partial matches.q- Generic query field that looks at peer name and descriptions. We want to allow partial matches here.
To make all this work we need a few components:
- filter class
- search form class
- updated list view template
- updated list view class
Filter class
First component we're going to work on is filter class. To help us with this we're using Django app called django_filters[1]. This app makes it easier to build model based filtering that will serve as an abstraction used by our list view.
Filtering class is going to be recorded in filters.py file.
# filters.py
import django_filters
from django.db.models import Q

from dcim.models import Device, Site

from .models import BgpPeering


class BgpPeeringFilter(django_filters.FilterSet):
    """Filter capabilities for BgpPeering instances."""

    q = django_filters.CharFilter(
        method="search",
        label="Search",
    )

    site = django_filters.ModelMultipleChoiceFilter(
        field_name="site__slug",
        queryset=Site.objects.all(),
        to_field_name="slug",
    )

    device = django_filters.ModelMultipleChoiceFilter(
        field_name="device__name",
        queryset=Device.objects.all(),
        to_field_name="name",
    )

    peer_name = django_filters.CharFilter(
        lookup_expr="icontains",
    )

    class Meta:
        model = BgpPeering

        fields = [
            "local_as",
            "remote_as",
            "peer_name",
        ]

    def search(self, queryset, name, value):
        """Perform the filtered search."""
        if not value.strip():
            return queryset
        qs_filter = Q(peer_name__icontains=value) | Q(description__icontains=value)
        return queryset.filter(qs_filter)
Since all this is new, I'm going to go through the code in detail.
We start building filter by creating BgpPeeringFilter class that inherits from django_filters.FilterSet.
Next, in class Meta, we define model this filter is based on.
In fields we specify list of fields for which filters will be auto-generated. This is based on the model definitions. Any fields that don't need special treatment can go in here.
class Meta:
    model = BgpPeering

    fields = [
        "local_as",
        "remote_as",
        "peer_name",
    ]
Fields that need customization, like linking to other models, or partial matching, we will define as class attributes.
Let's have a look at those fields now.
-
site- We want this to be a drop down-menu with multiple choices. To do that we make this an instance ofdjango_filters.ModelMultipleChoiceFilterclass.site = django_filters.ModelMultipleChoiceFilterWe initialize the object with three arguments
field_name,querysetandto_field_name.-
field_name- Specifies attribute on the model field that we will filterBgpPeeringobjects on. Here we usesitefield from our model and its attributeslug. Attribute follows__(double underscore) after name of the field:field_name="site__slug" -
queryset- This defines collection ofSiteobjects filter will present as filtering choices. We importedSitemodel fromdcim.modelsand return all of the available objects. -
to_field_name- Here we specify name of the attribute,slug, that filter will take fromSiteobject and apply tofield_namewe specified earlier.
-
-
device- Similar tosite, it's a drop-down menu with multiple choices. Here we link toDeviceNetBox model from which filter will takenameattribute. We filter BgpPeering objects using field/attribute combination ofdevice__name. -
peer_name- Peer name is a character field, so we usedjango_filters.CharFilterclass to define it.
We want to allow case insensitive partial matches here. To do that we pass argumentlookup_expr="icontains"when creating object.
Default lookup method isexactwhich forces exact matches. See docs for available lookup methods [2]. -
q- This is general, string, query field. We want it to be of character typedjango_filters.CharFilter.
Inmethodargument we specify Python method, heresearch, that should be called when this field is used [3].
Andlabelfield is the text that will appear in the field as a hint.q = django_filters.CharFilter( method="search", label="Search", )Next we define method
search, inside of the class, whichqfield filter will use. You can define these methods outside of the class scope but in most cases it makes sense to keep it close to the field definition.def search(self, queryset, name, value): """Perform the filtered search.""" if not value.strip(): return queryset qs_filter = Q(peer_name__icontains=value) | Q(description__icontains=value) return queryset.filter(qs_filter)Methods we define for filter fields will be passed
queryset,nameandvaluearguments. Hence why our method has(self, queryset, name, value)signature.queryset- This is essentially list of objects currently meeting filter criteria, beforeqfilter is applied.name- Name of the filter field, hereq.value- Value entered into the filter field in web GUI.
Logic in our method is relatively simple. We return unchanged queryset if no value was provided:
if not value.strip():
        return queryset
If there is a value we take advantage of Django
Q[4] object to build a query based on two fields.Q(peer_name__icontains=value)- We check, ignoring case, ifpeer_namefield containsvalue.Q(description__icontains=value)- We check, ignoring case, ifdescriptionfield containsvalue.
Then we combine these objects with
|- logical OR - operator and assign the result toqs_filtervariable.qs_filter = Q(peer_name__icontains=value) | Q(description__icontains=value)Finally, we apply this filter to queryset and return the result.
return queryset.filter(qs_filter)End effect is that if
valueis contained in eitherpeer_nameor peeringdescriptionfor given object then the object will be included in final queryset.
With that we finish filter class and move on to the form.
Search form class
Next step in our quest for filtering is creating class that will represent the search form.
We will add the below to forms.py:
# forms.py
from dcim.models import Device, Site

class BgpPeeringFilterForm(BootstrapMixin, forms.ModelForm):
    """Form for filtering BgpPeering instances."""

    q = forms.CharField(required=False, label="Search")

    site = forms.ModelChoiceField(
        queryset=Site.objects.all(), required=False, to_field_name="slug"
    )

    device = forms.ModelChoiceField(
        queryset=Device.objects.all(),
        to_field_name="name",
        required=False,
    )

    local_as = forms.IntegerField(
        required=False,
    )

    remote_as = forms.IntegerField(
        required=False,
    )

    peer_name = forms.CharField(
        required=False,
    )

    class Meta:
        model = BgpPeering
        fields = []
Let's break this code down.
We create BgpPeeringFilterForm that inherits from BootstrapMixin and forms.ModelForm. This is just like the form we defined in part 2 of this tutorial.
Next we define model we're building this form from, BgpPeering, and fields that will be auto-generated. I want to define all fields explicitly so fields attribute will be an empty list. You need to include this attribute even if you don't list anything here or an exception will be raised.
class Meta:
    model = BgpPeering
    fields = []
Following that we will define types and attributes of the fields used by search form.
-
q- General query field should be a character field so we use typeforms.CharField. This field is optional and we manually set label of this field toSearch. -
site- Site selection field, this field is optional.- To link it to NetBox
Siteobjects we make it of typeforms.ModelChoiceField. - We ask for all
Siteobjects to be available in drop-down withqueryset=Site.objects.all(). - When given item is selected we want
slugattribute to be returned. This is whatto_field_name="slug"does.
- To link it to NetBox
-
device- Similar tositebut here we link toDevicemodel and ask fornameattribute to be returned. -
local_asandremote_as- Optional integer fields, we use typeforms.IntegerFieldfor those. -
peer_name- Simple, optional, character field. We use typeforms.CharFieldfor it.
And that's our form class done.
Adding form to list view template
To allow users to search through BgpPeering objects we need to update our web UI page. We'll add search panel on the right side of the object list view template.
We add new <div> in bgppeering_list.html right after the one we created in part 2:
<div class="col-md-9">
    {% render_table table %}
</div>
<!-- search panel div start -->
<div class="col-md-3 noprint">
    <div class="panel panel-default">
        <div class="panel-heading">
            <span class="{{ icon_classes.search }}" aria-hidden="true"></span>
            <strong>Search</strong>
        </div>
        <div class="panel-body">
            <form action="." method="get" class="form">
                {% for field in filter_form.visible_fields %}
                <div class="form-group">
                    {% if field.name == "q" %}
                    <div class="input-group">
                        <input type="text" name="q" class="form-control" placeholder="{{ field.label }}"
                            {% if request.GET.q %}value="{{ request.GET.q }}" {% endif %} />
                        <span class="input-group-btn">
                            <button type="submit" class="btn btn-primary">
                                <span class="{{ icon_classes.search }}" aria-hidden="true"></span>
                            </button>
                        </span>
                    </div>
                    {% else %}
                    {{ field.label_tag }}
                    {{ field }}
                    {% endif %}
                </div>
                {% endfor %}
                <div class="text-right noprint">
                    <button type="submit" class="btn btn-primary">
                        <span class="{{ icon_classes.search }}" aria-hidden="true"></span> Apply
                    </button>
                    <a href="." class="btn btn-default">
                        <span class="{{ icon_classes.remove }}" aria-hidden="true"></span> Clear
                    </a>
                </div>
            </form>
        </div>
    </div>
</div>
We make this div 3 columns wide. Inside we place panel header and search form divs.
Form fields are rendered in for loop:
{% for field in filter_form.visible_fields %}
...
{% endfor %}
These fields are taken from form class we defined earlier. We leave all fields, with exception of q field, to their defaults by displaying field label followed by rendering actual field.
{{ field.label_tag }}
{{ field }}
Because q field does not belong to underlying model we handle it differently. We make it a text input field with label as a placeholder.
The interesting bit here is that the value of the field is carried over from previous search. This is done for us for auto-generated form fields but here we have to do it manually with the below expression:
{% if request.GET.q %}value="{{ request.GET.q }}" {% endif %} />
Remaining html/css code is for layout and visual elements.
Icon classes
You might have noticed a few references to icon_classes variable here like in class="{{ icon_classes.search }}". These are strings specifying CSS classes used for rendering icons. I pass these classes to the form in icon_classes variable from form view.
NetBox v2.10+ uses Material Design icons. Previous versions used Font Awesome. To make my plugin compatible with both versions I created icon_classes.py file with dictionary dynamically mapping class names to underlying MD or FA CSS classes.
# icon_classes.py
from .release import NETBOX_RELEASE_CURRENT, NETBOX_RELEASE_210


if NETBOX_RELEASE_CURRENT >= NETBOX_RELEASE_210:
    icon_classes = {
        "plus": "mdi mdi-plus-thick",
        "search": "mdi mdi-magnify",
        "remove": "mdi mdi-close-thick",
    }
else:
    icon_classes = {
        "plus": "fa fa-plus",
        "search": "fa fa-search",
        "remove": "fa fa-remove",
    }
I also use release.py borrowed from [5] to detect version of NetBox plugin is running under.
from packaging import version
from django.conf import settings

NETBOX_RELEASE_CURRENT = version.parse(settings.VERSION)
NETBOX_RELEASE_28 = version.parse("2.8")
NETBOX_RELEASE_29 = version.parse("2.9")
NETBOX_RELEASE_210 = version.parse("2.10")
The above additions allow me to easily add CSS classes for any other icons I might want to use in the future.
With that digression out of the way, let's put it all together by modifying list view class.
Adding filtering to list view class
All of the components we created up to this point need to be tied together in the class view. We're modifying the BgpPeeringListView class created in part 2, in order to support search/filtering functionality.
Changed BgpPeeringListView class:
# views.py
from .icon_classes import icon_classes
from .filters import BgpPeeringFilter
from .forms import BgpPeeringForm, BgpPeeringFilterForm

class BgpPeeringListView(View):
    """View for listing all existing BGP Peerings."""

    queryset = BgpPeering.objects.all()
    filterset = BgpPeeringFilter
    filterset_form = BgpPeeringFilterForm

    def get(self, request):
        """Get request."""

        self.queryset = self.filterset(request.GET, self.queryset).qs

        table = BgpPeeringTable(self.queryset)
        RequestConfig(request, paginate={"per_page": 25}).configure(table)

        return render(
            request,
            "netbox_bgppeering/bgppeering_list.html",
            {
                "table": table,
                "filter_form": self.filterset_form(request.GET),
                "icon_classes": icon_classes,
            },
        )
Few interesting things happen here, let's break them down.
-
filterset = BgpPeeringFilter- We addfiltersetattribute and set it toBgpPeeringFilterclass we created earlier. -
filterset_form = BgpPeeringFilterForm- This is the form that will be rendered in list view template. -
self.queryset = self.filterset(request.GET, self.queryset).qs- Here is where the filtering happens.
We feedfiltersetform values contained inrequest.GETandquerysetwith BgpPeering objects.
Method.qsreturnsQuerySetlike object that we assign back toself.queryset. This will be then fed to table constructor. Except now the resulting table will only contain objects matching filter values.
Finally, we provide two new arguments to render:
-
"filter_form": self.filterset_form(request.GET)- This is used to render form in UI.request.GETpreserves values used in previous searches. -
"icon_classes": icon_classes- This passes dictionary with CSS classes I defined for UI icons.
And that's it. We can now re-build plugin and take search panel for a spin.
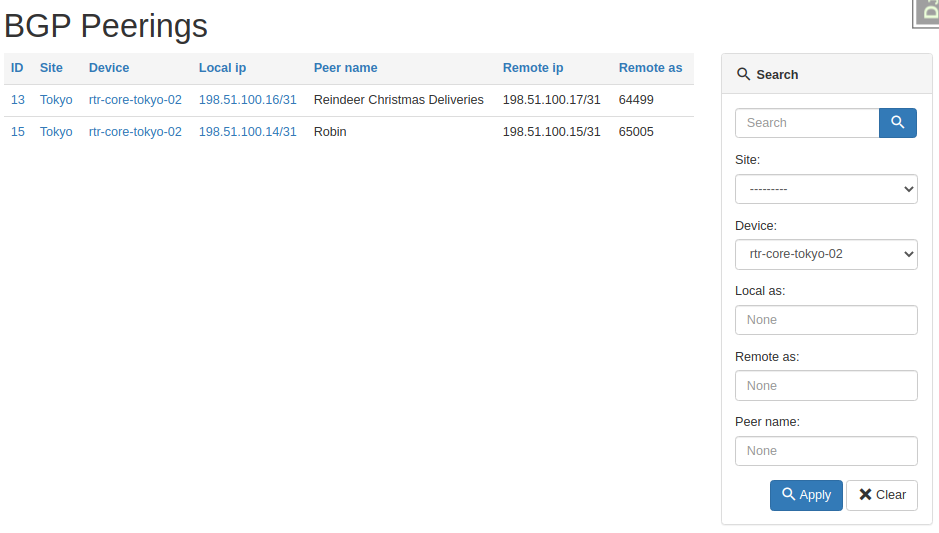
If you now navigate to /plugins/bgp-peering/ you should see search panel on the right hand side, next to table with the list of objects.
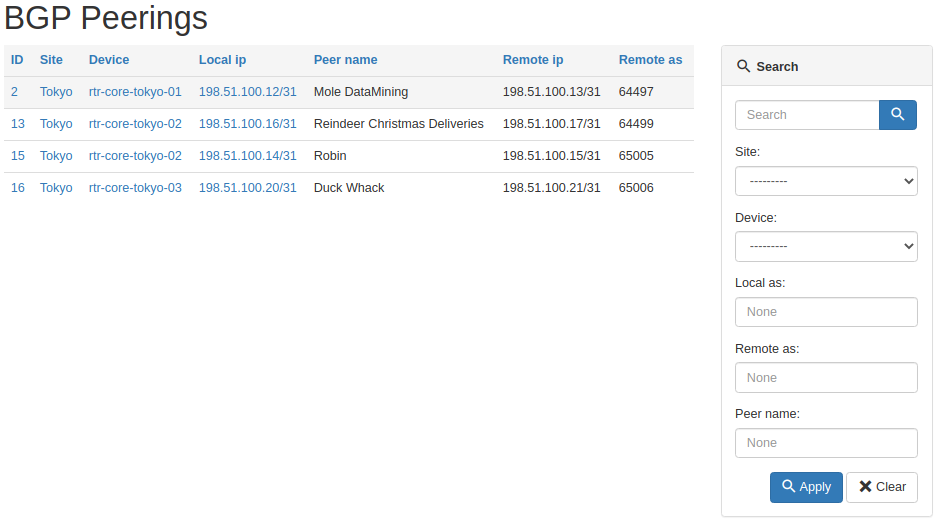
And here's the table after we asked for peerings on one device only.
And here's a result of the general query for primary string.
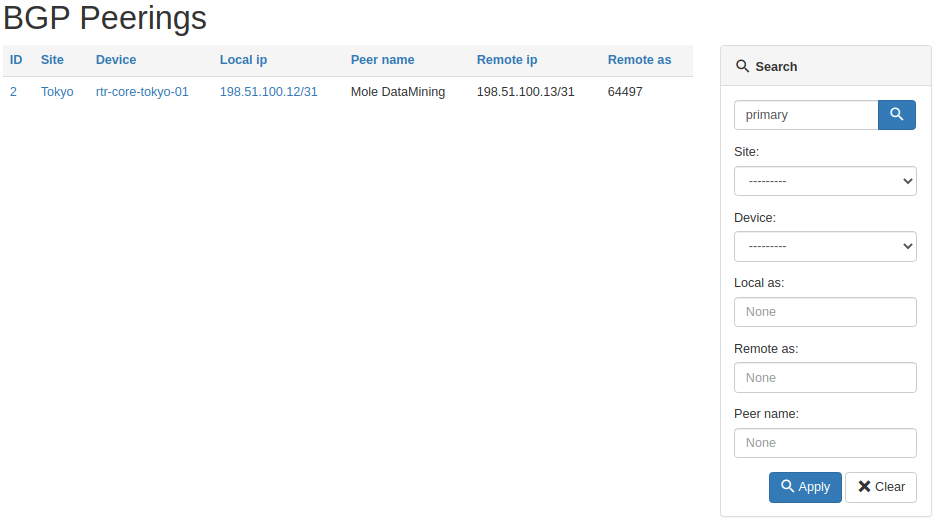
All working as intended, pretty cool right?
Source code with all the modifications we made up to this point is in branch bgppeering-list-search if you want to check it out: https://github.com/progala/ttl255-netbox-plugin-bgppeering/tree/bgppeering-list-search
Conclusion
This concludes post 3 in Developing NetBox Plugin series. Search functionality we implemented here should greatly improve usability of our plugin. It's going to be much easier now to find peering objects of interest.
In the next post we'll continue with making improvements to the plugin. There a few small things here and there that will make this all even better. Stay tuned!
Resources
- NetBox docs: Plugin Development: https://netbox.readthedocs.io/en/stable/plugins/development/
- NetBox source code on GitHub: https://github.com/netbox-community/netbox
- NetBox Extensibility Overview, NetBox Day 2020: https://www.youtube.com/watch?v=FSoCzuWOAE0
- NetBox Plugins Development, NetBox Day 2020: https://www.youtube.com/watch?v=LUCUBPrTtJ4
Django Filter app - https://django-filter.readthedocs.io/en/stable/ ↩︎
Django field lookups - https://docs.djangoproject.com/en/3.1/ref/models/querysets/#field-lookups ↩︎
Django filter method - https://django-filter.readthedocs.io/en/stable/ref/filters.html#method ↩︎
Django Q object - https://docs.djangoproject.com/en/3.1/topics/db/queries/#complex-lookups-with-q ↩︎
NTC NetBox Onboarding plugin - https://github.com/networktocode/ntc-netbox-plugin-onboarding/blob/develop/netbox_onboarding/release.py ↩︎
Welcome to part 2 of my tutorial walking you through process of developing NetBox plugin. In part 1 we set up our development environment and built base version of Bgp Peering plugin. Here we will continue work on the plugin by adding UI pages allowing us to list, view and add, Bgp Peering objects.
Developing NetBox Plugin tutorial series
- Developing NetBox Plugin - Part 1 - Setup and initial build
- Developing NetBox Plugin - Part 2 - Adding web UI pages
- Developing NetBox Plugin - Part 3 - Adding search panel
- Developing NetBox Plugin - Part 4 - Small improvements
- Developing NetBox Plugin - Part 5 - Permissions and API
Contents
- Adding web UI pages
- Enable model for permissions framework
- Single object view -
BgpPeeringView - Object list view -
BgpPeeringListView - Object creation view -
BgpPeeringCreateView - Conclusion
- Resources
- BGP Peering Plugin repository
Disclaimer
Original version of this post contained views that relied on views used internally by NetBox. This practice is not recommended by NetBox maintainers as these are likely to change in the future and your plugin might stop working.
To add to it, bugs with plugins are often logged against the core NetBox adding to the mainteners' workload even though this has nothing to do with them. I've now refactored these views to decouple this plugin from NetBox's implementation details.
Adding web UI pages
We previously created BgpPeering model which we can even work with from admin panel. This was all for quick testing and we should now expose the model to the end users.
The best way to do that is by adding set of pages to web UI. We're also going to re-use some of the NetBox's components so that our pages match look and feel of core offering.
Here are some of the things we need to work on to make this happen.
- Create template for pages, these go into in
templatesdirectory. - Write code responsible for rendering web response, we store views in
views.pyfile. - Add URLs pointing to our new pages in
urls.py - Add menu items in
navigation.pywhere appropriate. - Create table class in
tables.pyfor list view.
You will see me talking about views in few places. If you've never heard the term before, know that view[1] in Django is Python code that receives web request, executes some logic and returns web response.
In this post I want to create three views:
- view displaying details of single object
- view displaying list of objects
- view with form for adding new object
But before we get to views there is one more thing that we need to do. We need to make our model compatible with NetBox's permissions framework.
Enable model for permissions framework
NetBox has support for granular query permissions. Even though we currently don't use any permissions we want our components to support them. This will make future additions easier to make.
Below is the code I'm adding to models.py.
from utilities.querysets import RestrictedQuerySet

class BgpPeering(ChangeLoggedModel):
  ...
  objects = RestrictedQuerySet.as_manager()
We create class attribute called objects and assign RestrictedQuerySet to it. This will be used for retrieving and filtering BgpPeering records.
RestrictedQuerySet is a class we import from NetBox's utilities. This class provides support for permissions.
By using RestrictedQuerySet NetBox will be able to filter out objects for which user does not have specific rights.
objects is a default name Django uses for db query interface, Manager. Follow hyperlink to footnotes if you want to learn more [2].
Finally as_manager() method is used here to return instance of Manager class. This is a bit low level but know that Django expects to see Manager type here. We used custom QuerySet which as_manager() allows to use as Manager.
With that out of the way we can move to our first view.
Single object view - BgpPeeringView
First view we're going to create has name BgpPeeringView. Choice of names is completely arbitrary but I'm trying to follow naming convention used by NetBox.
This and all other views have to go into views.py file in your plugin's directory.
Also, for our views we'll be using Django class based views. These allow more flexiblity and reuse of code via inheritance compared to function based views[3].
Below is the initial code, which we're going to breakdown in a second.
# views.py
from django.shortcuts import get_object_or_404, render
from django.views import View

from .models import BgpPeering


class BgpPeeringView(View):
    """Display BGP Peering details"""

    queryset = BgpPeering.objects.all()

    def get(self, request, pk):
        """Get request."""
        bgppeering_obj = get_object_or_404(self.queryset, pk=pk)

        return render(
            request,
            "netbox_bgppeering/bgppeering.html",
            {
                "bgppeering": bgppeering_obj,
            },
        )
Let's have a closer look at this code.
-
We subclass
Viewwhich comes from core Django. This is one of the most basic type of class-based views. -
Next we have
querysetwhich we use to retrieve and filter interesting objects. We do this by calling methodall()onobjectsattribute we just defined inBgpPeeringmodel. No database calls are made at this stage so don't be alarmed by use ofall(). -
Method
get()is used to service incoming GET HTTP requests. -
Function
get_object_or_404()returns404HTML code instead of raising internal exception. This is more meaningful to end users. -
Then we're feeding defined queryset to
get_object_or_404asking for single object matchingpk.pkmeans primary key and each of objects will have one.
In our casepkmatches automatically genereatedidfield in our model. The value ofpkis passed toget()via URL defined inurls.pywhich we'll look at shortly. -
Finally
render()renders provided template and uses it to create a well-formed web response. We provide it name of the template to render, which we're going to build next.
Template for single object view
Most of our views will rely on templates stored in templates directory. Django templates use language[4] similar to Jinja2 so if you know Jinja you should be able to pick it up pretty quickly.
Best practice is to place templates used by our plugin in templates subdirectory named after our plugin. In our case that will be:
templates\bgppeering\
We refer to these templates later in few places. This makes it clear that template came from plugin namespace.
With that said, let's have a look at body of our template.
bgppeering.html
{% extends 'base.html' %}
{% load helpers %}

{% block content %}
<div class="row">
    <div class="col-md-6 col-md-offset-3">
        <div class="panel panel-default">
            <div class="panel-heading">
                <strong>BGP Peering</strong>
            </div>
            <table class="table table-hover panel-body attr-table">
                <tr>
                    <td>Site</td>
                    <td>
                        {% if bgppeering.site %}
                            <a href="{% url 'dcim:site' slug=bgppeering.site.slug %}">{{ bgppeering.site }}</a>
                        {% else %}
                            <span class="text-muted">None</span>
                        {% endif %}
                    </td>
                </tr>
                <tr>
                    <td>Device</td>
                    <td>
                        <a href="{% url 'dcim:device' pk=bgppeering.device.pk %}">{{ bgppeering.device }}</a>
                    </td>
                </tr>
                <tr>
                    <td>Local BGP AS</td>
                    <td>{{ bgppeering.local_as }}</td>
                </tr>
                <tr>
                    <td>Local peering IP address</td>
                    <td>
                        <a href="{% url 'ipam:ipaddress' pk=bgppeering.local_ip.pk %}">{{ bgppeering.local_ip }}</a>
                    </td>
                </tr>
                <tr>
                    <td>Remote BGP AS</td>
                    <td>{{ bgppeering.remote_as }}</td>
                </tr>
                <tr>
                    <td>Remote peering IP address</td>
                    <td>{{ bgppeering.remote_ip }}</td>
                </tr>
                <tr>
                    <td>Peer name</td>
                    <td>{{ bgppeering.peer_name|placeholder }}</td>
                </tr>
                <tr>
                    <td>Description</td>
                    <td>{{ bgppeering.description|placeholder }}</td>
                </tr>
            </table>
        </div>
    </div>
</div>
{% endblock %}
This looks like a lot but most of it is code generating table cells displaying attributes of object.
There are some interesting bits here though, let's look at them now:
-
{% extends 'base.html' %}-base.htmlcomes from NetBox and takes care of NetBox's look and feel for our page. It'll give us menus, footer, etc., we just need to take care of the main content. -
{% load helpers %}- loads custom tags and filters defined inhelpers. Again, we borrowhelpersfrom core NetBox. We need this because ofplaceholderfilter used in our template. -
Below links pointing to NetBox objects use Django's
urlfilter[5]. With that filter we don't have to hardcode links, instead we reference paths inurls.py.<a href="{% url 'dcim:site' slug=bgppeering.site.slug %}">{{ bgppeering.site }}</a> <a href="{% url 'dcim:device' pk=bgppeering.device.pk %}">{{ bgppeering.device }}</a <a href="{% url 'ipam:ipaddress' pk=bgppeering.local_ip.pk %}">{{ bgppeering.local_ip }}</a>For instance:
<a href="{% url 'dcim:site' slug=bgppeering.site.slug %}">{{ bgppeering.site }}</a>Points to below path in
netbox/netbox/dcim/views.py:path('sites/<slug:slug>/', views.SiteView.as_view(), name='site')Because URL is in
dcimapp and hasnameequal tositewe feeddcim:sitetourlfilter. This path also expectsslugargument.BgpPeeringobject keeps site info insiteattribute, so the siteslugcan be retrieved withbgppeering.site.slug.If you want to link to any other NetBox objects you can look at the paths recorded in
urls.pyfor given app. Then you need to identify expected argument. With those two you can construct links usingurlfilter, just like we did above. -
Lastly we display attribute values for given
BgpPeeringinstance by using dot.notation.
In view we created earlier, template receives variable namedbgppeeringcontainingBgpPeeringobject retrieved from database. Inside of our template we use that name to retrieve each of the model attributes by placing.afterbgppeering, followed by name of the attribute. E.g.bgppeering.site bgppeering.remote_ip
URL for single object view
We have single object view and template in place. Now we need to add URL path for it so the view can be accessed.
# urls.py
from .views import BgpPeeringView

urlpatterns = [
    ...
    path("<int:pk>/", BgpPeeringView.as_view(), name="bgppeering"),
]
First we import our view BgpPeeringView. Then we add another path entry to urlpatterns.
-
<int:pk>/equals toplugins/bgp-peering/<pk>, wherepkis the primary key of our record, and it's an integer, henceint. Our object use auto-incremented integeridfield as primary-key. Below is example of URL for object withidequal to 1.plugins/bgp-peering/1/ -
BgpPeering.as_view()-as_view()is needed here so that our view class can process requests. Technically speaking this creates callable that takes request and returns well- formed response. This is how we're going to use all our class based views.
The end result of rendering this template is basic but clean looking table presenting details of BgpPeering object:

There are some improvements that we could make to this view but we'll leave that for later.
Source code up to this point is in branch bgppeering-view-init if you want to check it out: https://github.com/progala/ttl255-netbox-plugin-bgppeering/tree/bgppeering-view-init .
Object list view - BgpPeeringListView
List view is usually the default view for objects in NetBox. This provides overview of records for object of given type and includes links to detailed views.
We're now going to create list view for records using BgpPeering model. This view will be the one we link to from navigational menu we created in post 1.
Create table class
To create list page we'll start with building table class.
What's a table class you ask? NetBox uses Django app called django_tables2 [6] to make working with tables easier. We'll save ourselves some work by following NetBox's example and leveraging that package.
To do that we need to create file called tables.py in our plugin package and add code defining our table.
# tables.py
import django_tables2 as tables
from utilities.tables import BaseTable
from .models import BgpPeering


class BgpPeeringTable(BaseTable):
    """Table for displaying BGP Peering objects."""

    id = tables.LinkColumn()
    site = tables.LinkColumn()
    device = tables.LinkColumn()
    local_ip = tables.LinkColumn()

    class Meta(BaseTable.Meta):
        model = BgpPeering
        fields = (
            "id",
            "site",
            "device",
            "local_ip",
            "peer_name",
            "remote_ip",
            "remote_as",
        )
Let's break this code down.
-
Our table is a class, named
BgpPeeringTable. We subclassBaseTablefrom NetBox utilities which adds some NetBox specific stuff. -
In class
Metawe define model used in the table, followed by names of the fields we want displayed in the table. This class needs to subclassBaseTable.Meta. Few things of note:- You don't have to list all of the fields used by your model. You should select whatever you feel makes sense to show as one line summary for each object.
- Order in which fields are displayed on the page matches order in which you listed them.
-
Finally we define class attributes for fields that need special treatment. We list several fields here:
id,site,deviceandlocal_ipusetables.LinkColumn()object. This will give us auto-generated links pointing to corresponding NetBox objects.
With that in place we're moving to the template.
Template for object list view
Compared to template for single view, this one is much shorter because we're offloading a lot of work. Let's have a look at the body of the template and then we'll break it down.
bgppeering_list.html
{% extends 'base.html' %}
{% load render_table from django_tables2 %}

{% block content %}
<h1>{% block title %}BGP Peerings{% endblock %}</h1>
<div class="row">
    <div class="col-md-9">
        {% render_table table %}
    </div>
</div>
{% endblock %}
We are again extending from base.html. Then we have content block which contains suspiciously little amount of code.
There is title block, in which we override block in base.html with the same name. Then we just have render_table table statement inside of div.
That render_table[7] statement is where a lot of heavy lifting happens. It's template tag that comes from django_tables2 and it renders HTML table for us among other things. All we have to do is provide this template our previously defined table class in variable called table.
Object list view class
Finally we have view class. Our class will this time inherit from ObjectListView class coming from NetBox. That class provides a lot of goodness for building views for series of objects, and it will use table class we built earlier.
We're updating our views.py with the following additions.
# views.py
from django_tables2 import RequestConfig
...
class BgpPeeringListView(View):
    """View for listing all existing BGP Peerings."""

    queryset = BgpPeering.objects.all()

    def get(self, request):
        """Get request."""
        table = BgpPeeringTable(self.queryset)
        RequestConfig(request, paginate={"per_page": 25}).configure(table)

        return render(
            request, "netbox_bgppeering/bgppeering_list.html", {"table": table}
        )
We named this view class BgpPeeringListView. Inside the class we have queryset where we specify that we want all of the objects to be given to the view.
Then we have our table class in table var and RequestConfig object. We use request to configure pagination of 25 object per page with:
RequestConfig(request, paginate={"per_page": 25}).configure(table)
Finally we call render to return well formed web response. We give it request object, name of the template, and table object used in our template.
We're almost done here, but there's one more thing we need to do before we try this view out.
Adding get_absolute_url to model
For list view to work we have to implement method get_absolute_url[8] in BgpPeering model. This is required by list view to automatically create links to details of BgpPeering objects.
If you remember, in the table class we made id a LinkedColumn with id = tables.LinkColumn(). Now we need to add some code to BgpPeering model for this to actually work.
Add below to models.py.
# models.py
from django.urls import reverse

  class BgpPeering(ChangeLoggedModel):
  ...
    def get_absolute_url(self):
        """Provide absolute URL to a Bgp Peering object."""
        return reverse("plugins:netbox_bgppeering:bgppeering", kwargs={"pk": self.pk})
We defined get_absolute_url method that has single line of code.
In that line reverse function will generate correct URL for given BgpPeering record based on the provided pk. We use the name defined in urls to point to correct path mapped to single object view.
And that's it, we're ready to try out our list view.
If you now click on BGP Peerings in Plugins menu, you should get list view.

Notice auto-generated URLs to linked objects. We also get pagination for free!
Source code up to this point is in branch bgppeering-list-view-init if you want to check it out: https://github.com/progala/ttl255-netbox-plugin-bgppeering/tree/bgppeering-list-view-init .
Object creation view - BgpPeeringCreateView
We could already create objects from admin panel but that is not available to regular users.
Time to rectify this oversight and create view for adding BgpPeering objects.
Form for object creation view
For creation view to work we need to build class representing creation form. This is the form that end user will have to fill out when adding new object.
Forms go into forms.py file in the plugin's directory.
This is what I've added to that file.
# forms.py
from django import forms

from utilities.forms import BootstrapMixin

from .models import BgpPeering


class BgpPeeringForm(BootstrapMixin, forms.ModelForm):
    """Form for creating a new BgpPeering object."""

    class Meta:
        model = BgpPeering
        fields = [
            "site",
            "device",
            "local_as",
            "local_ip",
            "peer_name",
            "remote_as",
            "remote_ip",
            "description",
        ]
-
We create class
BgpPeeringFormsubclassingBootstrapMixinandforms.ModelForm. -
forms.ModelForm[9] is a Django helper class that allows building forms from models.BootstrapMixincomes from NetBox and adds Bootstrap CSS classes. This makes our form match the look and feel of other forms used in NetBox. -
In form class itself we define
Metaclass where we:- specify model used to generate the form with
model = BgpPeering - list fields that will show up on the form in list assigned to
fieldsvariable.
- specify model used to generate the form with
And that's it, we're ready to create the view class.
Object creation view class
With form in place we can now build a view.
Let's add the below code to views.py:
# views.py
...
from django.views.generic.edit import CreateView
...
from .forms import BgpPeeringForm

...

class BgpPeeringCreateView(CreateView):
    """View for creating a new BgpPeering instance."""

    form_class = BgpPeeringForm
    template_name = "netbox_bgppeering/bgppeering_edit.html"
We again create a class representing our view. But here we inherit from CreateView provided by Django. This helps us offload boilerplate related to validation and saving.
Form class we created in forms.py gets assigned to form_class variable. This will be used in the template.
To top it off we specify template we want to use for this form.
template_name = "netbox_bgppeering/bgppeering_edit.html"
Great, but we don't have that template yet you say. Indeed, time to create it.
Template for object creation view
We create new template and save it as bgppeering_edit.html.
{% extends 'base.html' %}

{% block content %}
<form action="" method="post" enctype="multipart/form-data" class="form form-horizontal">
    {% csrf_token %}
    <div class="row">
        <div class="col-md-6 col-md-offset-3">
            <h3>
                {% block title %}Add a new BGP Peering{% endblock %}
            </h3>
            <div class="panel panel-default">
                <div class="panel-heading"><strong>BGP Peering</strong></div>
                <div class="panel-body">
                    {% for field in form %}
                    <div class="form-group">
                        <label class="col-md-3 control-label {% if field.field.required %} required{% endif %}" for="{ field.id_for_label }}">
                            {{ field.label }}
                        </label>
                        <div class="col-md-9">
                            {{ field }}
                            {% if field.help_text %}
                            <span class="help-block">{{ field.help_text|safe }}</span>
                            {% endif %}
                        </div>
                    </div>
                    {% endfor %}
                </div>
            </div>
        </div>
    </div>
    <div class="row">
        <div class="col-md-6 col-md-offset-3 text-right">
            {% block buttons %}
            <button type="submit" name="_create" class="btn btn-primary">Create</button>
            {% endblock %}
        </div>
    </div>
</form>
{% endblock %}
Looks like there's a lot going on but it's not that scary actually.
First we define HTML form. Inside of the form we add div elements making this form centered on the page.
Then we loop over fields of the form with {% for field in form %}. For each field we display label, in bold if field is required. Then we show the field itself.
Django will match render of each field to its type, as defined in the model. Finally we display helper text if one exists.
Validation and creation of the object will be handled by Django, courtesy of the class we're subclassing. After object is created we will be redirected to the single object view.
We're almost there, we only have two small additions left and create view will be ready for action.
Navigation button for object creation
So we've got our form and logic behind it but we need to access it somehow. For that we will add green plus button next to BGP Peerings entry in navigation bar. This will match behavior of the other NetBox menu items.
Below is the navigation.py after additions.
# navigation.py
from extras.plugins import PluginMenuButton, PluginMenuItem
from utilities.choices import ButtonColorChoices


menu_items = (
    PluginMenuItem(
        link="plugins:netbox_bgppeering:bgppeering_list",
        link_text="BGP Peerings",
        buttons=(
            PluginMenuButton(
                link="plugins:netbox_bgppeering:bgppeering_add",
                title="Add",
                icon_class="fa fa-plus",
                color=ButtonColorChoices.GREEN,
            ),
        ),
    ),
)
We are passing extra items to buttons argument of PluginMenuItem.
Class needed for creating button is called PluginMenuButton and we initialize it with few arguments:
link- this needs to match name of the path for our create view. We're going to add this path inurls.pyshortly.title- Text that appears when you hover over the button.icon_class- specifies font-awesome icon to usefa fa-plusis a plus sign.color- color of our buttonButtonColorChoices.GREENis green.
The end result should look like this:
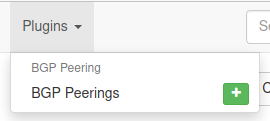
URL for object creation view
Finally, we need URL leading to object creation form. Let's modify urls.py.
# urls.py
from .views import BgpPeeringCreateView, BgpPeeringView, BgpPeeringListView


urlpatterns = [
    ...
    path("add/", BgpPeeringCreateView.as_view(), name="bgppeering_add"),
]
We import BgpPeeringCreateView and register it under add/ path using name bgppeering_add.
And that's it. With all the components in place we're ready to take our form for a spin!

And here it is, form for adding BGP Peering object in its full glory!
Source code up to this point is in branch bgppeering-create-view-init if you want to check it out: https://github.com/progala/ttl255-netbox-plugin-bgppeering/tree/bgppeering-create-view-init .
Conclusion
This concludes post 2 in Developing NetBox Plugin series. Web UI pages we built here give our users ways of interacting with model we built in part 1. They can now list, view details of, and create new Bgp Peering instances.
We could really stop here but there's more we can add to our pages. We can integrate change log into views. Or why not make our views like other NetBox pages by adding search panel and add/edit/delete buttons. How about permissions? It'd be good to revisit those and make our plugin use them.
We will be looking at some of those improvements in the future posts. So do come back for more!
Resources
- NetBox docs: Plugin Development: https://netbox.readthedocs.io/en/stable/plugins/development/
- NetBox source code on GitHub: https://github.com/netbox-community/netbox
- NetBox Extensibility Overview, NetBox Day 2020: https://www.youtube.com/watch?v=FSoCzuWOAE0
- NetBox Plugins Development, NetBox Day 2020: https://www.youtube.com/watch?v=LUCUBPrTtJ4
Django views: https://docs.djangoproject.com/en/3.1/topics/http/views/ ↩︎
Django
Manager: https://docs.djangoproject.com/en/3.1/topics/db/managers/#django.db.models.Manager ↩︎Django class-based Views: https://docs.djangoproject.com/en/3.1/topics/class-based-views/ ↩︎
Django templating language: https://docs.djangoproject.com/en/3.1/ref/templates/language/ ↩︎
Django
urlfilter: https://docs.djangoproject.com/en/3.1/ref/templates/builtins/#url ↩︎django-tables2 docs: https://django-tables2.readthedocs.io/en/latest/ ↩︎
render-tablein django-tables2 docs: https://django-tables2.readthedocs.io/en/latest/pages/template-tags.html#render-table ↩︎get-absolute-urlin Django docs: https://docs.djangoproject.com/en/3.1/ref/models/instances/#get-absolute-url ↩︎Django - Creating forms from models: https://docs.djangoproject.com/en/3.1/topics/forms/modelforms/ ↩︎
I'm excited to announce that TTL255.com is one of the finalists in the Most Educational category of the 2020 IT Blog Awards, hosted by Cisco.
Over the years I learned great deal from blogs and videos created by community members. At one point I realized that I also might have something to offer and started this blog to give back to community hoping to teach and inspire others.
Creating valuable technical content takes a lot of work and time commitment. After years of posting here I appreciate even more all content makers out there that often don't ask for anything in return.
This year I decided to submit TTL255.com to 2020 IT Blog Awards hoping to reach more people and see where that takes me.
If you find my content valuable and worth your time, please consider voting for TTL255.com by following the below link:
https://www.ciscofeedback.vovici.com/se/705E3ECD2A8D7180
![]()
You can find me in the Most Educational category:

While you there have a look at other amazing blog posts. Some of them might inspire you, some will teach you something new. All come from members of community that put themselves out there to share their knowledge with all of us.
Last but not least, remember that someone will always find what you have to say interesting, so if you don't have one already, consider starting your own blog!
Thanks for reading.
Przemek
]]>This is first post in my series showing how to develop NetBox plugin. We'll talk about what NetBox plugins are and why would you want one. Then I'll show you how to set up development environment. We'll finish by building base version of our custom plugin.
Developing NetBox Plugin tutorial series
- Developing NetBox Plugin - Part 1 - Setup and initial build
- Developing NetBox Plugin - Part 2 - Adding web UI pages
- Developing NetBox Plugin - Part 3 - Adding search panel
- Developing NetBox Plugin - Part 4 - Small improvements
- Developing NetBox Plugin - Part 5 - Permissions and API
Contents
- What are NetBox plugins?
- Why plugins?
- Development environment set-up
- Our plugin - BGP Peering
- Adding menu entry
- Data model
- Model Migrations
- Conclusion
- Resources
- BGP Peering Plugin repository
What are NetBox plugins?
NetBox plugins are small, self-contained, applications that add new functionality. This could range from adding new API endpoint to fully fledged apps. These apps can provide their own data models, views, background tasks and more. We can also inject content into existing model pages. NetBox added plugin support in version 2.8.
Plugins can access existing objects and functionality of NetBox. This allows them to integrate with NetBox's look and feel. Apps can also use any libraries, external resources, and API calls thy want. One of restrictions is that we're not allowed to change existing NetBox's models. That would break the rule of plugins being self-contained reusable apps.
Under the hood plugins are Django apps. This means most of the resources on this topic available on the web can be used for creating NetBox plugins.
You can alredy find on the net plugins created by community. I included links to some in References.
Why plugins?
NetBox is a very focused project. This allowed it to provide high quality functionality without getting too bloated. Features provided by the core are what majority of user base needs and uses.
New features that are not widely used would take up time that maintainers have in short supply. Instead this time can be used on improving the core. Some requirements are also so specific that they wouldn't fit in the standard model.
For that reason NetBox's maintainers came up with the awesome idea of plugin system. Users can create self-contained plugins adding required functionality.
With plugins you can have your own data models, new APIs, etc. be part of NetBox with no need for custom fork. You can write your own app and iterate it at your pace. If you want, you can can share that app with community. It can then be installed in NetBox like you would install any Python package.
In other words, endless possibilities for building cool stuff!
Development environment set-up
Before we start working on our plugin I'll show you my development setup. You can use your own setup if you have one, but you might find some inspiration here.
Prerequisites
I'm using NetBox 2.9+ with Python 3.8.5 under Ubuntu 20.04 and have following two Python utilities installed in userspace:
- poetry
- invoke
Poetry is used to manage dependencies and packaging of our app.
Invoke is a pure Python alternative to make. This allows us to define and execute commonly run tasks.
You will also need to have installed the Docker engine and the Docker Compose utility. These are used to run development environment in the container.
Note: When installing Poetry on Ubuntu20.04 I had to install below package to force Poetry to user Python 3 during its install:
apt install python-is-python3
See more details here: https://wiki.ubuntu.com/FocalFossa/ReleaseNotes#Python3_by_default
Setting up application package
With poetry and invoke in place we can start building scaffolding for our plugin.
- Create, and change into, directory where you'll keep plugin:
$ mkdir ttl255-netbox-plugin-bgppeering && cd ttl255-netbox-plugin-bgppeering
- Activate Python virtual environment with
poetry:
..ttl255-netbox-plugin-bgppeering$ poetry shell
Your prompt should change to let you know you're inside of Python Venv, see example below:
(ttl255-netbox-plugin-bgppeering-6_wYw8eP-py3.8) \
        przemek@quark:~/netdev/ttl255-netbox-plugin-bgppeering$
- Inside of plugin directory ask
poetryto initialize your package withpoetry init:
..ttl255-netbox-plugin-bgppeering$ poetry init

This command will guide you through creating your pyproject.toml config.

Package name [ttl255-netbox-plugin-bgppeering]:
Version [0.1.0]:
Description []:  NetBox Plugins - adds BGP Peering model
Author [None, n to skip]:  Przemek Rogala (ttl255.com)
License []:  Apache-2.0
Compatible Python versions [^3.8]:

Would you like to define your main dependencies interactively? (yes/no) [yes] no
Would you like to define your development dependencies interactively? (yes/no) [yes] no
Generated file

[tool.poetry]
name = "ttl255-netbox-plugin-bgppeering"
version = "0.1.0"
description = "NetBox Plugins - adds BGP Peering model"
authors = ["Przemek Rogala (ttl255.com)"]
license = "Apache-2.0"

[tool.poetry.dependencies]
python = "^3.8"

[tool.poetry.dev-dependencies]

[build-system]
requires = ["poetry-core>=1.0.0"]
build-backend = "poetry.core.masonry.api"


Do you confirm generation? (yes/no) [yes] yes
As you can see above you will be asked a few questions about your package. You need to provide name, version, description, etc. Once you're happy with everything poetry will generate pyproject.toml file with details of your package.
I used long name for my package to give it namespace and descriptive name in case I wanted to push it out to PyPi. It's unlikely that anyone else would use this name for the package.
When plugin is added to NetBox I want to use shorter name. I'm going to show you how to do it.
- Create directory with name that will be used when importing package:
..ttl255-netbox-plugin-bgppeering$ mkdir netbox_bgppeering
I want my plugin to be called netbox_bgppeering when it's added in NetBox. Directory we just created will store source code of our plugin.
- Tell
poetryto include package innetbox_bgppeeringdirectory:
We add the below to the [tool.poetry] config section in pyproject.toml:
packages = [
    { include = "netbox_bgppeering" },
]
Now when our plugin is imported it can be referred by netbox_bgppeering package name.
- Next we tell
poetryto add Python libraries that are used during development:
..ttl255-netbox-plugin-bgppeering$ poetry add bandit black invoke \
        pylint pylint-django pydocstyle yamllint --dev
All these packages will be added to dev dependencies in pyproject.toml. Poetry will also create new file poetry.lock. In there your dependencies are described in details and locked to specific versions. This allows you and other developers to recreate your Python environment.
- Add
invoketasks and environment build files:
Now we can take advantage of great work done by Network To Code folks. We'll borrow some files from NetBox Onboarding plugin. These will greatly help with standing up and managing development environment.
Navigate to or clone the repo https://github.com/networktocode/ntc-netbox-plugin-onboarding
Note: Repository is under Apache-2.0 license. Don't forget to keep relevant copyright information like license headers etc. if you intend to release work based on it.
Below are the files that I copied over, and use, in my workspace:
tasks.py
development/*
- Update plugin and Docker image names in
tasks.pyanddevelopment/*files:
You will need to review and update names of the plugin, Docker image, etc. in the following files. These should match the name of your plugin.
tasks.pydevelopment/docker-compose.yml
My repo has these files if you want to see how I've done it.
- Add your plugin to NetBox configuration file:
Find the PLUGINS and PLUGINS_CONFIG settings in development/base_configuration.py and add your plugin there.
You use first setting to enable your plugin. Second one is used to pass configuration settings expected by your plugin.
I don't currently have any setting so I'm using empty values here.
PLUGINS = ["netbox_bgppeering"]

PLUGINS_CONFIG = {"netbox_bgppeering": {}}
With all that in place we can start building our plugin.
Our plugin - BGP Peering
For this blog series I'm building plugin that can record details of BGP peers.
The idea is to be able to record and track information on BGP peer connections. I want to be able to keep the below details on each of the peers I have a BGP sessions with:
- Site (DC, etc.) where this peer connects
- Device on which peering takes place
- Local IP which we use for peering
- Local AS number we use for peering
- Remote IP that our peer uses
- Remote AS that peer uses
- Peer name
- Description to add more context
Some of that information that doesn't fit into NetBox's standard model. This is a perfect use case for writing plugin and custom models.
Initializing plugin - PluginConfig
First thing we need to do when writing NetBox plugin is to create plugin config. This goes into __init__.py file in plugin's directory. Most of the plugins will inherit from PluginConfig class, unless they have some special requirements.
In my case I created class BgpPeering that subclasses PluginConfig:
__init__.py
from extras.plugins import PluginConfig


class BgpPeering(PluginConfig):
    name = "bgp_peering"
    verbose_name = "BGP Peering"
    description = "Manages BGP peer connections"
    version = "0.1"
    author = "Przemek Rogala (ttl255.com)"
    author_email = "[email protected]"
    base_url = "bgp-peering"
    required_settings = []
    default_settings = {}


config = BgpPeering
This class has a number of attributes that describe our plugin. The important ones are:
name- this is the name of your plugin and it has to match the name of your package as defined inpoetry.tomlfile.verbose_name- human friendly name of the plugin.description- short description of what our plugin does.base-url- this defines base URL for our plugin that is appended to/plugin/NetBox URL.required_settings- this a list of settings that must be defined by user of the plugin.default_settings- here you include dictionary with plugin settings and their default values.
I have no settings at the moment but wanted to include attributes already in case I find need for them later.
Note: I'm only using a subset of attributes. For full list of attributes refer to official docs https://netbox.readthedocs.io/en/stable/plugins/development/
If you want to follow along I created git branch with all the code we created up until this point: https://github.com/progala/ttl255-netbox-plugin-bgppeering/tree/initial-plugin
Kick off the initial build
With plugin config in place we can run initial build of our NetBox dev environment using invoke build command.
..ttl255-netbox-plugin-bgppeering$ invoke build

... (cut fo brevity)

Successfully built 228ef14eb72b
Successfully tagged ttl255-netbox-plugin-bgppeering/netbox:master-py3.8
Once the command finished executing you should have a set of containers that will allow us to spin up NetBox for testing and iterating our plugin.
With build in place we should bring NetBox up for the first time. We can either use invoke start to run it in the background or invoke debug and see all console messages in our shell.
I'm going to run invoke start.
..ttl255-netbox-plugin-bgppeering$ invoke start
Starting Netbox in detached mode..
Creating network "netbox_bgppeering_default" with the default driver
Creating volume "netbox_bgppeering_pgdata_netbox_bgppeering" with default driver
Creating netbox_bgppeering_redis_1    ... done
Creating netbox_bgppeering_postgres_1 ... done
Creating netbox_bgppeering_netbox_1   ... done
Creating netbox_bgppeering_worker_1   ... done
You can check with docker ps if all containers are running:
..ttl255-netbox-plugin-bgppeering$ docker ps
CONTAINER ID        IMAGE                                                 COMMAND                  CREATED              STATUS                   PORTS                                                                         NAMES
0a97b5d04b86        ttl255-netbox-plugin-bgppeering/netbox:master-py3.8   "sh -c 'python manag…"   28 seconds ago       Up 27 seconds                                                                                          netbox_bgppeering_worker_1
07075c544b52        ttl255-netbox-plugin-bgppeering/netbox:master-py3.8   "sh -c 'python manag…"   28 seconds ago       Up 27 seconds            0.0.0.0:8000->8000/tcp                                                        netbox_bgppeering_netbox_1
7096a4a8a643        postgres:10                                           "docker-entrypoint.s…"   About a minute ago   Up 28 seconds            5432/tcp                                                                      netbox_bgppeering_postgres_1
1ce3bf4834b4        redis:5-alpine                                        "docker-entrypoint.s…"   About a minute ago   Up 28 seconds            6379/tcp                                                                      netbox_bgppeering_redis_1
With all that in place we should now create superuser account. This will allow us access to admin panel.
..ttl255-netbox-plugin-bgppeering$ invoke create-user --user ttl255

Email address:
Password:
Password (again):
Superuser created successfully.
And now time for the big moment. If everything worked as it should you can navigate to http://localhost:8000/ and login with you superuser credentials.
Once you're logged in you might wonder if our plugin made it to Netbox. We can't see anything extra, as we didn't really create anything substantial.
But don't worry, there's a way to check it if plugin is there.
Navigate to admin > System - Installed plugins.
And tada, it's here!
It's quite exciting. We just added some extra stuff to NetBox!
But as much fun as it is, it'd be nice if we could actually see this plugin in action.
Adding menu entry
I'm going to add a menu entry for our plugin. This will prove that we can add new elements to GUI and it'll give us something tangible.
- First we'll create
url.pywhich Django, and NetBox, use to map URLs used by our plugin to code that generates content for these URLs.
urls.py
from django.<a href="http" target="_blank">http</a> import HttpResponse
from django.urls import path


def dummy_view(request):
    html = "<html><body>BGP Peering plugin.</body></html>"
    return HttpResponse(html)


urlpatterns = [
    path("", dummy_view, name="bgppeering_list"),
]
For now we have just one URL, an empty string. This is root URL of our plugin accessible at <netbox-url>/plugins/bgp-peering/.
I named link bgppeering_list to allow us to refer to this URL later by a convenient name instead of hardcoding it.
I also created temporary function dummy_view returning dummy content. This will allow us to test the link.
- Next we'll create file
navigation.pywhere menu elements used by our plugin have to go.
navigation.py
from extras.plugins import PluginMenuItem


menu_items = (
    PluginMenuItem(
        link="plugins:netbox_bgppeering:bgppeering_list",
        link_text="BGP Peerings",
    ),
)
Here we are adding single element to our plugin's menu. We define display name in link_text variable and link variable points to URL we defined in urls.py. You can see here that we used previously defined name bgppeering_list.
Class we imported here, PluginMenuItem, comes from NetBox.
The link name is automatically put in the namespace plugins:<plugin_name> where <plugin_name> is the name we defined in PluginConfig in __init__.py. This is why the final URL name we used is plugins:netbox_bgppeering:bgppeering_list.
With these menu item and url in place we can rebuild the image and bring it up for testing.
...ttl255-netbox-plugin-bgppeering$ invoke stop
...ttl255-netbox-plugin-bgppeering$ invoke build
...ttl255-netbox-plugin-bgppeering$ invoke start
After few seconds NetBox should be up again. Navigate to it and check the top menu bar.
Look at that! Our plugin shows in the plugins top menu with the menu item we defined.
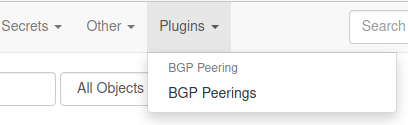
When we click on the menu item we will get text only response from our dummy function.

That's pretty cool. We have a plugin that shows up in NetBox and can actually do something!
All the code up to this point is in branch minimal-plugin if you want to check it out: https://github.com/progala/ttl255-netbox-plugin-bgppeering/tree/minimal-plugin
Data model
To give our plugin some substance we'll now work on the data model for our plugin.
In the world of Django model is a set of fields and behaviour of the data we want to store. Each model maps to an underlying database table.
As a reminder, these are the attributes I want to have in my data model:
- site - peer connects here
- device - peering takes place here
- local_ip - IP address we use for peering
- local_as - BGP ASN number we use for peering
- remote_ip - IP address our peer uses
- remote_as - BGP ASN number our peer uses
- peer_name - what our peer is called
- description - adds more context about this connection
Looking at the details I want to record, I can see that we can link some of those attributes into NetBox's model. For instance device is something that NetBox already has a model for. Same for local IP, which we'd expect to be assigned to an interface on the device where peering takes place.
What about remote IP? We could link it but I'm not going to at this stage. I don't know yet if I want to force these IPs to be in NetBox. We could always change it later.
Right, so how do we go about creating a model?
In vanilla Django models are classes that sublcass django.db.models.Model. In our case we'll take advantage of NetBox class extras.models.ChangeLoggedModel. This will automatically enable change logging for instances of model.
In Django database models need to be in models.py file, so we'll create that file and record our model there.
model.py
from django.db import models

from dcim.fields import ASNField
from extras.models import ChangeLoggedModel
from ipam.fields import IPAddressField


class BgpPeering(ChangeLoggedModel):
    site = models.ForeignKey(
        to="dcim.Site", on_delete=models.SET_NULL, blank=True, null=True
    )
    device = models.ForeignKey(to="dcim.Device", on_delete=models.PROTECT)
    local_ip = models.ForeignKey(to="ipam.IPAddress", on_delete=models.PROTECT)
    local_as = ASNField(help_text="32-bit ASN used locally")
    remote_ip = IPAddressField(help_text="IPv4 or IPv6 address (with mask)")
    remote_as = ASNField(help_text="32-bit ASN used by peer")
    peer_name = models.CharField(max_length=64, blank=True)
    description = models.CharField(max_length=200, blank=True)
There are a few things to unpack here, so let's run through this in more detail.
First we have a few import statements.
from django.db import models- this is Django module providing us with standard field types likeCharFieldorForeignKey.from extras.models import ChangeLoggedModel- Here we borrow model class defined in NetBox,ChangeLoggedModel.from dcim.fields import ASNField- NetBox definesASNFieldclass that we can use for our BGP AS attributes. This supports both 16 and 32 bit ASNs.from ipam.fields import IPAddressField- Another class provided by NetBox, this one handles IPv4/IPv6 addresses for us.
Next step is creating model class. Here I created class named BgpPeering which subclasses ChangeLoggedModel.
class BgpPeering(ChangeLoggedModel):
Next we have a number of model fields.
-
sitesite = models.ForeignKey( to="dcim.Site", on_delete=models.SET_NULL, blank=True, null=True )Field
sitelinks to NetBox'sdcim.Sitemodel so I made it aForeignKey.null=Trueallows the corresponding database column to be NULL (contain no value).blank=Truemeans this field is optional when appearing in forms.
The above two options basically mean that this field doesn't have to be filled and we can still record objects with it being empty.
on_delete=models.SET_NULLmeans that if NetBox site object to which we link is deleted we will set this field to NULL
-
devicedevice = models.ForeignKey( to="dcim.Device", on_delete=models.PROTECT )Field
deviceis linked todcim.Devicemodel in NetBox.nullandblankattributes are left to defaults meaning that this field is required and cannot be emtpy.- on_delete=models.PROTECT - this means that if the linked device cannot be deleted as long as our object exists
-
local_iplocal_ip = models.ForeignKey( to="dcim.Interface", on_delete=models.PROTECT )This field is linked to
ipam.IPAddressmodel. This field cannot be empty and the linked object can't be deleted. -
local_aslocal_as = ASNField( help_text="32-bit ASN used locally" )Next field,
local_asis ofASNFieldtype. This automatically enforces validity of ASNs. Help text is text that will provide additional context in forms where this field appears. -
remote_ipremote_ip = IPAddressField( help_text="IPv4 or IPv6 address (with mask)" )Field
remote_ipis ofIPAddressFieldtype. This means only valid IPv4 and IPv6 will be allowed here. Help text is provided as well. -
remote_asremote_as = ASNField( help_text="32-bit ASN used by peer" )This field is same as
local_asfield, with slightly different help text. -
peer_nameanddescriptionpeer_name = models.CharField( max_length=64, blank=True ) description = models.CharField( max_length=200, blank=True )Finally
peer_nameanddescriptionfields store string, with max length of 64 and 200 characters respectively. We allow these fields to be empty.This is a pretty basic model that we might have to add to in the future. But for now it will do.
Where do the field types come from?
You might be wondering how did I know that remote_ip can use IPAddressField class. Or that peer_name being string can use CharField.
We can find all standard field classes in Django docs, https://docs.djangoproject.com/en/3.1/ref/models/fields/#field-types, these are fields imported from "django.db.models".
You can also find few custom fields classes in NetBox's source code, https://github.com/netbox-community/netbox Best way to see how it all works is by investigating existing models. You'll learn a lot this way!
Do remember though that stuff you reuse from NetBox might change in the future. Most of the core is stable but keep that in mind.
Adding model to admin panel
We have defined our model but there is no way to interact with it yet. We'll work on forms and APIs in future posts but there's something we can do now.
With little effort we can add this model to admin panel. To do that we need to create file admin.py where admin related code goes.
admin.py
from django.contrib import admin
from .models import BgpPeering


@admin.register(BgpPeering)
class BgpPeeringAdmin(admin.ModelAdmin):
    list_display = ("device", "peer_name", "remote_as", "remote_ip")
We create BgpPeeringAdmin class which subclasses ModelAdmin class. Then we use admin.register decorator to register our BgpPeering model with it.
As a result our model will be accessible in admin panel and we'll be able to interact with it.
But before that happens there's something very important we need to do. We need to create migrations for our model.
Source code up until point is in branch adding-model: https://github.com/progala/ttl255-netbox-plugin-bgppeering/tree/adding-model
Model Migrations
We now defined our model in the code but that needs to be added to database before our plugin can use it.
Migrations are what Django uses to propagate changes we make to our models into database schema. These are like change control for database schema. As our models grow and change migrations help Django keep track of them.
Django provides makemigration commands to help with generating migrations. In our environment we have wrapper for that which we can use by running invoke makemigrations.
Note: I had trouble running makemigrations command on its own. I decided to extend invoke.py by adding extra argument app_name to it. By default this will use value stored in BUILD_NAME variable. By doing that I'm able to specify app for which Django will attempt to generate migrations.
So let's get to it. We'll rebuild our image first. Then we'll run makemigrations command:
...ttl255-netbox-plugin-bgppeering$ invoke build

... (cut for brevity)

...ttl255-netbox-plugin-bgppeering$ invoke makemigrations
netbox_bgppeering_postgres_1 is up-to-date
Starting netbox_bgppeering_postgres_1 ... done
Starting netbox_bgppeering_redis_1    ... done

Migrations for 'netbox_bgppeering':
  /source/netbox_bgppeering/migrations/0001_initial.py
    - Create model BgpPeering

... (cut for brevity)
Well, well. Something cool happened. Django created a directory with migration file containing instructions on how to add our model to database.
Important: We need to distribute this with our plugin package as that's what Djano will use to update NetBox's database.
...ttl255-netbox-plugin-bgp-peering$ tree netbox_bgppeering/migrations/
netbox_bgppeering/migrations/
├── 0001_initial.py
└── __init__.py
Seems we have all pieces of the puzzle in place now. We'll rebuild the image and start environment in debug mode to see if our migrations is applied during startup.
...ttl255-netbox-plugin-bgppeering$ invoke stop

... (cut for brevity)

...ttl255-netbox-plugin-bgppeering$ invoke build

... (cut for brevity)

...ttl255-netbox-plugin-bgppeering$ invoke debug

... (cut for brevity)

netbox_1    | Running migrations:
netbox_1    |   Applying netbox_bgppeering.0001_initial... OK

... (cut for brevity)
There it is! Somewhere in the middle of the log messages we can see our migration being applied. Very cool!
Let's go into admin panel and see if it's there!
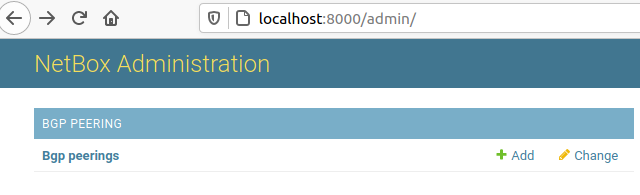
Awesome, our model is showing up. Time to create some peering record.
Click on Add button and fill in the form that shows up.

I already had Site, Device and Local ip created in Netbox to allow me to choose these in the drop down menus.
Now just click save and wait for result.
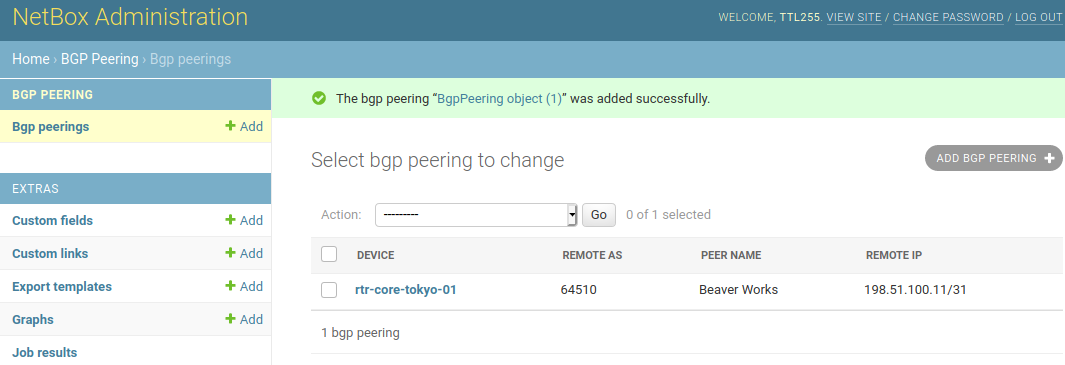
And it's here. Our first BGP Peering connection record got created!
Source code up until this point is in branch model-migrations: https://github.com/progala/ttl255-netbox-plugin-bgppeering/tree/model-migrations
Conclusion
With that we come to the end of first post in the series on developing NetBox plugins. I hope that this post gave you a good idea of what NetBox plugins are and why you would want one.
You've seen how you can setup productive development environment when writing plugins. And you could also see what needs to be done to get your own plugin off the ground.
In the next post I'll show you how we can add templates and views that render them. This will allow us to work with our BGP Peering connections from the main GUI.
I hope you learned something today and I look forward to seeing you again!
Resources
-
NetBox docs: Plugin Development: https://netbox.readthedocs.io/en/stable/plugins/development/
-
NetBox source code on GitHub: https://github.com/netbox-community/netbox
-
NetBox Extensibility Overview, NetBox Day 2020: https://www.youtube.com/watch?v=FSoCzuWOAE0
-
NetBox Plugins Development, NetBox Day 2020: https://www.youtube.com/watch?v=LUCUBPrTtJ4
-
NetBox Onboarding plugin: https://github.com/networktocode/ntc-netbox-plugin-onboarding
-
Netbox QR Code Plugin: https://github.com/k01ek/netbox-qrcode
-
NetBox Virtual Circuit Plugin: https://github.com/vapor-ware/netbox-virtual-circuit-plugin
-
Dynamic DNS Connector for NetBox: https://github.com/sjm-steffann/netbox-ddns
-
Poetry docs: https://python-poetry.org/docs/
-
Invoke docs: http://docs.pyinvoke.org/en/stable/
-
Django models: https://docs.djangoproject.com/en/3.1/topics/db/models/
-
Django model field types: https://docs.djangoproject.com/en/3.1/ref/models/fields/#field-types
-
Django migrations: https://docs.djangoproject.com/en/3.1/topics/migrations/
Contents
Introduction
In this short post I'll introduce you to lesser known type of Ansible loop: "until" loop. This loop is used for retrying task until certain condition is met.
To use this loop in task you essentially need to add 3 arguments to your task arguments:
until - condition that must be met for loop to stop. That is Ansible will continue executing the task until expression used here evaluates to true.
retry - specifies how many times we want to run the task before Ansible gives up.
delay - delay, in seconds, between retries.
As an example, below task will keep sending GET request to specified URL until the "status" key in response is equal to "READY". We ask Ansible to make 10 attempts in total with delay of 1 second between each attempt. If after final attempt condition in until is still not met task is marked as failed.
  - name: Wait until web app status is "READY"
    uri:
      url: "{{ app_url }}/status"
    register: app_status
    until: app_status.json.status == "READY"
    retries: 10
    delay: 1
What's so cool about this loop is that you can use it to actively check result of executing given task before proceeding to other tasks.
This is different to using when task argument for instance, where we only execute task IF condition is met. Here the condition MUST be met before we execute next task.
One is conditional execution, usually based on static check, i.e. existence of package or feature, or value of pre-defined variable. The other pauses execution until condition is met, and failing task if it isn't, to ensure desired state is in place before proceeding.
Some scenarios where until loop could be useful:
- Making sure web app service came up before progressing Playbook.
- Checking status via API endpoint of long running asynchronous task.
- Waiting for routing protocol adjacency to come up.
- Waiting for convergence of the system, e.g. routing in networking.
- Checking if Docker container is reporting as healthy.
- Retrying service that might take multiple attempts to come up fully.
Basically, there are a lot of use cases for until loop :)
Note that some of the above can also be achieved with wait_for module, which is a bit more specialized. Module wait_for can check status of ports, files and processes, among other things. Have a look at link in References if you want to find out more.
Examples
We now know what until loop is, how to use it, and where it could be useful. Next we'll now through some examples to give you a better intuition of how one would go about using it in Playbooks.
Setup details
Details of the setup used for the examples:
- Python 3.8.5
- Ansible 2.9.10 running in Python virtual environment
- Python libraries listed in
requirements.txtin the GitHub repository for this post - Docker engine
- Docker container named "veos:4.18.10M" built with vrnetlab and "vEOS-lab-4.18.10M.vmdk" image
Example 1 - Polling web app status via API
In first example I have a Playbook that gets content of home page of a web app. Twist is that this web app takes some time to fully come up. Fortunately there is an API endpoint that we can query to check if the app is ready to accept requests.
We'll take advantage of the until loop to keep polling the status until we get green light to proceed.
until_web_app.yml
---
- name: "PLAY 1. Use 'until' to wait for Web APP to come up."
  hosts: local
  connection: local
  gather_facts: no

  vars:
    app_url: "http://127.0.0.1:5010"

  tasks:
  - name: "TASK 1.1. Start Web app (async 20 keeps up app in bg for 20 secs)."
    command: python flask_app/main.py
    async: 20
    poll: 0
    changed_when: no

  - name: "TASK 1.2. Retrieve Web app home page (should fail)."
    uri:
      url: "{{ app_url }}"
    register: app_hp
    ignore_errors: yes

  - name: "TASK 1.3. Display HTTP code returned by home page."
    debug:
      msg: "Web app returned {{ app_hp.status }} HTTP code"

  - name: "TASK 1.4. Wait until GET to 'status' returns 'READY'."
    uri:
      url: "{{ app_url }}/status"
    register: app_status
    until: app_status.json.status == "READY"
    retries: 10
    delay: 1

  - name: "TASK 1.5. Retrieve Web app home page (should succeed now)."
    uri:
      url: "{{ app_url }}"
    register: app_hp

  - name: "TASK 1.6. Display HTTP code and body returned by home page."
    debug:
      msg:
        - "Web app returned {{ app_hp.status }} HTTP code"
        - "Web page content: {{ lookup('url', app_url) }}"
Let's have a look at interesting bits in this Playbook.
I built this app with API endpoint that returns status of the service in the json payload. This can be either "NOT_READY" or "READY".
-
In TASK 1.1 we launch a small Flask Web App that takes 10 seconds to fully come up. I use
asyncargument here to trick Ansible into keeping this up in background for 20 seconds, otherwise the Playbook would get stuck on this task. -
In TASK 1.2 we get an error while retrieving home page because App is not ready yet.
-
In TASK 1.4 we use
untilloop to keep querying thestatusendpoint until returned value equals "READY". Only when the task succeeds will we proceed to the next task where we again retrieve home page, now knowing that our chance of succeeding is much higher. -
In TASK 1.5 we retrieve home page again, which should now succeed, contents of which we'll display in TASK 1.6.
A lot of different Web API services expose some kind of status or healthcheck endpoint so this example shows a very useful pattern that we can use elsewhere.
If you're curiouse, you can find code of the Flask app in the Github repository together with the playbook.
And this is the output from the Playbook run:
venv) przemek@quark:~/netdev/repos/ans_unt$ ansible-playbook -i hosts.yml until_web_app.yml

PLAY [PLAY 1. Use 'until' to wait for Web APP to come up.] *********************************************************************************************************************************************

TASK [TASK 1.1. Start Web app (async 20 keeps up app in bg for 20 secs).] ******************************************************************************************************************************
ok: [localhost]

TASK [TASK 1.2. Retrieve Web app home page (should fail).] *********************************************************************************************************************************************
fatal: [localhost]: FAILED! => {"changed": false, "content": "", "content_length": "0", "content_type": "text/html; charset=utf-8", "date": "Sun, 22 Nov 2020 16:47:37 GMT", "elapsed": 0, "msg": "Status code was 503 and not [200]: HTTP Error 503: SERVICE UNAVAILABLE", "redirected": false, "server": "Werkzeug/1.0.1 Python/3.8.5", "status": 503, "url": "http://127.0.0.1:5010"}
...ignoring

TASK [TASK 1.3. Display HTTP code returned by home page.] **********************************************************************************************************************************************
ok: [localhost] => {
    "msg": "Web app returned 503 HTTP code"
}

TASK [TASK 1.4. Wait until GET to 'status' returns 'READY'.] *******************************************************************************************************************************************
FAILED - RETRYING: TASK 1.4. Wait until GET to 'status' returns 'READY'. (10 retries left).
FAILED - RETRYING: TASK 1.4. Wait until GET to 'status' returns 'READY'. (9 retries left).
FAILED - RETRYING: TASK 1.4. Wait until GET to 'status' returns 'READY'. (8 retries left).
FAILED - RETRYING: TASK 1.4. Wait until GET to 'status' returns 'READY'. (7 retries left).
FAILED - RETRYING: TASK 1.4. Wait until GET to 'status' returns 'READY'. (6 retries left).
FAILED - RETRYING: TASK 1.4. Wait until GET to 'status' returns 'READY'. (5 retries left).
FAILED - RETRYING: TASK 1.4. Wait until GET to 'status' returns 'READY'. (4 retries left).
ok: [localhost]

TASK [TASK 1.5. Retrieve Web app home page (should succeed now).] **************************************************************************************************************************************
ok: [localhost]

TASK [TASK 1.6. Display HTTP code and body returned by home page.] *************************************************************************************************************************************
ok: [localhost] => {
    "msg": [
        "Web app returned 200 HTTP code",
        "Web page content: Service ready for use."
    ]
}

PLAY RECAP *********************************************************************************************************************************************************************************************
localhost                  : ok=6    changed=0    unreachable=0    failed=0    skipped=0    rescued=0    ignored=1
Example 2 - Wait for BGP to establish before retrieving peer routes
In the world of networking we often encounter situations where some kind of adjacency, be it BFD, PIM or BGP has to be established before we can retrieve information that is of interest.
To illustrate this I wrote a Playbook that waits for BGP peering to come up before checking routes we receive from neighbors.
Bear in mind this is simplified for use in an example, in the real world you might need to add more checks to ensure routing information between peer has been fully exchanged.
until_eos_net.yml
---
- name: "PLAY 1. Use 'until' to wait for BGP sessions to establish."
  hosts: veos_net
  gather_facts: no

  tasks:
  - name: "TASK 1.1. Record peer IPs for use in 'until' task."
    eos_command:
      commands:
      - command: show ip bgp summary
        output: json
    register: init_bgp_sum

  - name: "TASK 1.2. Forcefully reset BGP sessions."
    eos_command:
      commands: clear ip bgp neighbor *

  - name: "TASK 1.3. Use 'until' to wait for all BGP sessions to establish."
    eos_command:
      commands:
      - command: show ip bgp summary
        output: json
    register: u_bgp_sum
    until: u_bgp_sum.stdout.0.vrfs.default.peers[item.key].peerState == "Established"
    retries: 15
    delay: 1
    loop: "{{ init_bgp_sum.stdout.0.vrfs.default.peers | dict2items }}"
    loop_control:
      label: "{{ item.key }}"

  - name: "TASK 1.4. Retrieve neighbor routes."
    eos_command:
      commands:
      - command: "show ip bgp neighbors {{ item.key }} routes"
        output: json
    register: nbr_routes
    loop: "{{ init_bgp_sum.stdout.0.vrfs.default.peers | dict2items }}"
    loop_control:
      label: "{{ item.key }}"

  - name: "TASK 1.5. Display neighbor routes."
    debug:
      msg:
        - "{{ ''.center(80, '=') }}"
        - "Neighbor: {{ nbr.item.key }}"
        - "{{ nbr.stdout.0.vrfs.default.bgpRouteEntries.keys() | list }}"
        - "{{ ''.center(80, '=') }}"
    loop: "{{ nbr_routes.results }}"
    loop_control:
      loop_var: nbr
      label: "{{ nbr.item.key }}"
Again, we'll look more closely at tasks that do something interesting.
-
In TASK 1.1 we record output of
show ip bgp summarythat we'll be used to iterate over list of BGP neighbors. -
In TASK 1.3 we have core of our logic.
- Using
untilloop we keep checking status of each of the peers until all of them report "Established" value. - During each retry output of
show ip bgp summaryis recorded inu_bgp_sumvariable. - To add to fun,
untilloop is run inside of a standard outer loop. Outer loop feedsuntilIPs of the peers so that it's easier to access data structure recorded inu_bgp_sum.
- Using
-
In TASK 1.4 we can get routes received from each neighbor knowing that all of the peerings are now established. These routes are displayed in TASK 1.5.
Waiting for convergence, or adjacency to get up, is another use case that comes up often. Hopefully this example illustrates how we can handle these.
You can also see here that until loop happily cooperates with standard loop allowing us to handle even more use cases.
Below is the result of running this Playbook.
(venv) przemek@quark:~/netdev/repos/ans_unt$ ansible-playbook -i hosts.yml until_eos_net.yml

PLAY [PLAY 1. Use 'until' to wait for BGP sessions to establish.] **************************************************************************************************************************************

TASK [TASK 1.1. Record peer IPs for use in 'until' task.] **********************************************************************************************************************************************
ok: [veos01]

TASK [TASK 1.2. Forcefully reset BGP sessions.] ********************************************************************************************************************************************************
ok: [veos01]

TASK [TASK 1.3. Use 'until' to wait for all BGP sessions to establish.] ********************************************************************************************************************************
FAILED - RETRYING: TASK 1.3. Use 'until' to wait for all BGP sessions to establish. (15 retries left).
FAILED - RETRYING: TASK 1.3. Use 'until' to wait for all BGP sessions to establish. (14 retries left).
FAILED - RETRYING: TASK 1.3. Use 'until' to wait for all BGP sessions to establish. (13 retries left).
ok: [veos01] => (item=10.0.13.2)
ok: [veos01] => (item=10.0.12.2)
FAILED - RETRYING: TASK 1.3. Use 'until' to wait for all BGP sessions to establish. (15 retries left).
FAILED - RETRYING: TASK 1.3. Use 'until' to wait for all BGP sessions to establish. (14 retries left).
ok: [veos01] => (item=10.1.11.2)

TASK [TASK 1.4. Retrieve neighbor routes.] *************************************************************************************************************************************************************
ok: [veos01] => (item=10.0.13.2)
ok: [veos01] => (item=10.0.12.2)
ok: [veos01] => (item=10.1.11.2)

TASK [TASK 1.5. Display neighbor routes.] **************************************************************************************************************************************************************
ok: [veos01] => (item=10.0.13.2) => {
    "msg": [
        "================================================================================",
        "Neighbor: 10.0.13.2",
        [
            "192.168.0.0/25",
            "192.168.1.0/25",
            "192.168.4.0/24",
            "192.168.7.0/24",
            "192.168.6.0/24",
            "10.50.255.3/32",
            "192.168.5.0/24"
        ],
        "================================================================================"
    ]
}
ok: [veos01] => (item=10.0.12.2) => {
    "msg": [
        "================================================================================",
        "Neighbor: 10.0.12.2",
        [
            "10.50.255.2/32",
            "192.168.0.0/25"
        ],
        "================================================================================"
    ]
}
ok: [veos01] => (item=10.1.11.2) => {
    "msg": [
        "================================================================================",
        "Neighbor: 10.1.11.2",
        [],
        "================================================================================"
    ]
}

PLAY RECAP *********************************************************************************************************************************************************************************************
veos01                     : ok=5    changed=0    unreachable=0    failed=0    skipped=0    rescued=0    ignored=0
Example 3 - Polling health status of Docker container
Docker is everywhere these days. There is a lot of tools like docker-compose that make running container easier. But we can also use Ansible to manage our containers.
Many containers these days come with built-in health checks which Docker engine can use to report on health of given container.
In this example I'll show you how we can talk to Docker to get the container status from inside of Ansible Playbook. Our goal is to launch 4 containers with virtual routers that we want to dynamically add to Ansible inventory. But we only want to do that once all of them came up fully.
until_docker.yml
---
- name: "PLAY 1. Provision lab with virtual routers."
  hosts: local
  connection: local
  gather_facts: no

  tasks:

  - name: "TASK 1.1. Bring up virtual router containers."
    docker_container:
      name: "{{ item }}"
      image: "{{ vr_image_name }}"
      privileged: yes
    register: cont_data
    loop: "{{ vnodes }}"
    loop_control:
      pause: 10

  - name: "TASK 1.2. Wait for virtual routers to finish booting."
    docker_container_info:
      name: "{{ item }}"
    register: cont_check
    until: cont_check.container.State.Health.Status == 'healthy'
    retries: 15
    delay: 25
    loop: "{{ vnodes }}"

  - name: "TASK 1.3. Auto discover device IPs and add to inventory group."
    set_fact:
      dyn_grp: "{{ dyn_grp | combine({cont_name: {'ansible_host': cont_ip_add }}) }}"
    vars:
      cont_ip_add: "{{ item.container.NetworkSettings.IPAddress }}"
      cont_name: '{{ item.container.Name | replace("/", "") }}'
      dyn_grp: {}
    loop: "{{ cont_data.results }}"
    loop_control:
      label: "{{ cont_name }}"

  - name: "TASK 1.4. Dynamically create hosts.yml inventory."
    copy:
      content: "{{ dyn_inv | to_nice_yaml }}"
      dest: ./lab_hosts.yml
    vars:
      dyn_inv:
        "{{ {'all': {'children': {inv_name: {'hosts': dyn_grp}}}} }}"
Of interest here are mostly TASK 1.1 and TASK 1.2. Remaining tasks deal with generating and saving inventory, but I wanted to leave them here to provide context.
Let's have a look at the first two tasks then.
-
In TASK 1.1 we loop over container names recorded in
vnodesvar and we launch container for each of the entries. I added 10 second pause between launching each container to avoid overwhelming my local Docker. -
In TASK 1.2 we got our
untilloop inside of standard loop. Inuntilloop we tell Docker to get info on container with name fed from outer loop. Then we check if value of health status ishealthy. We'll keep retrying here until we get status we want, of if we exceed number of retries the task will fail.
You might wonder how I chose the values for retries and delay arguments. These are completely arbitrary and depend on the machine and container that you're running. In my case I know from running these by hand that it takes some time for all containers to come up so 15 retries with 25 second delays fits my case well.
Now you can see that you can have Ansible poll status of your containers, pretty cool right?
To finish off, here's the result of this playbook being executed.
(venv) przemek@quark:~/netdev/repos/ans_unt$ ansible-playbook -i hosts.yml until_docker.yml

PLAY [PLAY 1. Provision lab with virtual routers.] *****************************************************************************************************************************************************

TASK [TASK 1.1. Bring up virtual router containers.] ***************************************************************************************************************************************************
changed: [localhost] => (item=spine1)
changed: [localhost] => (item=spine2)
changed: [localhost] => (item=leaf1)
changed: [localhost] => (item=leaf2)

TASK [TASK 1.2. Wait for virtual routers to finish booting.] *******************************************************************************************************************************************
FAILED - RETRYING: TASK 1.2. Wait for virtual routers to finish booting. (15 retries left).
FAILED - RETRYING: TASK 1.2. Wait for virtual routers to finish booting. (14 retries left).
FAILED - RETRYING: TASK 1.2. Wait for virtual routers to finish booting. (13 retries left).
FAILED - RETRYING: TASK 1.2. Wait for virtual routers to finish booting. (12 retries left).
FAILED - RETRYING: TASK 1.2. Wait for virtual routers to finish booting. (11 retries left).
FAILED - RETRYING: TASK 1.2. Wait for virtual routers to finish booting. (10 retries left).
FAILED - RETRYING: TASK 1.2. Wait for virtual routers to finish booting. (9 retries left).
ok: [localhost] => (item=spine1)
FAILED - RETRYING: TASK 1.2. Wait for virtual routers to finish booting. (15 retries left).
ok: [localhost] => (item=spine2)
ok: [localhost] => (item=leaf1)
FAILED - RETRYING: TASK 1.2. Wait for virtual routers to finish booting. (15 retries left).
ok: [localhost] => (item=leaf2)

TASK [TASK 1.3. Auto discover device IPs and add to inventory group.] **********************************************************************************************************************************
ok: [localhost] => (item=spine1)
ok: [localhost] => (item=spine2)
ok: [localhost] => (item=leaf1)
ok: [localhost] => (item=leaf2)

TASK [TASK 1.4. Dynamically create hosts.yml inventory.] ***********************************************************************************************************************************************
changed: [localhost]

PLAY RECAP *********************************************************************************************************************************************************************************************
localhost                  : ok=4    changed=2    unreachable=0    failed=0    skipped=0    rescued=0    ignored=0
Conclusion
Adding Ansible until loop to your toolset will open some new possibilities. Ability to dynamically repeat polling until certain condition is met is powerful and will allow you to add logic to your Playbooks that otherwise might be difficult to achieve.
I hope that my examples helped in illustrating the value of the until loop and you found this post useful.
Thanks for reading!
References
- Ansible docs for 'until' loop: https://docs.ansible.com/ansible/latest/user_guide/playbooks_loops.html#retrying-a-task-until-a-condition-is-met
- Ansible docs for 'wait_for' module:
https://docs.ansible.com/ansible/latest/collections/ansible/builtin/wait_for_module.html - vrnetlab: https://github.com/plajjan/vrnetlab
- TTL255 post on vrnetlab: https://ttl255.com/vrnetlab-run-virtual-routers-in-docker-containers/
- GitHub repo with resources for this post: https://github.com/progala/ttl255.com/tree/master/ansible/until-loop
Welcome to another instalment in my Jinja2 Tutorial series. So far we've learned a lot about rendering, control structures and various functions. Here we'll start discussing language features that help us deal with organizing templates. First constructs we'll look at are include and import statements.
Jinja2 Tutorial series
- Jinja2 Tutorial - Part 1 - Introduction and variable substitution
- Jinja2 Tutorial - Part 2 - Loops and conditionals
- Jinja2 Tutorial - Part 3 - Whitespace control
- Jinja2 Tutorial - Part 4 - Template filters
- Jinja2 Tutorial - Part 5 - Macros
- Jinja2 Tutorial - Part 6 - Include and Import
- J2Live - Online Jinja2 Parser
Contents
Introduction
Include and Import statements are some of the tools that Jinja gives us to help with organizing collections of templates, especially once these grow in size.
By using these constructs we can split templates into smaller logical units, leading to files with well-defined scopes. This in turn will make it easier to modify templates when new requirements come up.
The end goal of well-structured collection of templates is increased re-usability as well as maintainability.
Purpose and syntax
'Include' statement allows you to break large templates into smaller logical units that can then be assembled in the final template.
When you use include you refer to another template and tell Jinja to render the referenced template. Jinja then inserts rendered text into the current template.
Syntax for include is:
{% include 'path_to_template_file' %}
where 'path_to_template_file' is the full path to the template which we want included.
For instance, below we have template named cfg_draft.j2 that tells Jinja to find template named users.j2, render it, and replace {% include ... %} block with rendered text.
cfg_draft.j2
{% include 'users.j2' %}
users.j2
username przemek privilege 15 secret NotSoSecret
Final result:
username przemek privilege 15 secret NotSoSecret
Using 'include' to split up large templates
If you look at typical device configuration, you will see a number of sections corresponding to given features. You might have interface configuration section, routing protocol one, access-lists, routing policies, etc. We could write single template generating this entire configuration:
device_config.j2
hostname {{ hostname }}

banner motd ^
===========================================
|   This device is property of BigCorpCo  |
|   Unauthorized access is unauthorized   |
|  Unless you're authorized to access it  |
|  In which case play nice and stay safe  |
===========================================
^

no ip domain lookup
ip domain name local.lab
ip name-server {{ name_server_pri }}
ip name-server {{ name_server_sec }}

ntp server {{ ntp_server_pri }} prefer
ntp server {{ ntp_server_sec }}

{% for iname, idata in interfaces.items() -%}
interface {{ iname }}
 {{ idata.description }}
 {{ idata.ipv4_address }}
{% endfor %}

{% for pl_name, pl_lines in prefix_lists.items() -%}
ip prefix-list {{ pl_name }}
{%- for line in pl_lines %}
 {{ line -}}
{%  endfor -%}
{% endfor %}

router bgp {{ bgp.as_no }}
{%- for peer in bgp.peers %}
 neighbor {{ peer.ip }} remote-as {{ peer.as_no }}
 neighbor {{ peer.ip }} description {{ peer.description }}
{%- endfor %}
Often we grow our templates organically and add one section after another to the single template responsible for generating configuration. Over time however this template grows too large and it becomes difficult to maintain it.
One way of dealing with the growing complexity is to identify sections that roughly correspond to single feature. Then we can move them into their own templates that will be included in the final one.
What we're aiming for is a number of smaller templates dealing with clearly defined feature configuration sections. That way it's easier to locate file to modify when you need to make changes. It's also easier to tell which template does what since we can now give them appropriate names like "bgp.j2" and "acls.j2", instead of having one big template named "device_config.j2".
Taking the previous template we can decompose it into smaller logical units:
base.j2
hostname {{ hostname }}

banner motd ^
{% include 'common/banner.j2' %}
^
dns.j2
no ip domain lookup
ip domain name local.lab
ip name-server {{ name_server_pri }}
ip name-server {{ name_server_sec }}
ntp.j2
ntp server {{ ntp_server_pri }} prefer
ntp server {{ ntp_server_sec }}
interfaces.j2
{% for iname, idata in interfaces.items() -%}
interface {{ iname }}
 {{ idata.description }}
 {{ idata.ipv4_address }}
{% endfor %}
prefix_lists.j2
{% for pl_name, pl_lines in prefix_lists.items() -%}
ip prefix-list {{ pl_name }}
{%- for line in pl_lines %}
 {{ line -}}
{%  endfor -%}
{% endfor %}
bgp.j2
router bgp {{ bgp.as_no }}
{%- for peer in bgp.peers %}
 neighbor {{ peer.ip }} remote-as {{ peer.as_no }}
 neighbor {{ peer.ip }} description {{ peer.description }}
{%- endfor %}
We now have a collection of separate templates, each with a clear name conveying its purpose. While our example doesn't have too many lines, I think you'd agree with me that the logical grouping we arrived at will be easier to work with and it'll be quicker to build mental model of what is going on here.
With features moved to individual templates we can finally use include statements to compose our final config template:
config_final.j2
{# Hostname and banner -#}
{% include 'base.j2' %}

{% include 'dns.j2' %}

{% include 'ntp.j2' %}

{% include 'interfaces.j2' %}

{% include 'prefix_lists.j2' %}

{# BGP instance and peering -#}
{% include 'bgp.j2' %}
You open this template and just from a quick glance you should be able to get an idea as to what it's trying to do. It's much cleaner, and we can easily add comments that won't get lost among hundreds of other lines.
As a bonus, you can quickly test template with one feature disabled by commenting single line out, or simply temporarily removing it.
It's now easier to make changes and it's faster to identify feature and corresponding template instead of searching through one big template with potentially hundreds of lines.
Similarly, when new section is needed we can create separate template and include it in the final template therefore fulfilling our goal of increasing modularity.
Shared template snippets with 'include'
You might have also noticed that one of the included templates had itself include statement.
base.j2
hostname {{ hostname }}

banner motd ^
{% include 'common/banner.j2' %}
^
You can use include statement at any level in the hierarchy of templates and anywhere in the template you want. This is exactly what we did here; we moved text of our banner to a separate file which we then include in base.j2 template.
We could argue that banner itself is not important enough to warrant its own template. However, there's another class of use cases where include is helpful. We can maintain library of common snippets used across many different templates.
This differs from our previous example, where we decomposed one big template into smaller logical units all tightly related to the final template. With common library we have units that are re-usable across many different templates that might not otherwise have any similarities.
Missing and alternative templates
Jinja allows us to ask for template to be included optionally by adding ignore missing argument to include.
{% include 'guest_users.j2' ignore missing %}
It essentially tells Jinja to look for guest_users.j2 template and insert rendered text if found. If template is not found this will result in blank line, but no error will be raised.
I would generally advise against using this in your templates. It's not something that's widely used so someone reading your template might not know what it's meant to do. End result also relies on the presence of the specific file which might make troubleshooting more difficult.
There are better ways of dealing with optional features, some of which rely on template inheritance that we will talk about in the next post.
Closely related to 'ignore missing' is possibility of providing list of templates to include. Jinja will check templates for existence, including the first one that exists.
In the below example, if local_users.j2 does not exist but radius_users.j2 does, then rendered radius_users.j2 will end up being inserted.
{% include ['local_users.j2', 'radius_users.j2'] %}
You can even combine list of templates with ignore missing argument:
{% include ['local_users.j2', 'radius_users.j2'] ignore missing %}
This will result in search for listed templates and no error raised if none of them are found.
Again, while tempting, I'd advise against using this feature unless you exhausted other avenues. I wouldn't enjoy having to figure out which one of the listed templates ended up being included if something didn't look right in my final render.
To summarize, you can use 'include' to:
- split large template into smaller logical units
- re-use snippets shared across multiple templates
Import statement
In Jinja we use import statement to access macros kept in other templates. The idea is to have often used macros in their own files that are then imported in the templates that need them.
This is different than include statement in that no rendering takes place here. Instead the way it works is very similar to import statement in Python. Imported macros are made available for use in the template that imports them.
Three ways of importing
There are three ways in which we can import macros.
All three ways will use import the below template:
macros/ip_funcs.j2
{% macro ip_w_wc(ip_net) -%}
{{ ip_net|ipaddr('network') }} {{ ip_net|ipaddr('hostmask')}}
{%- endmacro -%}

{% macro ip_w_netm(ip_net) -%}
{{ ip_net|ipaddr('network') }} {{ ip_net|ipaddr('netmask') }}
{%- endmacro -%}

{% macro ip_w_pfxlen(ip_net) -%}
{{ ip_net|ipaddr('network/prefix') }}
{%- endmacro -%}
-
Importing the whole template and assigning it to variable. Macros are attributes of the variable.
imp_ipfn_way1.j2{% import 'macros/ip_funcs.j2' as ipfn %} {{ ipfn.ip_w_wc('10.0.0.0/24') }} {{ ipfn.ip_w_netm('10.0.0.0/24') }} {{ ipfn.ip_w_pfxlen('10.0.0.0/24') }} -
Importing specific macro into the current namespace.
imp_ipfn_way2.j2{% from 'macros/ip_funcs.j2' import ip_w_wc, ip_w_pfxlen %} {{ ip_w_wc('10.0.0.0/24') }} {{ ip_w_pfxlen('10.0.0.0/24') }} -
Importing specific macro into the current namespace and giving it an alias.
imp_ipfn_way3{% from 'macros/ip_funcs.j2' import ip_w_wc as ipwild %} {{ ipwild('10.0.0.0/24') }}
You can also combine 2 with 3:
imp_ipfn_way2_3
{% from 'macros/ip_funcs.j2' import ip_w_wc as ipwild, ip_w_pfxlen %}

{{ ipwild('10.0.0.0/24') }}
{{ ip_w_pfxlen('10.0.0.0/24') }}
My recommendation is to always use 1. This forces you to access macros via explicit namespace. Methods 2 and 3 risk clashes with variables and macros defined in the current namespace. As is often the case in Jinja, explicit is better than implicit.
Caching and context variables
Imports are cached, which means that they are loaded very quickly on each subsequent use. There is a price to pay for that, namely the imported templates don't have access to variables in template that imports them.
This means that by default you can't access variables passed into the context inside of macros imported from another file.
Instead you have to build your macros so that they only rely on values passed to them explicitly.
To illustrate this I wrote two versions of macro named def_if_desc, one trying to access variables available to template importing it. The other macro relies on dictionary passed to it explicitly via value.
Both versions use the below data:
default_desc.yaml
interfaces:
 Ethernet10:
   role: desktop
-
Version accessing template variables:
macros/def_desc_ctxvars.j2{% macro def_if_desc(ifname) -%} Unused port, dedicated to {{ interfaces[ifname].role }} devices {%- endmacro -%}im_defdesc_vars.j2{% import 'macros/def_desc_ctxvars.j2' as desc -%} {{ desc.def_if_desc('Ethernet10') }}When I try to render
im_defdesc_vars.j2I get the below traceback:...(cut for brevity) File "F:\projects\j2-tutorial\templates\macros\def_desc_ctxvars.j2", line 2, in template Unused port, dedicated to {{ interfaces[ifname].descri }} devices File "F:\projects\j2-tutorial\venv\lib\site-packages\jinja2\environment.py", line 452, in getitem return obj[argument] jinja2.exceptions.UndefinedError: 'interfaces' is undefinedYou can see that Jinja complains that it cannot access
interfaces. This is just as we expected. -
Version accessing key of dictionary passed explicitly by importing template.
default_desc.j2{% macro def_if_desc(intf_data) -%} Unused port, dedicated to {{ intf_data.role }} devices {%- endmacro -%}im_defdesc.j2{% import 'macros/default_desc.j2' as desc -%} {{ desc.def_if_desc(interfaces['Ethernet10']) }}And this renders just fine:
Unused port, dedicated to desktop devices
Hopefully now you can see what the default behavior is when importing macros. Since values of variables in the context can change at any time, Jinja engine cannot cache them and we are not allowed to access them from within macros.
Disabling macro caching
However, if for whatever reason you think it is a good idea to allow your macros to access context variables you can change the default behavior with additional argument with context which you pass to import statement.
Note: This will automatically disable caching.
For completeness this is how we can "fix" our failing macro:
macros/def_desc_ctxvars.j2
{% macro def_if_desc(ifname) -%}
Unused port, dedicated to {{ interfaces[ifname].role }} devices
{%- endmacro -%}
im_defdesc_vars_wctx.j2
{% import 'macros/def_desc_ctxvars.j2' as desc with context -%}

{{ desc.def_if_desc('Ethernet10') }}
And now it works:
Unused port, dedicated to devices
Personally, I don't think it's a good idea to use import together with context. The whole point of importing macros from separate file is to allow them to be used in other templates and leveraging caching. There could be potentially hundreds, if not thousands, of them, and as soon as you use with context the caching is gone.
I can also see some very subtle bugs creeping in in macros that rely on accessing variables from template context.
To be on the safe side, I'd say stick with standard import and always use namespaces, e.g.
{% import 'macros/ip_funcs.j2' as ipfn %}
Conclusion
We learned about two Jinja constructs that can help us in managing complexity emerging when our templates grow in size. By leveraging import and include statements we can increase re-usability and make our templates easier to maintain. I hope that included examples showed you how you can use this knowledge to make your template collection better organized and easier to understand.
Here's my quick summary of what to use when:
| Import | Include | |
|---|---|---|
| Purpose | Imports macros from other templates | Renders other template and inserts results |
| Context variables | Not accessible (default) | Accessible |
| Good for | Creating shared macro libraries | Splitting template into logical units and common snippets |
I hope you found this post useful and are looking forward to more. Next post will continue discussion of ways to organize templates by focusing on template inheritance. Stay tuned!
References
- Jinja2 import, official docs: https://jinja.palletsprojects.com/en/2.11.x/templates/#import
- Jinja2 include, official docs: https://jinja.palletsprojects.com/en/2.11.x/templates/#include
- GitHub repo with resources for this post. Available at: https://github.com/progala/ttl255.com/tree/master/jinja2/jinja-tutorial-p6-import-include
Welcome to the part 5 of Jinja2 Tutorial where we learn all about macros. We'll talk about what macros are, why we would use them and we'll see some examples to help us appreciate this feature better.
Jinja2 Tutorial series
- Jinja2 Tutorial - Part 1 - Introduction and variable substitution
- Jinja2 Tutorial - Part 2 - Loops and conditionals
- Jinja2 Tutorial - Part 3 - Whitespace control
- Jinja2 Tutorial - Part 4 - Template filters
- Jinja2 Tutorial - Part 5 - Macros
- Jinja2 Tutorial - Part 6 - Include and Import
- J2Live - Online Jinja2 Parser
Contents
- What are macros?
- Why and how of macros
- Adding parameters
- Macros for deeply nested structures
- Branching out inside macro
- Macros in macros
- Moving macros to a separate file
- Advanced macro usage
- Conclusion
- References
- GitHub repository with resources for this post
What are macros?
Macros are similar to functions in many programming languages. We use them to encapsulate logic used to perform repeatable actions. Macros can take arguments or be used without them.
Inside of macros we can use any of the Jinja features and constructs. Result of running macro is some text. You can essentially treat macro as one big evaluation statement that also allows parametrization.
Why and how of macros
Macros are great for creating reusable components when we find ourselves copy pasting around same lines of text and code. You might benefit from macro even when all it does is rendering static text.
Take for example device banners, these tend to be static but are used over and over again. Instead of copy pasting text of the banner across your templates you can create macro and have it render the banner.
Not only will you reduce mistakes that can happen during copying but you also make future updates to the banner much easier. Now you have only one place where the banner needs to be changed and anything else using this macro will reflect the changes automatically.
{% macro banner() -%}
banner motd ^
===========================================
|   This device is property of BigCorpCo  |
|   Unauthorized access is unauthorized   |
|  Unless you're authorized to access it  |
|  In which case play nice and stay safe  |
===========================================
^
{% endmacro -%}

{{ banner() }}
banner motd ^
===========================================
|   This device is property of BigCorpCo  |
|   Unauthorized access is unauthorized   |
|  Unless you're authorized to access it  |
|  In which case play nice and stay safe  |
===========================================
^
So that's our first macro right there!
As you can see above we start macro with {% macro macro_name(arg1, arg2) %} and we end it with {% endmacro %}. Arguments are optional.
Anything you put in between opening and closing tags will be processed and rendered at a location where you called the macro.
Once we defined macro we can use it anywhere in our template. We can directly insert results by using {{ macro_name() }} substitution syntax. We can also use it inside other constructs like if..else blocks or for loops. You can even pass macros to other macros!
Adding parameters
Real fun begins when you start using parameters in your macros. That's when their show their true potential.
Oure next macro renders default interface description. We assign different roles to our ports and we want the default description to reflect that. We could achieve this by writing macro taking interface role as argument.
Data:
interfaces:
 - name: Ethernet10
   role: desktop
 - name: Ethernet11
   role: desktop
 - name: Ethernet15
   role: printer
 - name: Ethernet22
   role: voice
Template with macro:
{% macro def_if_desc(if_role) -%}
Unused port, dedicated to {{ if_role }} devices
{%- endmacro -%}

{% for intf in interfaces -%}
interface {{ intf.name }}
  description {{ def_if_desc(intf.role) }}
{% endfor -%}
Rendered text:
interface Ethernet10
  description Unused port, dedicated to desktop devices
  ip address
interface Ethernet11
  description Unused port, dedicated to desktop devices
  ip address
interface Ethernet15
  description Unused port, dedicated to printer devices
  ip address
interface Ethernet22
  description Unused port, dedicated to voice devices
  ip address
It might not be immediately apparent if macro is useful here since we only have one line in the body. We could've just written this line inside of the for loop. Downside of that is that our intent is not clearly conveyed.
{% for intf in interfaces -%}
interface {{ intf.name }}
  description Unused port, dedicated to {{ intf.role }} devices
{% endfor -%}
This works but it's not immediately obvious that this is description we want to be used as a default. Things will get even worse if we start adding more processing here.
If we use macro however, the name of the macro tells us clearly that a default interface description will be applied. That is, it is clear what our intent was here.
And there's the real kicker. Macros can be moved to separate files and included in templates that need them. Which means you only need to maintain this one macro that then can be used by hundreds of templates! And number of places you have to update your default description? One, just one.
Macros for deeply nested structures
Another good use case for macros is accessing values in deeply nested data structures.
Modern APIs can return results with many levels of dictionaries and lists making it easy to make error when writing expressions accessing values in these data structures.
The below is real-life example of output returned by Arista device for command:
sh ip bgp neighbors x.x.x.x received-routes | json
Due to size, I'm showing full result for one route entry only, out of 3:
{
  "vrfs": {
      "default": {
      "routerId": "10.3.0.2",
      "vrf": "default",
      "bgpRouteEntries": {
          "10.1.0.1/32": {
          "bgpAdvertisedPeerGroups": {},
          "maskLength": 32,
          "bgpRoutePaths": [
              {
              "asPathEntry": {
                  "asPathType": null,
                  "asPath": "i"
              },
              "med": 0,
              "localPreference": 100,
              "weight": 0,
              "reasonNotBestpath": null,
              "nextHop": "10.2.0.0",
              "routeType": {
                  "atomicAggregator": false,
                  "suppressed": false,
                  "queued": false,
                  "valid": true,
                  "ecmpContributor": false,
                  "luRoute": false,
                  "active": true,
                  "stale": false,
                  "ecmp": false,
                  "backup": false,
                  "ecmpHead": false,
                  "ucmp": false
              }
              }
          ],
          "address": "10.1.0.1"
          },
  ...
      "asn": "65001"
      }
  }
}
There's a lot going on here and in most cases you will only need to get values for few of these attributes.
Say we wanted to access just prefix, next-hop and validity of the path.
Below is object hierarchy we need to navigate in order to access these values:
vrfs.default.bgpRouteEntries- prefixes are here (as keys)vrfs.default.bgpRouteEntries[pfx].bgpRoutePaths.0.nextHop- next hopvrfs.default.bgpRouteEntries[pfx].bgpRoutePaths.0.routeType.valid- route validity
I don't know about you but I really don't fancy copy pasting that into all places I would need to access these.
So here's what we can do to make it a bit easier, and more obvious, for ourselves.
{% macro print_route_info(sh_bgpr) -%}
{% for route, routenfo in vrfs.default.bgpRouteEntries.items() -%}
Route: {{ route }} - Next Hop: {{
routenfo.bgpRoutePaths.0.nextHop }} - Permitted: {{
routenfo.bgpRoutePaths.0.routeType.valid }}
{% endfor %}
{%- endmacro -%}

{{ print_route_info(sh_bgp_routes) }}
Route: 10.1.0.1/32 - Next Hop: 10.2.0.0 - Permitted: True
Route: 10.1.0.2/32 - Next Hop: 10.2.0.0 - Permitted: True
Route: 10.1.0.3/32 - Next Hop: 10.2.0.0 - Permitted: True
I moved the logic, and complexity, involved in accessing attributes to a macro called print_route_info. This macro takes output of our show command and then gives us back only what we need.
If we need to access more attributes we'd only have to make changes to the body of our macro.
At the place where we actually need the information we call well named macro and give it the output of the command. This makes it more obvious as to what we're trying to achieve and mechanics of navigating data structures are hidden away.
Branching out inside macro
Let's do another example, this time our macro will have if..else block to show that we can return result depending on conditional checks.
I created data model where BGP peer IP and name are not explicitly listed in the mapping I use for specifying peers. Instead we're pointing each peer entry to local interface over which we want to establish the peering.
We're also assuming here that all of our peerings use /31 mask.
interfaces:
  Ethernet1:
    ip_add: 10.1.1.1/31
    peer: spine1
    peer_intf: Ethernet1
  Ethernet2:
    ip_add: 10.1.1.9/31
    peer: spine2
    peer_intf: Ethernet1

bgp:
  as_no: 65001
  peers:
    - intf: Ethernet1
      as_no: 64512
    - intf: Ethernet2
      as_no: 64512
Using this data model we want to build config for BGP neighbors. Taking advantage of ipaddr filter we can do the following:
- Find 1st IP address in network configured on the linked interface.
- Check if 1st IP address equals IP address configured on the interface.
- If it is equal then IP of BGP peer must be the 2nd IP address in this /31.
- If not then BGP peer IP must be the 1st IP address.
Converting this to Jinja syntax we get the following:
router bgp {{ bgp.as_no }}
{%- for peer in bgp.peers -%}
{% set fst_ip = interfaces[peer.intf].ip_add | ipaddr(0) -%}
{% if our_ip == fst_ip -%}
{% set peer_ip = fst_ip | ipaddr(1) | ipaddr('address') -%}
{% else -%}
{% set peer_ip = fst_ip | ipaddr('address') -%}
{% endif %}
 neighbor {{ peer_ip }} remote-as {{ peer.as_no }}
 neighbor {{ peer_ip }} description {{ interfaces[peer.intf].peer }}
{%- endfor %}
And this is the result of rendering:
router bgp 65001
 neighbor 10.1.1.0 remote-as 64512
 neighbor 10.1.1.0 description spine1
 neighbor 10.1.1.8 remote-as 64512
 neighbor 10.1.1.8 description spine2
Job done. We got what we wanted, neighbor IP worked out automatically from IP assigned to local interface.
But, the longer I look at it the more I don't like feel of this logic and manipulation preceding the actual neighbor statements.
You also might want to use the logic of working out peer IP elsewhere in the template which means copy pasting. And if later you change mask on the interface or want to change data structure slightly you'll have to find all the places with the logic and make sure you change all of them.
I'd say this case is another good candidate for building a macro.
So I'm going to move logic for working out peer IP to the macro that I'm calling peer_ip. This macro will take one argument local_intf which is the name of the interface for which we're configuring peering.
If you compare this version with non-macro version you can see that most of the code is the same except that instead of setting final value and assigning it to variable we use substitution statements.
{% macro peer_ip(local_intf) -%}
{% set local_ip = interfaces[local_intf].ip_add -%}
{% set fst_ip = local_ip | ipaddr(0) -%}
{% if fst_ip == local_ip -%}
{{ fst_ip | ipaddr(1) | ipaddr('address') -}}
{% else -%}
{{ fst_ip | ipaddr('address') -}}
{%- endif -%}
{% endmacro -%}

router bgp {{ bgp.as_no }}
{%- for peer in bgp.peers -%}
{%- set bgp_peer_ip = peer_ip(peer.intf) %}
 neighbor {{ bgp_peer_ip }} remote-as {{ peer.as_no }}
 neighbor {{ bgp_peer_ip }} description {{ interfaces[peer.intf].peer }}
{%- endfor %}
We use this macro in exactly one place in our function, we assign value it returns to variable bgp_peer_ip. We can then use bgp_peer_ip in our neighbor statements.
{%- set bgp_peer_ip = peer_ip(peer.intf) %}
Another thing that I like about this approach is that we can move macro to its own file and then include it in the templates that use it.
We'll talk about Jinja imports and includes in more details in future posts. However this is such a useful feature that later in this post I will show you short example of macros in their own files.
Macros in macros
Now here's an interesting one. We can pass macros as arguments to other macros. This is similar to Python where functions can be passed around like any other object.
Would we want to do it though? There are certainly cases when that might be useful. I can think of need for having more generic macro producing some result and taking another macro as an argument to enable changing of format used to render result.
This means that we could have parent macro deal with rendering common part of the output we're interested in. Then macro passed as an argument would be responsible for handling difference in rendering specific bit that would be dependent on the needs of the caller.
To illustrate this and make it easier to visualize, consider case of rendering ACL entries. Different vendors could, and often do, use different format for IP source and destination objects. Some will use "net_address/pfxlen", while some will use "net_address wildcard".
We could write multiple ACL rendering macros, one for each case. Another option would be to have if..else logic in larger macro with macro argument deciding which format to use.
Or we can encapsulate logic responsible for format conversion in tiny macros. We then can have macro responsible for ACL rendering that receives format conversion macro as one of the arguments. That is, ACL macro doesn't know how to do rendering and it does not care. It just knows that it will be given macro from outside and that it can apply it where required.
Here's the actual implementation that includes 3 different formatting macros.
Data used for our example:
networks:
  - name: quant_server_net
    prefix: 10.0.0.0/24
    services:
      - computing

svc_def:
  computing:
    - {ip: 10.90.0.5/32, prot: tcp, port: 5008}
    - {ip: 10.91.4.0/255.255.255.0, prot: tcp, port: 5009}
    - {ip: 10.91.6.32/27, prot: tcp, port: 6800}
Template with macros:
{% macro ip_w_wc(ip_net) -%}
{{ ip_net|ipaddr('network') }} {{ ip_net|ipaddr('hostmask')}}
{%- endmacro -%}

{% macro ip_w_netm(ip_net) -%}
{{ ip_net|ipaddr('network') }} {{ ip_net|ipaddr('netmask') }}
{%- endmacro -%}

{% macro ip_w_pfxlen(ip_net) -%}
{{ ip_net|ipaddr('network/prefix') }}
{%- endmacro -%}

{% macro acl_lines(aclobj, src_pfx, pfx_fmt) -%}
{% for line in aclobj %}
 permit {{ line.prot }} {{ pfx_fmt(src_pfx) }} {{ pfx_fmt(line.ip) }}
{%- if line.prot in ['udp', 'tcp'] %} eq {{ line.port }}{% endif -%}
{% endfor -%}
{%- endmacro -%}

{% for net in networks -%}
ip access-list extended al_{{ net.name }}
{%-  for svc in net.services -%}
{{ acl_lines(svc_def[svc], net.prefix, ip_w_pfxlen) }}
{%  endfor -%}
{% endfor -%}
Rendering results with ip_w_wc macro:
ip access-list extended al_quant_server_net
 permit tcp 10.0.0.0 0.0.0.255 10.90.0.5 0.0.0.0 eq 5008
 permit tcp 10.0.0.0 0.0.0.255 10.91.4.0 0.0.0.255 eq 5009
 permit tcp 10.0.0.0 0.0.0.255 10.91.6.32 0.0.0.31 eq 6800
Rendering results with ip_w_netm macro:
ip access-list extended al_quant_server_net
 permit tcp 10.0.0.0 255.255.255.0 10.90.0.5 255.255.255.255 eq 5008
 permit tcp 10.0.0.0 255.255.255.0 10.91.4.0 255.255.255.0 eq 5009
 permit tcp 10.0.0.0 255.255.255.0 10.91.6.32 255.255.255.224 eq 6800
Rendering results with ip_w_pfxlen macro:
ip access-list extended al_quant_server_net
 permit tcp 10.0.0.0/24 10.90.0.5/32 eq 5008
 permit tcp 10.0.0.0/24 10.91.4.0/24 eq 5009
 permit tcp 10.0.0.0/24 10.91.6.32/27 eq 6800
Hopefully now you can see what I'm trying to achieve here. I can use the same parent macro in templates rendering the config for different vendors by simply providing different formatter macro. To top it off, we make our intent clear, yet again.
Our formatting macros can be reused in many places and it's very easy to add new formatters that can be used in ACL macro and elsewhere.
Also by decoupling, and abstracting away, IP prefix formatting we make ACL macro more focused.
A lot of these decisions are down to individual preferences but I feel that this technique is very powerful and it's good to know that it's there when you need it.
Moving macros to a separate file
I'll now show you an example of how a macro can be moved to a separate template file. We will then import the macro and call it from template located in a completely different file.
I decided to take macros we created for displaying IP network in different formats. I'm moving 3 formatting macros to separate file and keeping ACL macro in the original template.
The result is two templates.
ip_funcs.j2:
{% macro ip_w_wc(ip_net) -%}
{{ ip_net|ipaddr('network') }} {{ ip_net|ipaddr('hostmask')}}
{%- endmacro -%}

{% macro ip_w_netm(ip_net) -%}
{{ ip_net|ipaddr('network') }} {{ ip_net|ipaddr('netmask') }}
{%- endmacro -%}

{% macro ip_w_pfxlen(ip_net) -%}
{{ ip_net|ipaddr('network/prefix') }}
{%- endmacro -%}
acl_variants.j2:
{% import 'ip_funcs.j2' as ipfn -%}

{% macro acl_lines(aclobj, src_pfx, pfx_fmt) -%}
{% for line in aclobj %}
 permit {{ line.prot }} {{ pfx_fmt(src_pfx) }} {{ pfx_fmt(line.ip) }}
{%- if line.prot in ['udp', 'tcp'] %} eq {{ line.port }}{% endif -%}
{% endfor -%}
{%- endmacro -%}

Prefix with prefix length ACL:

{% for net in networks -%}
ip access-list extended al_{{ net.name }}
{%-  for svc in net.services -%}
{{ acl_lines(svc_def[svc], net.prefix, ipfn.ip_w_wc) }}
{%  endfor -%}
{% endfor %}

Network with Wildcard ACL:

{% for net in networks -%}
ip access-list extended al_{{ net.name }}
{%-  for svc in net.services -%}
{{ acl_lines(svc_def[svc], net.prefix, ipfn.ip_w_pfxlen) }}
{%  endfor -%}
{% endfor %}

Network with network Mask ACL:

{% for net in networks -%}
ip access-list extended al_{{ net.name }}
{%-  for svc in net.services -%}
{{ acl_lines(svc_def[svc], net.prefix, ipfn.ip_w_netm) }}
{%  endfor -%}
{% endfor -%}
First template ip_funcs.j2 contains formatter macros, and nothing else. Notice also there's no change to the code, we copied these over ad verbatim.
Something interesting happened to our original template, here called acl_variants.j2. First line {% import 'ip_funcs.j2' as ipfn -%} is new and the way we call formatter macros is different now.
Line {% import 'ip_funcs.j2' as ipfn -%} looks like import statement in Python and it works similarly. Jinja engine will look for file called ip_funcs.j2 and will make variables and macros from that file available in namespace ipfn. That is anything found in imported file can be now accessed using ipfn. notation.
And this is how we get to the way we need to call formatters now. For example macro converting IP prefix to network/wildcard form is called with ipfn.ip_w_wc syntax.
For good measure I added all formatting variants to our template and this is the final result:
Prefix with prefix length ACL:

ip access-list extended al_quant_server_net
 permit tcp 10.0.0.0 0.0.0.255 10.90.0.5 0.0.0.0 eq 5008
 permit tcp 10.0.0.0 0.0.0.255 10.91.4.0 0.0.0.255 eq 5009
 permit tcp 10.0.0.0 0.0.0.255 10.91.6.32 0.0.0.31 eq 6800


Network with Wildcard ACL:

ip access-list extended al_quant_server_net
 permit tcp 10.0.0.0/24 10.90.0.5/32 eq 5008
 permit tcp 10.0.0.0/24 10.91.4.0/24 eq 5009
 permit tcp 10.0.0.0/24 10.91.6.32/27 eq 6800


Network with network Mask ACL:

ip access-list extended al_quant_server_net
 permit tcp 10.0.0.0 255.255.255.0 10.90.0.5 255.255.255.255 eq 5008
 permit tcp 10.0.0.0 255.255.255.0 10.91.4.0 255.255.255.0 eq 5009
 permit tcp 10.0.0.0 255.255.255.0 10.91.6.32 255.255.255.224 eq 6800
Moving macros to their own files and importing them from other templates is a very powerful feature. I will be talking more about it in the future post on imports and includes.
Advanced macro usage
Varargs and kwargs
Inside of macros you can access special variables that are exposed by default. Some of them relate to internal plumbing and are not very interesting but few of them you might find use for.
-
varargs- if macro was given more positional arguments than explicitly listed in macro's definition, then Jinja will put them into special variable calledvarargs. You can then iterate over them and process if you feel it makes sense. -
kwargs- similarly tovarargs, any keyword arguments not matching explicitly listed ones will end up inkwargsvariable. This can be iterated over usingkwargs.items()syntax.
Personally I think both of these are not very useful in most of use cases. In the world of web development it might make sense to accept a number of elements for rendering tables, and other HTML items.
In the world of infrastructure automation I prefer explicit arguments and clear intent which I feel is not the case when using special variables.
I do have some contrived examples to show you how that would work if you ever feel you really can make use of this feature.
Below macro takes one explicit argument vid, which specifies VLAN ID we want assigned as access port to interfaces. Any extra positional arguments will be treated as interface names that need to be configured for the given VLAN ID.
{% macro set_access_vlan(vid) -%}
{% for intf in varargs -%}
interface {{ intf }}
  switchport
  switchport mode access
  switchport access vlan {{ vid }}
{% endfor -%}
{%- endmacro -%}

{{ set_access_vlan(10, "Ethernet10", "Ethernet20") }}
Result:
interface Ethernet10
  switchport
  switchport mode access
  switchport access vlan 10
interface Ethernet20
  switchport
  switchport mode access
  switchport access vlan 10
Below is similar macro but this time we have no explicit arguments. We will however read any passed keyword arguments and we treat key as the interface name and value as VLAN ID to assign.
{% macro set_access_vlan() -%}
{% for intf, vid in kwargs.items() -%}
interface {{ intf }}
  switchport
  switchport mode access
  switchport access vlan {{ vid }}
{% endfor -%}
{%- endmacro -%}

{{ set_access_vlan(Ethernet10=10, Ethernet15=15, Ethernet20=20) }}
Render results:
interface Ethernet10
  switchport
  switchport mode access
  switchport access vlan 10
interface Ethernet15
  switchport
  switchport mode access
  switchport access vlan 15
interface Ethernet20
  switchport
  switchport mode access
  switchport access vlan 20
Both of these examples work and even do something potentially useful. These special variables just don't feel right to me but they're there if you ever need them.
call block
Call blocks are constructs that call other macros and are themselves macros, except they have no names, so they're only used at the point they appear.
You use call bocks with {% call called_macro() %}...{% endcal %} syntax.
These work a bit like callbacks since macros they invoke in turn call back to execute call macros. You can see similarities here to our ACL macro that used different formatting macros. We can have many call macros using single named macro, with these call macros allowing variation in logic executed by named macro.
I don't know if there's a historical reason for their existence since I can't really see any advantage of using these over named macros. They are also not very intuitive to use. But again, they're here and maybe you will find need for them.
So contrived example time!
Bellow call macro calls make_acl macro which in turn calls back to execute calling macro:
{% macro make_acl(type, name) -%}
ip access-list {{ type }} {{ name }}
{{- caller() }}
{%- endmacro -%}

{% call make_acl('extended', 'al-ext-01') %}
 permit ip 10.0.0.0 0.0.0.255 10.0.0.0.255
 deny ip any any
{%- endcall %}
Result:
ip access-list extended al-ext-01
 permit ip 10.0.0.0 0.0.0.255 10.0.0.0.255
 deny ip any any
We got some sensible result here, but at what cost? Do you see how ACL lines made it to the body? The magic is in {{ caller() }} line. Here special function caller() essentially executes body of the call block that called make_acl macro.
This is what happened, step by step:
calllaunchedmake_aclmake_aclworked its way through, rendering stuff, until it encounteredcaller()make_aclexecuted calling block withcaller()and inserted resultsmake_aclmoved on pastcaller()through the rest of its body
It works but again I see no advantage over using named macros and passing them explicitly around.
Fun is not over yet though, called macro can invoke caller with arguments.
{% macro acl_lines(aclobj, src_pfx) -%}
{% for line in aclobj %}
 permit {{ line.prot }} {{ caller(src_pfx) }} {{ caller(line.ip) }}
{%- if line.prot in ['udp', 'tcp'] %} eq {{ line.port }}{% endif -%}
{% endfor -%}
{%- endmacro -%}

{% for net in networks -%}
ip access-list extended al_{{ net.name }}
{%-  for svc in net.services -%}

{% call(ip_net) acl_lines(svc_def[svc], net.prefix) -%}
{{ ip_net|ipaddr('network/prefix') }}
{%- endcall -%}

{%  endfor -%}
{% endfor -%}
This is a call block version of our ACL rendering with variable formatters. This time I included formatter inside of the call block. Our block takes ip_net argument which it expects called macro to provide when calling back.
And this is exactly what happens on the below line:
permit {{ line.prot }} {{ caller(src_pfx) }} {{ caller(line.ip) }}
So, we have call block call acl_lines with two arguments. Macro acl_lines then calls call back with caller(src_pfx) and caller(line.ip) fulfilling its contract.
Caveat here is that we cannot reuse our formatter, it's all in the unnamed macro aka call block. Once it executes, that's it, you need a new one if you want to use formatter.
Conclusion
I think that macros are one of the more powerful features of Jinja and you will benefit greatly from learning how to use them. Combined with import you will get reusable, well defined groups of snippets that can be kept separately from other templates. This allows us to extract repeatable, sometimes complex, logic, and make our templates cleaner and easier to follow.
As always, see what works for you. If your macros get unwieldy consider using custom filters. And be careful when using advanced macro features, these should really be only reserved for special cases, if used at all.
I hope you learned something from this post and that it gave you some ideas. More posts on Jinja2 are coming so do pop by every so often to see what's new :)
References
- Jinja2 macros, official docs: https://jinja.palletsprojects.com/en/2.11.x/templates/#macros
- Jinja2 calls, official docs: https://jinja.palletsprojects.com/en/2.11.x/templates/#call
- GitHub repo with resources for this post. Available at: https://github.com/progala/ttl255.com/tree/master/jinja2/jinja-tutorial-p5-macros
This short post shows how you can use Python to convert TCP/UDP port number to port name and vice versa.
Most of us know names of common TCP and UDP ports like 22/ssh, 23/telnet, 80/http or 443/https. We learn these early in our networking careers and many of them are so common that even when woken up middle of the night you'd know 53 is domain aka dns!
But there are also many not-so commonly used ports that have been given names. These ones sometimes show up in firewall logs or are mentioned in literature. Some vendors also try to replace numeric value with a human readable name in the configs and outputs of different commands.
One way or the other, I'd be good to have an easy method of getting port number given its name, and on occasion we might want to get name of particular port number.
There are many ways one could achieve that. We might search web, drop into documentation, or even check /etc/services if we have access to Linux box.
I decided to check if we can do some programmatic translation with Python, seeing as sometimes we could have hundreds of entries to process and I don't fancy doing that by hand.
As it turns out one of the built-in libraries has just what we need. This library is called socket, which has two functions of interest getservbyname and getservbyport. First one translates port name to number, second one does the reverse. Both of them also accept optional protocol name, either tcp or udp. If no protocol is provided we get result as long as there is match for any of these.
Ok, so let's get to it and see some examples.
>>> from socket import getservbyname, getservbyport
>>> getservbyname("ssh")
22
>>> getservbyname("domain", "udp")
53
>>> getservbyname("https", "tcp")
443
Hey, it's working. We can simply use port name but if we want to we can provide protocol name as well.
Naturally we now need to try translating port number to name:
>>> getservbyport(80)
'http'
>>> getservbyport(161, "udp")
'snmp'
>>> getservbyport(21, "tcp")
'ftp'
Again, it's all looking great. Port number on its own translated, same with number and protocol name.
But, there are cases when using just name/number works fine but might fail when protocol is specified as well.
>>> getservbyport(25)
'smtp'

>>> getservbyport(25, "udp")
Traceback (most recent call last):
  File "<stdin>", line 1, in <module>
OSError: port/proto not found

>>> getservbyname("ntp")
123

>>> getservbyname("ntp", "tcp")
Traceback (most recent call last):
  File "<stdin>", line 1, in <module>
OSError: service/proto not found
Ah yes, ntp does not use TCP and smtp is not using UDP either. So this makes sense. Just to be on the safe side however, we can use try..except block and prevent accidents from happening.
>>> try:
...     getservbyname("ntp", "tcp")
... except OSError:
...     print("No matching port number with this protocol")
...
No matching port number with this protocol
But that's not all. There are also rare cases where port can have different name depending on the protocol using it.
>>> getservbyport(21, "udp")
'fsp'
>>> getservbyport(21, "tcp")
'ftp'
>>> getservbyport(512, "udp")
'biff'
>>> getservbyport(512, "tcp")
'exec'
>>> getservbyname("who", "udp")
513
>>> getservbyname("login", "tcp")
513
>>> getservbyname("syslog", "udp")
514
>>> getservbyname("shell", "tcp")
514
Funky, same port, but different names! On the bright side these are all the cases that I could find :)
For completeness, same ports without protocol specified:
>>> getservbyport(21)
'ftp'
>>> getservbyport(512)
'exec'
>>> getservbyport(513)
'login'
>>> getservbyport(514)
'shell'
As you can see TCP name is used by default.
Generally you probably won't care that much so it's fine to use these functions without specifying protocol name.
If you want accuracy however you will need to specify protocol when translating port name/number and enclose your code in try..except block.
Important note
Results returned by getservbyport and getservbyname are OS dependent.
You should generally get the same names/port numbers regardless of the OS but in some cases one OS might have more services defined than the other.
- On Linux based systems you can find port definitions in
/etc/servicesfile. - If you use Windows the equivalent should be found in
%SystemRoot%\system32\drivers\etc\services.
If you want something that is OS independent that can be used for quick searching from CLI I recommend looking at whatportis utility, link in References.
Real-world applications
It's definitely useful for humans to be able to check what port name corresponds to what port number. There are however real-world applications where we might want to deploy our newly acquired knowledge.
For instance, look at the below output taken from Arista device:
veos1#sh ip access-lists so-many-ports
IP Access List so-many-ports
        10 deny tcp 10.0.0.0/24 10.0.1.0/24 eq tcpmux
        20 deny tcp 10.0.0.0/24 10.0.1.0/24 eq systat
        30 deny udp 10.0.0.0/24 10.0.1.0/24 eq daytime
        40 deny tcp 10.0.0.0/24 10.0.1.0/24 eq ssh
        50 deny tcp 10.0.0.0/24 10.0.1.0/24 eq telnet
        60 deny udp 10.0.0.0/24 10.0.1.0/24 eq time
        70 deny tcp 10.0.0.0/24 10.0.1.0/24 eq gopher
        80 deny tcp 10.0.0.0/24 10.0.1.0/24 eq acr-nema
        90 deny udp 10.0.0.0/24 10.0.1.0/24 eq qmtp
        100 permit tcp 10.0.0.0/24 10.0.1.0/24 eq ipx
        110 permit tcp 10.0.0.0/24 10.0.1.0/24 eq rpc2portmap
        120 deny tcp 10.0.0.0/24 10.0.1.0/24 eq svrloc
        130 deny udp 10.0.0.0/24 10.0.1.0/24 eq talk
        140 permit tcp 10.0.0.0/24 10.0.1.0/24 eq uucp
        150 deny tcp 10.0.0.0/24 10.0.1.0/24 eq dhcpv6-server
        160 deny tcp 10.0.0.0/24 10.0.1.0/24 eq submission
        170 permit tcp 10.0.0.0/24 10.0.1.0/24 eq ms-sql-m
It's a made up ACL but one thing stands out, there are no port numbers! Yes, by default Arista will convert port number to a port name both in config and in the output of show commands. In newer versions of EOS you can disable this behaviour but that might not always be allowed.
Real question is, is this a problem? Well, personally most of these port names mean nothing to me so I can't tell if given entry should be there or not. Displaying port names might be a great idea in principle but in my opinion it gets in the way.
Another reason why we might want to stick to port numbers is config abstraction. If I wanted to store this ACL in my Infrastructure as a Code repository I definitely would want to store ports in their numeric format. I don't know what devices I will use in the future and you might want to have multiple system consume this data, so why make it difficult?
Having said that, I wrote a small example program to quickly convert these port names.
from pathlib import Path
from socket import getservbyname

def main():
    with Path("arista-sh-acl.txt").open() as fin:
        aces = [line for line in fin.read().split("\n") if line]

    aces_clean = []
    for ace in aces:
        units = ace.strip().split(" ")
        prot = units[2]
        port = units[-1]
        if not port.isdigit():
            try:
                port_no = getservbyname(port, prot)
                aces_clean.append(" ".join(units[:-1] + [str(port_no)]))
            except OSError:
                print(f"Couldn't translate port name '{port}' for protocol {prot}")

    print("\n".join(aces_clean))

if __name__ == "__main__":
    main()
I saved lines of my ACL in file named arista-sh-acl.txt and ran the program:
(venv) przemek@quark:~/netdev/prot_names$ python acl_no_prot_names.py
Couldn't translate port name 'qmtp' for protocol udp
Couldn't translate port name 'ipx' for protocol tcp
Couldn't translate port name 'dhcpv6-server' for protocol tcp
10 deny tcp 10.0.0.0/24 10.0.1.0/24 eq 1
20 deny tcp 10.0.0.0/24 10.0.1.0/24 eq 11
30 deny udp 10.0.0.0/24 10.0.1.0/24 eq 13
40 deny tcp 10.0.0.0/24 10.0.1.0/24 eq 22
50 deny tcp 10.0.0.0/24 10.0.1.0/24 eq 23
60 deny udp 10.0.0.0/24 10.0.1.0/24 eq 37
70 deny tcp 10.0.0.0/24 10.0.1.0/24 eq 70
80 deny tcp 10.0.0.0/24 10.0.1.0/24 eq 104
110 permit tcp 10.0.0.0/24 10.0.1.0/24 eq 369
120 deny tcp 10.0.0.0/24 10.0.1.0/24 eq 427
130 deny udp 10.0.0.0/24 10.0.1.0/24 eq 517
140 permit tcp 10.0.0.0/24 10.0.1.0/24 eq 540
160 deny tcp 10.0.0.0/24 10.0.1.0/24 eq 587
170 permit tcp 10.0.0.0/24 10.0.1.0/24 eq 1434
Promising, but why did it fail on 3 names? Well it turns out that Ubuntu I'm running this on has only one protocol listed next to some of the definitions while Arista translates ports regardless of protocol.
Solution in this case is to just ignore protocol and ask for any definition, updated program below:
from pathlib import Path
from socket import getservbyname

def main():
    with Path("arista-sh-acl.txt").open() as fin:
        aces = [line for line in fin.read().split("\n") if line]

    aces_clean = []
    for ace in aces:
        units = ace.strip().split(" ")
        prot = units[2]
        port = units[-1]
        if not port.isdigit():
            try:
                port_no = getservbyname(port)
                aces_clean.append(" ".join(units[:-1] + [str(port_no)]))
            except OSError:
                print(f"Couldn't translate port name '{port}' for protocol {prot}")

    print("\n".join(aces_clean))

if __name__ == "__main__":
    main()
Let's run it again:
(venv) przemek@quark:~/netdev/prot_names$ python acl_no_prot_names.py
10 deny tcp 10.0.0.0/24 10.0.1.0/24 eq 1
20 deny tcp 10.0.0.0/24 10.0.1.0/24 eq 11
30 deny udp 10.0.0.0/24 10.0.1.0/24 eq 13
40 deny tcp 10.0.0.0/24 10.0.1.0/24 eq 22
50 deny tcp 10.0.0.0/24 10.0.1.0/24 eq 23
60 deny udp 10.0.0.0/24 10.0.1.0/24 eq 37
70 deny tcp 10.0.0.0/24 10.0.1.0/24 eq 70
80 deny tcp 10.0.0.0/24 10.0.1.0/24 eq 104
90 deny udp 10.0.0.0/24 10.0.1.0/24 eq 209
100 permit tcp 10.0.0.0/24 10.0.1.0/24 eq 213
110 permit tcp 10.0.0.0/24 10.0.1.0/24 eq 369
120 deny tcp 10.0.0.0/24 10.0.1.0/24 eq 427
130 deny udp 10.0.0.0/24 10.0.1.0/24 eq 517
140 permit tcp 10.0.0.0/24 10.0.1.0/24 eq 540
150 deny tcp 10.0.0.0/24 10.0.1.0/24 eq 547
160 deny tcp 10.0.0.0/24 10.0.1.0/24 eq 587
170 permit tcp 10.0.0.0/24 10.0.1.0/24 eq 1434
Much better now. All names have been translated to numbers!
So there you have it. You should now know how to use Python to translate between port numbers and their names. If you ever need to normalize output from network devices or other systems you'll know how to do it programmatically.
References
- Python
socketlibrary: https://docs.python.org/3/library/socket.html - OS independent utility for port number to name conversion: https://github.com/ncrocfer/whatportis
- GitHub repo with source code for this post: GitHub repository with code for this post
Contents
- Introduction
- Problem description.
- Discovery and research phase
- Plan of action
- Writing tests
- Closing thoughts
- References
- GitHub repository with code for this post
Introduction
In this post we're going to write Python program that generates DSCP to ToS conversion table while avoiding hardcoding values as much as possible. We will then save the final table to csv file with pre-defined column headers.
I got the idea for this blog article from the tweet posted the other day by Nick Russo. I thought it is an interesting problem to tackle as similar ones pop up all the time during early stages of Network Automation journey. What makes this challenge great is that it requires us to carry out tasks that apply to writing larger programs.
- We need to understand the problem and possibly do some research.
- We have to come up with plan of action.
- We need to break down larger tasks into smaller pieces.
- We need to implement all of the pieces we identified.
- Finally we have to put pieces back together and make sure final product works.
Before you continue reading this post I encourage you to try to implement solution to this problem yourself. Programming really is one of those skills that you learn best by doing. Once you've got something in place you can come back and see how I tackled this.
Full disclosure, I posted my hastily put together initial solution on Twitter but I made a lot of tweaks since then. It was lunch time and your first solution will rarely be the final one :) You can find it on Github, with few revisions due to several mistakes, and see how it evolved into solution I'm presenting here.
Problem description.
Our goal is to produce DSCP to ToS conversion table, additionally we need to provide multiple representations and bit values for each DSCP and ToS code. The end result should resemble the following CSV:

Discovery and research phase
There is quite a lot going on here but few patterns become apparent quite quickly.
We can see that some columns show the same value with the only change being number base. DSCP and ToS codes are shown in binary, decimal and hexadecimal bases. This is something we should be able to tackle even without understanding much about meaning of DSCP and ToS codes.
Looking at the entries it also appears that ToS = DSCP x 4. But we should not take this for granted, we should do research and refer to documents defining DSCP and ToS. Humans have tendency to see patterns everywhere and this can sometimes make us come up with good solution to a wrong problem.
With that being said I searched for RFC that can help us with understanding what DSCP and ToS are.
Below ToS definition is taken from RFC795:
The IP Type of Service has the following fields:

   Bits 0-2:  Precedence.
   Bit    3:  0 = Normal Delay,      1 = Low Delay.
   Bits   4:  0 = Normal Throughput, 1 = High Throughput.
   Bits   5:  0 = Normal Relibility, 1 = High Relibility.
   Bit  6-7:  Reserved for Future Use.

      0     1     2     3     4     5     6     7
   +-----+-----+-----+-----+-----+-----+-----+-----+
   |                 |     |     |     |     |     |
   |   PRECEDENCE    |  D  |  T  |  R  |  0  |  0  |
   |                 |     |     |     |     |     |
   +-----+-----+-----+-----+-----+-----+-----+-----+

   111 - Network Control
   110 - Internetwork Control
   101 - CRITIC/ECP
   100 - Flash Override
   011 - Flash
   010 - Immediate
   001 - Priority
   000 - Routine
You might have noticed that some items here match elements in our table. Precedence bits 0-2 match binary and decimal ToS Precedence columns as well as the ToS String Format. Bits 3, 4 and 5 match ToS Delay, Throughput and Reliability.
So we figured quite a lot already by noticing that same value is represented in different base number bases and then by looking at one RFC describing ToS.
We now need to figure out DSCP class codepoints (1st column) and understand how does DSCP map to ToS.
And to do that we'll look at more RFCs.
RFC2474 says this about DSCP:
   A replacement header field, called the DS field, is defined, which is
   intended to supersede the existing definitions of the IPv4 TOS octet
   [RFC791] and the IPv6 Traffic Class octet [IPv6].

   Six bits of the DS field are used as a codepoint (DSCP) to select the
   PHB a packet experiences at each node.  A two-bit currently unused
   (CU) field is reserved and its definition and interpretation are
   outside the scope of this document.  The value of the CU bits are
   ignored by differentiated services-compliant nodes when determining
   the per-hop behavior to apply to a received packet.

   The DS field structure is presented below:


        0   1   2   3   4   5   6   7
      +---+---+---+---+---+---+---+---+
      |         DSCP          |  CU   |
      +---+---+---+---+---+---+---+---+

        DSCP: differentiated services codepoint
        CU:   currently unused
Aha! So we now know that ToS uses 8 bits and DSCP uses just first 6 bits of the same byte in the IP header. From that follows that when converting from DSCP to ToS we will have to shift our number by two bits to the left.
But what does that mean? Well, each bit we shift our value by equals to multiplying by 2. In example below we shift binary number 0010 (decimal 2) to the left by 2 bits with resulting number being binary 1000 (decimal 8).
bin 0010 - dec 2

shift by 2 bits to the left

bin 1000 - dec 8
Hopefully now you can see that our initial hunch was correct, ToS = DSCP x 4, but now you also know why, which is much more important.
Great, so we have pretty much all pieces of the puzzle now. Let's find out what are the names of DSCP codepoints.
RFC4594 has this to say on the topic:
    ------------------------------------------------------------------
   |   Service     |  DSCP   |    DSCP     |       Application        |
   |  Class Name   |  Name   |    Value    |        Examples          |
   |===============+=========+=============+==========================|
   |Network Control|  CS6    |   110000    | Network routing          |
   |---------------+---------+-------------+--------------------------|
   | Telephony     |   EF    |   101110    | IP Telephony bearer      |
   |---------------+---------+-------------+--------------------------|
   |  Signaling    |  CS5    |   101000    | IP Telephony signaling   |
   |---------------+---------+-------------+--------------------------|
   | Multimedia    |AF41,AF42|100010,100100|   H.323/V2 video         |
   | Conferencing  |  AF43   |   100110    |  conferencing (adaptive) |
   |---------------+---------+-------------+--------------------------|
   |  Real-Time    |  CS4    |   100000    | Video conferencing and   |
   |  Interactive  |         |             | Interactive gaming       |
   |---------------+---------+-------------+--------------------------|
   | Multimedia    |AF31,AF32|011010,011100| Streaming video and      |
   | Streaming     |  AF33   |   011110    |   audio on demand        |
   |---------------+---------+-------------+--------------------------|
   |Broadcast Video|  CS3    |   011000    |Broadcast TV & live events|
   |---------------+---------+-------------+--------------------------|
   | Low-Latency   |AF21,AF22|010010,010100|Client/server transactions|
   |   Data        |  AF23   |   010110    | Web-based ordering       |
   |---------------+---------+-------------+--------------------------|
   |     OAM       |  CS2    |   010000    |         OAM&P            |
   |---------------+---------+-------------+--------------------------|
   |High-Throughput|AF11,AF12|001010,001100|  Store and forward       |
   |    Data       |  AF13   |   001110    |     applications         |
   |---------------+---------+-------------+--------------------------|
   |    Standard   | DF (CS0)|   000000    | Undifferentiated         |
   |               |         |             | applications             |
   |---------------+---------+-------------+--------------------------|
   | Low-Priority  |  CS1    |   001000    | Any flow that has no BW  |
   |     Data      |         |             | assurance                |
    ------------------------------------------------------------------

                Figure 3. DSCP to Service Class Mapping
Just what we needed! All of the DSCP names and corresponding values in one place.
This has been great but notice that we didn't write a single line of code! And this is how it should be. Often you will feel like jumping right in and getting those Python statements flowing. I would however advise you to spend some time to understand the problem first, you might find out that once you have better grasp of the task it will make it easier to write your code.
With that said, I think we're ready to get our hands dirty :)
Plan of action
I decided to split this problem by treating value generation for each column as a separate task to implement. I'm also separating generation of values from rendering of the whole table and from writing the table to the CSV file.
Here's my high level plan of action.
- Decide on what are the initial values.
- Generate each of the resulting values from initial values.
- Put values together to form table row.
- Generate final conversion table.
- Write conversion table to CSV file.
Initial values
I'm going to start with choosing initial values from which we will derive all of the other items. Natural choice here will be DSCP or ToS codes. You can't go wrong with either but I'll pick DSCP because numbers are smaller and they look more familiar to me.
Looking at DSCP codes in the table from the beginning of the post we have 0, then jump to 8, and then numbers increase by 2 all the way to 40. So that's a nice pattern. Finally we have numbers 46, 48 and 56.
From that we could define a list and type all of the numbers by hand, like so:
dscps_dec = [0, 8, 10, 12, 14, 16, 18, 20, 22, 24, 26, 28, 30, 32, 34, 36, 38, 40, 46, 48, 56]
This is a bit verbose though and our original problem asked to use logic where possible, within reason as we want this code to be easy to understand.
Below is what I ended up doing:
dscps_dec = (0, *range(8, 41, 2), 46, 48, 56)
I created a tuple, with 0, 46, 48, 56 typed manually and the numbers between 8 and 40 are unpacked from sequence returned by range().
DSCP to ToS conversion and different number bases
Now that we have our DSCP values we can start looking into generating remaining elements.
First let's get on with DSCP to ToS conversion and representations in different number bases. This should be a good warm up before more involving tasks.
For converting to binary and hexadecimal we'll employ Python's string format() method:
"{:06b}".format(dscp)
"{:#04x}".format(dscp)
And a little test:
>>> dscp = 22
>>> print("{:06b}".format(dscp))
010110
>>> print("{:#04x}".format(dscp))
0x16
That's looking good. Let's look more closely at what's happening here.
-
"{:06b}"-bmeans take provided number and display it in binary base,6makes field 6 characters wide and0adds 0s in the front if the resulting number has less than 6 digits. -
{:#04x}-xmeans display number in hexadecimal base,4makes field 4 characters wide,0prepends 0s if needed and#asks for display of base indicator0x.
Not too bad. We've got 3 columns sorted out, now we'll tackle ToS numbers.
We already found out that we need to shift DSCP number by two bits to arrive at ToS value. We could multiply DSCP by 4 but to emphasize our intent here we'll use Python's bitwise operator <<.
tos_dec = dscp << 2
And some tests:
>>> dscp = 16
>>> tos_dec = dscp << 2
>>> tos_dec
64
>>> dscp = 28
>>> tos_dec = dscp << 2
>>> tos_dec
112
With that in hand we can now get bin and hex values, we'll use similar string formatting as we did for DSCP but we'll make binary string field 8 characters wide as ToS values use all 8 bits.
"{:#04x}".format(tos_dec)
"{:08b}".format(tos_dec)
>>> tos_dec = 112
>>> print("{:08b}".format(tos_dec))
01110000
>>> print("{:#04x}".format(tos_dec))
0x70
Perfect, two more columns ticked off.
ToS Precedence, Delay, Throughput and Reliability
Let's move onto ToS Precedence and Delay, Throughput and Reliability bits. We know that Precedence is encoded by bits 0-2. And we just computed binary number so perhaps we can reuse that?
Here's what I did:
tos_bin = "{:08b}".format(tos_dec)
tos_prec_bin = tos_bin[:3]
And a little test:
>>> tos_dec = 112
>>> tos_bin = "{:08b}".format(tos_dec)
>>> tos_prec_bin = tos_bin[:3]
>>> tos_prec_bin
'011'
Since we'll be using binary ToS value on it's own and to help us get ToS Precedence value, I assigned result of binary base conversion to a variable. That variable now holds a reference to a string from which we need first 3 digits for ToS Precedence. We can use list slicing here, and assign the slice to a new variable.
We got ToS precedence in binary but we also need it in decimal form. We can take advantage of built-in int() function that can take string representation of number with optional base, and will give use back decimal.
int(tos_prec_bin, 2)
We feed it result from our previous assignment of tos_prec_bin:
>>> int(tos_prec_bin, 2)
3
Hey, it works! This is going quite well so far.
We still got 3 single bits to work out. We can see in RFC795 that we need to check if bit at given position is set or not. We will also need to check bits in 3 different places, so it makes sense to encapsulate this logic in the separate function.
To check if bit is set we should look at bitwise AND which in Python is done with & operator.
Ok, but what do we AND with what? On one side we will have our ToS number but we need to figure the other side.
Looking again at the diagram taken from RFC we see that bits are counted from left to right, starting with bit 0.
      0     1     2     3     4     5     6     7
   +-----+-----+-----+-----+-----+-----+-----+-----+
   |                 |     |     |     |     |     |
   |   PRECEDENCE    |  D  |  T  |  R  |  0  |  0  |
   |                 |     |     |     |     |     |
   +-----+-----+-----+-----+-----+-----+-----+-----+
To check bits 3, 4 and 5 we could use corresponding binary numbers:
0b00010000
0b00001000
0b00000100
If we apply bitwise AND to first binary number 0b00010000 and whatever value we pass, we will get 0b00010000 only if passed number has bit 3 set to 1. Otherwise end result will be 0.
Here's an example of how that would work:
>>> tos_bin = 0b0011_0000
>>> bw_and_res = tos_bin & 0b0001_0000
>>> "{:#010b}".format(bw_and_res)
'0b00010000'
Hopefully now you can see that bitwise AND operator can help us check if given bit is set or not.
There's one slight problem though, we want to get back number 1 if bit is set or 0 if it is not. Right now we get back 8-bit binary number. We'll now fix it and encapsulate the logic in the function named kth_bit8_val.
def kth_bit8_val(byte, k):
    """
    Returns value of k-th bit

    Most Significant Bit, bit-0, on the Left

    :param byte: 8 bit integer to check
    :param k: bit value to return
    :return: 1 if bit is set, 0 if not
    """
    return 1 if byte & (0b1000_0000 >> k) else 0
Our function is essentially one liner that does the following:
-
Takes provided number in
byteargument and k-th bit to check inkargument. -
Shifts binary number
0b10000000to right by k bits with(0b1000_0000 >> k). This prepares our mask for bitwise AND operation. If we wanted to check bit 3 we'd get0b00010000. Remember we count from 0. -
With mask in place we can AND our number with the mask
(byte & (0b1000_0000 >> k). Result will be either binary number 0 or binary number equal to our mask if the required bit is set, e.g.0b00010000. -
Because we don't want the 8-bit binary number but just 1 or 0, we write short
if..elsestatement that returns 0 if binary number is 0 or 1 if it's anything else.
Here's an example of our function in action:
>>> tos_val = 152
>>> kth_bit8_val(tos_val, 3)
1
>>> kth_bit8_val(tos_val, 4)
1
>>> kth_bit8_val(tos_val, 5)
0
With our function in place we can now get values for ToS Delay, Throughput and Reliability bits:
kth_bit8_val(tos_dec, 3)
kth_bit8_val(tos_dec, 4)
kth_bit8_val(tos_dec, 5)
Let's try these out:
>>> tos_dec = 88
>>> kth_bit8_val(tos_dec, 3)
1
>>> kth_bit8_val(tos_dec, 4)
1
>>> kth_bit8_val(tos_dec, 5)
0
>>> f"{tos_dec:08b}"
'01011000'
As you can see we got correct values for bits 3, 4 and 5. Another task completed :).
ToS string formats
We now only have 2 tasks left, getting DSCP class and ToS string format. These will require some manual typing but we can still have decent amount of logic.
First we'll get ToS string format out of the way.
If you look at RFC795 excerpt again you should see that ToS strings depend on the value of ToS Precedence field.
      0     1     2     3     4     5     6     7
   +-----+-----+-----+-----+-----+-----+-----+-----+
   |                 |     |     |     |     |     |
   |   PRECEDENCE    |  D  |  T  |  R  |  0  |  0  |
   |                 |     |     |     |     |     |
   +-----+-----+-----+-----+-----+-----+-----+-----+

   111 - Network Control
   110 - Internetwork Control
   101 - CRITIC/ECP
   100 - Flash Override
   011 - Flash
   010 - Immediate
   001 - Priority
   000 - Routine
And we already have that, we used int(tos_prec_bin, 2) before to get value of ToS Precedence field in decimal. Let's assign this to a variable.
Next we'll create a dictionary with keys being all possible ToS numbers and values in dictionary being corresponding strings.
tos_prec_dec = int(tos_prec_bin, 2)

TOS_STRING_TBL = {
    0: "Routine",
    1: "Priority",
    2: "Immediate",
    3: "Flash",
    4: "FlashOverride",
    5: "Critical",
    6: "Internetwork Control",
    7: "Network Control",
}
With tos_prec_dec variable in place we can use its value to get from dictionary corresponding string format.
TOS_STRING_TBL[tos_prec_dec]
Example use:
>>> tos_prec_bin = "110"
>>> tos_prec_dec = int(tos_prec_bin, 2)
>>> TOS_STRING_TBL[tos_prec_dec]
'Internetwork Control'
>>> tos_prec_bin = "010"
>>> tos_prec_dec = int(tos_prec_bin, 2)
>>> TOS_STRING_TBL[tos_prec_dec]
'Immediate'
That seems to be working fine, awesome! Only one more task left. Getting DSCP class.
DSCP classes
Let's have a look again at what RFC2579 and RFC4594 say about DSCP classes.
RFC2597:
   The RECOMMENDED values of the AF codepoints are as follows: AF11 = '
   001010', AF12 = '001100', AF13 = '001110', AF21 = '010010', AF22 = '
   010100', AF23 = '010110', AF31 = '011010', AF32 = '011100', AF33 = '
   011110', AF41 = '100010', AF42 = '100100', and AF43 = '100110'.  The
   table below summarizes the recommended AF codepoint values.

                        Class 1    Class 2    Class 3    Class 4
                      +----------+----------+----------+----------+
     Low Drop Prec    |  001010  |  010010  |  011010  |  100010  |
     Medium Drop Prec |  001100  |  010100  |  011100  |  100100  |
     High Drop Prec   |  001110  |  010110  |  011110  |  100110  |
                      +----------+----------+----------+----------+
RFC4594 has this to say on the topic:
    ------------------------------------------------------------------
   |   Service     |  DSCP   |    DSCP     |       Application        |
   |  Class Name   |  Name   |    Value    |        Examples          |
   |===============+=========+=============+==========================|
   |Network Control|  CS6    |   110000    | Network routing          |
   |---------------+---------+-------------+--------------------------|
   | Telephony     |   EF    |   101110    | IP Telephony bearer      |
   |---------------+---------+-------------+--------------------------|
   |  Signaling    |  CS5    |   101000    | IP Telephony signaling   |
   |---------------+---------+-------------+--------------------------|
   | Multimedia    |AF41,AF42|100010,100100|   H.323/V2 video         |
   | Conferencing  |  AF43   |   100110    |  conferencing (adaptive) |
   |---------------+---------+-------------+--------------------------|
   |  Real-Time    |  CS4    |   100000    | Video conferencing and   |
   |  Interactive  |         |             | Interactive gaming       |
   |---------------+---------+-------------+--------------------------|
   | Multimedia    |AF31,AF32|011010,011100| Streaming video and      |
   | Streaming     |  AF33   |   011110    |   audio on demand        |
   |---------------+---------+-------------+--------------------------|
   |Broadcast Video|  CS3    |   011000    |Broadcast TV & live events|
   |---------------+---------+-------------+--------------------------|
   | Low-Latency   |AF21,AF22|010010,010100|Client/server transactions|
   |   Data        |  AF23   |   010110    | Web-based ordering       |
   |---------------+---------+-------------+--------------------------|
   |     OAM       |  CS2    |   010000    |         OAM&P            |
   |---------------+---------+-------------+--------------------------|
   |High-Throughput|AF11,AF12|001010,001100|  Store and forward       |
   |    Data       |  AF13   |   001110    |     applications         |
   |---------------+---------+-------------+--------------------------|
   |    Standard   | DF (CS0)|   000000    | Undifferentiated         |
   |               |         |             | applications             |
   |---------------+---------+-------------+--------------------------|
   | Low-Priority  |  CS1    |   001000    | Any flow that has no BW  |
   |     Data      |         |             | assurance                |
    ------------------------------------------------------------------

                Figure 3. DSCP to Service Class Mapping
So it looks like we can build our logic by looking at first 3 bits and then 2 bits after that. Last bit is always set to 0 so we can ignore it.
Now, if you remember, bits 0-2 correspond to ToS Precedence value, and we already worked that out. Bits 3 and 4 are ToS Delay and Throughput bits, which we know already as well.
It looks like we can pass the values we previously computed to a function and then inside of the function we'll work out the DSCP name.
Below is what I came up with:
def dscp_class(bits_0_2, bit_3, bit_4):
    """
    Takes values of DSCP bits and computes dscp class

    Bits 0-2 decide major class
    Bit 3-4 decide drop precedence

    :param bits_0_2: int: decimal value of bits 0-2
    :param bit_3: int: value of bit 3
    :param bit_4: int: value of bit 4
    :return: DSCP class name
    """
    bits_3_4 = (bit_3 << 1) + bit_4
    if bits_3_4 == 0:
        dscp_cl = "cs{}".format(bits_0_2)
    elif (bits_0_2, bits_3_4) == (5, 3):
        dscp_cl = "ef"
    else:
        dscp_cl = "af{}{}".format(bits_0_2, bits_3_4)

    return dscp_cl
We take 3 arguments since we will have those available from earlier computations. So we get separately bits 0-2, bit 3 and bit 4.
First we compute decimal value held by bits 3 and 4 as this decides precedence drop.
bits_3_4 = (bit_3 << 1) + bit_4
With that in hand we can start building if..else logic.
We know that if bits 3 and 4 are equal to 0 we're dealing with cs class. The actual number of the cs class is decided by bits 0-2, and we know value of those. So we can insert that value into the string:
if bits_3_4 == 0:
    dscp_cl = "cs{}".format(bits_0_2)
Next off we're dealing with an exception, ef class. Here we need to check if bits 0-2 equal to 5 and bits 3-4 equal to 3 as per RFC table:
| Telephony | EF | 101110 | IP Telephony bearer |
elif (bits_0_2, bits_3_4) == (5, 3):
    dscp_cl = "ef"
Finally to build string for af class we append value held in bits 0-2 followed by value held in bits 3-4:
else:
    dscp_cl = "af{}{}".format(bits_0_2, bits_3_4)
Let's see the completed function in action:
>>> tos_prec = 0b001
>>> tos_del = 0
>>> tos_thr = 0
>>> dscp_class(tos_prec, tos_del, tos_thr)
'cs1'
>>> tos_prec = 0b010
>>> tos_del = 1
>>> tos_thr = 1
>>> dscp_class(tos_prec, tos_del, tos_thr)
'af23'
>>> tos_prec = 0b101
>>> tos_del = 1
>>> tos_thr = 1
>>> dscp_class(tos_prec, tos_del, tos_thr)
'ef'
Things are looking good indeed.
And that's it, we've got all of the components in place. Now we need to put them together.
Generating conversion table row
I decided to move building of all of the values for given DSCP code into its own function. It's easier for me to reason about this code, as well as test it later, when it is separated. I named this function dscp_conv_tbl_row:
def dscp_conv_tbl_row(dscp):
    """
    Generates DSCP to ToS conversion values as well as different representations

    :param dscp: int: decimal DSCP code
    :return: dict with each value assigned to value name
    """
    tos_dec = dscp << 2
    tos_bin = "{:08b}".format(tos_dec)
    tos_prec_bin = tos_bin[0:3]
    tos_prec_dec = int(tos_prec_bin, 2)
    tos_del_fl = kth_bit8_val(tos_dec, 3)
    tos_thr_fl = kth_bit8_val(tos_dec, 4)
    tos_rel_fl = kth_bit8_val(tos_dec, 5)
    dscp_cl = dscp_class(tos_prec_dec, tos_del_fl, tos_thr_fl)

    tbl_row_vals = (
        dscp_cl,
        "{:06b}".format(dscp),
        "{:#04x}".format(dscp),
        dscp,
        tos_dec,
        "{:#04x}".format(tos_dec),
        tos_bin,
        tos_prec_bin,
        tos_prec_dec,
        tos_del_fl,
        tos_thr_fl,
        tos_rel_fl,
        TOS_STRING_TBL[tos_prec_dec],
    )

    return tbl_row_vals
We've already seen most of this code, it's just now put together. We're taking DSCP value and computing values for different components that we need in our conversion table. We finally return all of the items in a tuple.
This is how it looks like when we run it:
>>> dscp_conv_tbl_row(28)
('af32', '011100', '0x1c', 28, 112, '0x70', '01110000', '011', 3, 1, 0, 0, 'Flash')
All of the values for one table row. Now we need to write code that computes these tuples for each of DSCP codes we require. Our end goal is to have full table that is saved to CSV. This is a good place to think about how to store the resulting rows.
Building final table
We know we want to save final product in CSV format so generating one big string is probably not a good idea. Either list of dictionary would work best here.
Python comes with built-in library for working with CSV files, named appropriately enough csv. We can use either of its methods writer() or DictWriter() to write our data to file. I opted for DictWriter() as this allows me to automatically map my data structure onto columns in resulting file. I suggest you try out both and see what works better for you.
Now that I know how I want to write to CSV file I know that my rows will be recorded as list of dictionaries. Time to write function that encapsulates this logic:
def gen_dscp_conversion_table():
    """
    Generates DSCP to TOS conversion table with rows for selected DSCP codes

    Final table is a list of dictionaries to make writing CSV easier

    :return: list(dict): final DSCP to TOS conversion table
    """
    column_names = (
        "DSCP Class",
        "DSCP (bin)",
        "DSCP (hex)",
        "DSCP (dec)",
        "ToS (dec)",
        "ToS (hex)",
        "ToS (bin)",
        "ToS Prec. (bin)",
        "ToS Prec. (dec)",
        "ToS Delay Flag",
        "ToS Throughput Flag",
        "ToS Reliability Flag",
        "TOS String Format",
    )
    # These are the DSCP codes we're interested in
    dscps_dec = (0, *range(8, 41, 2), 46, 48, 56)

    conv_tbl = [dict(zip(column_names, dscp_conv_tbl_row(dscp))) for dscp in dscps_dec]

    return conv_tbl
As you can see we first define tuple with column names, these match what will end up in the the CSV file.
Then we create tuple with DSCP values and finally we create list comprehension inside of which we create our dictionaries.
This list comprehension is composed of few elements so I'm going to break it down for you.
-
for dscp in dscps_dec- provides decimal dscp values for which we generate table rows. -
dscp_conv_tbl_row(dscp)- returns tuple with all values for our table row for given dscp. -
zip(column_names, dscp_conv_tbl_row(dscp))- goes over both column names and table row values and pairs 1st item from one with 1st item from second, then it moves to 2nd pair and so on. Result is a sequence of tuples in(column_name, dscp_tbl_row)format. -
dict(zip(column_names, dscp_conv_tbl_row(dscp)))- takes sequence of tuples and turns them into dictionary with 1st element being turned into key and 2nd element becoming value.
The end result of this list comprehension is a list of dictionaries, each dictionary having column names as keys with corresponding values mapped to them.
Writing table to CSV file
We're almost there. All that's left for us to do is to write fruits of our hard labor into the file.
def main():
    dscp_conversion_table = gen_dscp_conversion_table()

    with Path("dscp_tos_conv_table.csv").open(mode="w", newline="") as fout:
        dict_writer = csv.DictWriter(f=fout, fieldnames=dscp_conversion_table[0].keys())

        dict_writer.writeheader()
        dict_writer.writerows(dscp_conversion_table)
-
We're generating the full table first. Then we open file we want to write to, we specify write mode and newline is set to
""as required by csv library. -
Next we create
csv.DictWriter()object giving it our file. We set fieldnames argument to keys from the first dictionary in our list. All dictionaries have the same keys so it doesn't matter which one we take. -
Finally we ask
DictWriterto write header to the file, and then we write to the same file all of the entries in one go. We gaveDictWriterdictionary keys so it's able to map all of the row values automatically.
And with that we came to an end. Or have we?
Yes and no. We built program generating DSCP to ToS conversion table and we wrote the table to CSV file. But, do we know if this works correctly? Do we know if the values it produces are correct? And even if they are correct now, can we be certain that they will stay correct if we modify the program?
The answer is: we don't really know if any of this is correct. Maybe we checked the wrong bit somewhere or maybe there's a typo in a DSCP class name. Even a program that can fit on two pages of text can introduce a fair number of bugs.
Writing tests
You might already think what I'm thinking: testing. We need testing.
So testing we shall have.
In the course of writing our program we created 4 functions:
dscp_classkth_bit8_valdscp_conv_tbl_rowgen_dscp_conversion_table
I want to write tests for 3 of these but not gen_dscp_conversion_table. This one mostly relies on values generated by other 3 and I don't feel like we need to have coverage here.
So, how do we test?
We should look at each of these functions and think of values that will give us good confidence in our code being correct. For example dscp_class has if..else statement so it would be a good idea to test it with values that will make code take all possible paths. On top of that we want to add few cases that follow the most common path.
For my tests I'm using pytest and pytest.mark.parametrize() decorator. This allows me to define multiple test cases and pass them as parameters to our test function. Without it we'd have to write multiple assert statements.
Testing dscp_class
For testing dscp_class I chose values that should result in csX, afXY and ef DSCP classes. This accounts for all branches of if..else statement. To make sure our logic is correct I got few different examples for each of the major classes.
Here are the final test values and test code that I came up with:
@pytest.mark.parametrize(
    "bits_0_2, bit_3, bit_4, res_class",
    [
        (0b000, 0, 0, "cs0"),
        (0b001, 0, 1, "af11"),
        (0b011, 0, 0, "cs3"),
        (0b011, 1, 0, "af32"),
        (0b100, 1, 1, "af43"),
        (0b101, 1, 1, "ef"),
        (0b111, 0, 0, "cs7"),
    ]
)
def test_dscp_class(bits_0_2, bit_3, bit_4, res_class):
    assert dscp_class(bits_0_2, bit_3, bit_4) == res_class
Testing kth_bit8_val
For kth_bit8_val I decided to choose just few values. Corner case here is checking first and last bits, so we need to make sure these are handled correctly. Also each bit can be either set or unset (0 or 1) so we test if both 0 and 1 bit values are picked up.
Here is our test code:
@pytest.mark.parametrize(
    "byte, k_bit, bit_val",
    [
        (0b1000_0000, 0, 1),
        (0b1110_1111, 3, 0),
        (0b0100_0110, 5, 1),
        (0b0000_0001, 7, 1),
    ]
)
def test_kth_bit8_val(byte, k_bit, bit_val):
    assert kth_bit8_val(byte, k_bit) == bit_val
Testing test_gen_table_row
Lastly, we have test_gen_table_row. Here I chose values for 7 different ToS strings as well as values corresponding to different DSCP classes. We also want to test if values are returned in the correct order. If my function passes all of these test I will be fairly confident that it is working correctly.
Testing code:
@pytest.mark.parametrize(
    "dscp_code, conv_row_values",
    [
        (0, ("cs0", "000000", "0x00", 0, 0, "0x00", "00000000", "000", 0, 0, 0, 0, "Routine")),
        (8, ("cs1", "001000", "0x08", 8, 32, "0x20", "00100000", "001", 1, 0, 0, 0, "Priority")),
        (12, ("af12", "001100", "0x0c", 12, 48, "0x30", "00110000", "001", 1, 1, 0, 0, "Priority")),
        (22, ("af23", "010110", "0x16", 22, 88, "0x58", "01011000", "010", 2, 1, 1, 0, "Immediate")),
        (26, ("af31", "011010", "0x1a", 26, 104, "0x68", "01101000", "011", 3, 0, 1, 0, "Flash")),
        (40, ("cs5", "101000", "0x28", 40, 160, "0xa0", "10100000", "101", 5, 0, 0, 0, "Critical")),
        (46, ("ef", "101110", "0x2e", 46, 184, "0xb8", "10111000", "101", 5, 1, 1, 0, "Critical")),
        (48, ("cs6", "110000", "0x30", 48, 192, "0xc0", "11000000", "110", 6, 0, 0, 0, "Internetwork Control")),
        (56, ("cs7", "111000", "0x38", 56, 224, "0xe0", "11100000", "111", 7, 0, 0, 0, "Network Control")),
    ]
)
def test_gen_table_row(dscp_code, conv_row_values):
    assert dscp_conv_tbl_row(dscp_code) == conv_row_values
Running tests
Right, we have test functions, we have test values, time to actually run these tests against our codebase:
F:\projects\dscp_tos_conv
(venv) λ pytest -v
=================== test session starts ======================
platform win32 -- Python 3.8.2, pytest-6.0.1, py-1.9.0, \
pluggy-0.13.1 -- f:\projects\dscp_tos_conv\venv\scripts\python.exe
cachedir: .pytest_cache
rootdir: F:\projects\dscp_tos_conv
collected 20 items

test_dscp_tos_table.py::test_dscp_class[0-0-0-cs0] PASSED
[  5%] test_dscp_tos_table.py::test_dscp_class[1-0-1-af11] PASSED
[ 10%] test_dscp_tos_table.py::test_dscp_class[3-0-0-cs3] PASSED
[ 15%] test_dscp_tos_table.py::test_dscp_class[3-1-0-af32] PASSED
[ 20%] test_dscp_tos_table.py::test_dscp_class[4-1-1-af43] PASSED
[ 25%] test_dscp_tos_table.py::test_dscp_class[5-1-1-ef] PASSED
[ 30%] test_dscp_tos_table.py::test_dscp_class[7-0-0-cs7] PASSED
[ 35%] test_dscp_tos_table.py::test_kth_bit8_val[128-0-1] PASSED
[ 40%] test_dscp_tos_table.py::test_kth_bit8_val[239-3-0] PASSED
[ 45%] test_dscp_tos_table.py::test_kth_bit8_val[70-5-1] PASSED
[ 50%] test_dscp_tos_table.py::test_kth_bit8_val[1-7-1] PASSED
[ 55%] test_dscp_tos_table.py::test_gen_table_row[0-conv_row_values0] PASSED
[ 60%] test_dscp_tos_table.py::test_gen_table_row[8-conv_row_values1] PASSED
[ 65%] test_dscp_tos_table.py::test_gen_table_row[12-conv_row_values2] PASSED
[ 70%] test_dscp_tos_table.py::test_gen_table_row[22-conv_row_values3] PASSED
[ 75%] test_dscp_tos_table.py::test_gen_table_row[26-conv_row_values4] PASSED
[ 80%] test_dscp_tos_table.py::test_gen_table_row[40-conv_row_values5] PASSED
[ 85%] test_dscp_tos_table.py::test_gen_table_row[46-conv_row_values6] PASSED
[ 90%] test_dscp_tos_table.py::test_gen_table_row[48-conv_row_values7] PASSED
[ 95%] test_dscp_tos_table.py::test_gen_table_row[56-conv_row_values8] PASSED
[100%]

=================== 20 passed in 0.07s ================================
Awesome, all of the tests passed!
You might think this looks great but I did make some mistakes in my code before showing you the final run, that's the whole idea of testing, to give you confidence that your code works they way you expect it to. And when it doesn't you go back and fix it :)
Without tests you could miss bugs lurking somewhere so it really is a good idea to get used to creating them alongside your main program. Hopefully I showed you here that no code is too small to have a few tests thrown in for good measure, the future you will be thankful!
Closing thoughts
I had fun working on this challenge. It really is a good use case for problem decomposition, learning string formatting and bit-wise operators. And despite not looking like a tough one at first it did require me to dig a bit deeper and make sure that I understand the problem I'm trying to solve.
Finally after making few silly mistakes during refactoring I was reminded that testing is rarely, if ever, optional. You can get away with not writing tests for long time but sooner or later you'll wish you'd learned it earlier!
I hope you learned something new and enjoyed this post as much as I did writing it :)
References
- Python
csvlibrary: https://docs.python.org/3/library/csv.html - Pytest parametrize: https://docs.pytest.org/en/stable/parametrize.html
- Python string formatting guide: https://realpython.com/python-formatted-output/
- Service Mappings: https://tools.ietf.org/html/rfc795
- Definition of DS Field: https://tools.ietf.org/html/rfc2474
- Assured Forwarding PHB Group: https://tools.ietf.org/html/rfc2597
- Configuration Guidelines for DiffServ: https://tools.ietf.org/html/rfc4594
- GitHub repo with source code for this post: GitHub repository with code for this post
It’s time to have a look at some Network Automation tools. Today I want to introduce you to Vrnetlab, great piece of software that allows you to run virtual routers inside Docker containers. We’ll talk about what Vrnetlab does and what are its selling points. Then we’ll see how to bring up lab devices by hand and how to use them.
Contents
- Vrnetlab overview
- Installing Vrnetlab and its dependencies
- Building images with virtual devices
- Launching virtual devices
- Helper bash functions
- Accessing devices
- Connecting devices together
- Bring up pre-defined topology with Docker Compose
- Conclusion
- References
- GitHub repository with resources for this post
Vrnetlab overview
Vrnetlab provides convenient way of building virtualized network environments by leveraging existing Docker ecosystem.
This means that you can take image of virtual appliance provided by the vendor and use Vrnetlab to create containers for it. The selling point here is that the whole tool-chain was created with automation in mind, that is you can build your network automation CI pipeline on top of Vrnetlab and no human is needed to spin up the environment, and run desired tests or validations.
At the same time, you can still access the virtual devices via telnet or ssh, which is handy for quick labbing. I do that often when I want to make sure I got the CLI syntax right.
It's worth mentioning that Vrnetlab is heavily used at Deutsche Telekom where it was developed by Kristian Larsson @plajjan. So it's not just a tiny pet project, it's very much a grown up tool.
Why Vrnetlab?
Why use Vrnetlab and not GNS3, EVE-NG or some other emulation software? The way I see it, other tools put emphasis on GUI and interactive labbing whereas Vrnetlab is very lightweight with focus on use in automated pipelines. With exception of Docker, which most of the CI/CD systems already use heavily, there’s no actual software to install, it’s mostly container building scripts and helper tools.
Vrnetlab internals
A lot of heavy-lifting in Vrnetlab is done by tools it provides for building Docker container images with virtual appliances, that you get from networking vendors. Inside of final Docker container we have qemu/KVM duo responsible for running virtualized appliances.
Now, if you wanted to run these appliances individually you’d have to understand what’s required for turning them up, what resources they need and how can their virtual interfaces be exposed to the external world, to mention just a few things. And if you ever tried to do it yourself you know that all of this can vary wildly not only from vendor to vendor, but even between virtual images from the same vendor.
With Vrnetlab, you get build and bootstrap scripts for each of the supported appliances. These scripts are responsible for setting things like default credentials, management IPs, uploading licenses or even packaging multiple images in some cases. You don't have to worry about any of that anymore, Vrnetlab takes care of it all.
You can think of it as having an abstraction layer on top of various virtual appliances. Once you built your containers you will be able to access and manage them in standardized fashion regardless of the image they contain.
In other words, Vrnetlab is a perfect match for the world of Network Automation!
Vrnetlab currently supports virtual devices from the following vendors:
- Arista
- Cisco
- Juniper
- Nokia
- Mikrotik
- OpenWrt (Open Source OS)
You can check GitHub repository to see up to date list of available docker image builders.
Few words on Docker
If you haven't used Docker much, don't worry, Docker is used here mostly as packaging system. This allows us to leverage an existing tooling ecosystem. Many CI systems have support for bringing up, running tests within, and tearing down applications packaged as Docker images. You can also use container orchestration systems, like Kubernetes, to launch and control your virtual appliances.
You don’t actually need to know much about Docker apart from few commands which I’ll show you. Also, building steps and examples are well documented in the Vrnetlab repository.
Installing Vrnetlab and its dependencies
Vrnetlab has a few prerequisites and there are some things to look out for so I’m including full installation procedure below.
For reference, this is the setup I used for this blog post:
- VMware Workstation Pro running under Windows
- My virtual machine has virtualization extension enabled
- Guest operating system is fresh install of Ubuntu 20.04.1 LTS
Note: If you’re running Vrnetlab in virtual environment you need to make sure that your environment supports nested virtualization. This is needed by KVM and Vrnetlab won’t work correctly without this.
Installing KVM
- First make sure that virtualization is enabled, 0 means no hw virtualization support, 1 or more is good.
przemek@quark ~$ egrep --count "vmx|smv" /proc/cpuinfo
8
- Install KVM requisite packages.
przemek@quark ~$ sudo apt-get install qemu-kvm libvirt-daemon-system libvirt-clients bridge-utils
- Add your user to groups ‘kvm’ and ‘libvirt’. Logout and login after for changes to take effect.
przemek@quark:~$ sudo adduser `id -un` kvm
Adding user `przemek' to group `kvm' ...
Adding user przemek to group kvm
Done.
przemek@quark:~$ sudo adduser `id -un` libvirt
Adding user `przemek' to group `libvirt' ...
Adding user przemek to group libvirt
Done.
- Confirm KVM is installed and operational. Empty output is fine; if something went wrong you’ll get errors.
przemek@quark:~$ virsh list --all
 Id   Name   State
--------------------
And that’s it for KVM.
Installing Docker engine
- First we need to update package index and get apt ready to install HTTP repos.
przemek@quark:~$ sudo apt-get update

przemek@quark:~$ sudo apt-get install \
    apt-transport-https \
    ca-certificates \
    curl \
    gnupg-agent \
    Software-properties-common
- Next add GPG key for Docker to apt and verify the key matches fingerprint
9DC8 5822 9FC7 DD38 854A E2D8 8D81 803C 0EBF CD88
przemek@quark:~$ curl -fsSL https://download.docker.com/linux/ubuntu/gpg | sudo apt-key add -

przemek@quark:~$ sudo apt-key fingerprint 0EBFCD88

pub   rsa4096 2017-02-22 [SCEA]
      9DC8 5822 9FC7 DD38 854A  E2D8 8D81 803C 0EBF CD88
uid           [ unknown] Docker Release (CE deb) <[email protected]>
sub   rsa4096 2017-02-22 [S]
- Add stable Docker repository to apt.
przemek@quark:~$ sudo add-apt-repository \
   "deb [arch=amd64] https://download.docker.com/linux/ubuntu \
   $(lsb_release -cs) \
   stable"
- Finally update the package index and install Docker Engine and containerd.
przemek@quark:~$ sudo apt-get update
przemek@quark:~$ sudo apt-get install docker-ce docker-ce-cli containerd.io
- Run basic container to confirm installation was successful.
sudo docker run hello-world
- Optionally, add your username to the
dockergroup if you want to use Docker as a non-root user. I tend to do in lab environment but this might not be appropriate for your production environment, so check with your security team before doing this in prod.
przemek@quark:~$ sudo usermod -aG docker `id -un`
Docker is now installed.
Clone Vrnetlab repository
The quickest way to get Vrnetlab is to clone it from its repository:
przemek@quark:~/netdev$ git clone https://github.com/plajjan/vrnetlab.git
Cloning into 'vrnetlab'...
remote: Enumerating objects: 13, done.
remote: Counting objects: 100% (13/13), done.
remote: Compressing objects: 100% (13/13), done.
remote: Total 2558 (delta 3), reused 5 (delta 0), pack-reused 2545
Receiving objects: 100% (2558/2558), 507.67 KiB | 227.00 KiB/s, done.
Resolving deltas: 100% (1567/1567), done.
przemek@quark:~/netdev$ ls
Vrnetlab
And that’s it! Vrnetlab and all of its dependencies are installed and we’re ready to roll!
Building images with virtual devices
I mentioned previously that Vrnetlab provides build scripts for plenty of virtual routers from different vendors. What we don’t however get is the actual images.
Licenses that come with appliances don’t allow repackaging and distribution from sources other than the official channels. We will have to procure images ourselves.
If you don’t have any images handy and you just want to follow this post, you can register for free account with Arista and download image from the below link:
https://www.arista.com/en/support/software-download
You will need two images:
- AbootAboot-veos-serial-8.0.0.iso
- vEOS-lab-4.18.10M.vmdk
They are highlighted in green on the below screenshot:

Once you downloaded the images, you need to copy them to veos directory inside of vrnetlab directory. The end result should match the below output:
przemek@quark:~/netdev/vrnetlab/veos$ ls
Aboot-veos-serial-8.0.0.iso  Makefile   vEOS-lab-4.18.10M.vmdk
docker                       README.md
With files in place we’re ready to kick off Docker image build by running make command inside of the directory:
przemek@quark:~/netdev/vrnetlab/veos$ make
Makefile:18: warning: overriding recipe for target 'docker-pre-build'
../makefile.include:18: warning: ignoring old recipe for target 'docker-pre-build'
for IMAGE in vEOS-lab-4.18.10M.vmdk; do \
	echo "Making $IMAGE"; \
	make IMAGE=$IMAGE docker-build; \
done
Making vEOS-lab-4.18.10M.vmdk

...( cut for brevity )

 ---> Running in f755177783db
Removing intermediate container f755177783db
 ---> 71673f34bae9
Successfully built 71673f34bae9
Successfully tagged vrnetlab/vr-veos:4.18.10M
make[1]: Leaving directory '/home/przemek/netdev/vrnetlab/veos'
If everything worked correctly you should now have a new Docker image available locally. You can confirm that by running docker images command.
przemek@quark:~/netdev/vrnetlab/veos$ docker images vrnetlab/vr-veos
REPOSITORY          TAG                 IMAGE ID            CREATED             SIZE
vrnetlab/vr-veos    4.18.10M            71673f34bae9        32 minutes ago      894MB
You can optionally rename the image, to make the name shorter, or if you want to push it to your local docker registry.
przemek@quark:~$ docker tag vrnetlab/vr-veos:4.18.10M veos:4.18.10M
Now our image has 2 different names:
przemek@quark:~/netdev/repos/nginx-proxy$ docker images | grep 4.18.10
vrnetlab/vr-veos      4.18.10M            71673f34bae9        34 minutes ago      894MB
veos                  4.18.10M            71673f34bae9        34 minutes ago      894MB
You can safely delete the default name if you wish so:
przemek@quark:~/netdev$ docker rmi vrnetlab/vr-veos:4.18.10M
Untagged: vrnetlab/vr-veos:4.18.10M
przemek@quark:~/netdev$ docker images | grep 4.18.10
veos                  4.18.10M            71673f34bae9        53 minutes ago      894MB
Launching virtual devices
With that, all pieces are in place for us to run our first virtual router in Docker!
Run the below command to start container:
docker run -d --name veos1 --privileged veos:4.18.10M
This tells docker to start new container in the background using image we built. Argument --privileged is required by KVM, argument --name gives our chosen name to container, and the last argument veos:4.18.10M is the name of the image.
Here’s the command in action:
przemek@quark:~/netdev/vrnetlab$ docker run -d --name veos1 --privileged veos:4.18.10M
c62299c4785f5f6489e346ea18e88f584b18f6f91e50b7c0490ef4752e926dc8
rzemek@quark:~/netdev/vrnetlab$ docker ps | grep veos1
c62299c4785f veos:4.18.10M "/launch.py" 55 seconds ago
Up 54 seconds (health: starting) 22/tcp, 80/tcp, 443/tcp, 830/tcp, 5000/tcp, 10000-10099/tcp, 161/udp veos1
If all worked you should immediately get back Container ID. After that we can check if container is running with commands docker ps.
In our case container is up but it’s not ready yet, this is because we have (health: starting) in the output of docker ps command. Vrnetlab builds Docker images with a healthcheck script which allows us to check if container is fully up and ready for action.
With vEOS it usually takes around 3 minutes for the container to be fully up. This time will most likely be different for other images.
przemek@quark:~/netdev/vrnetlab$ docker ps | grep veos1
c62299c4785f veos:4.18.10M "/launch.py" 3 minutes ago Up 3 minutes (healthy) 22/tcp, 80/tcp, 443/tcp, 830/tcp, 5000/tcp, 10000-10099/tcp, 161/udp veos1
Here we go, we can see that our virtual device is fully up and ready now.
So what’s next? We should probably log into the device and play around, right?
Wait, but how do we do that? Read on to find out!
Helper bash functions
Vrnetlab comes with few useful functions defined in file vrnetlab.sh. If you use bash as your shell you can load these with command . vrnetlab.sh or source vrnetlab.sh. If that doesn't work you'll have to consult manual for your shell.
przemek@quark:~/netdev/vrnetlab$ ls | grep vrnet
vrnetlab.sh
przemek@quark:~/netdev/vrnetlab$ . vrnetlab.sh
Once your shell loaded the functions you should have access to the below commands.
-
vrcons CONTAINER_NAME- Connects to the console of your virtual device.przemek@quark:~$ vrcons veos1 Trying 172.17.0.4... Connected to 172.17.0.4. Escape character is '^]'. localhost# -
vrssh CONTAINER_NAME [USERNAME]- Login to your device via ssh. If USERNAME is not provided defaultvrnetlabusername is used with default password beingVR-netlab9.Default user:
przemek@quark:~$ vrssh veos1 Last login: Wed Aug 19 19:19:07 2020 from 10.0.0.2 localhost>who Line User Host(s) Idle Location 1 con 0 admin idle 00:04:25 - * 2 vty 7 vrnetlab idle 00:00:05 10.0.0.2Custom username:
przemek@quark:~$ vrssh veos1 przemek Password: localhost> -
vrbridge DEVICE1 DEV1_PORT DEVICE2 DEV2_PORT- Creates connection between interface DEV1_PORT on DEVICE1 and interface DEV2_PORT on DEVICE2.przemek@quark:~$ vrbridge veos1 3 veos2 3 ae8e6807e3817eaa05429a9357ffb887a27ddf844f06be3b293ca92a6e9d4103 przemek@quark:~$ docker ps CONTAINER ID IMAGE COMMAND CREATED STATUS PORTS NAMES ae8e6807e381 vr-xcon "/xcon.py --p2p veos…" 3 seconds ago Up 2 seconds bridge-veos1-3-veos2-3 -
vr_mgmt_ip CONTAINER_NAME- Tells you what IP was assigned to CONTAINER_NAME.przemek@quark:~$ vr_mgmt_ip veos1 172.17.0.4
All of these are very helpful but we’ll mostly be using vrcons and vrbridge in this post.
Accessing devices
Now that we have helper functions loaded into our shell we can access the device.
We’ll use vrcons command to connect to the console of our virtual router:
przemek@quark:~/netdev/vrnetlab$ vrcons veos1
Trying 172.17.0.4...
Connected to 172.17.0.4.
Escape character is '^]'.
localhost#sh ver
Arista vEOS
Hardware version:
Serial number:
System MAC address: 5254.0094.eeff
Software image version: 4.18.10M
Architecture: i386
Internal build version: 4.18.10M-10003124.41810M
Internal build ID: f39d7d34-f2ee-45c5-95a3-c9bd73696ee3
Uptime: 34 minutes
Total memory: 1893312 kB
Free memory: 854036 kB
localhost#
Well, well, look at that, we’re in and everything looks to be in order!
Personally I often do just that, launch a container, test a few commands and I’m out. I just love how quickly you can spin up a test device and then get rid of it after you’re done. There’s hardly anything involved in the setup. You just need to wait a few minutes and it’s all ready for you.
Great, we built container with virtual vEOS, we brought it up and managed to run some commands. But while that can be great for quickly labbing up some commands, we want more, we want to connect virtual devices together. After all that’s what networking is about right? Connect all the things!
Connecting devices together
Before we do anything else, let’s get second container up so that it’s ready when we need it:
przemek@quark:~/netdev/vrnetlab$ docker run -d --name veos2 --privileged veos:4.18.10M
fdd6acadacfea340be16fb47757913d3d9cb803f72bdad6fe7276a6b626c325a
To create connections between devices we need to build special Docker image, called vr-xcon. Containers using this image will provide connectivity between our virtual routes.
To build this image enter directory with vrnetlab repo and then navigate into vr-xcon directory. Once you’re in the directory type make. Vrnetlab scripts will do the rest.
przemek@quark:~/netdev/vrnetlab/vr-xcon$ make
docker build --build-arg http_proxy= --build-arg https_proxy= -t vrnetlab/vr-xcon .
Sending build context to Docker daemon 34.3kB
Step 1/6 : FROM debian:stretch
---> 5df937d2ac6c
Step 2/6 : MAINTAINER Kristian Larsson <[email protected]>
---> Using cache
---> a5bf654bbf7c
Step 3/6 : ENV DEBIAN_FRONTEND=noninteractive
---> Using cache
---> 6d2b8962f440
Step 4/6 : RUN apt-get update -qy && apt-get upgrade -qy && apt-get install -y bridge-utils iproute2 python3-ipy tcpdump telnet && rm -rf /var/lib/apt/lists/*
---> Running in d3df4c947d25
... (cut for brevity)
Removing intermediate container d3df4c947d25
---> fbc93d1624f4
Step 5/6 : ADD xcon.py /
---> 4cb6b8a3c55a
Step 6/6 : ENTRYPOINT ["/xcon.py"]
---> Running in 186f13b11bd8
Removing intermediate container 186f13b11bd8
---> bd1542effee7
Successfully built bd1542effee7
Successfully tagged vrnetlab/vr-xcon:latest
And to confirm that image is now available:
przemek@quark:~$ docker images | grep xcon
vrnetlab/vr-xcon latest bd1542effee7 21 hours ago 152MB
We just need to change its name to just vr-xcon to make it work with Vrnetlab scripts.
przemek@quark:~$ docker tag vrnetlab/vr-xcon:latest vr-xcon
przemek@quark:~$ docker images | grep "^vr-xcon"
vr-xcon latest bd1542effee7 22 hours ago 152MB
Perfect, our veos2 container should be up too now:
przemek@quark:~$ docker ps | grep veos2
7841eb2dd336 veos:4.18.10M "/launch.py" 4 minutes ago Up 4 minutes (healthy) 22/tcp, 80/tcp, 443/tcp, 830/tcp, 5000/tcp, 10000-10099/tcp, 161/udp veos2
Time to connect veos1 to veos2, let's do it the hard way first and then I'll show you the easy way.
przemek@quark:~$ docker run -d --name vr-xcon --link veos1 --link veos2 vr-xcon --p2p veos1/2--veos2/2
bfe3f53cb14d6d6c6d2800a7542f8a0bad6c7347c16a313f9812ed86ef808c3f
Below is the breakdown of the command.
docker run -d - This tells docker to run container in the background.
--name vr-xcon - We want our container to be named vr-xcon, you can call it something different if you want.
--link veos1 --links veos2 - Here we tell Docker to connect vr-xcon to veos1 and veos2 containers. This allows them to discover and talk to each other.
vr-xcon - Second reference to vr-xcon is the name of the image to run.
--p2p veos1/2--veos2/2 - Finally we have arguments that are passed to vr-xcon container. Here we ask for point-to-point connection between veos1 port 2 and veos2 also port 2. Port 1 maps to Management port so port 2 will be Ethernet1 inside the virtual router.
Hopefully you can now see how it all ties together. To confirm container is up and running we'll run docker ps and we'll check container logs.
przemek@quark:~$ docker ps | grep xcon
bfe3f53cb14d vr-xcon "/xcon.py --p2p veos…" 9 minutes ago Up 9 minutes vr-xcon
przemek@quark:~$ docker logs vr-xcon
przemek@quark:~$
Looks promising, container is up and logs are empty, so no errors reported.
But what is that easy way you ask? Remember the vrbridge helper function? We could use that instead:
przemek@quark:~$ vrbridge veos1 2 veos2 2
83557c0406995b17be306cbc365a9c911696221b0542ba2fbb7cdeaf9b442426
przemek@quark:~$ docker ps | grep bridge
83557c040699 vr-xcon "/xcon.py --p2p veos…" 38 seconds ago Up 38 seconds bridge-veos1-2-veos2-2
So that works as well. But you can only use it to create one link between two devices. I use it for quickly creating single links. For more involving jobs I use vr-xcon directly, that's why I wanted to show you exactly how it work.
In any case, we got link in place and we're ready to log into devices and confirm if our newly created connection is up.
We'll configure hostnames so that output from LLDP check includes them. We'll then configure IPs and try pinging across.
przemek@quark:~$ vrcons veos1
Trying 172.17.0.4...
Connected to 172.17.0.4.
Escape character is '^]'.
localhost#conf t
localhost(config)#host veos1
veos1(config)#int eth1
veos1(config-if-Et1)#no switch
veos1(config-if-Et1)#ip add 10.10.0.0/31
veos1(config-if-Et1)#end
veos1#sh lldp ne
Last table change time : 0:00:17 ago
Number of table inserts : 1
Number of table deletes : 0
Number of table drops : 0
Number of table age-outs : 0
Port Neighbor Device ID Neighbor Port ID TTL
Et1 veos2 Ethernet1 120
veos1#ping 10.10.0.1
PING 10.10.0.1 (10.10.0.1) 72(100) bytes of data.
80 bytes from 10.10.0.1: icmp_seq=1 ttl=64 time=788 ms
80 bytes from 10.10.0.1: icmp_seq=2 ttl=64 time=168 ms
80 bytes from 10.10.0.1: icmp_seq=3 ttl=64 time=176 ms
80 bytes from 10.10.0.1: icmp_seq=4 ttl=64 time=108 ms
80 bytes from 10.10.0.1: icmp_seq=5 ttl=64 time=28.0 ms
--- 10.10.0.1 ping statistics ---
5 packets transmitted, 5 received, 0% packet loss, time 2728ms
rtt min/avg/max/mdev = 28.002/253.615/788.050/272.424 ms, ipg/ewma 682.042/508.167 ms
veos1#
przemek@quark:~$ vrcons veos2
Trying 172.17.0.5...
Connected to 172.17.0.5.
Escape character is '^]'.
localhost#conf t
localhost(config)#host veos2
veos2(config)#int e1
veos2(config-if-Et1)#no switch
veos2(config-if-Et1)#ip add 10.10.0.1/31
veos2(config-if-Et1)#end
veos2#sh lldp ne
Last table change time : 0:01:37 ago
Number of table inserts : 1
Number of table deletes : 0
Number of table drops : 0
Number of table age-outs : 0
Port Neighbor Device ID Neighbor Port ID TTL
Et1 veos1 Ethernet1 120
veos2#ping 10.10.0.0
PING 10.10.0.0 (10.10.0.0) 72(100) bytes of data.
80 bytes from 10.10.0.0: icmp_seq=1 ttl=64 time=708 ms
80 bytes from 10.10.0.0: icmp_seq=2 ttl=64 time=148 ms
80 bytes from 10.10.0.0: icmp_seq=3 ttl=64 time=52.0 ms
80 bytes from 10.10.0.0: icmp_seq=4 ttl=64 time=796 ms
80 bytes from 10.10.0.0: icmp_seq=5 ttl=64 time=236 ms
--- 10.10.0.0 ping statistics ---
5 packets transmitted, 5 received, 0% packet loss, time 2484ms
rtt min/avg/max/mdev = 52.003/388.024/796.050/304.145 ms, pipe 2, ipg/ewma 621.038/548.983 ms
veos2#
Look at that! LLDP shows that both devices can see each other. Ping also works with no problems. Fully virtualized lab running in Docker, pretty neat :)
Here we used vr-xcon to create one connection between two devices but you can use single container to connect multiple devices. Or you can use however many containers you want, each providing just one connection, as long as names of the containers are different
What you do depends on your strategy and what you’re trying to achieve. Multiple containers providing connections can make more sense if you plan on simulating links going hard down. You can even start vr-xcon containers with mix of connections that reflect particular failure scenario that you want to test.
Some examples to show you different options.
Creating three links between three devices using one container:
docker run -d --name vr-xcon --link veos1 --link veos2 --link veos3 vr-xcon --p2p veos1/2--veos2/2 veos1/10--veos3/10 veos2/5-veos3/5
And same links created using three instances of vr-xcon container:
docker run -d --name vr-xcon1 --link veos1 --link veos2 vr-xcon --p2p veos1/2--veos2/2
docker run -d --name vr-xcon2 --link veos1 --link veos3 vr-xcon --p2p veos1/10--veos3/10
docker run -d --name vr-xcon3 --link veos2 --link veos3 vr-xcon --p2p veos2/5-veos3/5
Finally, to remove links, or links, you stop/remove the container used to create connections.
przemek@quark:~$ docker rm -f vr-xcon
vr-xcon
For completeness, it's worth mentioning that vr-xcon also provides tap mode with --tap-listen argument. This allows other apps to be used with virtual routers. See Readme for vr-xcon in Vrnetlab repo for more details.
After you're done with your lab and want to get rid of container you should run docker rm -f command.
docker rm -f veos1 veos2
And with that your containers will be gone.
Bring up pre-defined topology with Docker Compose
You should now know how to bring containers by hand and how to connect them. It can get a bit tedious though if you often bring up the same topology for testing. Why not write some kind of lab recipe that we can launch with single command? Well, we can do that and we will!
There are many ways that you can achieve this and for our example we will use Docker Compose. We'll create docker-compose.yml file that will bring up two virtual images and connect them together. As a bonus we will expose our virtual devices to the external world. This could be useful for remote labbing.
Note: If you don't have docker-compose installed you can get it by running sudo apt install docker-compose in Ubuntu. Other distros should have it readily available as well.
Compose uses docker-compose.yml file to define services to be run together.
I wrote one such file that will bring 2 vEOS devices with one link between them:
przemek@quark:~/netdev/dcompose/veos-lab$ cat docker-compose.yml
version: "3"
services:
veos1:
image: veos:4.18.10M
container_name: veos1
privileged: true
ports:
- "9001:22"
network_mode: default
veos2:
image: veos:4.18.10M
container_name: veos2
privileged: true
ports:
- "9002:22"
network_mode: default
vr-xcon:
image: vr-xcon
container_name: vr-xcon
links:
- veos1
- veos2
command: --p2p veos1/2--veos2/2
depends_on:
- veos1
- veos2
network_mode: default
If it's the first time you see docker-compose.yml don't worry, I'm breaking it down for you below.
-
First line defines version of Compose format,
version: "3"is pretty old but is widely supported. -
In
servicessection we define three containers that we want to be launched. First off we defineveos1service.veos1: image: veos:4.18.10M container_name: veos1 privileged: true ports: - "9001:22" network_mode: defaultveos1- Name of our service where we define container.image: veos:4.18.10M- We want our container to useveos:4.18.10Mimage.container_name: veos1- Override default container name to make it easier to refer to later.privileged: true- We need privileged mode for KVM.ports:- We tell Docker Compose to use host port 9001 to connect to port 22 in container.
network_mode: default- We ask Compose to use default Docker bridge, by default Docker Compose would create separate network and Vrnetlab doesn't like it.
-
Definition for
veos2is same except we map port 22 to port 9002 on host. -
Finally, we have
vr-xconservice. Items of note here:links:- Equivalent to--linkargument we used when running container by hand. Listed containers will be linked tovr-xconcontainer.command: --p2p veos1/2--veos2/2- This is how command is passed to container when using Docker Compose.
depends_on:- We tell Compose to wait for the listed service, hereveos1andveos2, before starting vr-xcon service.
With all that in place we're ready to launch our virtual lab using docker-compose up -d command, run in the directory that contains docker-compose.yml. Options -d makes Compose run in background.
przemek@quark:~/netdev/dcompose/veos-lab$ docker-compose rm
No stopped containers
przemek@quark:~/netdev/dcompose/veos-lab$ docker-compose up -d
Creating veos2 ... done
Creating veos1 ... done
Creating vr-xcon ... done
Now to check if containers are running:
przemek@quark:~/netdev/dcompose/veos-lab$ docker ps
CONTAINER ID IMAGE COMMAND CREATED STATUS PORTS NAMES
0ec9b3e8d4e9 vr-xcon "/xcon.py --p2p veos…" 30 minutes ago Up 29 minutes vr-xcon
3062da1b3417 veos:4.18.10M "/launch.py" 30 minutes ago Up 29 minutes (healthy) 80/tcp, 443/tcp, 830/tcp, 5000/tcp, 10000-10099/tcp, 161/udp, 0.0.0.0:9001->22/tcp veos1
4e81f0de7be7 veos:4.18.10M "/launch.py" 30 minutes ago Up 29 minutes (healthy) 80/tcp, 443/tcp, 830/tcp, 5000/tcp, 10000-10099/tcp, 161/udp, 0.0.0.0:9002->22/tcp veos2
Now we're talking! Entire mini lab launched with one command! And now that you know how this works you can extend the docker-compose.yml file to your liking. Want more devices? No problem, we'll define new veos service. Need extra links? Just define more services or add arguments to an existing one.
Let's quickly connect to the devices and configure hostnames. This will prove we can access them and it will help us identify devices later.
przemek@quark:~/netdev/dcompose/veos-lab$ vrcons veos1
Trying 172.17.0.5...
Connected to 172.17.0.5.
Escape character is '^]'.
localhost#conf t
localhost(config)#hostname veos1
veos1(config)#end
veos1#
telnet> quit
Connection closed.
przemek@quark:~/netdev/dcompose/veos-lab$ vrcons veos2
Trying 172.17.0.4...
Connected to 172.17.0.4.
Escape character is '^]'.
localhost#conf t
localhost(config)#hostname veos2
veos2(config)#end
veos2#
telnet> quit
Connection closed.
Yup, all accessible, no problems here.
Accessing lab from outside
You might remember that I exposed port TCP22 on both of our devices. I then mapped it to local ports 9001 and 9002 for veos1 and veos2 respectively.
przemek@quark:~/netdev/dcompose/veos-lab$ sudo lsof -nP -iTCP -sTCP:LISTEN | grep 900[12]
docker-pr 20748 root 4u IPv6 179906 0t0 TCP *:9002 (LISTEN)
docker-pr 20772 root 4u IPv6 185480 0t0 TCP *:9001 (LISTEN)
There we have it, two TCP ports, 9001 and 9002, listening on our machine.
przemek@quark:~/netdev/dcompose/veos-lab$ ip -4 a show dev ens33
2: ens33: <BROADCAST,MULTICAST,UP,LOWER_UP> mtu 1500 qdisc fq_codel state UP group default qlen 1000
inet 192.168.5.128/24 brd 192.168.5.255 scope global dynamic noprefixroute ens33
valid_lft 1590sec preferred_lft 1590sec
IP address of interface on my VM is 192.168.5.128. So we have ports, we have IP, we should be able to connect right? Let's give it a go :)
I added entries for both of the devics to my terminal app in Windows.

Let's try veos1 first.

Hey, we managed to access our virtual device running in a Docker Container over the network! You can see that it is running virtual image and it can see veos2 on one of its interfaces.
But, can we connect to veos2 as well?

Oh yes, we can :) Again, it's running virtual image and can see veos1. These are most definetely the boxes we brought up with Docker Compose.
And think what you can already do with that. You can create a job in Jenkins building the entire lab for you when you make your morning coffee. It will all be ready and accessible over the network when you come back to your desk.
There's tremendous value and potential there for sure.
Finally, once you're done and want your lab to go away, you again need only one command, this time docker-compose down. This will stop the services defined in docker-compose.yml file and will remove them completely.
przemek@quark:~/netdev/dcompose/veos-lab$ docker-compose down
Stopping veos-lab_vr-xcon_1 ... done
Stopping veos2 ... done
Stopping veos1 ... done
Removing veos-lab_vr-xcon_1 ... done
Removing veos2 ... done
Removing veos1 ... done
Conclusion
With that, we've come to an end of this post. I hope what you've seen here makes you as excited about Vrnetlab as I am. It might not have pretty GUI of other existing solutions out there, but it has its own unique strengths that I think make it better suited for Network Automation.
Once you built your collection of Docker images with virtual appliances it doesn't take much time to build your lab. Most importantly, you can describe your topology using code and store these files in GIT repository. This allows you to have multiple versions and track changes between deployments.
And that's not all. I have another post coming where I will use Vrnetlab with Ansible to build Network Automation CI pipelines. We'll have more code and more automation! I'm looking forward to that and I hope that you do too :)
References
-
Vrnetlab GitHub repository: https://github.com/plajjan/vrnetlab
-
Michael Kashin shows you how to run Vrnetlab at scale with Kubernetes: https://networkop.co.uk/post/2019-01-k8s-vrnetlab/
-
Other great post on Vrnetlab, has pretty diagrams: https://www.brianlinkletter.com/vrnetlab-emulate-networks-using-kvm-and-docker/
-
GitHub repo with resources for this post. Available at: https://github.com/progala/ttl255.com/tree/master/vrnetlab/vrnetlab-router-in-docker
This is part 4 of Jinja2 tutorial where we continue looking at the language features, specifically we'll be discussing template filters. We'll see what filters are and how we can use them in our templates. I'll also show you how you can write your own custom filters.
Jinja2 Tutorial series
- Jinja2 Tutorial - Part 1 - Introduction and variable substitution
- Jinja2 Tutorial - Part 2 - Loops and conditionals
- Jinja2 Tutorial - Part 3 - Whitespace control
- Jinja2 Tutorial - Part 4 - Template filters
- Jinja2 Tutorial - Part 5 - Macros
- Jinja2 Tutorial - Part 6 - Include and Import
- J2Live - Online Jinja2 Parser
Contents
- Overview of Jinja2 filters
- Multiple arguments
- Chaining filters
- Additional filters and custom filters
- Why use filters?
- When not to use filters?
- Writing your own filters
- Fixing "too clever" solution with Ansible custom filter
- Custom filters in Ansible
- Jinja2 Filters - Usage examples
- Conclusion
- References
- GitHub repository with resources for this post
Overview of Jinja2 filters
Let's jump straight in. Jinja2 filter is something we use to transform data held in variables. We apply filters by placing pipe symbol | after the variable followed by name of the filter.
Filters can change the look and format of the source data, or even generate new data derived from the input values. What's important is that the original data is replaced by the result of transformations and that's what ends up in rendered templates.
Here's an example showing a simple filter in action:
Template:
First name: {{ first_name | capitalize }}
Data:
first_name: przemek
Result:
First name: Przemek
We passed first_name variable to capitalize filter. As the name of the filter suggests, string held by variable will end up capitalized. And this is exactly what we can see happened. Pretty cool, right?
It might help to think of filters as functions that take Jinja2 variable as argument, the only difference to standard Python functions is syntax that we use.
Python equivalent of capitalize would look like this:
def capitalize(word):
return word.capitalize()
first_name = "przemek"
print("First name: {}".format(capitalize(first_name)))
Great, you say. But how did I know that capitalize is a filter? Where did it come from?
There's no magic here. Someone had to code all of those filters and make them available to us. Jinja2 comes with a number of useful filters, capitalize is one of them.
All of the built-in filters are documented in official Jinja2 docs. I'm including link in references and later in this post I'll show examples of some of the more useful, in my opinion, filters.
Multiple arguments
We're not limited to simple filters like capitalize. Some filters can take extra arguments in parentheses. These can be either keyword or positional arguments.
Below is an example of a filter taking extra argument.
Template:
ip name-server {{ name_servers | join(" ") }}
Data:
name_servers:
- 1.1.1.1
- 8.8.8.8
- 9.9.9.9
- 8.8.4.4
Result:
ip name-server 1.1.1.1 8.8.8.8 9.9.9.9 8.8.4.4
Filter join took list stored in name_servers and created a string by gluing together elements of the list with space as a separator. Separator is the argument we supplied in parenthesis and we could use different one depending on our needs.
You should refer to documentation to find out what arguments, if any, are available for given filter. Most filters use reasonable defaults and don't require all of the arguments to be explicitly specified.
Chaining filters
We've seen basic filter usage but we can do more. We can chain filters together. This means that multiple filters can be used at once, each separated by pipe |.
Jinja applies chained filters from left to right. Value that comes out of leftmost filter is fed into the next one, and the process is repeated until there are no more filters. Only the final result will end up in rendered template.
Let's have a look at how it works.
Data:
scraped_acl:
- " 10 permit ip 10.0.0.0/24 10.1.0.0/24"
- " 20 deny ip any any"
Template
{{ scraped_acl | first | trim }}
Result
10 permit ip 10.0.0.0/24 10.1.0.0/24
We passed list containing two items to first filter. This returned first element from the list and handed it over to trim filter which removed leading spaces.
The end result is line 10 permit ip 10.0.0.0/24 10.1.0.0/24.
Filter chaining is a powerful feature that allows us to perform multiple transformations in one go. The alternative would be to store intermediate results which would decrease readability and wouldn't be as elegant.
Additional filters and custom filters
Great as they are, built-in filters are very generic and many use cases call for more specific ones. This is why automation frameworks like Ansible or Salt provide many extra filters that cover wide range of scenarios.
In these frameworks you will find filters that can transform IP objects, display data in YAML/Json, or even apply regex, just to name a few. In references you can find links to docs for filters available in each framework.
Finally, you can create new filters yourself! Jinja2 provides hooks for adding custom filters. These are just Python functions, so if you wrote Python function before you will be able to write your own filter as well!
Aforementioned automation frameworks also support custom filters and the process of writing them is similar to vanilla Jinja2. You again need to write a Python function and then documentation for given tool will show you steps needed to register your module as a filter.
Why use filters?
No tool is a good fit for every problem. And some tools are solutions in search of a problem. So, why use Jinja2 filters?
Jinja, like most of the templating languages, was created with web content in mind. While data is stored in the standardized format in the database, we often need to transform it when displaying documents to the users. This is where language like Jinja with its filters enables on the go modification to the way data is presented, without having to touch back-end. That's the selling point of filters.
Below is my personal view on why I think Jinja2 filters are a good addition to the language:
1. They allow non-programmers to perform simple data transformations.
This applies to vanilla filters as well as extra filters provided by automation frameworks. For example, network engineers know their IP addresses and they might want to operate on them in templates without having any programming knowledge. Filters to the rescue!
2. You get predictable results.
If you use generally available filters anyone with some Jinja2 experience will know what they do. This allows people to get up to speed when reviewing templates written by others.
3. Filters are well maintained and tested.
Built-in filters as well as filters provided by automation frameworks are widely used by a lot people. This gives you high confidence that they give correct results and don't have many bugs.
4. The best code is no code at all.
The moment you add data transformation operations to your program, or create a new filter, you become responsible for the code, forever. Any bugs, feature requests, and tests will come your way for the lifetime of the solution. Write as much stuff as you want when learning but use already available solutions in production, whenever possible.
When not to use filters?
Filters can be really powerful and save us a lot of time. But with great power comes great responsibility. Overuse filters and you can end up with templates that are difficult to understand and maintain.
You know those clever one liners that no one, including yourself, can understand few months down the line? It's very easy to get into those situations with chaining a lot of filters, especially ones accepting multiple arguments.
I use the below heuristics to help me decide if what I did is too complicated:
- Is what I wrote at the limit of my understanding?
- Do I feel like what I just wrote is really clever?
- Did I use many chained filters in a way that didn't seem obvious at first?
If you answer yes to at least one of the above, you might be dealing with the case of too clever for your own good. It is possible that there's no good simpler solution for your use case, but chances are you need to do refactoring. If you're unsure if that's the case it's best to ask your colleagues or check with community.
To show you how bad things can get, here's an example of Jinja2 lines I wrote a few years ago. These use filters provided by Ansible and it got so complicated that I had to define intermediate variables.
Have a look at it and try to figure what does it do, and more importantly, how does it do it.
Template, cut down for brevity:
{% for p in ibgp %}
{% set jq = "[?name=='" + p.port + "'].{ myip: ip, peer: peer }" %}
{% set el = ports | json_query(jq) %}
{% set peer_ip = hostvars[el.0.peer] | json_query('ports[*].ip') | ipaddr(el.0.myip) %}
...
{% endfor %}
Example data used with the template:
ibgp:
- { port: Ethernet1 }
- { port: Ethernet2 }
..
ports:
- { name: Ethernet1, ip: "10.0.12.1/24", speed: 1000full, desc: "vEOS-02
There's so much to unpack here. In the first line I assign query string to a variable as a workaround for character escaping issues. In line two I apply json_query filter with argument coming from variable in line one, the result is stored in another helper variable. Finally, in the line three I apply two chained filters json_query and ipaddr.
The end result of these three lines should be IP address of BGP peer found on given interface.
I'm sure you will agree with me that this is terrible. Does this solution get any ticks next to heuristics I mentioned earlier? Yes! Three of them! This is a prime candidate for refactoring.
There are generally two things we can do in cases such as this:
- Pre-process data in the upper layer that calls rendering, e.g. Python, Ansible, etc.
- Write a custom filter.
- Revise the data model to see if it can be simplified.
In this case I went with option 2, I wrote my own filter, which luckily is the next topic on our list.
Writing your own filters
As I already mentioned, to write a custom filter you need to get your hands dirty and write some Python code. Have no fear however! If you ever wrote a function taking an argument you've got all it takes. That's right, we don't need to do anything too fancy, any regular Python function can become a filter. It just needs to take at least one argument and it must return something.
Here's an example of function that we will register with Jinja2 engine as a filter:
# hash_filter.py
import hashlib
def j2_hash_filter(value, hash_type="sha1"):
"""
Example filter providing custom Jinja2 filter - hash
Hash type defaults to 'sha1' if one is not specified
:param value: value to be hashed
:param hash_type: valid hash type
:return: computed hash as a hexadecimal string
"""
hash_func = getattr(hashlib, hash_type, None)
if hash_func:
computed_hash = hash_func(value.encode("utf-8")).hexdigest()
else:
raise AttributeError(
"No hashing function named {hname}".format(hname=hash_type)
)
return computed_hash
In Python this is how we tell Jinja2 about our filter:
# hash_filter_test.py
import jinja2
from hash_filter import j2_hash_filter
env = jinja2.Environment()
env.filters["hash"] = j2_hash_filter
tmpl_string = """MD5 hash of '$3cr3tP44$$': {{ '$3cr3tP44$$' | hash('md5') }}"""
tmpl = env.from_string(tmpl_string)
print(tmpl.render())
Result of rendering:
MD5 hash of '$3cr3tP44$$': ec362248c05ae421533dd86d86b6e5ff
Look at that! Our very own filter! It looks and feels just like built-in Jinja filters, right?
And what does it do? It exposes hashing functions from Python's hashlib library to allow for direct use of hashes in Jinja2 templates. Pretty neat if you ask me.
To put it in words, below are the steps needed to create custom filter:
- Create a function taking at least one argument, that returns a value. First argument is always the Jinja variable preceding
|symbol. Subsequent arguments are provided in parentheses(...). - Register the function with Jinja2 Environment. In Python insert your function into
filtersdictionary, which is an attribute ofEnvironmentobject. Key name is what you want your filter to be called, herehash, and value is your function. - You can now use your filter same as any other Jinja filter.
Fixing "too clever" solution with Ansible custom filter
We know how to write custom filters, so now I can show you how I replaced part of my template where I went too far with clever tricks.
Here is my custom filter in its fully glory:
# get_peer_info.py
import ipaddress
def get_peer_info(our_port_info, hostvars):
peer_info = {"name": our_port_info["peer"]}
our_net = ipaddress.IPv4Interface(our_port_info["ip"]).network
peer_vars = hostvars[peer_info["name"]]
for _, peer_port_info in peer_vars["ports"].items():
if not peer_port_info["ip"]:
continue
peer_net_obj = ipaddress.IPv4Interface(peer_port_info["ip"])
if our_net == peer_net_obj.network:
peer_info["ip"] = peer_net_obj.ip
break
return peer_info
class FilterModule(object):
def filters(self):
return {
'get_peer_info': get_peer_info
}
First part is something you've seen before, it's a Python function taking two arguments and returning one value. Sure, it's longer than "clever" three-liner, but it's so much more readable.
There's more structure here, variables have meaningful names and I can tell what it's doing pretty much right away. More importantly, I know how it's doing it, process is broken down into many individual steps that are easy to follow.
Custom filters in Ansible
The second part of my solution is a bit different than vanilla Python example:
class FilterModule(object):
def filters(self):
return {
'get_peer_info': get_peer_info
}
This is how you tell Ansible that you want get_peer_info to be registered as a Jinja2 filter.
You create class named FilterModule with one method called filters. This method must return dictionary with your filters. Keys in dictionary are names of the filters and values are functions. I say filter(s) and not filter, because you can register multiple filters in one file. Optionally you can have one filter per file if you prefer.
Once all is done you need to drop your Python module in filter_plugins directory, which should be located in the root of your repository. With that in place you can use your filters in Ansible Playbooks as well as Jinja2 templates.
Below you can see structure of the directory where my playbook deploy_base.yml is located in relation to the get_peer_info.py module.
.
├── ansible.cfg
├── deploy_base.yml
├── filter_plugins
│ └── get_peer_info.py
├── group_vars
...
├── hosts
├── host_vars
...
└── roles
└── base
Jinja2 Filters - Usage examples
All of the Jinja2 filters are well documented in officials docs but I felt that some of them could use some more examples. Below you will find my subjective selection with some comments and explanations.
batch
batch(value, linecount, fill_with=None) - Allows you to group list elements into multiple buckets, each containing up to n elements, where n is number we specify. Optionally we can also ask batch to pad bucket with default entries to make all of the buckets exactly n in length. Result is list of lists.
I find it handy for splitting items into groups of fixed size.
Template:
{% for i in sflow_boxes|batch(2) %}
Sflow group{{ loop.index }}: {{ i | join(', ') }}
{% endfor %}
Data:
sflow_boxes:
- 10.180.0.1
- 10.180.0.2
- 10.180.0.3
- 10.180.0.4
- 10.180.0.5
Result:
Sflow group1: 10.180.0.1, 10.180.0.2
Sflow group2: 10.180.0.3, 10.180.0.4
Sflow group3: 10.180.0.5
center
center(value, width=80)- Centers value in a field of given width by adding space padding. Handy when adding formatting to reporting.
Template:
{{ '-- Discovered hosts --' | center }}
{{ hosts | join('\n') }}
Data:
hosts:
- 10.160.0.7
- 10.160.0.9
- 10.160.0.3
Result:
-- Discovered hosts --
10.160.0.7
10.160.0.9
10.160.0.15
default
default(value, default_value='', boolean=False) - Returns default value if passed variable is not specified. Useful for guarding against undefined variables. Can also be used for optional attribute that we want to set to sane value as a default.
In below example we place interfaces in their configured vlans, or if no vlan is specified we assign them to vlan 10 by default.
Template:
{% for intf in interfaces %}
interface {{ intf.name }}
switchport mode access
switchport access vlan {{ intf.vlan | default('10') }}
{% endfor %}
Data:
interfaces:
- name: Ethernet1
vlan: 50
- name: Ethernet2
vlan: 50
- name: Ethernet3
- name: Ethernet4
Result:
interface Ethernet1
switchport mode access
switchport access vlan 50
interface Ethernet2
switchport mode access
switchport access vlan 50
interface Ethernet3
switchport mode access
switchport access vlan 10
interface Ethernet4
switchport mode access
switchport access vlan 10
dictsort
dictsort(value, case_sensitive=False, by='key', reverse=False) - Allows us to sort dictionaries as they are not sorted by default in Python. Sorting is done by key by default but you can request sorting by value using attribute by='value'.
In below example we sort prefix-lists by their name (dict key):
Template:
{% for pl_name, pl_lines in prefix_lists | dictsort %}
ip prefix list {{ pl_name }}
{{ pl_lines | join('\n') }}
{% endfor %}
Data:
prefix_lists:
pl-ntt-out:
- permit 10.0.0.0/23
pl-zayo-out:
- permit 10.0.1.0/24
pl-cogent-out:
- permit 10.0.0.0/24
Result:
ip prefix list pl-cogent-out
permit 10.0.0.0/24
ip prefix list pl-ntt-out
permit 10.0.0.0/23
ip prefix list pl-zayo-out
permit 10.0.1.0/24
And here we order some peer list by priority (dict value), with higher values being more preferred, hence use of reverse=true:
Template:
BGP peers by priority
{% for peer, priority in peer_priority | dictsort(by='value', reverse=true) %}
Peer: {{ peer }}; priority: {{ priority }}
{% endfor %}
Data:
peer_priority:
ntt: 200
zayo: 300
cogent: 100
Result:
BGP peers by priority
Peer: zayo; priority: 300
Peer: ntt; priority: 200
Peer: cogent; priority: 100
float
float(value, default=0.0) - Converts the value to float number. Numeric values in API responses sometimes come as strings. With float we can make sure string is converted before making comparison.
Here's an example of software version checking that uses float.
Template:
{% if eos_ver | float >= 4.22 %}
Detected EOS ver {{ eos_ver }}, using new command syntax.
{% else %}
Detected EOS ver {{ eos_ver }}, using old command syntax.
{% endif %}
Data:
eos_ver: "4.10"
Result
Detected EOS ver 4.10, using old command syntax.
groupby
groupby(value, attribute) - Used to group objects based on one of the attributes. You can choose to group by nested attribute using dot notation. This filter can be used for reporting based on feature value or selecting items for an operation that is only applicable to a subset of objects.
In the below example we group interfaces based on the vlan they're assigned to:
Template:
{% for vid, members in interfaces | groupby(attribute='vlan') %}
Interfaces in vlan {{ vid }}: {{ members | map(attribute='name') | join(', ') }}
{% endfor %}
Data:
interfaces:
- name: Ethernet1
vlan: 50
- name: Ethernet2
vlan: 50
- name: Ethernet3
vlan: 50
- name: Ethernet4
vlan: 60
Result:
Interfaces in vlan 50: Ethernet1, Ethernet2, Ethernet3
Interfaces in vlan 60: Ethernet4
int
int(value, default=0, base=10) - Same as float but here we convert value to integer. Can be also used for converting other bases into decimal base:
Example below shows hexadecimal to decimal conversion.
Template:
LLDP Ethertype
hex: {{ lldp_ethertype }}
dec: {{ lldp_ethertype | int(base=16) }}
Data:
lldp_ethertype: 88CC
Result:
LLDP Ethertype
hex: 88CC
dec: 35020
join
join(value, d='', attribute=None) - Very, very useful filter. Takes elements of the sequence and returns concatenated elements as a string.
For cases when you just want to display items, without applying any operations, it can replace for loop. I find join version more readable in these cases.
Template:
ip name-server {{ name_servers | join(" ") }}
Data:
name_servers:
- 1.1.1.1
- 8.8.8.8
- 9.9.9.9
- 8.8.4.4
Result:
ip name-server 1.1.1.1 8.8.8.8 9.9.9.9 8.8.4.4
map
map(*args, **kwargs) - Can be used to look up an attribute or apply filter on all objects in the sequence.
For instance if you want to normalize letter casing across device names you could apply filter in one go.
Template:
Name-normalized device list:
{{ devices | map('lower') | join('\n') }}
Data:
devices:
- Core-rtr-warsaw-01
- DIST-Rtr-Prague-01
- iNET-rtR-berlin-01
Result:
Name-normalized device list:
core-rtr-warsaw-01
dist-rtr-prague-01
Inet-rtr-berlin-01
Personally I find it most useful for retrieving attributes and their values across a large number of objects. Here we're only interested in values of name attribute:
Template:
Interfaces found:
{{ interfaces | map(attribute='name') | join('\n') }}
Data:
interfaces:
- name: Ethernet1
mode: switched
- name: Ethernet2
mode: switched
- name: Ethernet3
mode: routed
- name: Ethernet4
mode: switched
Result:
Interfaces found:
Ethernet1
Ethernet2
Ethernet3
Ethernet4
reject
reject(*args, **kwargs) - Filters sequence of items by applying a Jinja2 test and rejecting objects succeeding the test. That is item will be removed from the final list if result of the test is true.
Here we want to display only public BGP AS numbers.
Template:
Public BGP AS numbers:
{% for as_no in as_numbers| reject('gt', 64495) %}
{{ as_no }}
{% endfor %}
Data:
as_numbers:
- 1794
- 28910
- 65203
- 64981
- 65099
Result:
Public BGP AS numbers:
1794
28910
rejectattr
rejectattr(*args, **kwargs) - Same as reject filter but test is applied to the selected attribute of the object.
If your chosen test takes arguments, provide them after test name, separated by commas.
In this example we want to remove 'switched' interfaces from the list by applying test to the 'mode' attribute.
Template:
Routed interfaces:
{% for intf in interfaces | rejectattr('mode', 'eq', 'switched') %}
{{ intf.name }}
{% endfor %}
Data:
interfaces:
- name: Ethernet1
mode: switched
- name: Ethernet2
mode: switched
- name: Ethernet3
mode: routed
- name: Ethernet4
mode: switched
Result:
Routed interfaces:
Ethernet3
select
select(*args, **kwargs) - Filters the sequence by retaining only the elements passing the Jinja2 test. This filter is the opposite of reject. You can use either of those depending on what feels more natural in given scenario.
Similarly to reject there's also selectattr filter that works the same as select but is applied to the attribute of each object.
Below we want to report on private BGP AS numbers found on our device.
Template:
Private BGP AS numbers:
{% for as_no in as_numbers| select('gt', 64495) %}
{{ as_no }}
{% endfor %}
Data:
as_numbers:
- 1794
- 28910
- 65203
- 64981
- 65099
Result:
Private BGP AS numbers:
65203
64981
65099
tojson
tojson(value, indent=None) - Dumps data structure in JSON format. Useful when rendered template is consumed by application expecting JSON. Can be also used as an alternative to pprint for prettifying variable debug output.
Template:
{{ interfaces | tojson(indent=2) }}
Data:
interfaces:
- name: Ethernet1
vlan: 50
- name: Ethernet2
vlan: 50
- name: Ethernet3
vlan: 50
- name: Ethernet4
vlan: 60
Result:
[
{
"name": "Ethernet1",
"vlan": 50
},
{
"name": "Ethernet2",
"vlan": 50
},
{
"name": "Ethernet3",
"vlan": 50
},
{
"name": "Ethernet4",
"vlan": 60
}
]
unique
unique(value, case_sensitive=False, attribute=None) - Returns list of unique values in given collection. Pairs well with map filter for finding set of values used for given attribute.
Here we're finding which access vlans we use across our interfaces.
Template:
Access vlans in use: {{ interfaces | map(attribute='vlan') | unique | join(', ') }}
Data:
interfaces:
- name: Ethernet1
vlan: 50
- name: Ethernet2
vlan: 50
- name: Ethernet3
vlan: 50
- name: Ethernet4
vlan: 60
Result:
Access vlans in use: 50, 60
Conclusion
And with this fairly long list of examples we came to the end of this part of the tutorial. Jinja2 filters can be a very powerful tool in right hands and I hope that my explanations helped you in seeing their potential.
You do need to remember to use them judiciously, if it starts looking unwieldy and doesn't feel right, look at alternatives. See if you can move complexity outside of the template, revise your data model, or if that's not possible, write your own filter.
That's all from me. As always, I look forward to seeing you again, more Jinja2 posts are coming soon!
References
- Jinja2 built-in filters, official docs: https://jinja.palletsprojects.com/en/2.11.x/templates/#builtin-filters
- Jinja2 custom filters, official docs: https://jinja.palletsprojects.com/en/2.11.x/api/#custom-filters
- All filters available in Ansible, official docs: https://docs.ansible.com/ansible/latest/user_guide/playbooks_filters.html
- All filters available in Salt, official docs: https://docs.saltstack.com/en/latest/topics/jinja/index.html#filters
- GitHub repo with resources for this post. Available at: https://github.com/progala/ttl255.com/tree/master/jinja2/jinja-tutorial-p4-template-filters
Introduction
In this short post I explain what are YAML aliases and anchors. I then show you how to stop PyYAML from using these when serializing data structures.
While references are absolutely fine to use in YAML files meant for programmatic consumption I find that it sometimes confuses humans, especially if they’ve never seen these before. For this reason I tend to disable anchors and aliases when saving data to YAML files meant for human consumption.
Contents
- YAML aliases and anchors
- When does YAML use anchors and aliases
- YAML dump - don’t use anchors and aliases
- Conclusion
- References
- GitHub repository with resources for this post
YAML aliases and anchors
YAML specification has provision for preserving information about nodes pointing to the same data. This basically means that if you have some data that is referenced in multiple places in your data structure then YAML dumper will:
- add an anchor to the first occurrence
- replace any subsequent occurrences of that data with aliases
Now, how do these anchors and aliases look like?
&id001 - example of an anchor, placed with the first occurrence of data
*id001 - example of an alias, replaces subsequent occurrence of data
This might be easier to see on a concrete example. Below we have information about some interfaces. You can see that Ethernet1 has anchor &id001 next to its properties key and Ethernet2 has just alias *id001 next to its properties key.
Ethernet1:
description: Uplink to core-1
mtu: 9000
properties: &id001
- pim
- ptp
- lldp
speed: 1000
Ethernet2:
description: Uplink to core-2
mtu: 9000
properties: *id001
speed: 1000
When we load this data in Python and print it we get the below:
{'Ethernet1': {'description': 'Uplink to core-1',
'mtu': 9000,
'properties': ['pim', 'ptp', 'lldp'],
'speed': 1000},
'Ethernet2': {'description': 'Uplink to core-2',
'mtu': 9000,
'properties': ['pim', 'ptp', 'lldp'],
'speed': 1000}}
Anchor &id001 is gone and alias *id001 was expanded into ['pim', 'ptp', 'lldp'].
When does YAML use anchors and aliases
Dumper used by PyYAML can recognize Python variables and data structures pointing to the same object. This can often happen with deeply nested dictionaries with keys that refer to the same piece of data. A lot of APIs in the world of Network Automation use such dictionaries.
It’s worth pointing out that section 3.1.1 of YAML spec requires anchors and aliases to be used when serializing multiple references to the same node (data object). I will show how to override this behaviour but it’s good to know where it came from.
I wrote two, nearly identical, programs creating data structure from the beginning of this post. These will help us in understanding when PyYAML adds anchors and aliases.
Program #1:
# yaml_diff_ids.py
import yaml
interfaces = dict(
Ethernet1=dict(description="Uplink to core-1", speed=1000, mtu=9000),
Ethernet2=dict(description="Uplink to core-2", speed=1000, mtu=9000),
)
interfaces["Ethernet1"]["properties"] = ["pim", "ptp", "lldp"]
interfaces["Ethernet2"]["properties"] = ["pim", "ptp", "lldp"]
# Show IDs referenced by "properties" key
print("Ethernet1 properties object id:", id(interfaces["Ethernet1"]["properties"]))
print("Ethernet2 properties object id:", id(interfaces["Ethernet2"]["properties"]))
# Dump YAML to stdout
print("\n##### Resulting YAML:\n")
print(yaml.safe_dump(interfaces))
Program #1 output:
Ethernet1 properties object id: 41184424
Ethernet2 properties object id: 41182536
##### Resulting YAML:
Ethernet1:
description: Uplink to core-1
mtu: 9000
properties:
- pim
- ptp
- lldp
speed: 1000
Ethernet2:
description: Uplink to core-2
mtu: 9000
properties:
- pim
- ptp
- lldp
speed: 1000
Program #2:
# yaml_same_ids.py
import yaml
interfaces = dict(
Ethernet1=dict(description="Uplink to core-1", speed=1000, mtu=9000),
Ethernet2=dict(description="Uplink to core-2", speed=1000, mtu=9000),
)
prop_vals = ["pim", "ptp", "lldp"]
interfaces["Ethernet1"]["properties"] = prop_vals
interfaces["Ethernet2"]["properties"] = prop_vals
# Show IDs referenced by "properties" key
print("Ethernet1 properties object id:", id(interfaces["Ethernet1"]["properties"]))
print("Ethernet2 properties object id:", id(interfaces["Ethernet2"]["properties"]))
# Dump YAML to stdout
print("\n##### Resulting YAML:\n")
print(yaml.safe_dump(interfaces))
Program #2 output:
Ethernet1 properties object id: 13329416
Ethernet2 properties object id: 13329416
##### Resulting YAML:
Ethernet1:
description: Uplink to core-1
mtu: 9000
properties: &id001
- pim
- ptp
- lldp
speed: 1000
Ethernet2:
description: Uplink to core-2
mtu: 9000
properties: *id001
speed: 1000
So, two pretty much identical programs, two data structures containing identical data but two different results of YAML dump.
What caused this difference? It’s all due to a tiny change in the way we assigned values to properties key:
Program #1
interfaces["Ethernet1"]["properties"] = ["pim", "ptp", "lldp"]
interfaces["Ethernet2"]["properties"] = ["pim", "ptp", "lldp"]
Program #2
properties = ["pim", "ptp", "lldp"]
interfaces["Ethernet1"]["properties"] = properties
interfaces["Ethernet2"]["properties"] = properties
In Program #1 we created two new lists and passed the references to relevant properties keys. These look to be the same but are actually two completely separate objects.
In Program #2 we first created a list which was assigned to prop_vals variable. We then assigned prop_vals to each of the properties keys. This essentially means that each of the keys now references the same list object.
We also asked Python to give us IDs of the objects referenced by properties keys. Here we can see that indeed IDs in Program #1 differ but they’re the same in Program #2:
Program #1 IDs:
Ethernet1 properties object id: 41184424
Ethernet2 properties object id: 41182536
Program #2 IDs:
Ethernet1 properties object id: 13329416
Ethernet2 properties object id: 13329416
And that’s it. That’s how PyYAML knows it should use aliases and anchors to represent first and subsequent references to the same object.
For completeness, here’s an example of loading YAML file with references that we just dumped:
import yaml
with open("yaml_files/interfaces_same_ids.yml") as fin:
interfaces = yaml.safe_load(fin)
# Show IDs referenced by "properties" key
print("Ethernet1 properties object id:", id(interfaces["Ethernet1"]["properties"]))
print("Ethernet2 properties object id:", id(interfaces["Ethernet2"]["properties"]))
IDs of the loaded properties keys:
Ethernet1 properties object id: 19630664
Ethernet2 properties object id: 19630664
As you can see IDs are the same, so information about properties keys referencing same object was preserved.
YAML dump - don’t use anchors and aliases
You know know what anchors and aliases are, what they’re used for and where they come from. It’s now time to show you how to stop PyYAML from using them during dump operation.
PyYAML does not have built-in setting allowing disabling of the default behaviour. Fortunately there are two ways in which we can prevent references from being used:
- Force all data objects to have unique IDs by using
copy.deepcopy()function - Override
ignore_aliases()method in PyYAMLDumperclass
Method 1 might require source code modifications in multiple places and could be slow when copying large amounts of compound objects.
Method 2 only requires few lines of code to define custom dumper class. This can then be used alongside standard PyYAML dumper.
In any case, have a look at both and decide which one fits your case better.
Using copy.deepcopy() function
Python standard library provides us with copy.deepcopy() function which returns copy of an object, and copies of objects within that object if any found.
As we’ve seen already, PyYAML serializer uses anchors and aliases when it finds references to the same object. By applying deepcopy() during object assignment we’ll ensure all of these will have unique IDs. The end result? No YAML references in the final dump.
Program #2, modified to use deepcopy():
# yaml_same_ids_deep_copy.py
from copy import deepcopy
import yaml
interfaces = dict(
Ethernet1=dict(description="Uplink to core-1", speed=1000, mtu=9000),
Ethernet2=dict(description="Uplink to core-2", speed=1000, mtu=9000),
)
prop_vals = ["pim", "ptp", "lldp"]
interfaces["Ethernet1"]["properties"] = deepcopy(prop_vals)
interfaces["Ethernet2"]["properties"] = deepcopy(prop_vals)
# Show IDs referenced by "properties" key
print("Ethernet1 properties object id:", id(interfaces["Ethernet1"]["properties"]))
print("Ethernet2 properties object id:", id(interfaces["Ethernet2"]["properties"]))
# Dump YAML to stdout
print("\n##### Resulting YAML:\n")
print(yaml.safe_dump(interfaces))
Result:
Ethernet1 properties object id: 19775848
Ethernet2 properties object id: 19823048
##### Resulting YAML:
Ethernet1:
description: Uplink to core-1
mtu: 9000
properties:
- pim
- ptp
- lldp
speed: 1000
Ethernet2:
description: Uplink to core-2
mtu: 9000
properties:
- pim
- ptp
- lldp
speed: 1000
We passed prop_vals to deepcopy() during each assignment resulting in two new copies of that data. In the output we have two different IDs even though we reused prop_vals. The final YAML representation has no references, which is exactly what we wanted.
Overriding ignore_aliases() method
To completely disable generation of YAML references we can sub-class Dumper class and override its ignore_aliases method:
Class definition, borrowed from Issue #103 posted on PyYAML GitHub page:
class NoAliasDumper(yaml.SafeDumper):
def ignore_aliases(self, data):
return True
You could also monkey-patch the actual Dumper class but I think this solution is safer and more elegant.
We’ll now take NoAliasDumper and use it to modify Program #2:
# yaml_same_ids_custom_dumper.py
import yaml
class NoAliasDumper(yaml.SafeDumper):
def ignore_aliases(self, data):
return True
interfaces = dict(
Ethernet1=dict(description="Uplink to core-1", speed=1000, mtu=9000),
Ethernet2=dict(description="Uplink to core-2", speed=1000, mtu=9000),
)
prop_vals = ["pim", "ptp", "lldp"]
interfaces["Ethernet1"]["properties"] = prop_vals
interfaces["Ethernet2"]["properties"] = prop_vals
# Show IDs referenced by "properties" key
print("Ethernet1 properties object id:", id(interfaces["Ethernet1"]["properties"]))
print("Ethernet2 properties object id:", id(interfaces["Ethernet2"]["properties"]))
# Dump YAML to stdout
print("\n##### Resulting YAML:\n")
print(yaml.dump(interfaces, Dumper=NoAliasDumper))
Output:
Ethernet1 properties object id: 19455080
Ethernet2 properties object id: 19455080
##### Resulting YAML:
Ethernet1:
description: Uplink to core-1
mtu: 9000
properties:
- pim
- ptp
- lldp
speed: 1000
Ethernet2:
description: Uplink to core-2
mtu: 9000
properties:
- pim
- ptp
- lldp
speed: 1000
Perfect, properties keys reference the same object but dumped YAML no longer uses aliases and anchors. This is exactly what we needed.
Note that I replaced yaml.safe_dump with yaml.dump in the above example. This is because we need to explicitly pass our modified Dumper class. However NoAliasDumper inherited from yaml.SafeDumper class so we still get the same protection we do when using yaml.safe_dump.
Conclusion
This brings us to the end of the post. I hope I helped you in understanding what are &id001, *id001 found in YAML files and where they com from. You now also know how to stop PyYAML from using anchors and aliases when serializing data structures, should you ever need it.
References:
- PyYAML GitHub repository. Issue #103 Disable Aliases/Anchors: https://github.com/yaml/PyYAMLHi/issues/103
- YAML specification. Section 3.1.1. Dump: https://yaml.org/spec/1.2/spec.html#id2762313
- YAML specification. Section 6.9.2. Node Anchors. https://yaml.org/spec/1.2/spec.html#id2785586
- YAML specification. Section 7.1. Alias Nodes. https://yaml.org/spec/1.2/spec.html#id2786196
- GitHub repo with resources for this post. https://github.com/progala/ttl255.com/tree/master/yaml/anchors-and-aliases
Text documents are the final result of rendering templates. Depending on the end consumer of these documents whitespace placement could be significant. One of the major niggles in Jinja2, in my opinion, is the way control statements and other elements affect whitespace output in the end documents.
To put it bluntly, mastering whitespaces in Jinja2 is the only way of making sure your templates generate text exactly the way you intended.
Now we know the importance of the problem, time to understand where it originates, to do that we’ll have a look at a lot of examples. Then we'll learn how we can control rendering whitespaces in Jinja2 templates.
Jinja2 Tutorial series
- Jinja2 Tutorial - Part 1 - Introduction and variable substitution
- Jinja2 Tutorial - Part 2 - Loops and conditionals
- Jinja2 Tutorial - Part 3 - Whitespace control
- Jinja2 Tutorial - Part 4 - Template filters
- Jinja2 Tutorial - Part 5 - Macros
- Jinja2 Tutorial - Part 6 - Include and Import
- J2Live - Online Jinja2 Parser
Contents
- Understanding whitespace rendering in Jinja2
- Finding origin of whitespaces - alternative way
- Controlling Jinja2 whitespaces
- Whitespace control in Ansible
- Closing thoughts
- References
- GitHub repository with resources for this post
Understanding whitespace rendering in Jinja2
We'll start our learning by looking at how Jinja2 renders whitespaces by looking at trivial example, template with no variables, just two lines of text and a comment:
Starting line
{# Just a comment #}
Line after comment
This is how it looks like when it’s rendered:
Starting line
Line after comment
Ok, what happened here? Did you expect an empty line to appear in place of our comment? I did not. I’d expect the comment line to just disappear into nothingness, but that’s not the case here.
So here’s a very important thing about Jinja2. All of the language blocks are removed when the template is rendered but all of the whitespaces remain in place. That is if there are spaces, tabs, or newlines, before or after, blocks, then these will be rendered.
This explains why comment block left a blank line once template was rendered. There is a newline character after the {# #} block. While the block itself was removed, newline remained.
Below is a more involving, but fairly typical, template, containing for loop and if statements:
{% for iname, idata in interfaces.items() %}
interface {{ iname }}
description {{ idata.description }}
{% if idata.ipv4_address is defined %}
ip address {{ idata.ipv4_address }}
{% endif %}
{% endfor %}
Values that we feed into the template:
interfaces:
Ethernet1:
description: capture-port
Ethernet2:
description: leaf01-eth51
ipv4_address: 10.50.0.0/31
And this is how Jinja2 will render this, with all settings left to defaults:
interface Ethernet1
description capture-port
interface Ethernet2
description leaf01-eth51
ip address 10.50.0.0/31
This doesn’t look great, does it? There are extra newlines added in few places. Also, interestingly enough, there are leading spaces on some lines, that can’t be seen on screen but could really break things for us in the future. Overall it’s difficult to figure out where all of the whitespaces came from.
To help you in better visualizing generated text, here’s the same output, but now with all of the whitespaces rendered:

Each bullet point represents a space character, and return icon represents newlines. You should now clearly see leading spaces that were left by Jinja2 block on three of the lines, as well as all of the extra newlines.
Ok, that’s all great you say, but it still is not so obvious where these came from. The real question we want to answer is:
Which template line contributed to which line in the final result?
To answer that question I rendered whitespaces in the template as well as the output text. Then I added colored, numbered, highlight blocks in the lines of interest, to allow us to match source with the end product.


You should now see very easily where each of the Jinja blocks adds whitespaces to the resulting text.
If you’re also curious why then read on for detailed explanation:
-
Line containing
{% for %}block, number 1 with blue outlines, ends with a newline. This block gets executed for each key in dictionary. We have 2 keys, so we get extra 2 newlines inserted into final text. -
Line containing
{% if %}block, numbers 2a and 2b with green and light-green outlines, has 2 leading spaces and ends with a newline. This is where things get interesting. The actual{% if %}block is removed leaving behind 2 spaces that always get rendered. But trailing newline is inside of the block. This means that with{% if %}evaluating tofalsewe get 2a but NOT 2b. If it evaluates totruewe get both 2a AND 2b. -
Line containing
{% endif %}block, numbers 3a and 3b with red and orange outlines, has 2 leading spaces and ends with a newline. This is again interesting and our situation here is the reverse of previous case. Two leading spaces are inside of theifblock, but the newline is outside of it. So 3b, newline, is always rendered. But when{% if %}block evaluates totruewe also get 3a, if it'sfalsethen we get 3b only.
It’s also worth pointing out that if your template continued after {% endfor %} block, that block would contribute one extra newline. But worry not, we’ll have some examples later on illustrating this case.
I hope you’ll agree with me that the template we used in our example wasn’t especially big or complicated, yet it resulted in a fair amount of additional whitespaces.
Luckily, and I couldn’t stress enough how useful that is, there are ways of changing Jinja2 behavior and taking back control over exact look and feel of our text.
Note. The above explanation was updated on 12 Dec 2020. Previously 1st occurence of 3b was incorrectly attributed to 2b. Many thanks to Lawrr who triple-checked me and greatly helped in getting to the bottom of this!
Finding origin of whitespaces - alternative way
We’ve talked a bit how to tame Jinja’s engine with regards to whitespace generation. You also know that tools like J2Live can help you in visualizing all the whitespaces in the produced text. But can we tell with certainty which template line, containing block, contributed these characters to the final render?
To get answer to that question we can use a little trick. I came up with the following technique, that doesn’t require any external tools, for matching whitespaces coming from template block lines with extraneous whitespaces appearing in the resulting text document.
This method is quite simple really, you just need to add unambiguous characters to each of the block lines in the template that correspond to lines in the rendered document.
I find it works especially well with template inheritance and macros, topics we will discuss in the upcoming parts of this tutorial.
Origin of whitespaces - examples
Let’s see that secret sauce in action then. We’ll place additional characters, carefully selected so that they stand out from surrounding text, in strategic places on the lines with Jinja2 blocks. I’m using the same template we already worked with so previously that you can easily compare the results.
{% for iname, idata in interfaces.items() %}(1)
interface {{ iname }}
description {{ idata.description }}
(2){% if idata.ipv4_address is defined %}
ip address {{ idata.ipv4_address }}
(3){% endif %}
{% endfor %}
Final result:
(1)
interface Ethernet1
description capture-port
(2)
(1)
interface Ethernet2
description leaf01-eth51
(2)
ip address 10.50.0.0/31
(3)
I added (1), (2) and (3) characters on the lines where we have Jinja2 blocks. The end result matches what we got back from J2Live with Show whitespaces option enabled.
If you don’t have access to J2Live or you need to troubleshoot whitespace placement in production templates, then I definitely recommend using this method. It’s simple but effective.
Just to get more practice, I’ve added extra characters to slightly more complex template. This one has branching if statement and some text below final endfor to allow us to see what whitespaces come from that block.
Our template:
{% for acl, acl_lines in access_lists.items() %}(1)
ip access-list extended {{ acl }}
{% for line in acl_lines %}(2)
(3){% if line.action == "remark" %}
remark {{ line.text }}
(4){% elif line.action == "permit" %}
permit {{ line.src }} {{ line.dst }}
(5){% endif %}
{% endfor %}(6)
{% endfor %}(7)
# All ACLs have been generated
Data used to render it:
access_lists:
al-hq-in:
- action: remark
text: Allow traffic from hq to local office
- action: permit
src: 10.0.0.0/22
dst: 10.100.0.0/24
End result:
(1)
ip access-list extended al-hq-in
(2)
(3)
remark Allow traffic from hq to local office
(4)
(2)
(3)
permit 10.0.0.0/22 10.100.0.0/24
(5)
(6)
(7)
# All ACLs have been generated
A lot is happening here but there are no mysteries anymore. You can easily match each source line with line in the final text. And knowing where the whitespaces are coming from is the first step to learning how to control them, which is what we’re going to talk about shortly.
Also, for comparison is the rendered text without using helper characters:
ip access-list extended al-hq-in
remark Allow traffic from hq to local office
permit 10.0.0.0/22 10.100.0.0/24
# All ACLs have been generated
If you’re still reading this, congratulations! Your dedication to mastering whitespace rendering is commendable. Good news is that we’re now getting to the bit where we learn how to control Jinja2 behavior.
Controlling Jinja2 whitespaces
There are broadly three ways in which we can control whitespace generation in our templates:
- Enable one of, or both,
trim_blocksandlstrip_blocksrendering options. - Manually strip whitespaces by adding a minus sign
-to the start or end of the block. - Apply indentation inside of Jinja2 blocks.
First, I’ll give you an easy, by far more preferable, way of taming whitespace and then we’ll dig into the more involving methods.
So here it comes:
Always render with
trim_blocksandlstrip_blocksoptions enabled.
That’s it, the big secret is out. Save yourself trouble and tell Jinja2 to apply trimming and stripping to all of the blocks.
If you use Jinja2 as part of another framework then you might have to consult documentation to see what the default behaviour is and how it can be changed. Later in this post I will explain how we can control whitespaces when using Ansible to render Jinja2 templates.
Just a few words of explanation on what these options do. Trimming removes newline after block while stripping removes all of spaces and tabs on the lines preceding the block. Now, if you enable trimming alone, you might still get some funny output if there are any leading whitespaces on the lines containing blocks, so that’s why I recommend having both of these enabled.
Trimming and stripping in action
For example, this is what happens when we enable block trimming but leave block stripping disabled:
ip access-list extended al-hq-in
remark Allow traffic from hq to local office
permit 10.0.0.0/22 10.100.0.0/24
# All ACLs have been generated
That’s the same example we just had a look at, and I’m sure you didn’t expect this to happen at all. Let’s add some extra characters to figure out what happened:
{% for acl, acl_lines in access_lists.items() %}
ip access-list extended {{ acl }}
{% for line in acl_lines %}
(3){% if line.action == "remark" %}
remark {{ line.text }}
(4){% elif line.action == "permit" %}
permit {{ line.src }} {{ line.dst }}
{% endif %}
{% endfor %}
{% endfor %}
# All ACLs have been generated
ip access-list extended al-hq-in
(3) remark Allow traffic from hq to local office
(4) (3) permit 10.0.0.0/22 10.100.0.0/24
# All ACLs have been generated
Another puzzle solved, we got rid of newlines with trim_blocks enabled but leading spaces in front of if and elif blocks remained. Something that is completely undesirable.
So how would this template render if we had both trimming and stripping enabled? Have a look:
ip access-list extended al-hq-in
remark Allow traffic from hq to local office
permit 10.0.0.0/22 10.100.0.0/24
# All ACLs have been generated
Quite pretty right? This is what I meant when I talked about getting intended result. No surprises, no extra newlines or spaces, final text matches our expectations.
Now, I said enabling trim and lstrip options is an easy way, but if for whatever reason you can’t use it, or want to have total control over how whitespaces are generated on a per-block then we need to resort to manual control.
Manual control
Jinja2 allows us to manually control generation of whitespaces. You do it by using a minus sing - to strip whitespaces from blocks, comments or variable expressions. You need to add it to the start or end of given expression to remove whitespaces before or after the block, respectively.
As always, it’s best to learn from examples. We’ll go back to example from the beginning of the post. First we render without any - signs added:
{% for iname, idata in interfaces.items() %}
interface {{ iname }}
description {{ idata.description }}
{% if idata.ipv4_address is defined %}
ip address {{ idata.ipv4_address }}
{% endif %}
{% endfor %}
Result:
Right, some extra newlines and there are additional spaces as well. Let’s add minus sign at the end of for block:
{% for iname, idata in interfaces.items() -%}
interface {{ iname }}
description {{ idata.description }}
{% if idata.ipv4_address is defined %}
ip address {{ idata.ipv4_address }}
{% endif %}
{% endfor %}

Looks promising, we removed two of the extra newlines.
Next we look at if block. We need to get rid of the newlines this block generates so we try adding - at the end, just like we did with for block.
{% for iname, idata in interfaces.items() -%}
interface {{ iname }}
description {{ idata.description }}
{% if idata.ipv4_address is defined -%}
ip address {{ idata.ipv4_address }}
{% endif %}
{% endfor %}

Newline after line with description under Ethernet2 is gone. Oh, but wait, why do we have two spaces in the line with ip address now? Aha! These must’ve been the two spaces preceding the if block. Let’s just add - to the beginning of that block as well and we’re done!
{% for iname, idata in interfaces.items() -%}
interface {{ iname }}
description {{ idata.description }}
{%- if idata.ipv4_address is defined -%}
ip address {{ idata.ipv4_address }}
{% endif %}
{% endfor %}

Hmm, now it’s all broken! What happened here? A very good question indeed.
So here’s the thing. These magical minus signs remove all of the whitespaces before or after the block, not just whitespaces on the same line. Not sure if you expected that, I certainly did not when I first used manual whitespace control!
In our concrete case, the first - we added to the end of if block stripped newline AND one space on the next line, the one before ip address*. Because, if we now look closely, we should’ve had three spaces there not just two. One space that we placed there ourselves and two spaces that we had in front of the if block. But that space placed by us was removed by Jinja2 due to - sign placed in the if block.
Not all is lost though. You might notice that just adding - at the beginning of if and endif blocks will render text as intended. Let’s try doing that and see what happens.
{% for iname, idata in interfaces.items() -%}
interface {{ iname }}
description {{ idata.description }}
{%- if idata.ipv4_address is defined %}
ip address {{ idata.ipv4_address }}
{%- endif %}
{% endfor %}
Result:

Bingo! We got rid of all those pesky whitespaces! But was this easy and intuitive? Not really. And to be fair, this wasn’t a very involving example. Manually controlling whitespaces is certainly possible but you must remember that all whitespaces are removed, and just the ones on the same line as the block.
Indentation inside of Jinja2 blocks
There is a method of writing blocks that makes things a bit easier and predictable. We simply put opening of the block at the beginning of the line and apply indentation inside of the block. As always, easier to explain using an example:
{% for acl, acl_lines in access_lists.items() %}
ip access-list extended {{ acl }}
{% for line in acl_lines %}
{% if line.action == "remark" %}
remark {{ line.text }}
{% elif line.action == "permit" %}
permit {{ line.src }} {{ line.dst }}
{% endif %}
{% endfor %}
{% endfor %}
# All ACLs have been generated
As you can see we moved block opening {% all the way to the left and then indented as appropriate inside of the block. Jinja2 doesn’t care about extra spaces inside of the if or for blocks, it will simply ignore them. It only concerns itself with whitespaces that it finds outside of blocks.
Let’s render this to see what we get:
ip access-list extended al-hq-in
remark Allow traffic from hq to local office
permit 10.0.0.0/22 10.100.0.0/24
# All ACLs have been generated
How is this any better you may ask? At first sight, not much better at all. But before I tell you why this might be a good idea, and where it is especially useful I’ll show you the same template as we had it previously.
We’ll render it with trim_blocks enabled:
{% for acl, acl_lines in access_lists.items() %}
ip access-list extended {{ acl }}
{% for line in acl_lines %}
{% if line.action == "remark" %}
remark {{ line.text }}
{% elif line.action == "permit" %}
permit {{ line.src }} {{ line.dst }}
{% endif %}
{% endfor %}
{% endfor %}
# All ACLs have been generated
ip access-list extended al-hq-in
remark Allow traffic from hq to local office
permit 10.0.0.0/22 10.100.0.0/24
# All ACLs have been generated
Terrible, just terrible. Indentation got completely out of whack. But what am I trying to show you? Well, let’s now render version of this template with indentations inside of for and if blocks, again with trim_blocks turned on:
ip access-list extended al-hq-in
remark Allow traffic from hq to local office
permit 10.0.0.0/22 10.100.0.0/24
# All ACLs have been generated
Isn’t that nice? Remember that previously we had to enable both trim_blocks and lstrip_blocks to achieve the same effect.
So here it is:
Starting Jinja2 blocks from the beginning of the line and applying indentation inside of them is roughly equivalent to enabling
lstrip_block.
I say roughly equivalent because we don't strip anything here, we just hide extra spaces inside of blocks preventing them from being picked up at all.
And there is an extra bonus to using this method, it will make your Jinja2 templates used in Ansible safer. Why? Read on!
Whitespace control in Ansible
As you probably already know Jinja2 templates are used quite heavily when doing network automation with Ansible. Most people will use Ansible’s template module to do the rendering of templates. That module by default enables trim_blocks option but lstrip_blocks is turned off and needs to be enabled manually.
We can assume that most users will use the template module with default options which means that using indentation inside of the block technique will increase safety of our templates and the rendered text.
For the above reasons I’d recommend applying this technique if you know your templates will be used in Ansible. You will greatly reduce risk of your templates having seemingly random whitespaces popping up in your configs and other documents.
I would also say that it’s not a bad idea to always stick to this way of writing your blocks if you haven’t yet mastered the arcane ways of Jinja2. There are no real downsides of writing your templates this way.
The only side effect here is how visually templates present themselves, with a lot of blocks templates looking “busy”. This could make it difficult to see lines of text between the blocks since these need to have indentation matching your intent.
Personally I always try to use indentation within blocks method in templates meant for Ansible. For other templates, when rendered with Python, I do whatever feels right in terms of readability, and I render all templates with block trimming and stripping enabled.
Example Playbooks
For completeness sake, I built two short Ansible Playbooks, one uses default setting for template module while the other enables lstrip option.
We’ll be using the same template and data we used for testing trim and lstrip options previously.
Playbook using default settings, i.e. only trim is turned on:
---
- hosts: localhost
gather_facts: no
connection: local
vars_files:
- vars/access-lists.yml
tasks:
- name: Show vars
debug:
msg: "{{ access_lists }}"
- name: Render config for host
template:
src: "templates/ws-access-lists.j2"
dest: "out/ws-default.cfg"
And rendering results:
ip access-list extended al-hq-in
remark Allow traffic from hq to local office
permit 10.0.0.0/22 10.100.0.0/24
# All ACLs have been generated
If you recall, we got exactly same result when rendering this template in Python with trim option enabled. Again, indentations are misaligned so we need to do better.
Playbook enabling lstrip:
---
- hosts: localhost
gather_facts: no
connection: local
vars_files:
- vars/access-lists.yml
tasks:
- name: Show vars
debug:
msg: "{{ access_lists }}"
- name: Render config for host
template:
src: "templates/ws-access-lists.j2"
dest: "out/ws-lstrip.txt"
lstrip_blocks: yes
Rendered text:
ip access-list extended al-hq-in
remark Allow traffic from hq to local office
permit 10.0.0.0/22 10.100.0.0/24
# All ACLs have been generated
And again, same result as when you enabled trim and lstrip when rendering Jinja2 in Python.
Finally, let’s run the first Playbook, with default setting, using the template with indentation inside of blocks.
Playbook:
---
- hosts: localhost
gather_facts: no
connection: local
vars_files:
- vars/access-lists.yml
tasks:
- name: Show vars
debug:
msg: "{{ access_lists }}"
- name: Render config for host
template:
src: "templates/ws-bi-access-lists.j2"
dest: "out/ws-block-indent.txt"
Result:
ip access-list extended al-hq-in
remark Allow traffic from hq to local office
permit 10.0.0.0/22 10.100.0.0/24
# All ACLs have been generated
So, we didn’t have to enable lstrip option to get the same, perfect, result. Hopefully now you can see why I recommend using indentation within blocks as the default for Ansible templates. This gives you more confidence that your templates will be rendered the way you wanted them with default settings.
Closing thoughts
When I sat down to write this post I thought I knew how whitespaces in Jinja2 work. But it turns out that some behaviour was not so clear to me. It was especially true for manual stripping with - sign, I keep forgetting that all of the whitespaces before/after the block are stripped, not just the ones on the line with block.
So my advice is this: use trimming and stripping options whenever possible and generally favour indentation within blocks over indentation outside. And spend some time learning how Jinja2 generates whitespaces, that will allow you to take full control over your templates when you need it.
And that's it, I hope you found this post useful and I look forward to seeing you again!
References:
- Official documentation for the latest version of Jinja2 (2.11.x). Available at: https://jinja.palletsprojects.com/en/2.11.x/
- Documentation for Ansible template module: https://docs.ansible.com/ansible/latest/modules/template_module.html
- Jinja2 Python library at PyPi. Available at: https://pypi.org/project/Jinja2/
- GitHub repo with resources for this post. Available at: https://github.com/progala/ttl255.com/tree/master/jinja2/jinja-tutorial-p3-whitespace-control