Ignite has developed a Cosmos SDK module that integrates with the GnoVM and created an Ignite App to simplify its usage. Today, as of October 2025, this Cosmos
]]>In this tutorial, you will learn how to add GnoVM (Gno Virtual Machine) support to your Cosmos SDK blockchain using Ignite CLI.
Ignite has developed a Cosmos SDK module that integrates with the GnoVM and created an Ignite App to simplify its usage. Today, as of October 2025, this Cosmos SDK module is still heavily in development and still its alpha phase.
Quick Summary about Gno
In short, Gno is an open source smart contract language based on the Go syntax. It is easy to learn compared to other smart contract languages and has little gotchas as it is 99% like Go. It was originally created for its blockchain gno.land.
Learn more about the Gno language on its documentation and repository.
Step 1: Install Ignite Version 29.6.0
Begin by installing the required version of Ignite CLI:
👉 https://docs.ignite.com/welcome/install
Once installed, create your Cosmos SDK blockchain with the following command:
ignite scaffold chain gm --address-prefix gm
install command
Navigate into your new blockchain directory:
cd gm
Step 2: Install the Ignite GnoVM App
Open a new terminal window and install the Ignite GnoVM App using the following command:
ignite app install github.com/ignite/apps/gnovm@gnovm/v0.1.1
ignite gnovm app install
This will add the GnoVM module and related configurations to your project.
Step 3: Add GnoVM Capabilities
Integrate and configure the GnoVM module by running:
ignite gnovm add
gnovm module scaffolding
This commands wires the GnoVM module, its keepers and ante handlers.
By default the chain domain used for the packages in the module is gno.land.
These settings can be adjusted at genesis if needed. For more advanced configuration modify module configuration in the Ignite config.yml as usual.
Step 4: Start Your Blockchain
Start your blockchain using the standard command:
ignite chain serve
start blockchain (via ignite)
Your Cosmos SDK blockchain now supports running Gno smart contracts!
Step 5: Interact with the VM
You can interact with the VM as any other Cosmos SDK module.
Use the gnovm tx command to add packages or call functions on the smart contract. Or the gnovm q command to make some queries about a smart contract state.
Read more on the module documentation.
The Ignite GnoVM App significantly simplifies the process of configuring the GnoVM template manually. However, we recommend gaining a deeper understanding of Gno and the GnoVM and their concepts on the gno.land documentation:
👉 https://docs.gno.land
Questions or support needed? Join our discord.
]]>Ignite CLI offers a variety of Ignite Apps that simplify development. One of them is the Ignite EVM App, which streamlines the integration of Ethereum compatibility into your
]]>In this tutorial, you will learn how to add EVM (Ethereum Virtual Machine) support to your Cosmos SDK blockchain using Ignite CLI.
Ignite CLI offers a variety of Ignite Apps that simplify development. One of them is the Ignite EVM App, which streamlines the integration of Ethereum compatibility into your Cosmos SDK chain.
Step 1: Install Ignite Version 29.6.0
Begin by installing the required version of Ignite CLI:
👉 https://docs.ignite.com/welcome/install
Once installed, create your Cosmos SDK blockchain with the following command:
ignite scaffold chain gm --address-prefix gm
install command
Navigate into your new blockchain directory:
cd gm
Step 2: Install the Ignite EVM App
Open a new terminal window and install the Ignite EVM App using the following command:
ignite app install github.com/ignite/apps/evm@evm/v0.1.2
ignite evm app install
This will add the EVM module and related configurations to your project.
Step 3: Add EVM Capabilities
Integrate and configure the EVM module by running:
ignite evm add
evm module scaffolding
By default, the EVM module is configured for greater Cosmos compatibility:
- The token decimals are set to
18instead of6. - The precise bank keeper is not enabled.
These settings can be adjusted later if needed. For more advanced configuration, refer to the official guide.
Step 4: Start Your Blockchain
Start your blockchain using the standard command:
ignite chain serve
start blockchain (via ignite)
Alternatively, run it manually with Ethereum JSON-RPC enabled:
gmd start \
  --json-rpc.enable \
  --json-rpc.address="0.0.0.0:8545" \
  --json-rpc.ws-address="0.0.0.0:8546" \
  --json-rpc.api="eth,web3,net,txpool,debug,personal"
start blockchain (manually)
Note: Above, we are using flags, but as always, you can modify the config.yaml to achieve the same thing.
Your Cosmos SDK blockchain now supports Ethereum functionality.
The Ignite EVM App significantly simplifies the process of configuring the EVM template manually. However, we recommend gaining a deeper understanding of Cosmos EVM integration by reading the official documentation:
👉 https://evm.cosmos.network
Questions or support needed? Join our discord.
]]>In this tutorial, you'll learn how to wire a Proof of Authority (POA) module for your blockchain using the Ignite CLI. POA is a consensus mechanism designed for private and enterprise blockchains, where only pre-approved validators are allowed to produce blocks. This makes it ideal for organizations that prioritize speed, control, and privacy over decentralization.
What is Proof of Authority (POA)?
Proof of Authority (POA) is a consensus algorithm in which validators are selected based on their identity and reputation rather than computational power or stake. Unlike Proof of Stake (PoS), where validators are chosen based on the amount of cryptocurrency they lock up, POA relies on trusted entities—often known and verified individuals or organizations—to maintain the network.
In a POA system:
- Only authorized validators can propose and vote on new blocks.
- Validators are typically pre-approved by the network’s governing body.
- The network achieves fast finality and high throughput, making it perfect for enterprise use cases.
How POA Differs from Proof of Stake (PoS)
Feature | Proof of Stake (PoS) | Proof of Authority (POA) |
|---|---|---|
Validator Selection | Based on staked tokens | Based on identity and trust |
Decentralization | High | Low to moderate |
Finality | Fast, but can vary | Very fast and deterministic |
Use Case | Public, permissionless blockchains | Private, permissioned networks |
Security Model | Economic incentives | Identity and reputation |
While PoS is ideal for public blockchains like Ethereum, POA shines in enterprise environments where control and regulatory compliance are key.
How to Wire the POA Module into Your Ignite Blockchain
To implement POA in your Ignite blockchain, we recommend using the open-source implementation by Strangelove Ventures , which provides a robust and battle-tested POA module compatible with Cosmos SDK.
🔗 GitHub: https://github.com/strangelove-ventures/poa
Follow these steps to integrate the POA module into your existing Ignite project.
Step 1: Initialize Your Blockchain (if not already done)
ignite scaffold chain gm --skip-moduleThis creates a new blockchain project with a default module structure.
Step 2: Add the POA Module as a Dependency
An Ignite chain comes by default with the x/staking module, which implements POS.
To use the POA module, a few tweaks are necessary to the default template:
cd gm
go get github.com/strangelove-ventures/poa
Download the module
Note, there is a bug in that POA implementation the forces cosmossdk.io/core to update while it should not. Make sure to revert it by adding the following replace to your go.mod
replace cosmossdk.io/core => cosmossdk.io/core v0.11.3Once the module is downloaded, wire it as a Cosmos SDK module.
- Modify the
app.goto add the keeper to theAppstruct and inject the keeper:
diff --git a/app/app.go b/app/app.go
index f5947c4..1760711 100644
--- a/app/app.go
+++ b/app/app.go
@@ -47,6 +47,8 @@ import (

 	"gm/docs"
+
+	poakeeper "github.com/strangelove-ventures/poa/keeper"
 )

 const (
@@ -91,6 +93,7 @@ type App struct {
 	ConsensusParamsKeeper consensuskeeper.Keeper
 	CircuitBreakerKeeper  circuitkeeper.Keeper
 	ParamsKeeper          paramskeeper.Keeper
+	POAKeeper             poakeeper.Keeper

 	// ibc keepers
 	IBCKeeper           *ibckeeper.Keeper
@@ -174,6 +177,7 @@ func New(
 		&app.CircuitBreakerKeeper,
 		&app.ParamsKeeper,
+		&app.POAKeeper,
 	); err != nil {
 		panic(err)
 	}
app.go changes
- Modify the
app_config.goto write the module in he app configuration. Make sure the poa module is defined before the staking module:
diff --git a/app/app_config.go b/app/app_config.go
index 96a565b..0e2cd33 100644
--- a/app/app_config.go
+++ b/app/app_config.go
@@ -69,6 +69,9 @@ import (
 	icatypes "github.com/cosmos/ibc-go/v10/modules/apps/27-interchain-accounts/types"
 	ibctransfertypes "github.com/cosmos/ibc-go/v10/modules/apps/transfer/types"
 	ibcexported "github.com/cosmos/ibc-go/v10/modules/core/exported"
+	"github.com/strangelove-ventures/poa"
+	poamodulev1 "github.com/strangelove-ventures/poa/api/module/v1"
+	_ "github.com/strangelove-ventures/poa/module" // import for side-effects
 	"google.golang.org/protobuf/types/known/durationpb"
 )

@@ -119,6 +122,7 @@ var (
 						distrtypes.ModuleName,
 						slashingtypes.ModuleName,
 						evidencetypes.ModuleName,
+						poa.ModuleName,
 						stakingtypes.ModuleName,
 						authz.ModuleName,
 						epochstypes.ModuleName,
@@ -130,6 +134,7 @@ var (
 					},
 					EndBlockers: []string{
 						govtypes.ModuleName,
+						poa.ModuleName,
 						stakingtypes.ModuleName,
 						feegrant.ModuleName,
 						group.ModuleName,
@@ -171,7 +176,7 @@ var (
 						ibctransfertypes.ModuleName,
 						icatypes.ModuleName,
 						// chain modules
+						poa.ModuleName,
 						// this line is used by starport scaffolding # stargate/app/initGenesis
 					},
 				}),
@@ -272,6 +277,10 @@ var (
 				Name:   epochstypes.ModuleName,
 				Config: appconfig.WrapAny(&epochsmodulev1.Module{}),
 			},
+			{
+				Name:   poa.ModuleName,
+				Config: appconfig.WrapAny(&poamodulev1.Module{}),
+			},
 			// this line is used by starport scaffolding # stargate/app/moduleConfig
 		},
 	})
app_config.go changes
- Finally, adding ante handlers is required to make sure
x/stakingoperations are restricted.
If you are using the wasm app or evm, simply add the following to the ante.go:
anteDecorators := []sdk.AnteDecorator{
  ...
  poaante.NewPOADisableStakingDecorator(),
  poaante.NewPOADisableWithdrawDelegatorRewardsDecorator(),
  ...
}
ante.go changes
Those two ante handlers are disabling the following messages: Redelegate, Cancel Unbonding, Delegate, and Undelegate in x/staking and MsgWithdrawDelegatorReward in x/distribution.
Step 3: Configure the genesis
As the Cosmos SDK uses PoS by default, the x/slashing and x/slashing module parameters may not align with your wishes. With Ignite you can modify them easily by defining genesis configuration the config.yaml.
genesis:
  app_state:
    staking:
      params:
        max_validators: "12"
        min_commission_rate: "0.0"
    slashing:
      params:
        slash_fraction_double_sign: "0.0"
        slash_fraction_downtime: "0.0"
        signed_blocks_window: "10000"
        min_signed_per_window: "0.0001"
        downtime_jail_duration: 60s
config.yaml exension
Step 4: Start your node with POA
Build and start your node:
ignite chain serve --skip-protoNow, your blockchain is running with a POA consensus mechanism. Only the validators listed in the genesis file can produce blocks by default. After launch, governance, or a defined address (via the POA_ADMIN_ADDRESS environment variable), can modify the validator set:
Usage:
  gmd tx poa [flags]
  gmd tx poa [command]

Available Commands:
  create-validator      create new validator for POA (anyone)
  remove                remove a validator from the active set
  remove-pending        remove a validator from the pending set queue
  set-power             set the consensus power of a validator in the active set
  update-staking-params update the staking module params
poa transactions.
Conclusion
You are now using a Proof of Authority (POA) module using Ignite CLI and integrated it with the trusted strangelove-ventures/poa implementation. This setup is perfect for enterprise blockchains where control, speed, and compliance are critical.
POA isn’t for every use case—but when you need a secure, permissioned network with fast finality, it’s one of the best choices available.
]]>In this tutorial we will build a module that supports Polls to vote on.
You will learn how to
- Create a simple blockchain poll application
- Add logic to require funds to execute the create poll transaction
- Modify a message
Requirements
This tutorial requires Ignite
]]>
In this tutorial we will build a module that supports Polls to vote on.
You will learn how to
- Create a simple blockchain poll application
- Add logic to require funds to execute the create poll transaction
- Modify a message
Requirements
This tutorial requires Ignite CLI v29.0.0
To install Ignite CLI, follow the installation instructions on the official documentation.
Voting App Goals
Create a blockchain poll app with a voting module. The app will allow users to:
- Create polls
- Cast votes
- See voting results
Additional features:
- Collect transaction fees:
- Create poll transaction fee is 200 tokens
- Voting is free
- Restrict to one vote per user per poll
Build your Blockchain App
Create a new blockchain
ignite scaffold chain voter --no-module
A new directory named voter is created containing a working blockchain app.
Change your working directory to the blockchain with
cd voter
Create the voter module
In order for the module to have the dependency to account and bank, we scaffold the module with the dependencies.
ignite scaffold module voter --dep bank,auth
Add the Poll Type
Create the poll type with title and options:
ignite scaffold type poll title options:array.string --no-message
This creates the basic structure for polls but we need to modify it to handle multiple options.
Modify the Protocol Buffer Types
For running Polls modify the Protocol Buffer in the proto directory.
We need to add two fields and make sure the "options" for the Poll input is a repeated type, so each Poll can have multiple Options.
Update proto/voter/v1/poll.proto as follows:
message Poll {
  string creator = 1;
  uint64 id = 2;
  string title = 3;
  repeated string options = 4;
}
Add Messages for Poll Operations
Create messages for poll operations:
ignite scaffold message create-poll title options:array.string --response id:int,title --desc "Create a new poll" --module voter
Add the Vote Type
Create the vote type:
ignite scaffold type vote pollID option --no-message
Add message for creating votes:
ignite scaffold message cast-vote pollID option --response id:int,option --desc "Cast a vote on a poll" --module voter
Update the Protocol Buffer for the Vote file proto/voter/voter/v1/vote.proto
message Vote {
  string creator = 1;
  uint64 id = 2;
  uint64 pollID = 3;
  string option = 4;
}
Add Keys
We'll need to define the Keys where the Keeper stores the information, let's define the paths in x/voter/types/keys.go in the const field.
    // Key prefixes
	PollKey      = "Poll/value/"
	PollCountKey = "Poll/count/"
	VoteKey      = "Vote/value/"
	VoteCountKey = "Vote/count/"
Implement Poll and Vote Keeper Helper Functions
Let's create a new file in the keeper directory. The x/voter/keeper/poll.go file:
package keeper

import (
    "context"
    "encoding/binary"

    "voter/x/voter/types"

    "cosmossdk.io/store/prefix"
    "github.com/cosmos/cosmos-sdk/runtime"
)

func (k Keeper) AppendPoll(ctx context.Context, poll types.Poll) uint64 {
	count := k.GetPollCount(ctx)
	poll.Id = count
	storeAdapter := runtime.KVStoreAdapter(k.storeService.OpenKVStore(ctx))
	store := prefix.NewStore(storeAdapter, []byte(types.PollKey))
	appendedValue := k.cdc.MustMarshal(&poll)
	store.Set(GetPollIDBytes(poll.Id), appendedValue)
	k.SetPollCount(ctx, count+1)
	return count
}

func (k Keeper) GetPollCount(ctx context.Context) uint64 {
	storeAdapter := runtime.KVStoreAdapter(k.storeService.OpenKVStore(ctx))
	store := prefix.NewStore(storeAdapter, []byte{})
	byteKey := []byte(types.PollCountKey)
	bz := store.Get(byteKey)
	if bz == nil {
		return 0
	}
	return binary.BigEndian.Uint64(bz)
}

func GetPollIDBytes(id uint64) []byte {
	bz := make([]byte, 8)
	binary.BigEndian.PutUint64(bz, id)
	return bz
}

func (k Keeper) SetPollCount(ctx context.Context, count uint64) {
	storeAdapter := runtime.KVStoreAdapter(k.storeService.OpenKVStore(ctx))
	store := prefix.NewStore(storeAdapter, []byte{})
	byteKey := []byte(types.PollCountKey)
	bz := make([]byte, 8)
	binary.BigEndian.PutUint64(bz, count)
	store.Set(byteKey, bz)
}

func (k Keeper) GetPoll(ctx context.Context, id uint64) (val types.Poll, found bool) {
	storeAdapter := runtime.KVStoreAdapter(k.storeService.OpenKVStore(ctx))
	store := prefix.NewStore(storeAdapter, []byte(types.PollKey))
	b := store.Get(GetPollIDBytes(id))
	if b == nil {
		return val, false
	}
	k.cdc.MustUnmarshal(b, &val)
	return val, true
}

func (k Keeper) GetAllPolls(ctx context.Context) (list []types.Poll) {
	storeAdapter := runtime.KVStoreAdapter(k.storeService.OpenKVStore(ctx))
	store := prefix.NewStore(storeAdapter, []byte(types.PollKey))
	iterator := store.Iterator(nil, nil)
	defer iterator.Close()

	for ; iterator.Valid(); iterator.Next() {
		var val types.Poll
		k.cdc.MustUnmarshal(iterator.Value(), &val)
		list = append(list, val)
	}

	return
}
We will need the same for votes, let's create the x/voter/keeper/vote.go file:
package keeper

import (
	"context"
	"encoding/binary"

	"voter/x/voter/types"

	errorsmod "cosmossdk.io/errors"
	"cosmossdk.io/store/prefix"
	"github.com/cosmos/cosmos-sdk/runtime"
	sdkerrors "github.com/cosmos/cosmos-sdk/types/errors"
)

func (k Keeper) CastVote(ctx context.Context, vote types.Vote) error {
	// Check if poll exists
	_, found := k.GetPoll(ctx, vote.PollID)
	if !found {
		return errorsmod.Wrap(sdkerrors.ErrKeyNotFound, "poll not found")
	}

	// Check if user has already voted
	votes := k.GetAllVote(ctx)
	for _, existingVote := range votes {
		if existingVote.Creator == vote.Creator && existingVote.PollID == vote.PollID {
			return errorsmod.Wrap(sdkerrors.ErrUnauthorized, "already voted on this poll")
		}
	}

	count := k.GetVoteCount(ctx)
	vote.Id = count
	storeAdapter := runtime.KVStoreAdapter(k.storeService.OpenKVStore(ctx))
	store := prefix.NewStore(storeAdapter, []byte(types.VoteKey))
	appendedValue := k.cdc.MustMarshal(&vote)
	store.Set(GetVoteIDBytes(vote.Id), appendedValue)
	k.SetVoteCount(ctx, count+1)

	return nil
}

func (k Keeper) GetVoteCount(ctx context.Context) uint64 {
	storeAdapter := runtime.KVStoreAdapter(k.storeService.OpenKVStore(ctx))
	store := prefix.NewStore(storeAdapter, []byte{})
	byteKey := []byte(types.VoteCountKey)
	bz := store.Get(byteKey)
	if bz == nil {
		return 0
	}
	return binary.BigEndian.Uint64(bz)
}

func GetVoteIDBytes(id uint64) []byte {
	bz := make([]byte, 8)
	binary.BigEndian.PutUint64(bz, id)
	return bz
}

func (k Keeper) SetVoteCount(ctx context.Context, count uint64) {
	storeAdapter := runtime.KVStoreAdapter(k.storeService.OpenKVStore(ctx))
	store := prefix.NewStore(storeAdapter, []byte{})
	byteKey := []byte(types.VoteCountKey)
	bz := make([]byte, 8)
	binary.BigEndian.PutUint64(bz, count)
	store.Set(byteKey, bz)
}

func (k Keeper) GetAllVote(ctx context.Context) (list []types.Vote) {
	storeAdapter := runtime.KVStoreAdapter(k.storeService.OpenKVStore(ctx))
	store := prefix.NewStore(storeAdapter, []byte(types.VoteKey))
	iterator := store.Iterator(nil, nil)
	defer iterator.Close()

	for ; iterator.Valid(); iterator.Next() {
		var val types.Vote
		k.cdc.MustUnmarshal(iterator.Value(), &val)
		list = append(list, val)
	}

	return
}

func (k Keeper) GetPollVotes(ctx context.Context, pollID uint64) (list []types.Vote) {
	allVotes := k.GetAllVote(ctx)
	for _, vote := range allVotes {
		if vote.PollID == pollID {
			list = append(list, vote)
		}
	}
	return
}
Implement Poll Creation Logic
Update the keeper method in x/voter/keeper/msg_server_create_poll.go:
package keeper

import (
   "context"

	"voter/x/voter/types"

	errorsmod "cosmossdk.io/errors"
	sdk "github.com/cosmos/cosmos-sdk/types"
	sdkerrors "github.com/cosmos/cosmos-sdk/types/errors"
)

func (k msgServer) CreatePoll(goCtx context.Context, msg *types.MsgCreatePoll) (*types.MsgCreatePollResponse, error) {
    ctx := sdk.UnwrapSDKContext(goCtx)

    // Get the module account address
    moduleAcct := k.authKeeper.GetModuleAddress(types.ModuleName)
    if moduleAcct == nil {
        return nil, errorsmod.Wrap(sdkerrors.ErrUnknownAddress, "module account does not exist")
    }

    // Parse and validate the payment
    feeCoins, err := sdk.ParseCoinsNormalized("200token")
    if err != nil {
        return nil, errorsmod.Wrap(sdkerrors.ErrInvalidCoins, "invalid fee amount")
    }

    // Get creator's address
    creator, err := sdk.AccAddressFromBech32(msg.Creator)
    if err != nil {
        return nil, errorsmod.Wrap(sdkerrors.ErrInvalidAddress, "invalid creator address")
    }

    // Check if creator has enough balance
    spendableCoins := k.bankKeeper.SpendableCoins(ctx, creator)
    if !spendableCoins.IsAllGTE(feeCoins) {
        return nil, errorsmod.Wrap(sdkerrors.ErrInsufficientFunds, "insufficient funds to pay for poll creation")
    }

    // Transfer the fee
    if err := k.bankKeeper.SendCoins(ctx, creator, moduleAcct, feeCoins); err != nil {
        return nil, errorsmod.Wrap(err, "failed to pay poll creation fee")
    }

    // Validate poll options
    if len(msg.Options) < 2 {
        return nil, errorsmod.Wrap(sdkerrors.ErrInvalidRequest, "poll must have at least 2 options")
    }

    poll := types.Poll{
        Creator: msg.Creator,
        Title:   msg.Title,
        Options: msg.Options,
    }

    id := k.AppendPoll(ctx, poll)
    return &types.MsgCreatePollResponse{
        Id: int32(id),
        Title: msg.Title,
    }, nil
}
Update the expected Keepers in x/voter/types/expected_keepers to make the functions for the Module Account available:
// AccountKeeper defines the expected interface for the Account module.
type AuthKeeper interface {
	AddressCodec() address.Codec
	GetAccount(context.Context, sdk.AccAddress) sdk.AccountI // only used for simulation
	// Methods imported from account should be defined here
	GetModuleAddress(moduleName string) sdk.AccAddress
}

// BankKeeper defines the expected interface for the Bank module.
type BankKeeper interface {
	SpendableCoins(ctx context.Context, addr sdk.AccAddress) sdk.Coins
	// Methods imported from bank should be defined here
	SendCoins(ctx context.Context, fromAddr sdk.AccAddress, toAddr sdk.AccAddress, amt sdk.Coins) error
}
Implement Vote Cast Logic
Update the keeper method in x/voter/keeper/msg_server_cast_vote.go:
package keeper

import (
	"context"
	"strconv"

	"voter/x/voter/types"

	sdk "github.com/cosmos/cosmos-sdk/types"
)

func (k msgServer) CastVote(goCtx context.Context, msg *types.MsgCastVote) (*types.MsgCastVoteResponse, error) {
	ctx := sdk.UnwrapSDKContext(goCtx)

	pollId, err := strconv.ParseInt(msg.PollId, 10, 64)
	if err != nil {
		return nil, err
	}

	vote := types.Vote{
		Creator: msg.Creator,
		PollID:  uint64(pollId),
		Option:  msg.Option,
	}

	err = k.Keeper.CastVote(ctx, vote)
	if err != nil {
		return nil, err
	}

	return &types.MsgCastVoteResponse{
		Id:     pollId,
		Option: msg.Option,
	}, nil
}
Add Queries
After implementing the message handling for creating polls and casting votes, we need to add queries to retrieve the data.
Let's scaffold these queries using Ignite CLI.
Query Single Poll
ignite scaffold query show-poll poll-id:uint --response creator,id,title,options
Add to x/voter/keeper/query_show_poll.go
func (q queryServer) ShowPoll(ctx context.Context, req *types.QueryShowPollRequest) (*types.QueryShowPollResponse, error) {
	if req == nil {
		return nil, status.Error(codes.InvalidArgument, "invalid request")
	}

	// TODO: Process the query
	poll, found := q.k.GetPoll(ctx, req.PollId)
	if !found {
		return nil, status.Error(codes.NotFound, "poll not found")
	}

	return &types.QueryShowPollResponse{
		Creator: poll.Creator,
		Id:      strconv.FormatUint(poll.Id, 10),
		Title:   poll.Title,
		Options: strings.Join(poll.Options, ","),
	}, nil
}
Query Votes For A Poll
ignite scaffold query show-poll-votes poll-id:uint --response creator,pollID,option
Add to x/voter/keeper/query_show_poll_votes.go
package keeper

import (
	"context"

	"voter/x/voter/types"

	"cosmossdk.io/store/prefix"
	"github.com/cosmos/cosmos-sdk/runtime"
	"github.com/cosmos/cosmos-sdk/types/query"
	"google.golang.org/grpc/codes"
	"google.golang.org/grpc/status"
)

func (q queryServer) ShowPollVotes(ctx context.Context, req *types.QueryShowPollVotesRequest) (*types.QueryShowPollVotesResponse, error) {
	if req == nil {
		return nil, status.Error(codes.InvalidArgument, "invalid request")
	}

	storeAdapter := runtime.KVStoreAdapter(q.k.storeService.OpenKVStore(ctx))
	store := prefix.NewStore(storeAdapter, []byte(types.VoteKey))

	var votes []*types.Vote
	pageRes, err := query.Paginate(store, req.Pagination, func(key []byte, value []byte) error {
		var vote types.Vote
		if err := q.k.cdc.Unmarshal(value, &vote); err != nil {
			return err
		}
		// Only include votes for the requested poll
		if vote.PollID == req.PollId {
			votes = append(votes, &vote)
		}
		return nil
	})

	if err != nil {
		return nil, status.Error(codes.Internal, err.Error())
	}

	return &types.QueryShowPollVotesResponse{
		Votes:      votes,
		Pagination: pageRes,
	}, nil
}
For this to work we need to look into proto/voter/voter/v1/query.pro with the following changes
import "voter/voter/v1/vote.proto";

// [...]

message QueryShowPollVotesRequest {
  uint64 poll_id = 1;
  // pagination defines an optional pagination for the request.
    cosmos.base.query.v1beta1.PageRequest pagination = 2;
}

message QueryShowPollVotesResponse {
  repeated Vote votes = 1;
  // Pagination defines the pagination in the response.
    cosmos.base.query.v1beta1.PageResponse pagination = 2;
}
Testing the Application
- Start the Blockchain:
ignite chain serve
- Create a Poll:
voterd tx voter create-poll "Favorite Color" "red,blue,green" --from alice --gas auto -y
- Cast a Vote:
voterd tx voter cast-vote 0 "blue" --from bob --gas auto -y
- Query Polls:
voterd query voter show-poll 0
- Query Votes:
voterd query voter show-poll-votes 0
Congratulations! You've built a blockchain polling application with Ignite CLI and Cosmos SDK v0.50+.
]]>This tutorial was first presented as a workshop at GODays 2020 Berlin by Billy Rennekamp and later adopted to Ignite and edited for scale by Tobias Schwarz. To view slides from this workshop please see here.
The goal of this session is to get you thinking about what is
]]>
This tutorial was first presented as a workshop at GODays 2020 Berlin by Billy Rennekamp and later adopted to Ignite and edited for scale by Tobias Schwarz. To view slides from this workshop please see here.
The goal of this session is to get you thinking about what is possible when developing applications that have access to digital scarcity as a primitive. The easiest way to think of scarcity is as money; If money grew on trees it would stop being scarce and stop having value. We have a long history of software which deals with money, but it's never been a first class citizen in the programming environment. Instead, money has always been represented as a number or a float, and it has been up to a third party merchant service or some other process of exchange where the representation of money is swapped for actual cash. If money were a primitive in a software environment, it would allow for real economies to exist within games and applications, taking one step further in erasing the line between games, life and play.
We will be working today with a Golang framework called the Cosmos SDK. This framework makes it easy to build deterministic state machines. A state machine is simply an application that has a state and explicit functions for updating that state. You can think of a light bulb and a light switch as a kind of state machine: the state of the "application" is either light on or light off. There is one function in this state machine: flip switch. Every time you trigger flip switch the state of the application goes from light on to light off or vice versa. Simple, right?

A deterministic state machine is just a state machine in which an accumulation of actions, taken together and replayed, will have the same outcome. So if we were to take all the switch on and switch off actions of the entire month of January for some room and replay then in August, we should have the same final state of light on or light off. There should be nothing about January or August that changes the outcome - of course a real room might not be deterministic if there were things like power shortages or maintenance that took place during those periods.
What is nice about deterministic state machines is that you can track changes with cryptographic hashes of the state just like version control systems like git. If there is agreement about the hash of a certain state, it is unnecessary to replay every action from genesis to ensure that two repos are in sync. These properties are useful when dealing with software that is run by many different people in many different situations, just like git.
Another nice property of cryptographically hashing state is that it creates a system of reliable dependencies. I can build software that uses your library and reference a specific state in your software. That way if you change your code in a way that breaks my code, I don't have to use your new version but can continue to use the version that I reference. This same property of knowing exactly what the state of a system (as well as all the ways that state can update) makes it possible to have the necessary assurances that allow for digital scarcity within an application. If I say there is only one of some thing within a state machine and you know that there is no way for that state machine to create more than one, you can rely on there always being only one.

You might have guessed by now that what I'm really talking about are Blockchains. These are deterministic state machines which have very specific rules about how state is updated. They checkpoint state with cryptographic hashes and use asymmetric cryptography to handle access control. There are different ways that different Blockchains decide who can make a checkpoint of state. These entities can be called Validators. Some of them are chosen by an electricity intensive game called proof-of-work in tandem with something called the longest chain rule or Nakamoto Consensus on Blockchains like Bitcoin or Ethereum 1.0.
The state machine we are building will use an implementation of proof-of-stake called Tendermint (or CometBFT lately), which is energy efficient and can consist of one or many validators, either trusted or byzantine. When building a system that handles real scarcity, the integrity of that system becomes very important. One way to ensure that integrity is by sharing the responsibility of maintaining it with a large group of independently motivated participants as validators.
So, now that we know a little more about why we might build an app like this, let's dive into the game itself.
The Game
The application we're building today can be used in many different ways but I'll be talking about it as scavenger hunt game. Scavenger hunts are all about someone setting up tasks or questions that challenge a participant to find solutions which come with some sort of a prize. The basic mechanics of the game are as follows:
- Anyone can post a question with an encrypted answer.
- This question comes paired with a bounty of coins.
- Anyone can post an answer to this question, if they get it right, they receive the bounty of coins.
Something to note here is that when dealing with a public network with latency, it is possible that something like a man-in-the-middle attack could take place. Instead of pretending to be one of the parties, an attacker would take the sensitive information from one party and use it for their own benefit. This is actually called Front Running and happens as follows:
- You post the answer to some question with a bounty attached to it.
- Someone else sees you posting the answer and posts it themselves right before you.
- Since they posted the answer first, they receive the reward instead of you.
To prevent Front-Running, we will implement a commit-reveal scheme. A commit-reveal scheme converts a single exploitable interaction and turns it into two safe interactions.
The first interaction is the commit. This is where you "commit" to posting an answer in a follow-up interaction. This commit consists of a cryptographic hash of your name combined with the answer that you think is correct. The app saves that value which is a claim that you know the answer but that it hasn't been confirmed whether the answer is correct.
The next interaction is the reveal. This is where you post the answer in plaintext along with your name. The application will take your answer and your name and cryptographically hash them. If the result matches what you previously submitted during the commit stage, then it will be proof that it is in fact you who knows the answer, and not someone who is just front-running you.

A system like this could be used in tandem with any kind of gaming platform in a trustless way. Imagine you were playing the legend of Zelda and the game was compiled with all the answers to different scavenger hunts already included. When you beat a level the game could reveal the secret answer. Then either explicitly or behind the scenes, this answer could be combined with your name, hashed, submitted and subsequently revealed. Your name would be rewarded and you would have more points in the game.
Another way of achieving this would be to have an access control list where there was an admin account that the video game company controlled. This admin account could confirm that you beat the level and then give you points. The problem with this is that it creates a single point of failure and a single target for trying to attack the system. If there is one key that rules the castle then the whole system is broken if that key is compromised. It also creates a problem with coordination if that Admin account has to be online all the time in order for players to get their points. If you use a commit reveal system then you have a more trustless architecture where you don't need permission to play. This design decision has benefits and drawbacks, but paired with a careful implementation it can allow your game to scale without a single bottle neck or point of failure.
Now that we know what we're building we can get started.
Ignite
Requirements
For this tutorial we will be using Ignite CLI v28.7.0, an easy to use tool for building blockchains. To install ignite visit the docs and find your best way to install for your operating system:
Create a blockchain
Afterwards, you can enter in ignite in your terminal, and should see the following help text displayed:
$ ignite
Ignite CLI is a tool for creating sovereign blockchains built with Cosmos SDK, the world's
most popular modular blockchain framework. Ignite CLI offers everything you need to scaffold,
test, build, and launch your blockchain.

To get started, create a blockchain:

        ignite scaffold chain example

Usage:
  ignite [command]

Available Commands:
  scaffold    Create a new blockchain, module, message, query, and more
  chain       Build, init and start a blockchain node
  generate    Generate clients, API docs from source code
  node        Make requests to a live blockchain node
  account     Create, delete, and show Ignite accounts
  docs        Show Ignite CLI docs
  version     Print the current build information
  app         Create and manage Ignite Apps
  completion  Generates shell completion script.
  testnet     Start a testnet local
  network     Launch a blockchain in production
  relayer     Connect blockchains with an IBC relayer
  help        Help about any command

Flags:
  -h, --help   help for ignite

Use "ignite [command] --help" for more information about a command.
Now that the ignite command is available, you can scaffold an application by using the ignite scaffold chain scavenge command:
$ ignite scaffold chain scavenge --help
Scaffolding is a quick way to generate code for major pieces of your
application.

For details on each scaffolding target (chain, module, message, etc.) run the
corresponding command with a "--help" flag, for example, "ignite scaffold chain
--help".

The Ignite team strongly recommends committing the code to a version control
system before running scaffolding commands. This will make it easier to see the
changes to the source code as well as undo the command if you've decided to roll
back the changes.

This blockchain you create with the chain scaffolding command uses the modular
Cosmos SDK framework and imports many standard modules for functionality like
proof of stake, token transfer, inter-blockchain connectivity, governance, and
more. Custom functionality is implemented in modules located by convention in
the "x/" directory. By default, your blockchain comes with an empty custom
module. Use the module scaffolding command to create an additional module.

An empty custom module doesn't do much, it's basically a container for logic
that is responsible for processing transactions and changing the application
state. Cosmos SDK blockchains work by processing user-submitted signed
transactions, which contain one or more messages. A message contains data that
describes a state transition. A module can be responsible for handling any
number of messages.

A message scaffolding command will generate the code for handling a new type of
Cosmos SDK message. Message fields describe the state transition that the
message is intended to produce if processed without errors.

Scaffolding messages is useful to create individual "actions" that your module
can perform. Sometimes, however, you want your blockchain to have the
functionality to create, read, update and delete (CRUD) instances of a
particular type. Depending on how you want to store the data there are three
commands that scaffold CRUD functionality for a type: list, map, and single.
These commands create four messages (one for each CRUD action), and the logic to
add, delete, and fetch the data from the store. If you want to scaffold only the
logic, for example, you've decided to scaffold messages separately, you can do
that as well with the "--no-message" flag.

Reading data from a blockchain happens with a help of queries. Similar to how
you can scaffold messages to write data, you can scaffold queries to read the
data back from your blockchain application.

You can also scaffold a type, which just produces a new protocol buffer file
with a proto message description. Note that proto messages produce (and
correspond with) Go types whereas Cosmos SDK messages correspond to proto "rpc"
in the "Msg" service.

If you're building an application with custom IBC logic, you might need to
scaffold IBC packets. An IBC packet represents the data sent from one blockchain
to another. You can only scaffold IBC packets in IBC-enabled modules scaffolded
with an "--ibc" flag. Note that the default module is not IBC-enabled.

Usage:
  ignite scaffold [command]

Aliases:
  scaffold, s

Available Commands:
  chain          New Cosmos SDK blockchain
  module         Custom Cosmos SDK module
  list           CRUD for data stored as an array
  map            CRUD for data stored as key-value pairs
  single         CRUD for data stored in a single location
  type           Type definition
  message        Message to perform state transition on the blockchain
  query          Query for fetching data from a blockchain
  packet         Message for sending an IBC packet
  chain-registry Configs for the chain registry

Flags:
  -h, --help   help for scaffold

Use "ignite scaffold [command] --help" for more information about a command.
Run the command
ignite scaffold chain scavenge --no-module
to create your Blockchain App.
You've successfully scaffolded a Cosmos SDK application using ignite! In the next step, we're going to run the application using the instructions provided.
Let's enter the new directory to continue working with our application. Open the terminal in that directory and optimally your IDE or code working environment.
$ cd scavenge
To finish our blockchain template, add the module that we will be working in, the scavenge module:
ignite scaffold module scavenge --dep bank,account
This will create the scavenge module inside the newly create scavenge blockchain. Out of convention, all modules are hosted in the containing x directory. The directory scavenge/x/scavenge should now exist and already be pre-wired with other modules like the bank and account module.
Starting our application
Follow these commands to run our application:
$ ignite chain serve
  Blockchain is running

  👤 alice's account address: cosmos1sz9n7y4cgh9zvc435aczzxv2un7v7x8jr4llke
  👤 bob's account address: cosmos1hc3hzm8me6aqaglvfh35vljys7y2m59lv27wru

  🌍 Tendermint node: http://0.0.0.0:26657
  🌍 Blockchain API: http://0.0.0.0:1317
  🌍 Token faucet: http://0.0.0.0:4500

  ⋆ Data directory: /Users/tobiasschwarz/.scavenge
  ⋆ App binary: /Users/tobiasschwarz/Desktop/go/bin/scavenged

  Press the 'q' key to stop serve
Breaking down the ignite chain serve command
From the output above, we can see the following has occurred:
- Two accounts were created with the respective mnemonics. Later on in this tutorial, you'll use them to log in and interact with your application.
- Our Tendermint consensus engine (think of it as a database) is running at
http://localhost:26657 - A web server is running at
http://localhost:1317 - A faucet for requesting tokens to new accounts is running at
http://localhost:4500
Before starting up our application, the chain serve command runs a build for our Cosmos SDK application.
The build process executed by ignite chain serve is similar to running make install with a Makefile.
After building the application, the serve command initializes the application based on the information provided in the config.yml file:
ersion: 1
validation: sovereign
accounts:
- name: alice
  coins:
  - 20000token
  - 200000000stake
- name: bob
  coins:
  - 10000token
  - 100000000stake
client:
  openapi:
    path: docs/static/openapi.yml
faucet:
  name: bob
  coins:
  - 5token
  - 100000stake
validators:
- name: alice
  bonded: 100000000stake
- name: validator1
  bonded: 100000000stake
- name: validator2
  bonded: 200000000stake
- name: validator3
  bonded: 300000000stake
You can see we've defined two accounts to the genesis, alice and bob, and have set up alice as the validator for the node we're going to run.
This setup can also be performed manually using the scavanged command, which is available after the application is built.
If you want to run the application manually, you can run scavenged start to start your Cosmos SDK application.
$ scavenged start
I[2020-09-27|04:58:19.684] starting ABCI with Tendermint                module=main
I[2020-09-27|04:58:24.900] Executed block                               module=state height=1 validTxs=0 invalidTxs=0
I[2020-09-27|04:58:24.909] Committed state                              module=state height=1 txs=0 appHash=26BB4D82E1E3BCB98EC9EAFE7139D1551B96F5AD98D3A3AE904F42AF39D16DA6
I[2020-09-27|04:58:29.940] Executed block                               module=state height=2 validTxs=0 invalidTxs=0
I[2020-09-27|04:58:29.947] Committed state                              module=state height=2 txs=0 appHash=26BB4D82E1E3BCB98EC9EAFE7139D1551B96F5AD98D3A3AE904F42AF39D16DA6
Application
In this section, we'll be explaining how to quickly scaffold types for your application using the ignite scaffold type command.
Scaffolding Types
Open a new terminal under project's folder and run the following ignite scaffold type command to generate our scavenge-question type:
ignite scaffold type scavenge-question creator question answer bounty:uint completed:bool winner:string
We also want to create a second type, Commit, in order to prevent frontrunning of our submitted solutions as mentioned earlier.
ignite scaffold type committed-answer creator question-id:uint solution
Here, ignite has already done the majority of the work by helping us scaffold the necessary files and functions.
In the next sections, we'll be modifying these to give our application the functionality we want, according to the game.
Messages
Messages are a great place to start when building a module because they define the actions that your application can make. Think of all the scenarios where a user would be able to update the state of the application in any way. These should be boiled down into basic interactions, similar to CRUD (Create, Read, Update, Delete).
Create Scavenge Message
We will need to scaffold messages for our scavenge application.
- Message Create Scavenge
- Message Commit Answer
- Message Reveal Answer
Let's scaffold these messages with the following commands:
Scaffold Create Scavenge
ignite scaffold message create-question question answer bounty:uint
Scaffold Commit Answer
ignite scaffold message commit-answer question-id:uint answer
Scaffold Reveal Answer
ignite scaffold message reveal-answer question-id:uint answer
Keeper
Our keeper stores all our data for our module. Sometimes a module will import the keeper of another module. This will allow state to be shared and modified across modules. Since we are dealing with coins in our module as bounty rewards, we have defined access to the bank module's keeper.
Understanding the Keeper and Store Keys
In our implementation, you'll notice we use different key prefixes like ScavengeQuestionKey, ScavengeQuestionCountKey, and CommittedAnswerKey. These are defined in x/scavenge/types/keys.go and help organize our data storage in the keeper.
The keeper in Cosmos SDK acts as a key-value store, similar to a database. Each piece of data is stored under a unique key, which we need to carefully structure to avoid conflicts and enable efficient querying.
Here's how our keys are organized in keys.go:
const (
    // ModuleName defines the module name
    ModuleName = "scavenge"

    // StoreKey defines the primary module store key
    StoreKey = ModuleName

    // Key prefixes
    ScavengeQuestionKey    = "ScavengeQuestion/value/"
    ScavengeQuestionCountKey = "ScavengeQuestion/count/"
    CommittedAnswerKey       = "CommittedAnswer/value/"
)
For our scavenger hunt game, we store two main types of data:
ScavengeQuestions: Each question is stored with a unique ID (uint64), which we generate using a counter.
CommittedAnswers: Each commit is stored using a combination of the question ID and the creator's address.
Key Construction and Storage
When storing a ScavengeQuestion or CommittedAnswer, we use helper functions to construct the appropriate keys:
// Helper function for ScavengeQuestion IDs
func GetScavengeQuestionIDBytes(id uint64) []byte {
    bz := make([]byte, 8)
    binary.BigEndian.PutUint64(bz, id)
    return bz
}

// Helper function for CommittedAnswer keys
func GetCommittedAnswerKey(questionId uint64, creator string) []byte {
    questionIdBytes := make([]byte, 8)
    binary.BigEndian.PutUint64(questionIdBytes, questionId)

    var key []byte
    key = append(key, KeyPrefix(CommittedAnswerKey)...)
    key = append(key, questionIdBytes...)
    key = append(key, []byte(creator)...)

    return key
}
Now that you've seen the keys where paths for Commit and Scavenge are stored, we need to connect the messages to the storage. This process is called handling the messages and is done inside the Keeper.
Store Prefixes and Iteration
In Cosmos SDK v0.50.11 and higher, we use the store service pattern with prefixes to organize our data. When we need to access all questions or commits, we use the prefix store:
// Example of getting all ScavengeQuestions
func (k Keeper) GetAllScavengeQuestion(ctx sdk.Context) (list []types.ScavengeQuestion) {
    store := prefix.NewStore(k.getStore(ctx), types.KeyPrefix(types.ScavengeQuestionKey))
    iterator := store.Iterator(nil, nil)
    defer iterator.Close()

    for ; iterator.Valid(); iterator.Next() {
        var val types.ScavengeQuestion
        k.cdc.MustUnmarshal(iterator.Value(), &val)
        list = append(list, val)
    }
    return
}
This organization allows us to:
- Store questions with auto-incrementing IDs
- Store commits using a composite key of question ID and creator address
- Efficiently query all questions or commits using prefix iteration
- Prevent key collisions between different types of data
Expected Keeper
In our game we will want to provide bounties to the winners of a scavenge hunt. In order to securely deposit the game bounty, we use the "module account" - an account that can just be controlled by the module itself. In order to use them easily, it was necessary to scaffold our module with the --dep bank dependency. Update the expected keeper file accordingly and add functions like SendCoinsFromAccountToModule or the other way around:
package types

import (
	"context"

	sdk "github.com/cosmos/cosmos-sdk/types"
)

// AccountKeeper defines the expected interface for the Account module.
type AccountKeeper interface {
	GetAccount(context.Context, sdk.AccAddress) sdk.AccountI // only used for simulation
	// Methods imported from account should be defined here
	GetModuleAddress(moduleName string) sdk.AccAddress
}

// BankKeeper defines the expected interface for the Bank module.
type BankKeeper interface {
	SpendableCoins(context.Context, sdk.AccAddress) sdk.Coins
	// Methods imported from bank should be defined here
	SendCoinsFromAccountToModule(context.Context, sdk.AccAddress, string, sdk.Coins) error
	SendCoinsFromModuleToAccount(context.Context, string, sdk.AccAddress, sdk.Coins) error
}

// ParamSubspace defines the expected Subspace interface for parameters.
type ParamSubspace interface {
	Get(context.Context, []byte, interface{})
	Set(context.Context, []byte, interface{})
}
Message Handling
The message handling in our implementation is done through the keeper's message server methods. Each message type (CreateQuestion, CommitAnswer, RevealAnswer) has its own handler that interacts with the keeper's storage methods.
In the context of our scavenger hunt:
- Questions are stored with their encrypted answers (hash of the solution)
- Commits store a hash of both the solution and the committer's address (preventing front-running)
- Reveals verify both the commit and the solution before awarding the bounty
This structured approach to data storage and message handling ensures our scavenger hunt game is both secure and efficient.
The message server acts as the controller layer between the incoming messages and the keeper's storage methods. If you're familiar with MVC architecture, the keeper is like the Model (data layer), and the message server is like the Controller (business logic layer). In React/Redux terms, the keeper is similar to the Store/Reducer, while the message server methods are like Action Handlers.
Our message server implementation is structured as follows:
- The message server is initialised in
x/scavenge/keeper/msg_server.go
// NewMsgServerImpl returns an implementation of the MsgServer interface
// for the provided Keeper.
func NewMsgServerImpl(keeper Keeper) types.MsgServer {
	return &msgServer{Keeper: keeper}
}

var _ types.MsgServer = msgServer{}
- For every message that we scaffolded, we now have a new file
msg_server_SCAFFOLDED_MESSAGE. In our case, we start with thecreate-questionmessage. Now open the filemsg_server_create_question.goand you will see a newly scaffolded message without the logic yet. Add the following code to create new scavenges:
package keeper

import (
	"context"

	"scavenge/x/scavenge/types"

	errorsmod "cosmossdk.io/errors"
	sdkmath "cosmossdk.io/math"
	sdk "github.com/cosmos/cosmos-sdk/types"
	sdkerrors "github.com/cosmos/cosmos-sdk/types/errors"
)

func (k msgServer) CreateQuestion(goCtx context.Context, msg *types.MsgCreateQuestion) (*types.MsgCreateQuestionResponse, error) {
	ctx := sdk.UnwrapSDKContext(goCtx)

	// Get the next question ID
	count := k.GetScavengeQuestionCount(ctx)

	// Create a new scavenge question
	question := types.ScavengeQuestion{
		Id:              count,
		Creator:         msg.Creator,
		Question:        msg.Question,
		Answer:          msg.Answer,
		Bounty:          msg.Bounty,
		Completed:       false,
		Winner:          "",
	}

	// Lock the bounty in the module account
	creator, err := sdk.AccAddressFromBech32(msg.Creator)
	if err != nil {
		return nil, errorsmod.Wrap(sdkerrors.ErrInvalidAddress, "invalid creator address")
	}

	coins := sdk.NewCoins(sdk.NewCoin(types.ChainDenom, sdkmath.NewInt(int64(msg.Bounty))))
	if err := k.bankKeeper.SendCoinsFromAccountToModule(ctx, creator, types.ModuleName, coins); err != nil {
		return nil, errorsmod.Wrap(err, "failed to lock bounty")
	}

	k.SetScavengeQuestion(ctx, question)
	k.SetScavengeQuestionCount(ctx, count+1)

	return &types.MsgCreateQuestionResponse{
		Id: count,
	}, nil
}
We also need the helper function GetScavengeQuestionCount. Create a new go file for this where we can store helper function.
I call this scavenge_question.go within the keeper directory.
Add the two functions that we need above:
package keeper

import (
	"encoding/binary"
	"scavenge/x/scavenge/types"

	"cosmossdk.io/store/prefix"
	sdk "github.com/cosmos/cosmos-sdk/types"
)

// GetScavengeQuestionCount get the total number of scavengeQuestion
func (k Keeper) GetScavengeQuestionCount(ctx sdk.Context) uint64 {
	store := k.getStore(ctx)
	byteKey := types.KeyPrefix(types.ScavengeCountKey)
	bz := store.Get(byteKey)
	if bz == nil {
		return 0
	}
	return binary.BigEndian.Uint64(bz)
}

// SetScavengeQuestion store a specific scavengeQuestion in the store
func (k Keeper) SetScavengeQuestion(ctx sdk.Context, scavengeQuestion types.ScavengeQuestion) uint64 {
	store := prefix.NewStore(k.getStore(ctx), types.KeyPrefix(types.ScavengeKey))
	appendedValue := k.cdc.MustMarshal(&scavengeQuestion)

	// Get the current count
	count := k.GetScavengeQuestionCount(ctx)

	// Store using the count as the ID
	store.Set(GetScavengeQuestionIDBytes(count), appendedValue)

	// Update the count
	k.SetScavengeQuestionCount(ctx, count+1)

	return count
}
Message Commit Answer
Now that the Keeper knows how to store the Question. Let's look at the Commit Answer part. Open x/scavenge/keeper/msg_server_commit_answer.go.
A user commits to answering a question.
package keeper

import (
	"context"
	"strconv"

	"scavenge/x/scavenge/types"

	errorsmod "cosmossdk.io/errors"
	sdk "github.com/cosmos/cosmos-sdk/types"
	sdkerrors "github.com/cosmos/cosmos-sdk/types/errors"
)

func (k msgServer) CommitAnswer(goCtx context.Context, msg *types.MsgCommitAnswer) (*types.MsgCommitAnswerResponse, error) {
	ctx := sdk.UnwrapSDKContext(goCtx)

	// Hash of solution and scavenger combined - this prevents front-running
	commit := types.CommittedAnswer{
		QuestionId: msg.QuestionId,
		HashAnswer: msg.HashAnswer, // This should be hash(solution + creator)
		Creator:    msg.Creator,
	}

	// Check if a commit already exists
	_, found := k.GetCommittedAnswer(ctx, msg.QuestionId, msg.Creator)
	if found {
		return nil, errorsmod.Wrap(sdkerrors.ErrInvalidRequest, "commit already exists for this question and creator")
	}

	k.SetCommittedAnswer(ctx, commit)

	return &types.MsgCommitAnswerResponse{}, nil
}
Message Reveal Answer
After commiting, you are ready to reveal the answer. Open x/scavenge/keeper/msg_server_reveal_answer.go.
package keeper

import (
	"context"
	"strconv"

	"scavenge/x/scavenge/types"

	"crypto/sha256"
	"encoding/hex"

	errorsmod "cosmossdk.io/errors"
	sdkmath "cosmossdk.io/math"
	sdk "github.com/cosmos/cosmos-sdk/types"
	sdkerrors "github.com/cosmos/cosmos-sdk/types/errors"
)

func (k msgServer) RevealAnswer(goCtx context.Context, msg *types.MsgRevealAnswer) (*types.MsgRevealAnswerResponse, error) {
	ctx := sdk.UnwrapSDKContext(goCtx)

	// Get the question
	question, found := k.GetScavengeQuestion(ctx, msg.QuestionId)
	if !found {
		return nil, errorsmod.Wrap(sdkerrors.ErrKeyNotFound, "question not found")
	}

	if question.Completed {
		return nil, errorsmod.Wrap(sdkerrors.ErrInvalidRequest, "question already completed")
	}

	// First verify the commit exists by recreating the hash of solution + creator
	plainTextSha := sha256.Sum256([]byte(msg.PlainText))
	encodedPlainText := hex.EncodeToString(plainTextSha[:])

	solutionScavengerBytes := []byte(encodedPlainText + msg.Creator)
	solutionScavengerHash := sha256.Sum256(solutionScavengerBytes)
	commitHash := hex.EncodeToString(solutionScavengerHash[:])

	// Get the commit
	commit, found := k.GetCommittedAnswer(ctx, msg.QuestionId, msg.Creator)
	if !found {
		return nil, errorsmod.Wrap(sdkerrors.ErrInvalidRequest, "no commit found: must commit before reveal")
	}

	// Verify the hash matches their commit
	if commitHash != commit.HashAnswer {
		return nil, errorsmod.Wrap(sdkerrors.ErrInvalidRequest, "committed hash does not match: "+commitHash)
	}

	// Verify the solution hash matches the question's encrypted answer
	if encodedPlainText != question.EncryptedAnswer {
		return nil, errorsmod.Wrap(sdkerrors.ErrInvalidRequest, "incorrect answer "+msg.PlainText+": "+encodedPlainText+" vs "+question.EncryptedAnswer)
	}

	// Award the bounty
	winner, err := sdk.AccAddressFromBech32(msg.Creator)
	if err != nil {
		return nil, errorsmod.Wrap(sdkerrors.ErrInvalidAddress, "invalid winner address")
	}

	coins := sdk.NewCoins(sdk.NewCoin(types.ChainDenom, sdkmath.NewInt(int64(question.Bounty))))
	if err := k.bankKeeper.SendCoinsFromModuleToAccount(ctx, types.ModuleName, winner, coins); err != nil {
		return nil, errorsmod.Wrap(err, "failed to send bounty")
	}

	// Update the question
	question.Completed = true
	question.Winner = msg.Creator
	k.SetScavengeQuestion(ctx, question)

	return &types.MsgRevealAnswerResponse{}, nil
}
In this function we replicate the commit-reveal scheme and verify if it has been followed. This includes re-creating the commit hash and checking if it has been followed. Afterwards checking if the provided answer matches the solution by the Creator of the Question. If all checks go successful, the Bounty is awarded to the user and the challenge switches "Completed" to true and the Winner to the User.
In order for these commands to be userfriendly, we do not want them to do the hashing of the answers themselves. But they also should not end up on the blockchain in plain text. We need to interrupt between the user entering the solution and anything submitted on the blockchain. To do this, we need to create a new client.
The Client
Normally your application probably works totally fine with the AutoCLI feature that Ignite provides for you in x/scavenge/module/autocli.go.
For this application, we need to interrupt and hash the user input before it becomes written on the blockchain for everyone to see. Else the commit-reveal scheme would not make sense.
Using the standard tree for Cosmos blockchains, create a client and within cli directory in x/scavenge.
In the cli directory create a new file tx.go.
This file now is in x/scavenge/client/cli/tx.go and will be issuing Cobra commands to the user. This procedure will override the autocli commands.
Let's initiate cobra with the following code:
package cli

import (
	"crypto/sha256"
	"encoding/hex"
	"fmt"
	"strconv"

	"github.com/spf13/cobra"

	"scavenge/x/scavenge/types"

	"github.com/cosmos/cosmos-sdk/client"
	"github.com/cosmos/cosmos-sdk/client/flags"
	"github.com/cosmos/cosmos-sdk/client/tx"
)

// GetTxCmd returns the transaction commands for the scavenge module
func GetTxCmd() *cobra.Command {
	cmd := &cobra.Command{
		Use:                        types.ModuleName,
		Short:                      fmt.Sprintf("%s transactions subcommands", types.ModuleName),
		DisableFlagParsing:         true,
		SuggestionsMinimumDistance: 2,
		RunE:                       client.ValidateCmd,
	}

	cmd.AddCommand(
		CmdCreateQuestion(),
		CmdCommitAnswer(),
		CmdRevealAnswer(),
	)

	return cmd
}
Client Create Question
That the Creator of a question can put the answer in plain text without having to sha256 hash on its own, we provide the hashing in the Client.
This command looks as follows:
func CmdCreateQuestion() *cobra.Command {
	cmd := &cobra.Command{
		Use:   "create-question [question] [answer] [bounty]",
		Short: "Create a new scavenge question with a bounty",
		Args:  cobra.ExactArgs(3),
		RunE: func(cmd *cobra.Command, args []string) error {
			clientCtx, err := client.GetClientTxContext(cmd)
			if err != nil {
				return err
			}

			question := args[0]
			answer := args[1]

			// Hash the answer
			answerHash := sha256.Sum256([]byte(answer))
			answerHashString := hex.EncodeToString(answerHash[:])

			bounty, err := strconv.ParseUint(args[2], 10, 64)
			if err != nil {
				return err
			}

			msg := types.NewMsgCreateQuestion(
				clientCtx.GetFromAddress().String(),
				question,
				answerHashString,
				bounty,
			)

			return tx.GenerateOrBroadcastTxCLI(clientCtx, cmd.Flags(), msg)
		},
	}

	flags.AddTxFlagsToCmd(cmd)
	return cmd
}
As you can see, we have three arguments being entered, the question, answer and bounty.
The answer becomes a sha256 hash of the answer before it get's forwarded to the Message and the Keeper.
Client Commit Answer
func CmdCommitAnswer() *cobra.Command {
	cmd := &cobra.Command{
		Use:   "commit-answer [question-id] [solution]",
		Short: "Commit a answer to a scavenge question",
		Args:  cobra.ExactArgs(2),
		RunE: func(cmd *cobra.Command, args []string) error {
			clientCtx, err := client.GetClientTxContext(cmd)
			if err != nil {
				return err
			}

			questionID, err := strconv.ParseUint(args[0], 10, 64)
			if err != nil {
				return err
			}

			// Get the solution from args
			solution := args[1]

			// Get creator address
			creator := clientCtx.GetFromAddress().String()

			plainTextSha := sha256.Sum256([]byte(solution))
			encodedPlainText := hex.EncodeToString(plainTextSha[:])

			// Create the hash from solution and creator address
			hash := sha256.Sum256([]byte(encodedPlainText + creator))
			hashString := hex.EncodeToString(hash[:])

			msg := types.NewMsgCommitAnswer(
				creator,
				questionID,
				hashString,
			)

			return tx.GenerateOrBroadcastTxCLI(clientCtx, cmd.Flags(), msg)
		},
	}

	flags.AddTxFlagsToCmd(cmd)
	return cmd
}
For the Commit-Solution scheme we want to create a new hash as described before, a combination of the answer and the person submitting the answer.
This is enabled with the line hash := sha256.Sum256([]byte(encodedPlainText + creator)). Later with submitting the final answer we can check if with the answer and the creator of the solution this holds true. Let's look at the final part revealing the answer.
Client Reveal Answer
func CmdRevealAnswer() *cobra.Command {
	cmd := &cobra.Command{
		Use:   "reveal-answer [question-id] [solution]",
		Short: "Reveal the answer for a committed answer",
		Args:  cobra.ExactArgs(2),
		RunE: func(cmd *cobra.Command, args []string) error {
			clientCtx, err := client.GetClientTxContext(cmd)
			if err != nil {
				return err
			}

			questionID, err := strconv.ParseUint(args[0], 10, 64)
			if err != nil {
				return err
			}

			answer := args[1]

			// Hash the answer
			answerHash := sha256.Sum256([]byte(answer))
			answerHashString := hex.EncodeToString(answerHash[:])

			msg := types.NewMsgRevealAnswer(
				clientCtx.GetFromAddress().String(),
				questionID,
				answerHashString,
				args[1],
			)

			return tx.GenerateOrBroadcastTxCLI(clientCtx, cmd.Flags(), msg)
		},
	}

	flags.AddTxFlagsToCmd(cmd)
	return cmd
}
As you can see in the code, we submit now both, the hashed answer and plain text to the chain for everyone to see. The bounty is only payed if all the hashes turn out to be correct.
Events
At the end of each message is an EventManager which will create logs within the transaction that reveals information about what occurred during the handling of this message. This is useful for client side software that wants to know exactly what happened as a result of this state transition.
Let's add events to our message handlers.
Event Create Question
We put the event right before returning, after all checks were successful and the data written to the blockchain. Let's create the event within msg_server_create_question.go:
	k.SetScavengeQuestion(ctx, question)
	k.SetScavengeQuestionCount(ctx, count+1)

	ctx.EventManager().EmitEvent(
		sdk.NewEvent(
			sdk.EventTypeMessage,
			sdk.NewAttribute(sdk.AttributeKeyModule, types.ModuleName),
			sdk.NewAttribute(sdk.AttributeKeyAction, "create_question"),
			sdk.NewAttribute(types.AttributeKeyQuestionId, strconv.FormatUint(count, 10)),
			sdk.NewAttribute(types.AttributeKeyCreator, msg.Creator),
			sdk.NewAttribute(types.AttributeKeyBounty, strconv.FormatUint(msg.Bounty, 10)),
		),
	)

	return &types.MsgCreateQuestionResponse{
		Id: count,
	}, nil
Event Commit Answer
k.SetCommittedAnswer(ctx, commit)

	ctx.EventManager().EmitEvent(
		sdk.NewEvent(
			sdk.EventTypeMessage,
			sdk.NewAttribute(sdk.AttributeKeyModule, types.ModuleName),
			sdk.NewAttribute(sdk.AttributeKeyAction, "commit_answer"),
			sdk.NewAttribute(types.AttributeKeyQuestionId, strconv.FormatUint(msg.QuestionId, 10)),
			sdk.NewAttribute(types.AttributeKeyCommitter, msg.Creator),
			sdk.NewAttribute(types.AttributeKeyCommitHash, msg.HashAnswer),
		),
	)

	return &types.MsgCommitAnswerResponse{}, nil
Event Reveal Answer
k.SetScavengeQuestion(ctx, question)

	ctx.EventManager().EmitEvent(
		sdk.NewEvent(
			sdk.EventTypeMessage,
			sdk.NewAttribute(sdk.AttributeKeyModule, types.ModuleName),
			sdk.NewAttribute(sdk.AttributeKeyAction, "reveal_answer"),
			sdk.NewAttribute(types.AttributeKeyQuestionId, strconv.FormatUint(msg.QuestionId, 10)),
			sdk.NewAttribute(types.AttributeKeyWinner, msg.Creator),
			sdk.NewAttribute(types.AttributeKeyBounty, strconv.FormatUint(question.Bounty, 10)),
		),
	)

	return &types.MsgRevealAnswerResponse{}, nil
Event Types
With these events we are adding a few new types, let's define them in the keys.go file within our types directory:
	AttributeKeyQuestionId = "question_id"
	AttributeKeyCreator    = "creator"
	AttributeKeyBounty     = "bounty"
	AttributeKeyCommitter  = "committer"
	AttributeKeyCommitHash = "commit_hash"
	AttributeKeyWinner     = "winner"
Done - you now have the Events specified,.
Querier
In order to query the data of our app we need to make it accessible using Queries.
Ignite helps us build the skeleton of the queries and we can implement their logic.
Let's first scaffold our queries, we want:
- List Questions
- List Commits
- Show Question
- Show Commit
Starting with the List Questions Query. It will list all the questions every added to the chain scaffold it using:
ignite scaffold query list-questions
Next, let's look at querying a single question with:
ignite scaffold query show-question question-id:uint
Now let's continue with the Commits which look very similar.
ignite scaffold query list-commits
and for the individual commit:
ignite scaffold query show-commit question-id:uint creator
Let's add to our x/scavenge/keeper/scavenge_question.go file helper function for getting these data.
// GetScavengeQuestion returns a scavengeQuestion from its id
func (k Keeper) GetScavengeQuestion(ctx sdk.Context, id uint64) (val types.ScavengeQuestion, found bool) {
	store := prefix.NewStore(k.getStore(ctx), types.KeyPrefix(types.ScavengeKey))
	b := store.Get(GetScavengeQuestionIDBytes(id))
	if b == nil {
		return val, false
	}
	k.cdc.MustUnmarshal(b, &val)
	return val, true
}


// SetScavengeQuestionCount set the total number of scavengeQuestion
func (k Keeper) SetScavengeQuestionCount(ctx sdk.Context, count uint64) {
	store := k.getStore(ctx)
	byteKey := types.KeyPrefix(types.ScavengeCountKey)
	bz := make([]byte, 8)
	binary.BigEndian.PutUint64(bz, count)
	store.Set(byteKey, bz)
}

// Helper function to convert ID to bytes
func GetScavengeQuestionIDBytes(id uint64) []byte {
	bz := make([]byte, 8)
	binary.BigEndian.PutUint64(bz, id)
	return bz
}

// GetAllScavengeQuestion returns all scavenge questions
func (k Keeper) GetAllScavengeQuestion(ctx sdk.Context) (list []types.ScavengeQuestion) {
	store := prefix.NewStore(k.getStore(ctx), types.KeyPrefix(types.ScavengeKey))
	iterator := store.Iterator(nil, nil)
	defer iterator.Close()

	for ; iterator.Valid(); iterator.Next() {
		var val types.ScavengeQuestion
		k.cdc.MustUnmarshal(iterator.Value(), &val)
		list = append(list, val)
	}

	return list
}

func (k Keeper) GetAllCommittedAnswer(ctx sdk.Context) (list []types.CommittedAnswer) {
	store := prefix.NewStore(k.getStore(ctx), types.KeyPrefix(types.CommitKeyPrefix))
	iterator := store.Iterator(nil, nil)
	defer iterator.Close()

	for ; iterator.Valid(); iterator.Next() {
		var val types.CommittedAnswer
		k.cdc.MustUnmarshal(iterator.Value(), &val)
		list = append(list, val)
	}

	return list
}
Now we can easily add these functionality to our queries. Let's start with the query for List all Questions:
Open the file x/scavenge/keeper/query_list_questions.go
package keeper

import (
	"context"

	"scavenge/x/scavenge/types"

	sdk "github.com/cosmos/cosmos-sdk/types"
	"google.golang.org/grpc/codes"
	"google.golang.org/grpc/status"
)

func (k Keeper) ListQuestions(goCtx context.Context, req *types.QueryListQuestionsRequest) (*types.QueryListQuestionsResponse, error) {
	if req == nil {
		return nil, status.Error(codes.InvalidArgument, "invalid request")
	}

	sdkCtx := sdk.UnwrapSDKContext(goCtx)
	questions := k.GetAllScavengeQuestion(sdkCtx)

	return &types.QueryListQuestionsResponse{
		ScavengeQuestion: questions,
	}, nil
}
This is quite self-explanatory since we're using the before defined helper functions. Let's continue with the next files.
In x/scavenge/keeper/query_show_question.go
package keeper

import (
	"context"

	"scavenge/x/scavenge/types"

	sdk "github.com/cosmos/cosmos-sdk/types"
	"google.golang.org/grpc/codes"
	"google.golang.org/grpc/status"
)

func (k Keeper) ShowQuestion(goCtx context.Context, req *types.QueryShowQuestionRequest) (*types.QueryShowQuestionResponse, error) {
	if req == nil {
		return nil, status.Error(codes.InvalidArgument, "invalid request")
	}

	ctx := sdk.UnwrapSDKContext(goCtx)

	question, found := k.GetScavengeQuestion(ctx, req.QuestionId)
	if !found {
		return nil, status.Error(codes.NotFound, "question not found")
	}

	return &types.QueryShowQuestionResponse{
		ScavengeQuestion: question,
	}, nil
}
In x/scavenge/keeper/query_list_commits.go
package keeper

import (
	"context"

	"scavenge/x/scavenge/types"

	sdk "github.com/cosmos/cosmos-sdk/types"
	"google.golang.org/grpc/codes"
	"google.golang.org/grpc/status"
)

func (k Keeper) ListCommits(goCtx context.Context, req *types.QueryListCommitsRequest) (*types.QueryListCommitsResponse, error) {
	if req == nil {
		return nil, status.Error(codes.InvalidArgument, "invalid request")
	}

	ctx := sdk.UnwrapSDKContext(goCtx)

	commits := k.GetAllCommittedAnswer(ctx)

	return &types.QueryListCommitsResponse{
		CommittedAnswer: commits,
	}, nil
}
and in x/scavenge/keeper/query_show_commit.go
package keeper

import (
	"context"

	"scavenge/x/scavenge/types"

	sdk "github.com/cosmos/cosmos-sdk/types"
	"google.golang.org/grpc/codes"
	"google.golang.org/grpc/status"
)

func (k Keeper) ShowCommit(goCtx context.Context, req *types.QueryShowCommitRequest) (*types.QueryShowCommitResponse, error) {
	if req == nil {
		return nil, status.Error(codes.InvalidArgument, "invalid request")
	}

	ctx := sdk.UnwrapSDKContext(goCtx)

	commit, found := k.GetCommittedAnswer(ctx, req.QuestionId, req.Creator)
	if !found {
		return nil, status.Error(codes.NotFound, "commit not found")
	}

	return &types.QueryShowCommitResponse{
		CommittedAnswer: commit,
	}, nil
}
That's it! Now we want to start the chain with the command:
ignite chain serve --reset-once
Play
Your application is running! That's great but who cares unless you can play with it. The first command you will want to try is creating a new scavenge. Since our user alice has way more stake token than the user bob, let's create the scavenge from their account.
You can begin by running scavenged tx scavenge --help to see all the commands we created for your new module. You should see the following options:
$ scavenged tx scavenge --help
scavenge transactions subcommands

Usage:
  scavenged tx scavenge [flags]
  scavenged tx scavenge [command]

Available Commands:
  commit-answer     Commit a answer to a scavenge question
  complete-question Execute the CompleteQuestion RPC method
  create-question   Create a new scavenge question with a bounty
  reveal-answer     Reveal the answer for a committed answer

Flags:
  -h, --help   help for scavenge

Global Flags:
      --chain-id string     The network chain ID (default "scavenge")
      --home string         directory for config and data (default "/Users/tobiasschwarz/.scavenge")
      --log_format string   The logging format (json|plain) (default "plain")
      --log_level string    The logging level (trace|debug|info|warn|error|fatal|panic|disabled or '*:<level>,<key>:<level>') (default "info")
      --log_no_color        Disable colored logs
      --trace               print out full stack trace on errors

Use "scavenged tx scavenge [command] --help" for more information about a command.
We want to use the create-question command so let's check the help screen for it as well like scavenged tx scavenge create-question --help. It should look like:
$ scavenged tx scavenge create-question --help
Create a new scavenge question with a bounty

Usage:
  scavenged tx scavenge create-question [question] [answer] [bounty] [flags]
Let's follow the instructions and create a new scavenge. The first parameter we need is the question.
Next we should list our solution, but probably we should also know what the actual quesiton is that our solution solves (our description).
How about our challenge question be something family friendly like: I have cities, but no houses. I have mountains, but no trees. I have water, but no fish. I have roads, but no cars. What am I?. Of course the solution to this question is: map.
Let's give away 69token as a reward for solving our scavenge (nice).
Now we have all the pieces needed to create our Message. Let's piece them all together, adding the flag --from so the CLI knows who is sending it:
scavenged tx scavenge create-question "I have cities, but no houses. I have mountains, but no trees. I have water, but no fish. I have roads, but no cars. What am I?" "map" 69 --from alice --chain-id scavenge
After confirming the message looks correct and signing it, you should see something like the following:
auth_info:
  fee:
    amount: []
    gas_limit: "200000"
    granter: ""
    payer: ""
  signer_infos: []
  tip: null
body:
  extension_options: []
  memo: ""
  messages:
  - '@type': /scavenge.scavenge.MsgCreateQuestion
    bounty: "69"
    creator: cosmos13ynhy7670sre5pw97kx6pnu4hl6yhn7f3m0zl0
    encryptedAnswer: 60be9861750facbfad8758254a2f76c0cfe78d54459a3bc187d49b1401fcd8e8
    question: I have cities, but no houses. I have mountains, but no trees. I have
      water, but no fish. I have roads, but no cars. What am I?
  non_critical_extension_options: []
  timeout_height: "0"
signatures: []
confirm transaction before signing and broadcasting [y/N]: y
code: 0
codespace: ""
data: ""
events: []
gas_used: "0"
gas_wanted: "0"
height: "0"
info: ""
logs: []
raw_log: ""
timestamp: ""
tx: null
txhash: 1A36A8C594544DA0E86AAD5C6CA4F0238644F15D715288D8637DDF009D3944DD
This tells you that the message was accepted into the app. Whether the message failed afterwards can not be told from this screen. However, the section under txhash is like a receipt for this interaction. To see if it was successfully processed after being successfully included you can run the following command:
scavenged q tx <txhash>
But replace the <txhash> with your own. You should see something similar to this afterwards:
code: 0
codespace: ""
data: 122E0A2C2F73636176656E67652E73636176656E67652E4D73674372656174655175657374696F6E526573706F6E7365
events:
- attributes:
  - index: true
    key: fee
    value: ""
  - index: true
    key: fee_payer
    value: cosmos13ynhy7670sre5pw97kx6pnu4hl6yhn7f3m0zl0
  type: tx
- attributes:
  - index: true
    key: acc_seq
    value: cosmos13ynhy7670sre5pw97kx6pnu4hl6yhn7f3m0zl0/1
  type: tx
- attributes:
  - index: true
    key: signature
    value: 6HDhd5rv8JpSorEkywS+Zt5l0DSc6jM0hx4YcgY/NA0v8HU9+cYvA0wYQxsJVXPRjfEBT+yOaYNHXrlB4TOBoA==
  type: tx
- attributes:
  - index: true
    key: action
    value: /scavenge.scavenge.MsgCreateQuestion
  - index: true
    key: sender
    value: cosmos13ynhy7670sre5pw97kx6pnu4hl6yhn7f3m0zl0
  - index: true
    key: msg_index
    value: "0"
  type: message
- attributes:
  - index: true
    key: spender
    value: cosmos13ynhy7670sre5pw97kx6pnu4hl6yhn7f3m0zl0
  - index: true
    key: amount
    value: 69stake
  - index: true
    key: msg_index
    value: "0"
  type: coin_spent
- attributes:
  - index: true
    key: receiver
    value: cosmos13aupkh5020l9u6qquf7lvtcxhtr5jjama2kwyg
  - index: true
    key: amount
    value: 69stake
  - index: true
    key: msg_index
    value: "0"
  type: coin_received
- attributes:
  - index: true
    key: recipient
    value: cosmos13aupkh5020l9u6qquf7lvtcxhtr5jjama2kwyg
  - index: true
    key: sender
    value: cosmos13ynhy7670sre5pw97kx6pnu4hl6yhn7f3m0zl0
  - index: true
    key: amount
    value: 69stake
  - index: true
    key: msg_index
    value: "0"
  type: transfer
- attributes:
  - index: true
    key: sender
    value: cosmos13ynhy7670sre5pw97kx6pnu4hl6yhn7f3m0zl0
  - index: true
    key: msg_index
    value: "0"
  type: message
- attributes:
  - index: true
    key: module
    value: scavenge
  - index: true
    key: action
    value: create_question
  - index: true
    key: question_id
    value: "0"
  - index: true
    key: creator
    value: cosmos13ynhy7670sre5pw97kx6pnu4hl6yhn7f3m0zl0
  - index: true
    key: bounty
    value: "69"
  - index: true
    key: msg_index
    value: "0"
  type: message
gas_used: "81136"
gas_wanted: "200000"
height: "114"
info: ""
logs: []
raw_log: ""
timestamp: "2025-01-28T16:07:16Z"
tx:
  '@type': /cosmos.tx.v1beta1.Tx
  auth_info:
    fee:
      amount: []
      gas_limit: "200000"
      granter: ""
      payer: ""
    signer_infos:
    - mode_info:
        single:
          mode: SIGN_MODE_DIRECT
      public_key:
        '@type': /cosmos.crypto.secp256k1.PubKey
        key: Al8ngYEK4fGX2VooGy9VItcp8r53ntdFpHNpnnwyWDNv
      sequence: "1"
    tip: null
  body:
    extension_options: []
    memo: ""
    messages:
    - '@type': /scavenge.scavenge.MsgCreateQuestion
      bounty: "69"
      creator: cosmos13ynhy7670sre5pw97kx6pnu4hl6yhn7f3m0zl0
      encryptedAnswer: 60be9861750facbfad8758254a2f76c0cfe78d54459a3bc187d49b1401fcd8e8
      question: I have cities, but no houses. I have mountains, but no trees. I have
        water, but no fish. I have roads, but no cars. What am I?
    non_critical_extension_options: []
    timeout_height: "0"
  signatures:
  - 6HDhd5rv8JpSorEkywS+Zt5l0DSc6jM0hx4YcgY/NA0v8HU9+cYvA0wYQxsJVXPRjfEBT+yOaYNHXrlB4TOBoA==
txhash: 1A36A8C594544DA0E86AAD5C6CA4F0238644F15D715288D8637DDF009D3944DD
Here you can see all the events we defined within our Handler that describes exactly what happened when this message was processed. Since our message was formatted correctly and since the user alice had enough stake to pay the bounty, our Scavenge was accepted. You can also see what the solution looks like now that it has been hashed:
encryptedAnswer: 60be9861750facbfad8758254a2f76c0cfe78d54459a3bc187d49b1401fcd8e8
Let's query the question for more details:
$ scavenged q scavenge list-questions
The ourput is
scavengeQuestion:
- bounty: "69"
  creator: cosmos13ynhy7670sre5pw97kx6pnu4hl6yhn7f3m0zl0
  encryptedAnswer: 60be9861750facbfad8758254a2f76c0cfe78d54459a3bc187d49b1401fcd8e8
  question: I have cities, but no houses. I have mountains, but no trees. I have water,
    but no fish. I have roads, but no cars. What am I?
Since we know the solution to this question and since we have another user at hand that can submit it, let's begin the process of committing and revealing that solution.
First we should check the CLI command for commit-answer by running scavenged tx scavenge commit-answer --help in order to see:
$ scavenged tx scavenge commit-answer --help
Commit a answer to a scavenge question

Usage:
  scavenged tx scavenge commit-answer [question-id] [solution] [flags]
Let's follow the instructions and submit the answer as a commit on behalf of bob:
scavenged tx scavenge commit-answer 0 "map" --from bob --chain-id scavenge -y
This time we're passing the -y to auto-confirm the transaction. Afterwards, we should see our txhash again. To confirm the txhash let's look at it again with scavenged q tx <txhash>. This time you should see something like:
code: 0
codespace: ""
data: 122C0A2A2F73636176656E67652E73636176656E67652E4D7367436F6D6D6974416E73776572526573706F6E7365
events:
- attributes:
  - index: true
    key: fee
    value: ""
  - index: true
    key: fee_payer
    value: cosmos1wlchtxjg8vkznh5qz0t30t3kdyjhgnzyj5xrs5
  type: tx
- attributes:
  - index: true
    key: acc_seq
    value: cosmos1wlchtxjg8vkznh5qz0t30t3kdyjhgnzyj5xrs5/0
  type: tx
- attributes:
  - index: true
    key: signature
    value: jOAEXAqQ7REC61wTFyr/mU9MvQ0+DhssnXG9D8ziuaBa4Wh5WU5Nm7ukW3D9X/Nt/R+uVoCvGyk31ZB5R49GjQ==
  type: tx
- attributes:
  - index: true
    key: action
    value: /scavenge.scavenge.MsgCommitAnswer
  - index: true
    key: sender
    value: cosmos1wlchtxjg8vkznh5qz0t30t3kdyjhgnzyj5xrs5
  - index: true
    key: msg_index
    value: "0"
  type: message
- attributes:
  - index: true
    key: module
    value: scavenge
  - index: true
    key: action
    value: commit_answer
  - index: true
    key: question_id
    value: "0"
  - index: true
    key: committer
    value: cosmos1wlchtxjg8vkznh5qz0t30t3kdyjhgnzyj5xrs5
  - index: true
    key: commit_hash
    value: 35384ce20f46773ab0ca7e363a1785479986de00c4c8a53b3a2f9f0f75d8e811
  - index: true
    key: msg_index
    value: "0"
  type: message
gas_used: "52523"
gas_wanted: "200000"
height: "628"
info: ""
logs: []
raw_log: ""
timestamp: "2025-01-28T16:16:36Z"
tx:
  '@type': /cosmos.tx.v1beta1.Tx
  auth_info:
    fee:
      amount: []
      gas_limit: "200000"
      granter: ""
      payer: ""
    signer_infos:
    - mode_info:
        single:
          mode: SIGN_MODE_DIRECT
      public_key:
        '@type': /cosmos.crypto.secp256k1.PubKey
        key: AvfeuRZsoTJS6CdbRbCXLva5iN1hSSgzUIHbL1Q/wXW0
      sequence: "0"
    tip: null
  body:
    extension_options: []
    memo: ""
    messages:
    - '@type': /scavenge.scavenge.MsgCommitAnswer
      creator: cosmos1wlchtxjg8vkznh5qz0t30t3kdyjhgnzyj5xrs5
      hashAnswer: 35384ce20f46773ab0ca7e363a1785479986de00c4c8a53b3a2f9f0f75d8e811
      questionId: "0"
    non_critical_extension_options: []
    timeout_height: "0"
  signatures:
  - jOAEXAqQ7REC61wTFyr/mU9MvQ0+DhssnXG9D8ziuaBa4Wh5WU5Nm7ukW3D9X/Nt/R+uVoCvGyk31ZB5R49GjQ==
txhash: FC98E639BA1094093A582255ADE211577A78BCC04BBB280341E234FCFC5585BF
You'll notice that the solutionHash matches the one before. We've also created a new hash for the solutionScavengerHash which is the combination of the solution and our account address. We can make sure the commit has been made by querying it directly as well:
scavenged q scavenge list-commits
Hopefully you should see something like:
committedAnswer:
- creator: cosmos1wlchtxjg8vkznh5qz0t30t3kdyjhgnzyj5xrs5
  hashAnswer: 35384ce20f46773ab0ca7e363a1785479986de00c4c8a53b3a2f9f0f75d8e811
This confirms that your commit was successfully submitted and is awaiting the follow-up reveal. To make that command let's first check the --help command using scavenged tx scavenge reveal-answer --help. This should show the following screen:
$ scavenged tx scavenge reveal-answer --help
Reveal the answer for a committed answer

Usage:
  scavenged tx scavenge reveal-answer [question-id] [solution] [flags]
Since all we need is the solution again let's send and confirm our final message:
scavenged tx scavenge reveal-answer 0 "map" --from bob --chain-id scavenge
We can gather the txhash and query it again using scavenged q tx <txhash> to reveal:
code: 0
codespace: ""
data: 122C0A2A2F73636176656E67652E73636176656E67652E4D736752657665616C416E73776572526573706F6E7365
events:
- attributes:
  - index: true
    key: fee
    value: ""
  - index: true
    key: fee_payer
    value: cosmos1y4ydygwmfv5uyq8aeu0htfzyjeecakgpnu99zg
  type: tx
- attributes:
  - index: true
    key: acc_seq
    value: cosmos1y4ydygwmfv5uyq8aeu0htfzyjeecakgpnu99zg/1
  type: tx
- attributes:
  - index: true
    key: signature
    value: JwJwimTOvwfFO4f0MgoWCQFfXVZxhFDS0KEDfOV5cy0mvxVF39KQNqPMZ809Ilcyq2+xaYxkNWUuTi+OoUFHPA==
  type: tx
- attributes:
  - index: true
    key: action
    value: /scavenge.scavenge.MsgRevealAnswer
  - index: true
    key: sender
    value: cosmos1y4ydygwmfv5uyq8aeu0htfzyjeecakgpnu99zg
  - index: true
    key: msg_index
    value: "0"
  type: message
- attributes:
  - index: true
    key: spender
    value: cosmos13aupkh5020l9u6qquf7lvtcxhtr5jjama2kwyg
  - index: true
    key: amount
    value: 69stake
  - index: true
    key: msg_index
    value: "0"
  type: coin_spent
- attributes:
  - index: true
    key: receiver
    value: cosmos1y4ydygwmfv5uyq8aeu0htfzyjeecakgpnu99zg
  - index: true
    key: amount
    value: 69stake
  - index: true
    key: msg_index
    value: "0"
  type: coin_received
- attributes:
  - index: true
    key: recipient
    value: cosmos1y4ydygwmfv5uyq8aeu0htfzyjeecakgpnu99zg
  - index: true
    key: sender
    value: cosmos13aupkh5020l9u6qquf7lvtcxhtr5jjama2kwyg
  - index: true
    key: amount
    value: 69stake
  - index: true
    key: msg_index
    value: "0"
  type: transfer
- attributes:
  - index: true
    key: sender
    value: cosmos13aupkh5020l9u6qquf7lvtcxhtr5jjama2kwyg
  - index: true
    key: msg_index
    value: "0"
  type: message
- attributes:
  - index: true
    key: module
    value: scavenge
  - index: true
    key: action
    value: reveal_answer
  - index: true
    key: question_id
    value: "0"
  - index: true
    key: winner
    value: cosmos1y4ydygwmfv5uyq8aeu0htfzyjeecakgpnu99zg
  - index: true
    key: bounty
    value: "69"
  - index: true
    key: msg_index
    value: "0"
  type: message
gas_used: "61309"
gas_wanted: "200000"
height: "12"
info: ""
logs: []
raw_log: ""
timestamp: "2025-01-28T16:21:32Z"
tx:
  '@type': /cosmos.tx.v1beta1.Tx
  auth_info:
    fee:
      amount: []
      gas_limit: "200000"
      granter: ""
      payer: ""
    signer_infos:
    - mode_info:
        single:
          mode: SIGN_MODE_DIRECT
      public_key:
        '@type': /cosmos.crypto.secp256k1.PubKey
        key: A1uB1GOU2zjInoowIl3rrTtBuqfkTZ6sGskopYUuaFLk
      sequence: "1"
    tip: null
  body:
    extension_options: []
    memo: ""
    messages:
    - '@type': /scavenge.scavenge.MsgRevealAnswer
      answer: 60be9861750facbfad8758254a2f76c0cfe78d54459a3bc187d49b1401fcd8e8
      creator: cosmos1y4ydygwmfv5uyq8aeu0htfzyjeecakgpnu99zg
      plainText: map
      questionId: "0"
    non_critical_extension_options: []
    timeout_height: "0"
  signatures:
  - JwJwimTOvwfFO4f0MgoWCQFfXVZxhFDS0KEDfOV5cy0mvxVF39KQNqPMZ809Ilcyq2+xaYxkNWUuTi+OoUFHPA==
txhash: EC0E4DE761751E4A8F5ACEAA1ADFA67B7D206E333543D8191F265EE3DD3C54C1
You'll notice that the final event that was submitted was a transfer. This shows the movement of the reward into the account of the user user1. To confirm user2 now has 69token more you can query their account balance as follows:
scavenged q bank balances $(scavenged keys show bob -a)
This should show a healthy account balance of 100000069 stake since bob began with 100000000 stake:
balances:
- amount: "100000069"
  denom: stake
- amount: "10000"
  denom: token
Thanks for joining me in building a deterministic state machine and using it as a game. I hope you can see that even such a simple app can be extremely powerful as it contains digital scarcity.
If you'd like to keep going, consider trying to expand on the capabilities of this application by doing one of the following:
- Allow the
Creatorof aScavengeto edit or delete a scavenge. - Create a query that lists more details about a scavenge.
If you're interested in learning more about the Cosmos SDK check out the rest of our docs or join our forum.
If you want to learn more about Ignite, visit our documentation at: Ignite Docs.
]]>Blockchain bloat, spam, transaction validation and data availability are important points for any blockchain.
In this tutorial you will be learning how to mitigate spam or address blockchain bloat.
]]>How transactions are handled or stored on a Cosmos SDK blockchain has the biggest impact on the size of your blockchain.
Blockchain bloat, spam, transaction validation and data availability are important points for any blockchain.
In this tutorial you will be learning how to mitigate spam or address blockchain bloat. How data availability works in the Cosmos SDK ecosystem and how to configure your node.
Adjusting Gas Fees in Ignite
In the Cosmos SDK, gas fees are essential to protect the network from spam and to compensate validators. Ignite CLI simplifies configuration of these parameters, which you can manage within the app.toml file located in your chain's config directory. (~/.example/config)
-
Setting Minimum Gas Prices
The
min-gas-pricesparameter sets the minimum amount of tokens per unit of gas that validators are willing to accept for transaction processing. In theapp.tomlfile:min-gas-prices = "0.025stake"- Each transaction has a gas cost, which represents the computational effort needed for processing. For example, a transaction with a gas cost of 200,000 and a
min-gas-pricesset at 0.025stake would require:- Total Gas Fee=Gas Cost×Min Gas Price=200,000×0.025=5stake
- Adjust this value based on your network's economic model, where a higher
min-gas-pricesmakes it costlier to interact with the blockchain. For instance, setting it to0.05stakewould require users to pay more for each transaction. - Lowering gas prices can incentivize transaction volume but might reduce validator rewards.
- Each transaction has a gas cost, which represents the computational effort needed for processing. For example, a transaction with a gas cost of 200,000 and a
-
Impact of Gas Fees
- Network Security: Higher gas fees discourage spam but may restrict access.
- User Accessibility: Lower fees make it more accessible but could lead to network congestion if not managed correctly.
- Validator Incentives: Validators are compensated through fees, so fee adjustments impact their incentives and long-term participation.
Adjusting gas fees requires careful calibration, as excessively high fees may discourage network usage, while too-low fees could lead to congestion and insufficient validator incentives
Pruning Settings and Their Impact on Storage
Not every node needs to have the full archival history of the whole blockchain.
Some nodes need to know only the tip of the chain to quickly validate incoming transactions while other (mostly public accessible) nodes would provide more history and data.
Pruning removes historical data to reduce storage demands on nodes. In the Cosmos SDK, you can configure pruning options in the app.toml file as follows:
-
Pruning Options in Cosmos SDK
In the
app.tomlfile, under the[pruning]section, you’ll see different pruning strategies:nothing: No pruning; retains all historical data. Best for archival nodes but requires the most storage.everything: Prunes all state history except the latest. This saves storage significantly but limits query capabilities.default: A balance that keeps recent history for querying while pruning older data.custom: Define custom parameters withkeep_recent(number of recent states to retain) andinterval(frequency of pruning).
Example for custom pruning:
pruning = "custom"
pruning-keep-recent = "100"
pruning-interval = "10"
Pruning-Keep-Recent:
This setting defines the number of recent states the node will retain. For example, if set to 100, the node will store the last 100 state heights (blocks) only.
Keeping fewer states reduces storage requirements, but it also limits the ability to query older transaction histories and state snapshots.
Pruning-Interval:
The pruning-interval determines how often the node performs pruning. For example, setting it to 10 means that pruning occurs every 10 blocks.
Frequent pruning helps reduce data storage progressively, maintaining a clean and manageable node database over time.
Using custom pruning settings allows a Cosmos SDK chain to operate efficiently without overwhelming nodes with excessive data. Validators and end-users can select settings suited to their role: archival nodes might avoid pruning entirely to support complete data availability, while validators can prune aggressively to optimize performance and resource use
- Impact of Pruning Settings
- Storage Efficiency: Aggressive pruning (
everything) conserves storage, ideal for validators who don’t need historical data. - Data Availability: Nodes with less pruning (
nothing) retain complete data, beneficial for applications needing transaction history but increasing storage demands. - Network Performance: Reducing storage requirements for nodes can lower entry costs and attract more validators, improving network decentralization and resilience.
- Storage Efficiency: Aggressive pruning (
Each setting impacts storage requirements differently, so align pruning strategy with the intended role of each node (e.g., archival vs. validator)
Optimizing Storage in Cosmos SDK Chains
Reducing storage is essential for network efficiency and longevity. Here are several optimization approaches:
- Optimize Block and Transaction Size
- Adjust block parameters (e.g.,
max_bytesandmax_gasinapp.toml) to limit the size of transactions and blocks, controlling data growth on the chain.
- Adjust block parameters (e.g.,
- Utilize State Sync
- State Sync allows new nodes to rapidly join the network by downloading only the latest state rather than the full history, significantly reducing initial sync times and storage needs.
- Snapshots and Archiving
- Take periodic snapshots and archive older data off-chain. This lets you keep a lightweight node while offering optional access to historical data when needed.
- Cosmos SDK has built-in snapshotting capabilities that can capture the current state at defined intervals, useful for faster recovery and state sync.
- Implement Custom Data Compression
- Use custom modules to compress or discard redundant data. Modules can be designed to avoid storing unessential data or to aggregate records more efficiently.
- Selective Data Retention
- For blockchain applications that don’t require all historical data, periodically clearing unneeded records can conserve storage.
Optimizing storage in Cosmos SDK chains is a balance of managing the data needs of dApps, validators, and end users. By leveraging pruning, efficient block management, and advanced storage techniques, a Cosmos-based blockchain can remain both performant and scalable.
]]>What is a Denom?
Denom stands for denomination and represents the name of a token within the Cosmos SDK and Ignite. In the Cosmos ecosystem, denoms play a crucial role in identifying and managing tokens.
In Ignite, the configuration of your blockchain, including
]]>What is a Denom?

Denom stands for denomination and represents the name of a token within the Cosmos SDK and Ignite. In the Cosmos ecosystem, denoms play a crucial role in identifying and managing tokens.
In Ignite, the configuration of your blockchain, including the specification of denoms, is set in the config.yml file within your blockchain directory. This file allows the definition of various denoms before initializing your blockchain.
Common examples of denoms include formats like token or stake.
Usage of Denoms
In the Cosmos SDK, assets are represented as a Coins type, which combines an amount with a denom. The amount is flexible, allowing for a wide range of values. Accounts in the Cosmos SDK, including both basic and module accounts, maintain balances comprised of these Coins.
The x/bank module is pivotal in the Cosmos SDK as it tracks all account balances and the total supply of tokens in the application.
Key Points on Denoms and Balances:
- Fixed Denomination Unit: The Cosmos SDK treats the amount of a balance as a single, fixed unit of denomination, regardless of the denom itself.
- Client and App Flexibility: While clients and apps built on Cosmos SDK chains can define arbitrary denomination units, all transactions and operations in the Cosmos SDK ultimately use these fixed units.
- Example: On the Cosmos Hub (Gaia), the common assumption is 1 ATOM = 10^6 uatom, and operations are based on these units of 10^6.
Denoms and IBC (Inter-Blockchain Communication)
One of the primary uses of IBC is the transfer of tokens between blockchains. This process involves creating a token voucher on the target blockchain upon receiving tokens from a source chain.
Characteristics of IBC Voucher Tokens:
- Naming Convention: IBC voucher tokens are denoted with a naming syntax that starts with
ibc/. This convention helps in identifying and managing IBC tokens on a blockchain. - Native vs. Voucher Tokens: With IBC, a native token on one blockchain can be referenced as a
vouchertoken on another. These tokens are differentiated by theirdenomnames.
For a comprehensive understanding of IBC denoms and their application, refer to Understand IBC Denoms with Gaia, which provides detailed insights into the format and utilization of voucher tokens in the IBC context.
]]>After scaffolding a Cosmos SDK blockchain using Ignite CLI, you gain access to a comprehensive command suite. These commands help you initialize, configure, manage, and interact with your blockchain network. Below is an overview of each command’s purpose and a brief guide on how
]]>
After scaffolding a Cosmos SDK blockchain using Ignite CLI, you gain access to a comprehensive command suite. These commands help you initialize, configure, manage, and interact with your blockchain network. Below is an overview of each command’s purpose and a brief guide on how to use them effectively.
Comet
Command: comet
Purpose: The comet command provides access to CometBFT (Tendermint) subcommands, which are integral for managing consensus and node states. CometBFT is the consensus engine that secures block finality and coordinates nodes.
Usage Insight: This command is mostly used by advanced users or for troubleshooting low-level consensus issues. It’s helpful when diving deeper into the node's consensus and communication layers.
Completion
Command: completion
Purpose: Generates shell-specific autocompletion scripts, enhancing productivity by suggesting commands as you type.
Best Use: Run completion for your shell (bash, zsh, etc.) to save time when typing commands. This is especially useful for beginners who need guidance on available options without memorizing each command.
Example:
exampled completion bash > ~/.bash_completion
Config
Command: config
Purpose: Helps manage application configurations like node settings, RPC details, and chain parameters.
Best Use: Use config when setting up your node for the first time or tweaking its parameters for optimization. This command is often combined with init to create an optimized setup.
Debug
Command: debug
Purpose: Offers tools for debugging, which is essential when diagnosing issues in your application.
Usage Insight: Ideal during development or testing phases. It’s worth exploring the specific debug options available to tailor the insights it provides based on the problem.
Export
Command: export
Purpose: Exports the blockchain state to JSON format.
Best Use: Run this command when you need to create snapshots of the chain state, back up data, or migrate it to another environment. Particularly useful for testing or forensics on state data.
Genesis
Command: genesis
Purpose: Manages genesis files and parameters, essential for defining the initial state of your blockchain.
Usage Insight: This command is fundamental during the network setup phase. Configure the genesis file accurately to ensure a smooth deployment of the initial blockchain state across nodes.
Help
Command: help
Purpose: Displays detailed information on each available command and subcommand.
Best Use: Type exampled help for an overview or exampled <command> --help for specifics on a given command. Perfect for when you’re learning the CLI.
In-Place-Testnet
Command: in-place-testnet
Purpose: Allows updating of the application and consensus state with validator information, useful for testing. Spin up a new testnet in no time.
Usage Insight: Use this when preparing your testnet setup. It ensures your node state is aligned with provided validator configurations, which streamlines testing for new chain configurations.
Init
Command: init
Purpose: Initializes all necessary configuration files for a new node, including private validator keys, peer-to-peer details, and genesis files.
Best Use: Essential during initial setup. Run this command first to create a standardized setup environment before adding other customizations.
Example:
exampled init
Keys
Command: keys
Purpose: Manages application keys, which are critical for node security and account management.
Usage Insight: Use keys to securely create, view, and manage public and private keys associated with your blockchain accounts. Critical for wallet management and validator keys.
Module-Hash-By-Height
Command: module-hash-by-height
Purpose: Fetches module hashes at specific blockchain heights.
Best Use: This command is useful for comparing state consistency at specific blocks, which can assist in tracking state evolution over time or troubleshooting inconsistencies.
Prune
Command: prune
Purpose: Removes older blockchain states to save disk space and improve performance.
Usage Insight: Run this periodically in production environments to reduce storage costs and maintain node performance. Ideal for full nodes not intended to retain historical states indefinitely.
Query
Command: query
Purpose: Provides subcommands to retrieve blockchain data, such as account balances, transaction history, and block information.
Best Use: Use query whenever you need to interact with the blockchain for reading state data. The range of subcommands here is broad, covering most aspects of blockchain state.
Rollback
Command: rollback
Purpose: Reverts the application state by one block, allowing for quick recovery from recent issues.
Usage Insight: Use this if an issue arises shortly after a block is committed. It’s particularly useful for development testing to undo the last state transition.
Snapshots
Command: snapshots
Purpose: Manages local blockchain snapshots, which can be used to speed up node syncing.
Best Use: Take snapshots periodically to improve recovery time for nodes. This is helpful in production to minimize downtime if a node falls behind.
Start
Command: start
Purpose: Starts the full node, which begins participating in the network, validating transactions, and syncing blocks.
Best Use: Once all initial configurations are complete, run start to make your node active. This command is central to node operations in a live network.
Status
Command: status
Purpose: Queries a remote node for its current status, useful for monitoring.
Usage Insight: Use this to check the health and connectivity of nodes, especially when monitoring multiple nodes in a network.
Tx
Command: tx
Purpose: Transaction-related subcommands that handle creating and sending transactions on the network.
Best Use: Use tx when testing or executing transactions, such as transfers, staking, or voting. It’s especially helpful in development environments to test different transaction scenarios.
Version
Command: version
Purpose: Displays the current version of the application binary.
Usage Insight: Check the version to ensure consistency across network nodes, particularly useful when upgrading or maintaining network compatibility.
Example:
exampled version
Best Practices for Command Usage
- Initial Setup: Run
initto set up configuration files andconfigto fine-tune settings. Follow up withgenesisfor initial parameters. - Automation: Use
completionto streamline command entry. If you’re managing multiple nodes, automate configuration files withconfig. - Debugging: Utilize
debugin development to troubleshoot or track issues in transaction processing. - Resource Management: Regularly
pruneold states to save disk space. Usesnapshotsto take consistent backups. - Monitoring: The
statusandquerycommands provide insights into your node's state and network health, which is key for operations.
This command suite will guide you through all stages of blockchain development, testing, deployment, and maintenance, making it an essential toolkit for any Cosmos SDK project!
]]>It extends the Ignite CLI functionality, making it easier to set up and manage your Cosmos SDK blockchain on remote servers.
Prerequisites
Before we begin, make sure you have the following:
- Ignite CLI: Version
v28.4.0or
Ignite Spaceship is tool that helps you deploy your blockchain with SSH.
It extends the Ignite CLI functionality, making it easier to set up and manage your Cosmos SDK blockchain on remote servers.
Prerequisites
Before we begin, make sure you have the following:
- Ignite CLI: Version
v28.4.0or higher - A blockchain scaffolded using Ignite
- SSH access to a remote server
Introduction
You've written your Cosmos SDK blockchain with Ignite scaffolding, created your own modules, and now it's time to deploy the blockchain permanently. Spaceship adopts the settings of your current config.yml file, making the deployment process seamless.
Getting Started
-
Navigate to your blockchain's directory:
cd exampleTIP: If you don't have a blockchain project, create one with
ignite scaffold chain example -
Ensure your
config.ymlfile is properly set up with your desired chain configuration.
Deployment Options
Spaceship provides multiple ways to connect to your SSH server for deployment. Choose the method that best suits your setup:
-
Using a private key:
ignite spaceship deploy [email protected] --key $HOME/.ssh/id_rsa -
Specifying user and key separately:
ignite spaceship deploy 127.0.0.1 --user root --key $HOME/.ssh/id_rsa -
Using a password:
ignite spaceship deploy 127.0.0.1 --user root --password password -
Using a private key with a passphrase:
ignite spaceship deploy [email protected] --key $HOME/.ssh/id_rsa --key-password key_password
What Happens During Deployment
When you run the deploy command, Spaceship performs the following actions:
- Builds the blockchain binary
- Sets up the chain's home directory based on your configuration
- Connects to the specified SSH server
- Establishes workspaces on the remote server
- Transfers the binary
- Executes the binary using a runner script
Workspace Structure
Spaceship organizes the deployment in the following structure on the remote server:
$HOME/workspace/<chain-id>/
├── bin/         # Contains the chain binary
├── home/        # Stores chain data
├── log/         # Holds logs of the running chain
├── run.sh       # Script to start the binary in the background
└── spaceship.pid # Stores the PID of the running chain instance
Managing Your Deployed Chain
After deployment, you can manage your blockchain using the following commands:
-
Check status:
ignite spaceship status [email protected] --key $HOME/.ssh/id_rsa -
View logs:
ignite spaceship log [email protected] --key $HOME/.ssh/id_rsa -
Watch logs in real-time:
ignite spaceship log [email protected] --key $HOME/.ssh/id_rsa --real-time -
Restart the chain:
ignite spaceship restart [email protected] --key $HOME/.ssh/id_rsa -
Stop the chain:
ignite spaceship stop [email protected] --key $HOME/.ssh/id_rsa
Redeploying
To redeploy the chain on the same server without overwriting the home directory, use the --init-chain flag:
ignite spaceship deploy [email protected] --key $HOME/.ssh/id_rsa --init-chain
This will reinitialize the chain if necessary.
Configuring Your Chain
You can override the default chain configuration by modifying the Ignite configuration file. Here's an example of how to customize your config.yml:
validators:
  - name: alice
    bonded: '100000000stake'
    app:
      pruning: "nothing"
    config:
      moniker: "mychain"
    client:
      output: "json"
Spaceship initializes the chain locally in a temporary folder using this config file and then copies the configuration to the remote machine at $HOME/workspace/<chain-id>/home.
Best Practices
- Always ensure your SSH key or password is secure. Best practice is to use keys instead of passwords.
- Regularly check the status and logs of your deployed chain.
- Keep your Ignite CLI and Spaceship up to date for the latest features and security improvements.
- Backup your chain data regularly.
Troubleshooting
If you encounter issues during deployment or management:
- Check your SSH connection and credentials.
- Verify that the remote server meets all prerequisites.
- Review the logs for any error messages.
- Ensure your
config.ymlis correctly formatted and contains valid settings.
You should now be able to deploy and manage your Cosmos SDK blockchain using Ignite Spaceship. Happy deploying!
]]>In the chapters afterwards, you can learn how to create your own provider chain and connect both to create your own full development environment.
Requirements
Before proceeding, ensure you meet the following requirements:
- Go: Make
This tutorial will cover how to create a new ICS consumer chain using Ignite CLI.
In the chapters afterwards, you can learn how to create your own provider chain and connect both to create your own full development environment.
Requirements
Before proceeding, ensure you meet the following requirements:
- Go: Make sure you have Go installed on your machine. You can install it here.
- Ignite CLI: The Makefile handles the installation, but if you'd like to install it manually, visit the Ignite CLI Installation Guide.
Quick Start
Create a new Cosmos SDK consumer chain:
ignite scaffold chain <yourchainname> --consumer --skip-proto --no-module
Then name ccv is a common convention for consumer and would be scaffolded as follows:
ignite scaffold chain ccv --consumer --skip-proto --no-module
This creates a new directory ccv with a configured consumer chain. On this chain you are expected to add your business logic.
Learn how to create your own modules on our tutorials page.
Connect your chain
Next to creating a consumer chain is adding it to the provider chain to gain access to the security providers of the provider chain.
In a production environment, the provider chain is typically already running, and you would only need to create and submit your proposal to connect the consumer chain. However, we provide a
Makefilefor testing and local development that automates the entire setup with scripts, allowing you to quickly create both the provider and consumer chains. If you prefer a more detailed approach or need manual configurations, refer to the Advanced Configuration Section.
This process will require the following steps:
- Download and install the Interchain Security (ICS) source code
- Run the provider chain
- Create a proposal to add the consumer chain to the provider chain
- Start the consumer chain
Makefile
To get started quickly, use the Makefile provided. It automates the setup of both the provider and consumer chains for local testing and development with pre-defined scripts.
Once you have copied the Makefile, run:
make all
Extra Requirements
- Hermes Relayer: To handle cross-chain communication, install the Hermes relayer from here. Ensure that Hermes is properly configured before proceeding with IBC connections.
Setup
-
Clone the ICS repository and navigate to the ICS directory:
git clone https://github.com/cosmos/interchain-security && cd interchain-security -
Once you are inside the
ics/directory, run:make installThis will automatically perform the following steps:
- Install ICS binaries and Ignite CLI.
- Set up and start the provider chain.
- Scaffold the consumer chain.
- Submit a proposal for adding the consumer chain to the provider chain.
- Automatically cast a "yes" vote on the proposal.
-
After the vote passes, manually start the consumer chain:
interchain-security-cd start -
To stop the provider chain, run:
make stop -
To clean up your environment and remove all data, use:
make clean
Detailed Breakdown (Advanced Configuration)
For users who prefer a more manual setup and want to dive deeper into the process's inner workings, here is a breakdown of each step, including script execution and manual configuration.
Set Up the ICS Environment
Start by cloning the ICS repository and installing the necessary binaries:
git clone https://github.com/cosmos/interchain-security && cd interchain-security
git checkout v5.1.1
make install
This will install two binaries that we will use in the following steps:
# Provider chain binary
interchain-security-pd

# Consumer chain binary
interchain-security-cd
Run the Provider Chain
Next, set up and run the provider chain using the pre-defined script:
sh provider/create_and_start.sh
This script will perform the following actions:
- Initialize the provider chain
- Configure genesis parameters
- Generate key pairs for both the validator and delegator
- Add initial funds to the accounts
- Stake the validator and start the provider node
The provider chain will also generate the necessary genesis files and bootstrap the network, preparing it for the consumer chain proposal.
Scaffold a New Consumer Chain
In a separate terminal tab or window, scaffold the consumer chain using the Ignite CLI:
ignite scaffold chain ccv --consumer --skip-proto --no-module
Submit and Vote on the Proposal
Once your consumer chain is scaffolded, you need to submit a proposal to connect it to the provider chain. This step is critical, as the timing for the consumer chain's genesis must be carefully considered in relation to the proposal's approval.
-
Create the consumer chain proposal:
Ensure the spawn time is set to AFTER the proposal passes:
The following JSON configuration is an example setup for submitting a consumer chain proposal. Be sure to check and adjust values as needed, such as
chain_id,genesis_hash,binary_hash,spawn_time, and other parameters to match your specific chain configuration and requirements.tee $PROVIDER_HOME/consumer-proposal.json<<EOF { "messages": [ { "@type": "/interchain_security.ccv.provider.v1.MsgConsumerAddition", "chain_id": "ccv-1", "initial_height": { "revision_number": "1", "revision_height": "1" }, "genesis_hash": "519df96a862c30f53e67b1277e6834ab4bd59dfdd08c781d1b7cf3813080fb28", "binary_hash": "09184916f3e85aa6fa24d3c12f1e5465af2214f13db265a52fa9f4617146dea5", "spawn_time": "2024-08-01T12:03:00.000000000-00:00", "unbonding_period": "600s", "ccv_timeout_period": "1200s", "consumer_redistribution_fraction": "0.75", "blocks_per_distribution_transmission": "1000", "distribution_transmission_channel": "channel-1", "top_N": 95, "validators_power_cap": 0, "validator_set_cap": 0, "allowlist": [], "denylist": [], "authority": "cosmos10d07y265gmmuvt4z0w9aw880jnsr700j6zn9kn" } ], "metadata": "ipfs://CID", "deposit": "50000stake", "title": "Create a chain", "summary": "Gonna be a great chain", "expedited": false } EOF -
Submit the proposal to the governance module:
$PROVIDER_BINARY tx gov submit-proposal $PROVIDER_HOME/consumer-proposal.json \ --chain-id $PROVIDER_CHAIN_ID --from $VALIDATOR --home $PROVIDER_HOME --node tcp://$PROVIDER_RPC_LADDR --keyring-backend test -b sync -y -
Dynamically retrieve the proposal ID and vote on the proposal:
proposal_id=$($PROVIDER_BINARY q gov proposals --output json | jq -r '.proposals[-1].proposal_id')
$PROVIDER_BINARY tx gov vote $$proposal_id yes --from $VALIDATOR --chain-id $PROVIDER_CHAIN_ID --node tcp://$PROVIDER_RPC_LADDR --home $PROVIDER_HOME -y --keyring-backend test
sleep 5  # Wait for the vote to be processed
Start the Consumer Chain
Once the proposal has passed and the consumer chain is approved, you need to start the consumer chain and connect it to the provider chain.
-
Collect the Cross-Chain Validation (CCV) state from the provider chain:
interchain-security-pd q provider consumer-genesis ccv-1 --node tcp://localhost:26658 -
Update the consumer chain's genesis file with the CCV state:
jq -s '.[0].app_state.ccvconsumer = .[1] | .[0]' <consumer genesis without CCV state> ccv-state.json > <consumer genesis file with CCV state> -
Start the consumer chain:
interchain-security-cd start
Create IBC Channels and Connections
Once both chains are running, you need to establish IBC channels for communication between the provider and consumer chains. This is done using the Hermes relayer:
-
Query the IBC client ID of the provider chain:
gaiad q provider list-consumer-chains -
Use Hermes to create the necessary IBC connections and channels:
hermes create connection --a-chain <consumer chain ID> --a-client 07-tendermint-0 --b-client <provider chain client ID>
hermes create channel --a-chain <consumer chain ID> --a-port consumer --b-port provider --order ordered --a-connection connection-0 --channel-version 1
Start the Hermes Relayer
Finally, start the Hermes relayer to sync the validator sets and ensure that the chains remain in sync:
hermes start
Ensure that the relayer's trusting period is configured correctly in line with the provider chain's settings (the trusting period fraction is typically set to 0.25).
We have created a short script for you to eventually stop all provider chains.
Congratulations, you've managed to create your own Consumer Chain and hook it to a running Provider Chain.
]]>Ignite Apps let you and other developers benefit from extending the Ignite CLI feature set. You’ve probably already used commands like ignite scaffold or ignite chain serve but are looking for new ways to interact with your blockchain or extend scaffolding features?

Ignite Apps let you and other developers benefit from extending the Ignite CLI feature set. You’ve probably already used commands like ignite scaffold or ignite chain serve but are looking for new ways to interact with your blockchain or extend scaffolding features?
In order to find all already built Apps, have a look at the App Registry: https://github.com/ignite/apps/tree/main/_registry
Are you considering to build your own Ignite App? We’ve created the right pathway for you to get started.
Use the command ignite app scaffold myapp in order to scaffold a new App called "myapp".
Inside the newly generated “myapp” directory you will see an App skeleton. The skeleton provides your first “Hello World” App. When running this, the output of your App will be a simple answer, let’s try it.
After scaffolding your App, it will let you know in the success command, how to install it. Follow the instructions.
You should see a success message similar to this:

Try out the help message of your App to see which commands are now available for you: ignite myapp --help.
Try out this App with ignite myapp hello and you will be greeted by your own App.

Congratulations for completing the first step to get into Ignite App programming!
Next goal should be to edit the response, then you will get a feeling how the Apps are built.
]]>Prerequisites
Before we begin, ensure you have the following:
- Ignite CLI installed: Instructions
In this tutorial, we will walk through the process of creating and managing proposals using the Governance module in a Cosmos SDK-based blockchain. Governance is a critical feature for decentralised networks, allowing stakeholders to make decisions collectively.
Prerequisites
Before we begin, ensure you have the following:
- Ignite CLI installed: Instructions can be found here.
- Basic knowledge of Go: Familiarity with Go programming will be helpful.
Step 1: Setting Up Your Project
-
Initialise a New Blockchain Project:
ignite scaffold chain github.com/username/mychain --address-prefix myprefix
cd mychain
Run the blockchain with
ignite chain serve
-
Add the Governance Module:
The Governance module is included by default in a scaffolded Ignite chain. To confirm, checkapp/app.gofor the following import:import ( "github.com/cosmos/cosmos-sdk/x/gov" )
Step 2: Configuring the Governance Module
-
Enable Governance Module in Your App:
Inapp/app_config.go, ensure the Governance module is included in the module manager and configured correctly:{ Name: govtypes.ModuleName, Config: appconfig.WrapAny(&govmodulev1.Module{}), }, -
Set Up Governance Parameters:
Governance parameters can be configured inconfig/genesis.jsonunder thegovsection. Example configuration:{ "gov": { "voting_params": { "voting_period": "172800s" }, "deposit_params": { "min_deposit": [ { "denom": "stake", "amount": "10000000" } ], "max_deposit_period": "172800s" }, "tally_params": { "quorum": "0.334000000000000000", "threshold": "0.500000000000000000", "veto": "0.334000000000000000" } } }
With the Ignite CLI, you can make this a permanent for your blockchain with modifying the config.yml file at the root of your scaffolded blockchain. The settings would look like this:
genesis:
  app_state:
    gov:
      voting_params:
        voting_period: "172800s"
      deposit_params:
        min_deposit:
          - denom: "stake"
            amount: "10000"
        max_deposit_period: "172800s"
      tally_params:
        quorum: "0.334000000000000000"
        threshold: "0.500000000000000000"
        veto: "0.334000000000000000"
Step 3: Creating a Proposal
- Proposal Types:
There are different types of proposals you can create, including
- Text Proposals,
- Parameter Change Proposals
- Software Upgrade Proposals
- Cancel Software Upgrade Proposal
- Community Pool Spend Proposal
-
Creating a Text Proposal:
To create a simple text proposal, use the following command:mychaind tx gov draft-proposal

Please enter in the details, you can get some inspiration from the following example.

-
Broadcast the Proposal:
Ensure your transaction is broadcasted to the network:mychaind tx gov submit-proposal ./draft_proposal.json --from=alice --chain-id mychain
Congratulations, you've created a text proposal on your local blockchain.
Step 4: Creating an Upgrade Proposal
-
Create the Upgrade Proposal:
To create an upgrade proposal, use the following command:mychaind tx gov draft-proposal
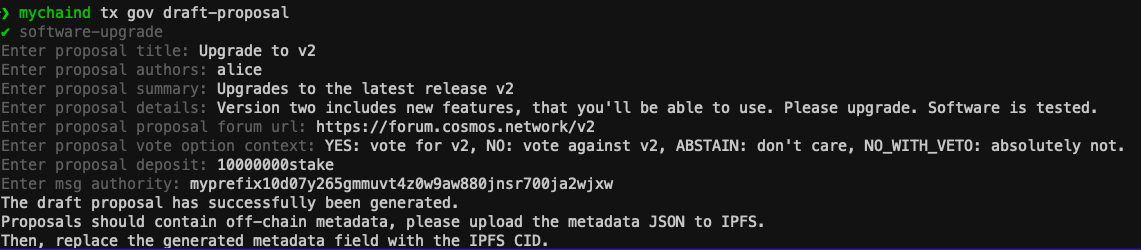
Now insert your data into the skeleton draft_proposal.json.
In your draft_proposal.json populate the height with your desired upgrade height and populate the info field with additional information (must be a valid JSON string):
{
 "messages": [
  {
   "@type": "/cosmos.upgrade.v1beta1.MsgSoftwareUpgrade",
   "authority": "myprefix10d07y265gmmuvt4z0w9aw880jnsr700ja2wjxw",
   "plan": {
    "name": "v2.0.0",
    "time": "0001-01-01T00:00:00Z",
    "height": "15000",
    "info": "xxx",
    "upgraded_client_state": null
   }
  }
 ],
 "metadata": "ipfs://CID",
 "deposit": "10000000stake",
 "title": "Upgrade to v2",
 "summary": "Upgrades to the latest release v2",
 "expedited": false
}
You can specify the binaries used, have a look at this example from Cosmos Documentation.
{
  "binaries": {
    "darwin/amd64": "https://github.com/cosmos/gaia/releases/download/v15.0.0/gaiad-v15.0.0-darwin-amd64?checksum=sha256:7157f03fbad4f53a4c73cde4e75454f4a40a9b09619d3295232341fec99ad138",
    "darwin/arm64": "https://github.com/cosmos/gaia/releases/download/v15.0.0/gaiad-v15.0.0-darwin-arm64?checksum=sha256:09e2420151dd22920304dafea47af4aa5ff4ab0ddbe056bb91797e33ff6df274",
    "linux/amd64": "https://github.com/cosmos/gaia/releases/download/v15.0.0/gaiad-v15.0.0-linux-amd64?checksum=sha256:236b5b83a7674e0e63ba286739c4670d15d7d6b3dcd810031ff83bdec2c0c2af",
    "linux/arm64": "https://github.com/cosmos/gaia/releases/download/v15.0.0/gaiad-v15.0.0-linux-arm64?checksum=sha256:b055fb7011e99d16a3ccae06443b0dcfd745b36480af6b3e569e88c94f3134d3",
    "windows/armd64": "https://github.com/cosmos/gaia/releases/download/v15.0.0/gaiad-v15.0.0-windows-amd64.exe?checksum=sha256:f0224ba914cad46dc27d6a9facd8179aec8a70727f0b1e509f0c6171c97ccf76",
    "windows/arm64": "https://github.com/cosmos/gaia/releases/download/v15.0.0/gaiad-v15.0.0-windows-arm64.exe?checksum=sha256:cbbce5933d501b4d54dcced9b097c052bffdef3fa8e1dfd75f29b34c3ee7de86"
  }
}
Make sure to convert the JSON of the binaries with escaped characters, then it will be interpreted accordingly by the blockchain software. Then it can be added to the info field
{\"binaries\":{\"darwin/amd64\":\"https://github.com/cosmos/gaia/releases/download/v15.0.0/gaiad-v15.0.0-darwin-amd64?checksum=sha256:7157f03fbad4f53a4c73cde4e75454f4a40a9b09619d3295232341fec99ad138\",\"darwin/arm64\":\"https://github.com/cosmos/gaia/releases/download/v15.0.0/gaiad-v15.0.0-darwin-arm64?checksum=sha256:09e2420151dd22920304dafea47af4aa5ff4ab0ddbe056bb91797e33ff6df274\",\"linux/amd64\":\"https://github.com/cosmos/gaia/releases/download/v15.0.0/gaiad-v15.0.0-linux-amd64?checksum=sha256:236b5b83a7674e0e63ba286739c4670d15d7d6b3dcd810031ff83bdec2c0c2af\",\"linux/arm64\":\"https://github.com/cosmos/gaia/releases/download/v15.0.0/gaiad-v15.0.0-linux-arm64?checksum=sha256:b055fb7011e99d16a3ccae06443b0dcfd745b36480af6b3e569e88c94f3134d3\",\"windows/amd64\":\"https://github.com/cosmos/gaia/releases/download/v15.0.0/gaiad-v15.0.0-windows-amd64.exe?checksum=sha256:f0224ba914cad46dc27d6a9facd8179aec8a70727f0b1e509f0c6171c97ccf76\",\"windows/arm64\":\"https://github.com/cosmos/gaia/releases/download/v15.0.0/gaiad-v15.0.0-windows-arm64.exe?checksum=sha256:cbbce5933d501b4d54dcced9b097c052bffdef3fa8e1dfd75f29b34c3ee7de86\"}}
Final JSON:
{
 "messages": [
  {
   "@type": "/cosmos.upgrade.v1beta1.MsgSoftwareUpgrade",
   "authority": "myprefix10d07y265gmmuvt4z0w9aw880jnsr700ja2wjxw",
   "plan": {
    "name": "v2.0.0",
    "time": "0001-01-01T00:00:00Z",
    "height": "15000",
    "info": "{\"binaries\":{\"darwin/amd64\":\"https://github.com/cosmos/gaia/releases/download/v15.0.0/gaiad-v15.0.0-darwin-amd64?checksum=sha256:7157f03fbad4f53a4c73cde4e75454f4a40a9b09619d3295232341fec99ad138\",\"darwin/arm64\":\"https://github.com/cosmos/gaia/releases/download/v15.0.0/gaiad-v15.0.0-darwin-arm64?checksum=sha256:09e2420151dd22920304dafea47af4aa5ff4ab0ddbe056bb91797e33ff6df274\",\"linux/amd64\":\"https://github.com/cosmos/gaia/releases/download/v15.0.0/gaiad-v15.0.0-linux-amd64?checksum=sha256:236b5b83a7674e0e63ba286739c4670d15d7d6b3dcd810031ff83bdec2c0c2af\",\"linux/arm64\":\"https://github.com/cosmos/gaia/releases/download/v15.0.0/gaiad-v15.0.0-linux-arm64?checksum=sha256:b055fb7011e99d16a3ccae06443b0dcfd745b36480af6b3e569e88c94f3134d3\",\"windows/amd64\":\"https://github.com/cosmos/gaia/releases/download/v15.0.0/gaiad-v15.0.0-windows-amd64.exe?checksum=sha256:f0224ba914cad46dc27d6a9facd8179aec8a70727f0b1e509f0c6171c97ccf76\",\"windows/arm64\":\"https://github.com/cosmos/gaia/releases/download/v15.0.0/gaiad-v15.0.0-windows-arm64.exe?checksum=sha256:cbbce5933d501b4d54dcced9b097c052bffdef3fa8e1dfd75f29b34c3ee7de86\"}}",
    "upgraded_client_state": null
   }
  }
 ],
 "metadata": "ipfs://CID",
 "deposit": "10000000stake",
 "title": "Upgrade to v2",
 "summary": "Upgrades to the latest release v2",
 "expedited": false
}
-
Example Upgrade Proposal Command:
mychaind tx gov submit-proposal draft_proposal.json --from=alice --chain-id mychain --gas 500000
Step 5: Voting on a Proposal
-
Query Existing Proposals:
List all the proposals to find the one you want to vote on:mychaind query gov proposals -
Vote on a Proposal:
Use the proposal ID obtained from the previous step to cast your vote:mychaind tx gov vote [proposal-id] yes --from=alice --chain-id mychainReplace
yeswithno,no_with_veto, orabstainas per your decision.
Step 6: Managing Proposals
-
Depositing to a Proposal:
Other users can add deposits to a proposal to help it reach the minimum deposit requirement:mychaind tx gov deposit [proposal-id] 5000000stake --from=bob -
Tallying Votes:
Once the voting period ends, the proposal is automatically tallied. You can manually trigger tallying (not usually necessary):mychaind q gov tally [proposal-id] -
Query Proposal Status:
Check the status and details of a specific proposal:mychaind query gov proposal [proposal-id]
Step 7: Best Practices
- Clear Proposal Descriptions:
Ensure proposals have clear and detailed descriptions to help voters make informed decisions. - Community Engagement:
Engage with the community through discussions and forums to explain and promote your proposals. In the Cosmos ecosystem the community expects a forum proposal to be uploaded 2 weeks prior to the proposal on the blockchain, so the community can already discuss it and tweaks can be applied before uploading the proposal to the blockchain. - Regular Updates:
Provide regular updates on the progress and status of proposals to keep the community informed.
Conclusion
By following these steps, you can effectively create and manage proposals, including upgrade proposals, using the Governance module in a Cosmos SDK-based blockchain. Governance is a powerful tool for decentralised decision-making, enabling the community to shape the future of the blockchain network.
For more detailed information, refer to the Cosmos SDK Governance Module documentation.
]]>gen-mig-diffs tool, a resource for Ignite developers aiming to track and manage changes in scaffolded chains between different versions of Ignite CLI. This guide will walk you through the process of setting up and using the tool, as well as offer an alternative]]>Welcome to this tutorial on using the gen-mig-diffs tool, a resource for Ignite developers aiming to track and manage changes in scaffolded chains between different versions of Ignite CLI. This guide will walk you through the process of setting up and using the tool, as well as offer an alternative migration strategy.
Introduction to gen-mig-diffs
The gen-mig-diffs tool is designed to simplify the migration process by helping developers visualize code changes across multiple major versions of Ignite. When upgrading your project to a newer version of Ignite CLI, it can be challenging to track changes and ensure compatibility. This tool automates the process, providing a clear, organized view of the differences between versions.
Features
- Visualizes code changes: Easily see what has changed between two versions.
- Simplifies upgrades: Streamlines the process of migrating your project to a newer version of Ignite CLI.
- Automates diff generation: Generates migration diff files for each of Ignite's scaffold commands.
- Compare any Ignite CLI versions: Any migration of Ignite CLI versions is compatible.
Setting Up gen-mig-diffs
Prerequisites
- Go: Ensure you have Go installed on your system.
Installation Steps
-
Clone the Ignite CLI repository:
git clone https://github.com/ignite/cli.git && \ cd cli/ignite/internal/tools/gen-mig-diffs -
Install the tool:
go install . && gen-mig-diffs -h
Use gen-mig-diffs
Example Usage
To generate migration diffs between versions 0.27.2 and 28.3.0, use the following command:
gen-mig-diffs --output temp/migration --from v0.27.2 --to v28.3.0
Important Flags
f, --from string: Specifies the version of Ignite or the path to the Ignite source code to generate the diff from.t, --to string: Specifies the version of Ignite or the path to the Ignite source code to generate the diff to.o, --output string: Defines the output directory to save the migration document.
This command will scaffold blockchains with the specified versions and display the differences, aiding developers in understanding the necessary changes for their projects.
Alternative Migration Strategy
While gen-mig-diffs provides a streamlined way to visualize changes, an alternative approach involves scaffolding a new chain and manually porting over modules from the old chain. This method can sometimes lead to a more successful migration, especially when dealing with significant changes or customizations.
Steps for Manual Migration
- Scaffold a new chain without modules: Use the latest version of Ignite CLI to create a new project scaffold.
- Port modules from the old chain: Copy the custom modules and configurations from your old project to the new scaffolded project.
- Debug and resolve errors: Work through any compatibility issues and errors that arise from the differences between the old and new versions.
Benefits of Manual Migration
- Full control: Allows for a granular approach to handling changes and customizations.
- Thorough testing: Encourages comprehensive testing and debugging, ensuring that all aspects of the project are up-to-date and compatible.
Conclusion
The gen-mig-diffs tool is an excellent resource for developers looking to upgrade their Ignite projects efficiently. By visualizing the changes between versions, it simplifies the migration process. However, for those who prefer a more hands-on approach, scaffolding a new chain and manually porting modules remains a viable and often successful alternative.
By following this guide, you should be well-equipped to handle migrations in your Ignite projects, whether using gen-mig-diffs or opting for a manual approach.
Happy coding!
]]>To effectively release and version your Ignite created Cosmos SDK chain software, ensuring the binary properly displays the version and users can easily fetch it from GitHub, you'll want to follow best practices around versioning and using tools like Ignite CLI. Here’s a streamlined process to
]]>
To effectively release and version your Ignite created Cosmos SDK chain software, ensuring the binary properly displays the version and users can easily fetch it from GitHub, you'll want to follow best practices around versioning and using tools like Ignite CLI. Here’s a streamlined process to achieve this:
1. Semantic Versioning
Adopt semantic versioning (SemVer), which uses a three-part version number: major, minor, and patch (e.g., v1.0.0). This helps communicate changes and stability in your updates:
- Major version changes indicate breaking changes.
- Minor version changes introduce new features but are backward compatible.
- Patch version changes are for backward-compatible bug fixes.
2. Use Git Tags
Using Git tags helps to mark a specific point in your repository's history as important, typically used for releases:
- Create a tag in Git to indicate a release:
git tag -a v1.0.0 -m "Release version 1.0.0" - Push the tags to GitHub:
git push origin --tags
Good Practices
- Document everything: Make sure that each release has clear and detailed release notes explaining the changes.
- Automate processes: Use CI/CD pipelines to automate testing, building, and deploying your software.
- Communicate with your community: Keep the users of your software in the loop about upcoming changes, deprecations, and improvements.
3. Consensus-Breaking Changes in the Cosmos SDK
Consensus-breaking changes occur when updates to the blockchain software modify the rules of transaction validation or the blockchain state in a way that is not compatible with earlier versions. These changes require all validators to upgrade to the new version to maintain consensus and avoid network forks.
Key Steps for Managing Consensus-Breaking Changes
- Identify the Changes: Clearly identify and document the changes that will break consensus. This includes changes to the transaction structure, state machine, consensus rules, or any other component that affects how blocks are validated.
- Versioning: Consensus-breaking changes should increment the major version number as per Semantic Versioning (e.g., from
1.x.xto2.0.0). This indicates a breaking change that is not backward compatible. - On-Chain Governance:
- Upgrade Proposal: Propose an on-chain governance proposal for the upgrade. This proposal should detail the changes, reasons, impacts, and the proposed activation block height.
- Voting: Allow validators and stakeholders to vote on the proposal. A successful vote means that there is consensus to implement the changes.
- Scheduling: If approved, the upgrade is scheduled for a specific block height at which the new rules will come into effect.
- Upgrade Handlers: Implement upgrade handlers in your Cosmos SDK application to handle the state migration or any necessary transformations to the new software version.
-
Registering an Upgrade Handler: Use the
app.UpgradeKeepermodule to manage the software upgrades. Here’s a basic example of how to set this up:import ( "github.com/cosmos/cosmos-sdk/x/upgrade" ) func RegisterUpgradeHandlers(app *baseapp.BaseApp) { app.UpgradeKeeper.SetUpgradeHandler("v2.0.0", func(ctx sdk.Context, plan upgrade.Plan) { // Logic for transitioning from v1.x.x to v2.0.0 }) }Read
zeroFruit's Blogpost to learn more about implementing upgrade handlers and migrating Modules: https://medium.com/web3-surfers/cosmos-dev-series-cosmos-sdk-based-blockchain-upgrade-b5e99181554c
-
Handling Non-Breaking Changes
Non-breaking changes, such as minor feature enhancements or bug fixes, do not require coordination via on-chain governance and can be handled through minor or patch version upgrades. These updates should still be tested thoroughly but do not necessitate a network-wide coordinated upgrade.
Best Practices
- Testing: Rigorously test all updates, especially consensus-breaking changes, on testnets under conditions as close as possible to the mainnet environment.
- Communication: Maintain clear and open communication channels with all network participants about upcoming changes, requirements, and timelines for upgrades.
- Documentation: Provide detailed release notes and upgrade guides to assist validators and other stakeholders in understanding the changes and the steps required to implement the upgrade.
Conclusion
Handling consensus-breaking changes with the Cosmos SDK involves careful planning, clear communication, and rigorous testing to ensure network stability and continuity. By using the built-in upgrade modules of the Cosmos SDK and following best practices, you can manage these changes effectively and maintain the trust and reliability of your blockchain network.
For further details and advanced scenarios, the Cosmos SDK documentation and community forums are invaluable resources for support and guidance.
]]>Decentralized finance (DeFi) is a rapidly growing sector that is transforming the way we think about financial instruments and provides an array of inventive financial products and services. These include lending, borrowing, spot trading, margin trading, and flash loans, all of which are available to anyone possessing an internet
]]>
Decentralized finance (DeFi) is a rapidly growing sector that is transforming the way we think about financial instruments and provides an array of inventive financial products and services. These include lending, borrowing, spot trading, margin trading, and flash loans, all of which are available to anyone possessing an internet connection.
A DeFi loan represents a financial contract where the borrower is granted a certain asset, like currency or digital tokens.
In return, the borrower agrees to pay an additional fee and repay the loan within a set period of time.
To secure a loan, the borrower provides collateral that the lender can claim in the event of default.
This tutorial was last tested with Ignite CLI v29.0.0.
Setup and Scaffold
- Create a New Blockchain:
ignite scaffold chain loan --no-module && cd loan
Notice the --no-module flag, in the next step we make sure the bank dependency is included with scaffolding the module.
- Create a Module:
Create a new "loan" module that is based on the standard Cosmos SDK bank module.
ignite scaffold module loan --dep bank
- Define the loan Module:
The "list" scaffolding command is used to generate files that implement the logic for storing and interacting with data stored as a list in the blockchain state.
ignite scaffold list loan amount fee collateral deadline state borrower lender --no-message
- Scaffold the Messages:
Scaffold the code for handling the messages for requesting, approving, repaying, liquidating, and cancelling loans.
- Handling Loan Requests
ignite scaffold message request-loan amount fee collateral deadline
- Approving and Canceling Loans
ignite scaffold message approve-loan id:uint
ignite scaffold message cancel-loan id:uint
- Repaying and Liquidating Loans
ignite scaffold message repay-loan id:uint
ignite scaffold message liquidate-loan id:uint
Additional Features
- Extend the BankKeeper:
Ignite takes care of adding the bank keeper, but you still need to tell the loan module which bank methods you will be using. You will be using three methods: SendCoins, SendCoinsFromAccountToModule, and SendCoinsFromModuleToAccount.
Remove the SpendableCoins function from the BankKeeper.
Add these to the Bankkeeper interface.
x/loan/types/expected_keepers.go
package types

import (
	"context"

	sdk "github.com/cosmos/cosmos-sdk/types"
)

// AuthKeeper defines the expected interface for the Auth module.
type AuthKeeper interface {
	AddressCodec() address.Codec
	GetAccount(context.Context, sdk.AccAddress) sdk.AccountI // only used for simulation
	// Methods imported from account should be defined here
}

// BankKeeper defines the expected interface for the Bank module.
type BankKeeper interface {
	// SpendableCoins(context.Context, sdk.AccAddress) sdk.Coins
	// Methods imported from bank should be defined here
	SendCoins(ctx context.Context, fromAddr sdk.AccAddress, toAddr sdk.AccAddress, amt sdk.Coins) error
	SendCoinsFromAccountToModule(ctx context.Context, senderAddr sdk.AccAddress, recipientModule string, amt sdk.Coins) error
	SendCoinsFromModuleToAccount(ctx context.Context, senderModule string, recipientAddr sdk.AccAddress, amt sdk.Coins) error
}

// ParamSubspace defines the expected Subspace interface for parameters.
type ParamSubspace interface {
	Get(context.Context, []byte, interface{})
	Set(context.Context, []byte, interface{})
}
Create a new loan.go file in your x/loan/keeper/ directory.
package keeper

import (
	"encoding/binary"

	"loan/x/loan/types"

	"cosmossdk.io/store/prefix"
	"github.com/cosmos/cosmos-sdk/runtime"
	sdk "github.com/cosmos/cosmos-sdk/types"
)

// GetLoanCount get the total number of loan
func (k Keeper) GetLoanCount(ctx sdk.Context) uint64 {
	storeAdapter := runtime.KVStoreAdapter(k.storeService.OpenKVStore(ctx))
	store := prefix.NewStore(storeAdapter, []byte(types.LoanCountKey))
	byteKey := []byte(types.LoanCountKey)
	bz := store.Get(byteKey)

	// Count doesn't exist: no element
	if bz == nil {
		return 0
	}

	// Parse bytes
	return binary.BigEndian.Uint64(bz)
}

// SetLoanCount set the total number of loan
func (k Keeper) SetLoanCount(ctx sdk.Context, count uint64) {
	storeAdapter := runtime.KVStoreAdapter(k.storeService.OpenKVStore(ctx))
	store := prefix.NewStore(storeAdapter, []byte(types.LoanCountKey))
	byteKey := []byte(types.LoanCountKey)
	bz := make([]byte, 8)
	binary.BigEndian.PutUint64(bz, count)
	store.Set(byteKey, bz)
}

// AppendLoan appends a loan in the store with a new id and update the count
func (k Keeper) AppendLoan(ctx sdk.Context, loan types.Loan) uint64 {
	// Create the loan
	count := k.GetLoanCount(ctx)

	// Set the ID of the appended value
	loan.Id = count

	storeAdapter := runtime.KVStoreAdapter(k.storeService.OpenKVStore(ctx))
	store := prefix.NewStore(storeAdapter, []byte(types.LoanKey))
	appendedValue := k.cdc.MustMarshal(&loan)
	store.Set(GetLoanIDBytes(loan.Id), appendedValue)

	// Update loan count
	k.SetLoanCount(ctx, count+1)

	return count
}

// SetLoan set a specific loan in the store
func (k Keeper) SetLoan(ctx sdk.Context, loan types.Loan) {
	storeAdapter := runtime.KVStoreAdapter(k.storeService.OpenKVStore(ctx))
	store := prefix.NewStore(storeAdapter, []byte(types.LoanKey))
	b := k.cdc.MustMarshal(&loan)
	store.Set(GetLoanIDBytes(loan.Id), b)
}

// GetLoan returns a loan from its id
func (k Keeper) GetLoan(ctx sdk.Context, id uint64) (val types.Loan, found bool) {
	storeAdapter := runtime.KVStoreAdapter(k.storeService.OpenKVStore(ctx))
	store := prefix.NewStore(storeAdapter, []byte(types.LoanKey))
	b := store.Get(GetLoanIDBytes(id))
	if b == nil {
		return val, false
	}
	k.cdc.MustUnmarshal(b, &val)
	return val, true
}

// RemoveLoan removes a loan from the store
func (k Keeper) RemoveLoan(ctx sdk.Context, id uint64) {
	storeAdapter := runtime.KVStoreAdapter(k.storeService.OpenKVStore(ctx))
	store := prefix.NewStore(storeAdapter, []byte(types.LoanKey))
	store.Delete(GetLoanIDBytes(id))
}

// GetAllLoan returns all loan
func (k Keeper) GetAllLoan(ctx sdk.Context) (list []types.Loan) {
	storeAdapter := runtime.KVStoreAdapter(k.storeService.OpenKVStore(ctx))
	store := prefix.NewStore(storeAdapter, []byte(types.LoanKey))
	iterator := store.Iterator(nil, nil)
	defer iterator.Close()

	for ; iterator.Valid(); iterator.Next() {
		var val types.Loan
		k.cdc.MustUnmarshal(iterator.Value(), &val)
		list = append(list, val)
	}

	return
}

// GetLoanIDBytes returns the byte representation of the ID
func GetLoanIDBytes(id uint64) []byte {
	bz := make([]byte, 8)
	binary.BigEndian.PutUint64(bz, id)
	return bz
}

// GetLoanIDFromBytes returns ID in uint64 format from a byte array
func GetLoanIDFromBytes(bz []byte) uint64 {
	return binary.BigEndian.Uint64(bz)
}
Using the Platform
- As a Borrower:
Implement RequestLoan keeper method that will be called whenever a user requests a loan. RequestLoan creates a new loan; Set terms like amount, fee, collateral, and repayment deadline. The collateral from the borrower's account is sent to a module account, and adds the loan to the blockchain's store.
Replace your scaffolded templates with the following code.
x/loan/keeper/msg_server_request_loan.go
package keeper

import (
	"context"
	"strconv"

	"loan/x/loan/types"

	errorsmod "cosmossdk.io/errors"
	sdk "github.com/cosmos/cosmos-sdk/types"
	sdkerrors "github.com/cosmos/cosmos-sdk/types/errors"
)

func (k msgServer) RequestLoan(ctx context.Context, msg *types.MsgRequestLoan) (*types.MsgRequestLoanResponse, error) {
	if _, err := k.addressCodec.StringToBytes(msg.Creator); err != nil {
		return nil, errorsmod.Wrap(err, "invalid authority address")
	}

	_, err := sdk.AccAddressFromBech32(msg.Creator)
	if err != nil {
		return nil, errorsmod.Wrapf(sdkerrors.ErrInvalidAddress, "invalid creator address (%s)", err)
	}
	amount, _ := sdk.ParseCoinsNormalized(msg.Amount)
	if !amount.IsValid() {
		return nil, errorsmod.Wrap(sdkerrors.ErrInvalidRequest, "amount is not a valid Coins object")
	}
	if amount.Empty() {
		return nil, errorsmod.Wrap(sdkerrors.ErrInvalidRequest, "amount is empty")
	}
	fee, _ := sdk.ParseCoinsNormalized(msg.Fee)
	if !fee.IsValid() {
		return nil, errorsmod.Wrap(sdkerrors.ErrInvalidRequest, "fee is not a valid Coins object")
	}
	deadline, err := strconv.ParseInt(msg.Deadline, 10, 64)
	if err != nil {
		return nil, errorsmod.Wrap(sdkerrors.ErrInvalidRequest, "deadline is not an integer")
	}
	if deadline <= 0 {
		return nil, errorsmod.Wrap(sdkerrors.ErrInvalidRequest, "deadline should be a positive integer")
	}
	collateral, _ := sdk.ParseCoinsNormalized(msg.Collateral)
	if !collateral.IsValid() {
		return nil, errorsmod.Wrap(sdkerrors.ErrInvalidRequest, "collateral is not a valid Coins object")
	}
	if collateral.Empty() {
		return nil, errorsmod.Wrap(sdkerrors.ErrInvalidRequest, "collateral is empty")
	}

	borrower, err := sdk.AccAddressFromBech32(msg.Creator)
	if err != nil {
		panic(err)
	}

	var loan = types.Loan{
		Amount:     msg.Amount,
		Fee:        msg.Fee,
		Collateral: msg.Collateral,
		Deadline:   msg.Deadline,
		State:      "requested",
		Borrower:   msg.Creator,
	}

	sdkError := k.bankKeeper.SendCoinsFromAccountToModule(ctx, borrower, types.ModuleName, collateral)
	if sdkError != nil {
		return nil, sdkError
	}
	k.AppendLoan(sdk.UnwrapSDKContext(ctx), loan)
	return &types.MsgRequestLoanResponse{}, nil
}
As a borrower, you have the option to cancel a loan you have created if you no longer want to proceed with it. However, this action is only possible if the loan's current status is marked as "requested".
x/loan/keeper/msg_server_cancel_loan.go
package keeper

import (
	"context"

	"loan/x/loan/types"

	errorsmod "cosmossdk.io/errors"
	sdk "github.com/cosmos/cosmos-sdk/types"
	sdkerrors "github.com/cosmos/cosmos-sdk/types/errors"
)

func (k msgServer) CancelLoan(ctx context.Context, msg *types.MsgCancelLoan) (*types.MsgCancelLoanResponse, error) {
	if _, err := k.addressCodec.StringToBytes(msg.Creator); err != nil {
		return nil, errorsmod.Wrap(err, "invalid authority address")
	}

	loan, found := k.GetLoan(sdk.UnwrapSDKContext(ctx), msg.Id)
	if !found {
		return nil, errorsmod.Wrapf(sdkerrors.ErrKeyNotFound, "key %d doesn't exist", msg.Id)
	}
	if loan.Borrower != msg.Creator {
		return nil, errorsmod.Wrap(sdkerrors.ErrUnauthorized, "Cannot cancel: not the borrower")
	}
	if loan.State != "requested" {
		return nil, errorsmod.Wrapf(types.ErrWrongLoanState, "%v", loan.State)
	}
	borrower, _ := sdk.AccAddressFromBech32(loan.Borrower)
	collateral, _ := sdk.ParseCoinsNormalized(loan.Collateral)
	err := k.bankKeeper.SendCoinsFromModuleToAccount(ctx, types.ModuleName, borrower, collateral)
	if err != nil {
		return nil, err
	}
	loan.State = "cancelled"
	k.SetLoan(sdk.UnwrapSDKContext(ctx), loan)
	return &types.MsgCancelLoanResponse{}, nil
}
- As a Lender:
Approve loan requests and liquidate loans if borrowers fail to repay.
x/loan/keeper/msg_server_approve_loan.go
package keeper

import (
	"context"

	"loan/x/loan/types"

	errorsmod "cosmossdk.io/errors"
	sdk "github.com/cosmos/cosmos-sdk/types"
	sdkerrors "github.com/cosmos/cosmos-sdk/types/errors"
)

func (k msgServer) ApproveLoan(ctx context.Context, msg *types.MsgApproveLoan) (*types.MsgApproveLoanResponse, error) {
	if _, err := k.addressCodec.StringToBytes(msg.Creator); err != nil {
		return nil, errorsmod.Wrap(err, "invalid authority address")
	}

	loan, found := k.GetLoan(sdk.UnwrapSDKContext(ctx), msg.Id)
	if !found {
		return nil, errorsmod.Wrapf(sdkerrors.ErrKeyNotFound, "key %d doesn't exist", msg.Id)
	}
	if loan.State != "requested" {
		return nil, errorsmod.Wrapf(types.ErrWrongLoanState, "%v", loan.State)
	}
	lender, _ := sdk.AccAddressFromBech32(msg.Creator)
	borrower, _ := sdk.AccAddressFromBech32(loan.Borrower)
	amount, err := sdk.ParseCoinsNormalized(loan.Amount)
	if err != nil {
		return nil, errorsmod.Wrap(types.ErrWrongLoanState, "Cannot parse coins in loan amount")
	}
	err = k.bankKeeper.SendCoins(ctx, lender, borrower, amount)
	if err != nil {
		return nil, err
	}
	loan.Lender = msg.Creator
	loan.State = "approved"
	k.SetLoan(sdk.UnwrapSDKContext(ctx), loan)
	return &types.MsgApproveLoanResponse{}, nil
}
x/loan/keeper/msg_server_repay_loan.go
package keeper

import (
	"context"

	"loan/x/loan/types"

	errorsmod "cosmossdk.io/errors"
	sdk "github.com/cosmos/cosmos-sdk/types"
	sdkerrors "github.com/cosmos/cosmos-sdk/types/errors"
)

func (k msgServer) RepayLoan(ctx context.Context, msg *types.MsgRepayLoan) (*types.MsgRepayLoanResponse, error) {
	if _, err := k.addressCodec.StringToBytes(msg.Creator); err != nil {
		return nil, errorsmod.Wrap(err, "invalid authority address")
	}

	loan, found := k.GetLoan(sdk.UnwrapSDKContext(ctx), msg.Id)
	if !found {
		return nil, errorsmod.Wrapf(sdkerrors.ErrKeyNotFound, "key %d doesn't exist", msg.Id)
	}
	if loan.State != "approved" {
		return nil, errorsmod.Wrapf(types.ErrWrongLoanState, "%v", loan.State)
	}
	lender, _ := sdk.AccAddressFromBech32(loan.Lender)
	borrower, _ := sdk.AccAddressFromBech32(loan.Borrower)
	if msg.Creator != loan.Borrower {
		return nil, errorsmod.Wrap(sdkerrors.ErrUnauthorized, "Cannot repay: not the borrower")
	}
	amount, _ := sdk.ParseCoinsNormalized(loan.Amount)
	fee, _ := sdk.ParseCoinsNormalized(loan.Fee)
	collateral, _ := sdk.ParseCoinsNormalized(loan.Collateral)
	err := k.bankKeeper.SendCoins(ctx, borrower, lender, amount)
	if err != nil {
		return nil, err
	}
	err = k.bankKeeper.SendCoins(ctx, borrower, lender, fee)
	if err != nil {
		return nil, err
	}
	err = k.bankKeeper.SendCoinsFromModuleToAccount(ctx, types.ModuleName, borrower, collateral)
	if err != nil {
		return nil, err
	}
	loan.State = "repayed"
	k.SetLoan(sdk.UnwrapSDKContext(ctx), loan)
	return &types.MsgRepayLoanResponse{}, nil
}
x/loan/keeper/msg_server_liquidate_loan.go
package keeper

import (
	"context"
	"strconv"

	"loan/x/loan/types"

	errorsmod "cosmossdk.io/errors"
	sdk "github.com/cosmos/cosmos-sdk/types"
	sdkerrors "github.com/cosmos/cosmos-sdk/types/errors"
)

func (k msgServer) LiquidateLoan(ctx context.Context, msg *types.MsgLiquidateLoan) (*types.MsgLiquidateLoanResponse, error) {
	if _, err := k.addressCodec.StringToBytes(msg.Creator); err != nil {
		return nil, errorsmod.Wrap(err, "invalid authority address")
	}

	sdkCtx := sdk.UnwrapSDKContext(ctx)

	loan, found := k.GetLoan(sdkCtx, msg.Id)
	if !found {
		return nil, errorsmod.Wrapf(sdkerrors.ErrKeyNotFound, "key %d doesn't exist", msg.Id)
	}
	if loan.Lender != msg.Creator {
		return nil, errorsmod.Wrap(sdkerrors.ErrUnauthorized, "Cannot liquidate: not the lender")
	}
	if loan.State != "approved" {
		return nil, errorsmod.Wrapf(types.ErrWrongLoanState, "%v", loan.State)
	}
	lender, _ := sdk.AccAddressFromBech32(loan.Lender)
	collateral, _ := sdk.ParseCoinsNormalized(loan.Collateral)
	deadline, err := strconv.ParseInt(loan.Deadline, 10, 64)
	if err != nil {
		panic(err)
	}
	if sdkCtx.BlockHeight() < deadline {
		return nil, errorsmod.Wrap(types.ErrDeadline, "Cannot liquidate before deadline")
	}
	err = k.bankKeeper.SendCoinsFromModuleToAccount(ctx, types.ModuleName, lender, collateral)
	if err != nil {
		return nil, err
	}
	loan.State = "liquidated"
	k.SetLoan(sdkCtx, loan)
	return &types.MsgLiquidateLoanResponse{}, nil
}
Add the custom errors ErrWrongLoanState and ErrDeadline:
x/loan/types/errors.go
package types

import (
	"cosmossdk.io/errors"
)

var (
    ErrInvalidSigner  = errors.Register(ModuleName, 1100, "expected gov account as only signer for proposal message")
	ErrWrongLoanState = errors.Register(ModuleName, 2, "wrong loan state")
	ErrDeadline       = errors.Register(ModuleName, 3, "deadline")
)
Testing the Application
- Add Test Tokens:
Configure config.yml to add tokens (e.g., 10000foocoin) to test accounts.
config.yml
version: 1
validation: sovereign
default_denom: stake
accounts:
  - name: alice
    coins:
      - 20000token
      - 10000foocoin
      - 200000000stake
  - name: bob
    coins:
      - 10000token
      - 100000000stake
client:
  openapi:
    path: docs/static/openapi.yml
faucet:
  name: bob
  coins:
    - 5token
    - 100000stake
validators:
  - name: alice
    bonded: 100000000stake
- Start the Blockchain:
ignite chain serve
If everything works successful, you should see the Blockchain is running message in the Terminal.
- Request a loan:
In a new terminal window, request a loan of 1000token with 100token as a fee and 1000foocoin as a collateral from Alice's account. The deadline is set to 500 blocks:
loand tx loan request-loan 1000token 100token 1000foocoin 500 --from alice --chain-id loan
- Approve the loan:
loand tx loan approve-loan 0 --from bob --chain-id loan
- Repay a loan:
loand tx loan repay-loan 0 --from alice --chain-id loan
- Liquidate a loan:
loand tx loan request-loan 1000token 100token 1000foocoin 20 --from alice --chain-id loan -y
loand tx loan approve-loan 1 --from bob --chain-id loan -y
loand tx loan liquidate-loan 1 --from bob --chain-id loan -y
At any state in the process, use q list loan to see the active state of all loans.
loand q loan list-loan
Query the blockchain for balances to confirm they have changed according to your transactions.
loand q bank balances $(loand keys show alice -a)
Conclusion
This tutorial outlines the process of setting up a decentralized platform for digital asset loans using blockchain technology. By following these steps, you can create a DeFi platform that allows users to engage in secure and transparent lending and borrowing activities.
]]>