#10 Make projects public
Want everyone to be able to see what you’re working on? You can do that easily. Using the Advanced Permissions addon, you can make certain projects publicly viewable.
To set up a project to public viewing, install the Advanced Permissions addon, (if you have purchased it, you can download it from your UpStream account) and then activate it.
Once you have the addon activated, go to UpStream -> Advanced Permissions in your WordPress admin dashboard.

In the Permissions XML box, you can enter permissions rules. There is a complete explanation of how to set up any type of permissions here. To make a project publicly viewable, you can use the user type=”anonymous” rule.
For example, to make a project with ID 7 publicly viewable, you can use the code below
<upstream-permissions>
   <object type="project" id="7" allow="view"></object>
</upstream-permissions>
Finally, select enable and click save to enable the rules.
There are a few notes to remember with Advanced Permissions:
- When you enable Advanced Permissions, you disable all of the standard permissions (except admin and UpStream Manager access). Therefore, you will want to make sure you add any other necessary rules before enabling.
- You can only allow public viewing, not editing
- You can use other predicates for the rule as well, such as assigned-to
#9 You can create or edit projects from forms
If you use WPForms, Ninja Forms, or Gravity Forms, you can actually connect them to UpStream, so that form submitters can create or edit projects/tasks/milstones/bugs.
By using the UpStream Forms addon, you can link forms in your favorite forms tool to UpStream and you can set up rules, so form fields are mapped to project fields.
Check out these user guides for more information:
- Using UpStream Forms with WPForms
- Using UpStream Forms with Gravity Forms
- Using UpStream Forms with Ninja Forms
#8 You can change almost any label easily
Want to change a label in UpStream? You can do that quickly and easily with the Naming module. The naming module lets you change nearly any text label in UpStream to something else.
For example, you may want to change the phrase End Date everywhere to “Closing Date.” Then, your Edit Project page will look like this:

All you need to do is install and activate the Naming addon, and then go to UpStream -> Naming. Select End Date from the first dropdown, and then enter the text you want to use instead right below:

You can use the naming addon to replace up to 50 different labels.
#7 You can search tasks that have taken too long or spent too much
Using UpStream Reports and the UpStream Time and Budget Tracking module, you can easily run a report of any projects that have taken too much time — or spent too much.
Just choose a task report in the Reports section, and scroll down to the Elapsed Time or Amount Spent sections. You can then enter a minimum number, and find all tasks that are above that number.
Learn more about the different reports offered here.
#6 You can send notifications on specific dates
Beyond just the normal notification options (a week before, a day before, etc.), you can choose to send notifications on specific dates.
If you want to do this, just go into the item you want to edit, and then scroll down to Reminders. In the box that is marked Select a Date, you can enter a date, or use the date picker to choose a date.

#5 There’s an API
Yes, that’s right: UpStream finally has an API that is integrated with WordPress’ REST API. That means you can create or edit projects, tasks, clients, milestones, files, bugs, and more programmatically.
The API provides access to most fields in UpStream, as well as custom fields and other data.

You can see all of the information on using the API here.
#4 You have multiple file management options
By default UpStream uses WordPress’ own file management system. This works great for a lot of users.
But for those users who want extra security or privacy, UpStream has its own file management system built in.
Before getting started, please note that this must be done before adding any files to your UpStream installation. You may lost files if you change it after you have already attached files in UpStream.
To set up UpStream’s own file management solution, you can go to your UpStream -> General settings area. Under File Upload Manager, select Use UpStream Secure File Uploads. Then, in the following field, enter the local path of a writeable location on your server.

Once you have done this, your UpStream files will be stored outside of the web root, and be served by UpStream. This ensures that your files are kept privately and can only be downloaded by users with appropriate access rights.
#3 You can customize the UpStream front end to look like your website
With the UpStream customizer, you can customize the front end of UpStream to look like your website.
You can place your logo, change CSS, set colors, and much more using our customizer interface. You can set backgrounds, foregrounds, headers, and menu colors.
Additionally, administrators can add Javascript or CSS to the page, essentially offering unlimited customization.

#2 You can also customize the reminder and status emails sent by UpStream
Want your notifications and status emails to look like your other emails? You can do that using the UpStream Email Notifications addon.
For each significant email type, you can set a subject, as well as an HTML pre- and post- section. There are special codes that you can enter to add in information from your project.

You can read a lot more on customizing your emails here.
#1 You can set field-level permissions on any field on UpStream
One of the many things that sets UpStream apart from other tools is that you can set permissions on any field, so that some fields can be editable, some can be read-only, and some can be hidden — depending on the viewer.
Using the Advanced Permissions module, you have complete control over who sees what information in your project. Want to allow certain roles to only change status and end dates? You can do that. Want to allow a reviewer role to only see certain information? You can do that too.
You can learn all about what you can do with Advanced Permissions here.
]]>UpStream 1.26 is here and it brings big improvements to the Project Timeline / Gantt Chart feature in UpStream.
New Project Timeline page
When you update, there will be a new “Timeline” link on the frontend of your projects:
This “Timeline” link leads to a big new version of the Project Timeline extension. This is the Gantt Chart for UpStream. This chart gives you an overview of all the Milestones across all your projects.

Milestone Categories
For large sites, there’s now the option to categorize your Milestones.
Beyond the ability to organize and filter your Milestones, the main benefit is the color on the frontend. If you choose a color for Milestone Category, it will cascade down to all the Milestones in that category. This will work unless you’ve also picked a color for a single Milestone.

You can disable this feature by going to UpStream > Settings > Disable Milestone Categories:

See all your projects on the frontend
We added an option to show all your projects in the left sidebar on the frontend:

You can enable or disable this feature by going to UpStream > Settings > Show all projects in the frontend sidebar

More notifications
We are working on improved notifications for UpStream. In the short term, there is a change to notifications: new comments/discussions will send an email to everyone in a project.
Other updates
To make these changes possible, there were releases for three UpStream extensions:
- Project Timeline, version 1.3.0. See the changelog.
- Copy Project, version 1.1.4. See the changelog.
- Frontend Edit, version 1.10.0. See the changelog.
These features are all driven by your feedback. We really appreciate all of you who use UpStream and take the time to send in useful suggestions.
We’ve been releasing a new version of UpStream at the end of each month. Each new version has 5 or 6 added features, plus bug-fixes. This end-of-month cycle has been successful, so look for more monthly releases in the future.
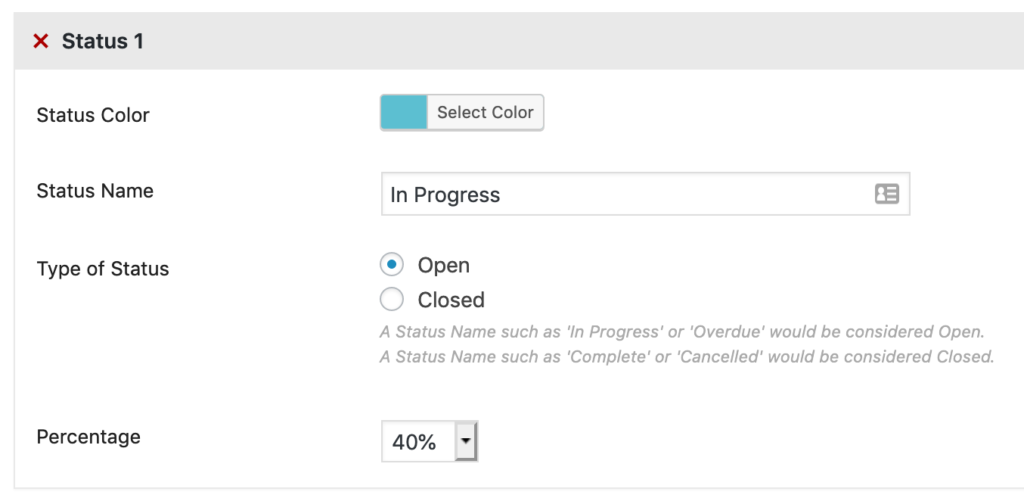
Give a specific percentage to Statuses
This new feature allows you to be more consistent in how your projects run.
It’s now possible to link the Status for a Task to a percentage. For example, you can decide that “Completed” always means that a Task is at 100% progress. Or perhaps, “Waiting for Approval” always mean that a Task is at 80% approval.
We hope this this will make things easier for people who are creating and editing Tasks.
You can link the Statuses and percentages by going to UpStream > Tasks.
Show Usernames instead of Avatars
You’ll now find a new option called “Show Users Name”. If you set this to “Yes”, you’ll see names instead of avatars. This does take up more screen space, but may be a better option for your team:

To find this setting, go to UpStream > General:

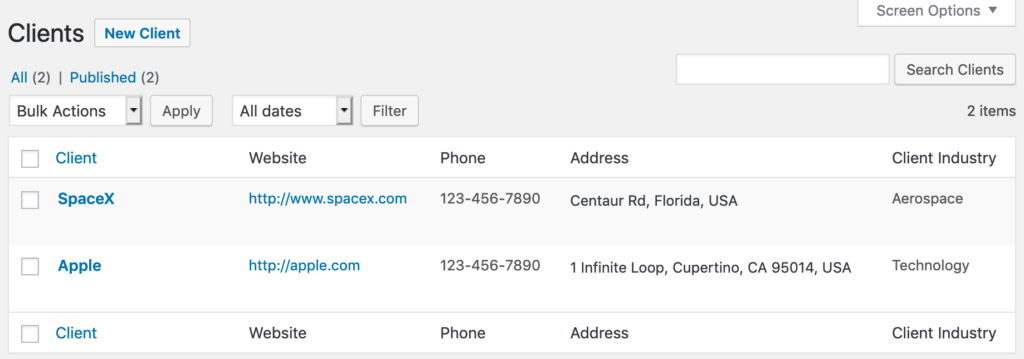
Custom fields for Clients
It’s now possible to use the Custom Fields extension to collect more information on your Clients.
When you create a new field, you can choose to use the field on Clients:

After adding a field, go to UpStream > Clients. Edit a Client and you’ll see the fields in the right sidebar. In the example below, “Client Industry” is a custom field.

You can choose to show these fields on the main “Clients” screen, as in the image below:
More Delete buttons on the frontend
Every item on the frontend of UpStream should now have a red “Delete” button, from Tasks and Milestones, to Projects and Bugs.

Copy a Project from the frontend
If you have the Copy Project extension installed, it will now work on the frontend of your site too. You will see a small “Copy” icon next to the “Edit” pencil:
Full details and changelogs
To make these changes possible, there were releases for three UpStream extensions:
- Copy Project, version 1.1.3. See the changelog.
- Custom Fields, version 1.6.0. See the changelog.
- Frontend Edit, version 1.9.3. See the changelog.
There are also several releases for UpStream extensions.
Here’s an overview of some changes you’ll see in UpStream 1.24.4.
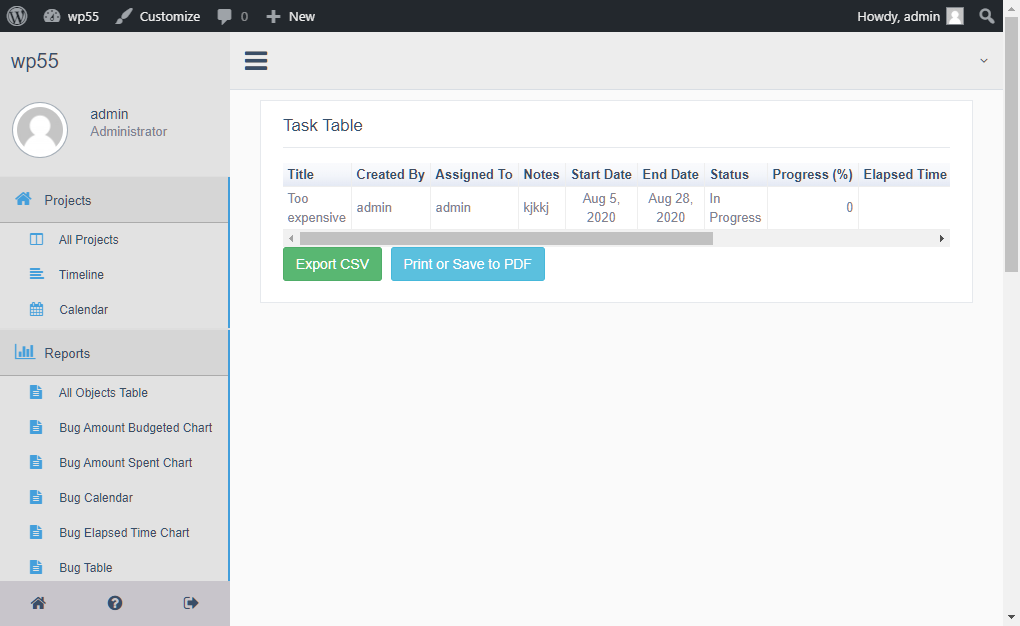
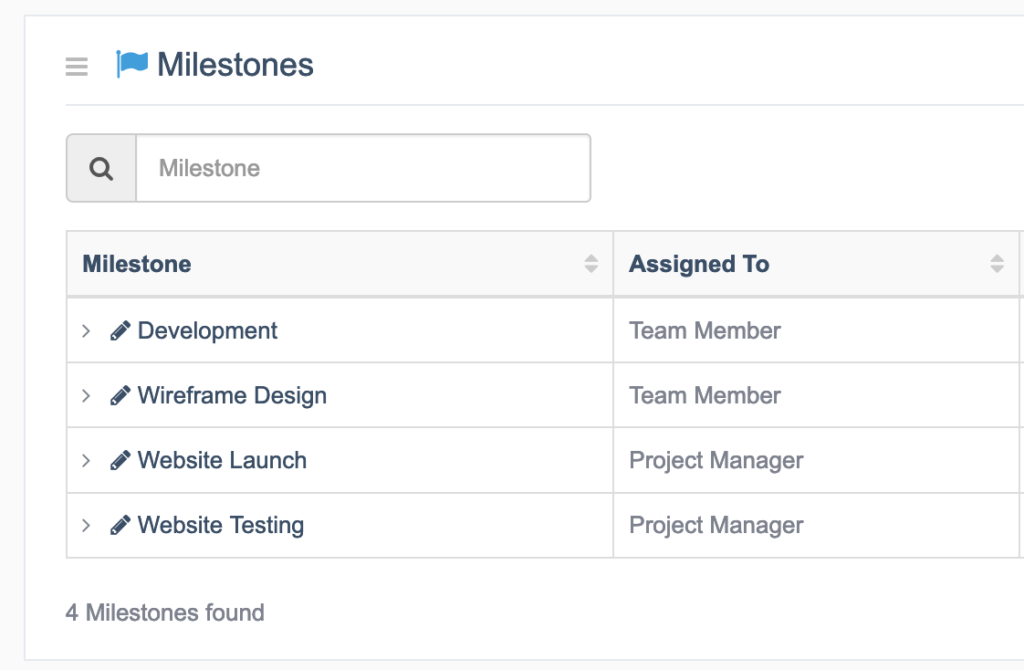
UpStream tables will now show the number of items. For example, you can see “4 Milestones found” in the image below. These results will update if you search or filter the listings.
We split Start Dates and End Dates into separate fields. This makes it easier to order items by these dates. It also means that the CSV export feature works better because the dates aren’t combined into the same column.

Also worth noting is that Project progress is now based directly on Tasks, rather than Milestones. In previous versions of UpStream, the Project progress also involved Milestones, and this made it difficult to disable the “Milestones” feature. Click here to read more about UpStream progress.
Custom Fields improvements
The Custom Fields extension has a couple of new field types.
- There’s a new field type for selecting WordPress users:

- There’s a new field type for selecting countries:

Full details and changelogs
To make these changes possible, there were releases for four UpStream extensions:
- Copy Project, version 1.1.2. See the changelog.
- Custom Fields, version 1.5.0. See the changelog.
- Frontend Edit, version 1.9.2. See the changelog.
- Project Timeline, version 1.2.3. See the changelog.
1.24 was a big change and since then, we’ve released several smaller UpStream updates as a result of your feedback.
I’m glad to say that we’re now moving forward again and working on the next stage of UpStream.
Next for UpStream: improved notifications
Our next focus for UpStream is making the Email Notifications extension much more flexible. This image shows a preview of what we’re working on:

You will be able to set up multiple notifications. Each notification can be customized in four ways:
- When to notify? Does the notification send when a new item is added? When an item changes from “In Progress” to “Complete”?
- For which content? Does the notification send for Projects, Milestones, Tasks, or something else?
- Who to notify? Who receives the notification?
- What to say? You can customize the content of the notification.
Plus, we need to change the name of the “Email Notifications” extension, because we plan to also add support Slack.
We don’t have an estimated release date yet, but we’ll let you know as soon as this new feature is ready for testing.
]]>One key new feature is that you can create unique Milestones for each project. In previous versions of UpStream, there was a general set of Milestones that were shared across projects.
In this UpStream release, you are also free to add any users to your projects. Your users no longer have to be in a specific role.
Please read before updating
This update does require a data migration. Please backup your site before updating.
We wrote a small migration script to move the old milestones to the new structure. This should automatically after you update.
However, if you don’t see the “Milestones” link, go UpStream > Settings and look for the “Migrate Legacy Milestones” button. Click “Start Migration”.

If the update doesn’t work, don’t worry. All your data is safe. You can use your site backup, or use this technique to rollback to a previous version of UpStream.
Flexible milestones
After installing UpStream 1.24, you will see a new “Milestones” link in the admin area:

The Milestones screen has a list of all the milestones on your site.

You can edit each Milestone and customize the features:

Flexible project user roles
Until now, only users in the 3 roles could take part in projects. Those roles were “UpStream Manager”, “UpStream User” and “UpStream Client Users”.
You can now choose which roles are able to take part in UpStream projects. Go to UpStream > General and look for the “Project Users Roles” area:

UpStream will still install with the “UpStream Manager”, “UpStream User” and “UpStream Client Users” role, but you will now be able to use other roles too.
Full details and changelogs
To make these changes possible, there were releasse for six UpStream extensions:
- Calendar View, version 1.3.0. See the changelog.
- Copy Project, version 1.1.0. See the changelog.
- Custom Fields, version 1.4.0. See the changelog.
- Email Notifications, version 1.2.1. See the changelog.
- Frontend Edit, version 1.9.0. See the changelog.
- Project Timeline, version 1.2.1. See the changelog.
The full changelog for version 1.24 is on WordPress.org.
Over to you
If you have any questions, please feel free to send us message. We’d love to hear your feedback on these changes.
]]>These updates make UpStream much easier to use.
Both the Calendar View and Project Timeline extensions now allow you to update project items using drag-and-drop. They also both support quick-editing of your project items.
Here’s an overview of 4 cool new features in the latest UpStream releases.
Feature #1. Drag-and-drop calendar items
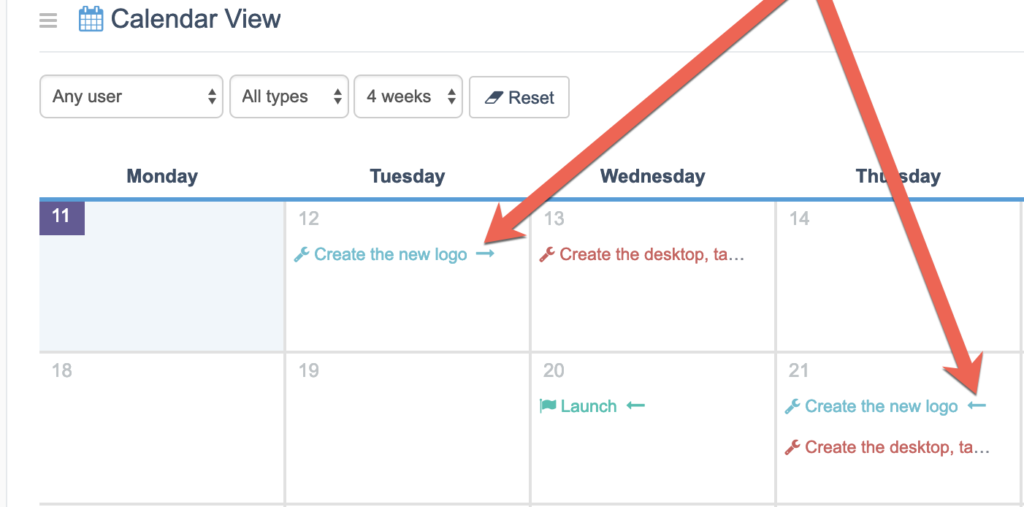
My favorite feature in these releases is drag-and-drop support for the Calendar View extension. You can use this to quickly move items on the calendar to new dates. In the image below, you can drag-and-drop the “Create the new logo” task from Thursday 14th to Tuesday 19th.

Your Calendar will show both the Start and End dates for project items. So to make it easier to know which one you’re looking at, we added arrow icons. In the image below, the arrow pointing to the right shows a Start date. The arrow pointing to the left shows the End date for the same item.
Feature #2. Create and edit items inside the calendar
The next new Calendar feature allows you to create and edit project items more easily. You will now see a “Click to create” link inside any date:
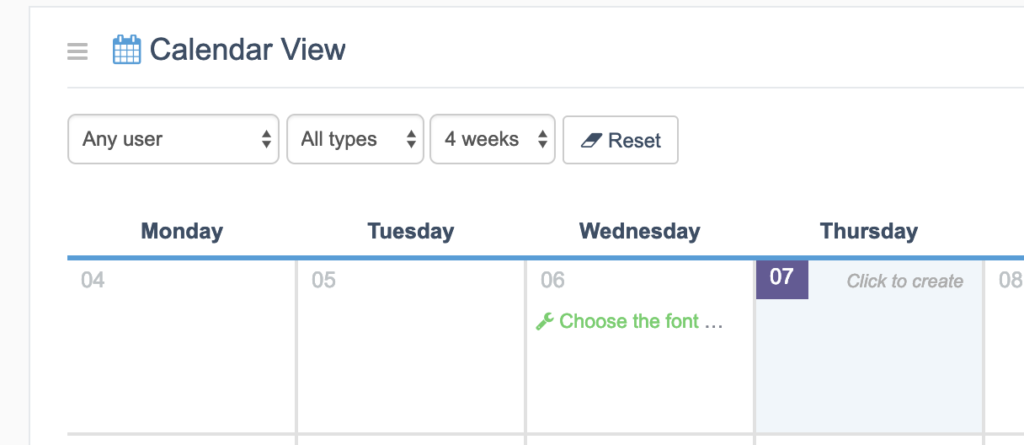
After clicking on the “Click to create” link, you will be able to choose to create a Task, Bug or Milestone.
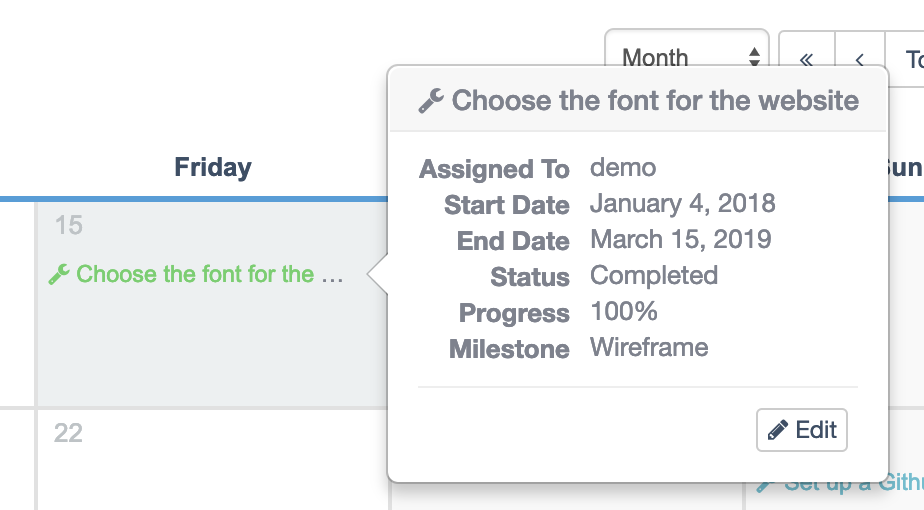
You can also click on any item in the Calendar to get more information. This image shows the extra information you’ll see, plus an “Edit” button.
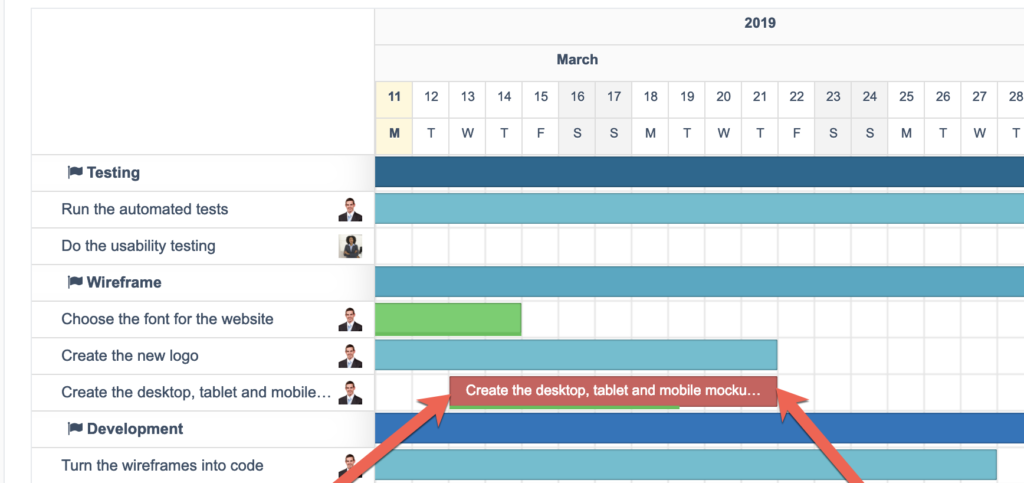
Feature #3. Drag-and-drop to change timeline items
Using the Project Timeline extension, you can click on the Start and End dates of any item. You can drag the toolbar items to change the date.
Feature #4. Edit items from the Project Timeline
As with the Calendar, the Project Timeline extension also allows you to click on items to edit them in the timeline

Details and changelogs
I’ve given an overview of four cool new features in these releases, but there are lots of smaller changes and bug-fixes too. If you want to see more specific details, we have full changelogs available.
The full changelog for UpStream 1.23.2 is on WordPress.org.
There were release for four UpStream extensions:
- Calendar View, version 1.2.0. See the changelog.
- Email Notifications, version 1.2.0. See the changelog.
- Frontend Edit, version 1.8.3. See the changelog.
- Project Timeline, version 1.2.0. See the changelog.
A new version of UpStream is available today. UpStream 1.23.1 has several small improvements and bug-fixes.
We resolved a lot of small bugs and issues that had accumulated over the December holidays.
Three Extension Updates
The full changelog for version 1.23.1 is on WordPress.org.
To make these changes possible, there were release for three UpStream extensions:
- Calendar View, version 1.1.1. See the changelog.
- Custom Fields, version 1.3.2. See the changelog.
- Frontend Edit, version 1.8.2. See the changelog.
New Features Coming Soon!
We’re not just fixing bugs – there are also new features coming to UpStream. Here’s a video teaser for a new and improved Calendar View.
PS. Yes, we’re on YouTube now.
As you can see in the video, this update allows you to create items directly from the calendar. You’ll also be able to drag-and-drop items to new dates.
We’re also working on allowing you to create custom milestones for projects. At the moment, milestones are the same for all projects.
Finally, we’re building the first stages of an export feature to enable reporting in UpStream.
Have any ideas for 2019?
Do you have feedback on what you’d like to see in UpStream this year? Our door is always open: [email protected].
]]>Version 5 brings the new Gutenberg editor to WordPress. If you’re unfamiliar with the new editor, the official launch post is a good place to start.
Here’s the intro video from WordPress.org
I have good news for UpStream users: UpStream is not impacted by Gutenberg at all. If you update to 5.0, you won’t see any issues related to UpStream.
However, I do urge you to be careful when updating to version 5. This is probably the biggest update in the history of WordPress. Things will break. We develop other plugins and at least one of those is broken because of features that are missing in Gutenberg.
There’s no need to rush and update your sites to WordPress 5. This release contains no security fixes – only new features. I know a lot of WordPress professionals and hosting companies are waiting until January to update. If you want to update now, be sure to try the update on a test site.
If you have any questions about UpStream and Gutenberg, please feel free to contact our team.
]]>Yes, that’s definitely possible. In this guide, I’ll show you several ways you can customize the experience that users get when they log in to your site.
Step #1. Customize the login screen
When you log in to this site (UpStreamPlugin.com), the image below shows the login screen. We have removed the WordPress logo and replaced it with our own mascot. We’ve also changed the color scheme.

There are a wide variety of plugins that can customize the login screen for you. Some themes also offer this feature. We have had success with the LoginPress plugin, but there are several good alternatives.

Step #2. Hide the WordPress admin toolbar
The login page is on obvious sign that you’re using WordPress. Another, particularly for logged-in users, is the black admin toolbar you see across the top of the site.
The “Hide Admin Bar from Non-Admins” plugin does exactly what the name suggests. This plugin has absolutely no settings! All you need to do is install and activate the plugin. After that, no-one except the admin users will see the toolbar.

Step #3. Redirect your users when they log in
If your users will be spending all their time with a plugin like UpStream, then you can redirect them automatically. With the UpStream user who asked us about this problem, he didn’t want his users doing anything on the site except project management.
So, we recommended the plugin called Peter’s Login Redirect.

This next image shows a real setting taken from this site. “edd_suscriber” is the name of the role we give to customers. So when a customer logs into the site, they are automatically sent to the “My Downloads” page. When they logout, they are automatically sent to the homepage.
If you were using this plugin with UpStream, you can redirect your users to the /projects URL.

Other ideas for customizing the login experience
If you want to dive deeper and customize other areas of the login process, there are possibilities. Here are a couple more ideas:
- You could completely deny your users access to the WordPress admin area. The “Remove Dashboard Access” plugin can help with that.
- You could also customize the welcome email that users get when they join your site. The “SB Welcome Email Editor” plugin can help there.
WordPress is flexible enough that you can create a unique and branded experience for your users.
If you have more ideas or questions, please leave them in the comments.
]]>