In the previous post, we set up persistent storage with Longhorn and MinIO. Today, we’re enhancing our cluster with a full monitoring and observability stack using Prometheus, Grafana, and AlertManager. We’ll also use a GitOps approach with ArgoCD]]>
Welcome back to the Kubernetes Homelab Series! 🚀
In the previous post, we set up persistent storage with Longhorn and MinIO. Today, we’re enhancing our cluster with a full monitoring and observability stack using Prometheus, Grafana, and AlertManager. We’ll also use a GitOps approach with ArgoCD to deploy and manage these tools.
Monitoring is critical in any Kubernetes environment, whether in production or in your homelab. A robust monitoring stack gives you real-time insights into resource consumption, application performance, and potential failures. By the end of this guide, you’ll have a fully functional monitoring stack that will help you answer questions like:
- How much CPU and memory are my applications consuming?
- Are my nodes and workloads operating correctly?
- Is my storage nearing its capacity limits?
- Are there any anomalies that could impact performance?
Kubernetes Upgrade: I’ve expanded my cluster with two additional worker nodes as VMs, bringing the total to four nodes. With plans to deploy more applications and services, this upgrade was essential to ensure scalability and performance.
The Monitoring Stack at a Glance
The stack we’ll deploy includes:
- Prometheus — Collects and stores metrics from Kubernetes and your applications.
- Grafana — Visualizes those metrics on customizable dashboards.
- AlertManager — Sends notifications when metrics breach defined thresholds.
- Node Exporter & Other Exporters — Pre-configured exporters to gather node and pod-level metrics.

Step 1: Deploy Prometheus and Grafana
Assuming you already have ArgoCD installed (refer to Part 2 for details), we’ll use the kube-prometheus-stack Helm chart.
Add the Helm Chart
helm repo add prometheus-community https://prometheus-community.github.io/helm-charts
helm repo update
Download the kube-prometheus-stack chart for customization:
helm fetch prometheus-community/kube-prometheus-stack --untarThis downloads the chart locally so you can modify the values as needed.
Step 2: Customize the Monitoring Stack
We need to configure persistent storage (using Longhorn) for Prometheus and Grafana and set up our alerting rules.
Create a custom-values.yaml file with the following content:
crds:
  create: false

grafana:
  service:
    type: LoadBalancer
    port: 80
  persistence:
    enabled: true
    accessModes:
      - ReadWriteOnce
    size: 8Gi
  affinity:
    nodeAffinity:
      requiredDuringSchedulingIgnoredDuringExecution:
        nodeSelectorTerms:
          - matchExpressions:
              - key: kubernetes.io/hostname
                operator: In
                values:
                  - beelink
prometheus:
  prometheusSpec:
    remoteWriteDashboards: false
    affinity:
      nodeAffinity:
        requiredDuringSchedulingIgnoredDuringExecution:
          nodeSelectorTerms:
            - matchExpressions:
                - key: kubernetes.io/hostname
                  operator: In
                  values:
                    - beelink
    serverSideApply: true
    retention: 12h
    storageSpec:
      volumeClaimTemplate:
        spec:
          storageClassName: longhorn
          accessModes:
            - ReadWriteOnce
          resources:
            requests:
              storage: 25Gi
    resources:
      requests:
        memory: 3Gi
        cpu: 500m
      limits:
        memory: 6Gi
        cpu: 2
This configuration ensures that both Prometheus and Grafana have persistent storage and are scheduled on your preferred node (the Beelink mini PC).
Step 3: Deploy the Stack with ArgoCD
We’ll now define an ArgoCD application to deploy the monitoring stack. Save the following manifest as monitoring-application.yaml:
apiVersion: argoproj.io/v1alpha1
kind: Application
metadata:
  name: monitoring
  namespace: argocd
spec:
  project: default
  sources:
    - repoURL: 'https://prometheus-community.github.io/helm-charts'
      chart: kube-prometheus-stack
      targetRevision: 67.9.0
      helm:
        valueFiles:
          - $values/apps/kube-prometheus-stack/custom-values.yaml
    - repoURL: 'https://github.com/pablodelarco/kubernetes-homelab'
      targetRevision: main
      ref: values
  destination:
    server: 'https://kubernetes.default.svc'
    namespace: monitoring
  syncPolicy:
    automated:
      prune: true
      selfHeal: true
    syncOptions:
      - CreateNamespace=true
This instructs ArgoCD to deploy the Prometheus stack using your customized values from your Git repository.
Step 4: Set Up Grafana Dashboards
Grafana is the visualization layer. One of the key dashboards we’ll use is the Kubernetes Dashboard: 15757. This dashboard displays:
- Cluster Resource Usage: Displays CPU and RAM usage (real, requested, and limits) across the cluster.
- Kubernetes Objects Overview: The number of nodes, namespaces, running pods, and other resources.
- Performance Metrics: Tracks CPU and memory utilization trends over time.
- Namespace Breakdown: Visualizes CPU and memory usage per namespace.

Grafana Login Credentials
- Default username: admin
- Retrieve password:
kubectl get secret -n monitoring monitoring-grafana -o jsonpath="{.data.admin-password}" | base64 --decodeStep 5: Configuring AlertManager
Defining Alert Rules
To monitor critical cluster events, we’ll define Prometheus alert rules for:
- High CPU Usage (>80% for 2 minutes)
- High Memory Usage (>80% for 2 minutes)
- Node Down (Unreachable for 5 minutes)
- CrashLoopBackOff (Pod stuck for 5 minutes)
Create a file named alerts.yaml:
apiVersion: monitoring.coreos.com/v1
kind: PrometheusRule
metadata:
  name: cluster-alerts
  namespace: monitoring
spec:
  groups:
    - name: cluster-rules
      rules:
        - alert: HighCPUUsage
          expr: (1 - avg(rate(node_cpu_seconds_total{mode="idle"}[5m])) by (instance) > 0.8
          for: 2m
          labels:
            severity: critical
          annotations:
            summary: "High CPU usage on {{ $labels.instance }}"
            description: "CPU usage is {{ humanize $value }}% for 2 minutes."

        - alert: HighMemoryUsage
          expr: (1 - (node_memory_MemAvailable_bytes / node_memory_MemTotal_bytes)) > 0.8
          for: 2m
          labels:
            severity: critical
          annotations:
            summary: "High memory usage on {{ $labels.instance }}"
            description: "Memory usage is {{ humanize $value }}% for 2 minutes."

        - alert: NodeDown
          expr: up{job="node-exporter"} == 0
          for: 5m
          labels:
            severity: critical
          annotations:
            summary: "Node {{ $labels.instance }} is down"
            description: "Node has been unreachable for 5 minutes."

        - alert: CrashLoopBackOff
          expr: kube_pod_container_status_waiting_reason{reason="CrashLoopBackOff"} == 1
          for: 5m
          labels:
            severity: critical
          annotations:
            summary: "Pod {{ $labels.pod }} is crashing"
            description: "Pod {{ $labels.pod }} in {{ $labels.namespace }} is in CrashLoopBackOff."
Configuring AlertManager for Email Notifications
To receive alerts via email, define the AlertManager configuration in alertmanager-configmap.yaml:
apiVersion: v1
kind: ConfigMap
metadata:
  name: alertmanager-config
  namespace: monitoring
data:
  alertmanager.yml: |
    global:
      resolve_timeout: 5m
      smtp_smarthost: 'smtp.example.com:587'
      smtp_from: '[email protected]'
      smtp_auth_username: '[email protected]'
      smtp_auth_password: 'yourpassword'
      smtp_require_tls: true

    route:
      receiver: 'email-notifications'
      group_wait: 30s
      group_interval: 5m
      repeat_interval: 3h

    receivers:
    - name: 'email-notifications'
      email_configs:
      - to: '[email protected]'
        send_resolved: true
Conclusion
With Prometheus, Grafana, and AlertManager fully integrated, your Kubernetes homelab now has a robust monitoring and alerting stack. This setup ensures real-time observability, allowing you to detect and respond to high resource usage, node failures, and pod crashes before they become critical.
Next, we’ll explore Kubernetes networking and ingress, focusing on how to simplify load balancing with MetalLB and enhance remote access using Tailscale. This will provide seamless connectivity and improved security for your homelab. Stay tuned!
If you’re building your own Kubernetes homelab, let’s connect on LinkedIn and exchange insights! You can also check out all my other posts on Medium.
]]>In this post, we&
]]>Welcome back to the Kubernetes Homelab Series! After building a strong foundation in Part 1 with a two-node Kubernetes cluster, it’s time to take our homelab to the next level by addressing one of the most critical needs in any Kubernetes environment: persistent storage.
In this post, we’ll explore how to combine Longhorn and MinIO to create a robust storage solution:
- Longhorn: Distributed block storage designed for Kubernetes, providing resilient and automated backups.
- MinIO: S3-compatible object storage, ideal for leveraging your NAS as a backup target.
- GitOps with ArgoCD: Ensures all configurations are managed declaratively, making your setup reliable and version-controlled.
By the end of this guide, you’ll have a scalable and resilient storage solution that is perfect for modern applications and homelabs alike.
Why Persistent Storage Matters
Imagine your Kubernetes cluster running perfectly until a pod restarts or a node reboots and you lose important data. Persistent storage ensures that your data remains intact, even during these disruptions. With Longhorn and MinIO, you’re not just ensuring data persistence; you’re adding resilience, scalability, and disaster recovery capabilities to your homelab.
What is Longhorn?
Longhorn is an open-source distributed block storage system designed specifically for Kubernetes. It simplifies persistent storage management and provides features like automated volume provisioning, snapshots, and backups.

Key Features of Longhorn:
- Built for Kubernetes: Fully integrated with Kubernetes APIs.
- Distributed Storage: Data is replicated across nodes, ensuring resilience against node failures.
- Snapshots and Backups: Includes automated options for easy management.
- Lightweight: Designed to work efficiently, even in homelabs with limited resources.
Part 1: Deploying Longhorn with GitOps

Why GitOps?
Managing Kubernetes clusters can become overwhelming. GitOps transforms this complexity into simplicity by using Git as the single source of truth. This approach ensures consistency, automation, and version control for all your configurations.
There are several tools to implement GitOps, such as Flux and ArgoCD. For my homelab, I chose ArgoCD because of its intuitive interface and seamless integration with Kubernetes.
Key features of ArgoCD:
- Automated Sync: Keeps your cluster in sync with Git automatically or on-demand.
- Declarative Management: Ensures your cluster’s state always matches what’s defined in Git.
- User-Friendly UI: A clean interface for managing applications and troubleshooting issues.
- Multi-Cluster Support: Easily manages multiple clusters from one place.
Let’s start by setting up ArgoCD to manage our cluster.

Step 1: Install ArgoCD
First, add the ArgoCD Helm repository and create a namespace:
helm repo add argo https://argoproj.github.io/argo-helm
helm repo update

kubectl create namespace argocd
Next, install ArgoCD using Helm:
helm install argocd argo/argo-cd - n argocdTo access the ArgoCD UI:
kubectl port-forward svc/argocd-server -n argocd 8080:443Navigate to https://localhost:8080 and retrieve the initial admin password:
kubectl -n argocd get secret argocd-initial-admin-secret -o jsonpath="{.data.password}" | base64 -dYou’re now ready to use ArgoCD!
Step 2: Deploy Longhorn
To install Longhorn, start by adding its Helm repository:
helm repo add longhorn https://charts.longhorn.io
helm repo update
Custom Configuration
Create a custom-values.yaml file to store Longhorn configurations in your Git repository. Here’s an example:
persistence:
  defaultClass: true
defaultSettings:
  backupTarget: "s3://k8s-backups@us-east-1/"
  backupTargetCredentialSecret: "minio-credentials"
service:
  ui:
    type: LoadBalancer
    port: 80
Adding a dummy AWS region (e.g., us-east-1) in the backupTarget configuration is necessary because many S3-compatible systems, including MinIO, emulate the Amazon S3 API. The AWS region plays a role in how clients interpret and validate the S3 endpoint.
MinIO Credentials Secret
Define the MinIO credentials in a Kubernetes secret:
apiVersion: v1
kind: Secret
metadata:
  name: minio-credentials
  namespace: longhorn-system
type: Opaque
data:
  AWS_ACCESS_KEY_ID: <base64-encoded-access-key>
  AWS_SECRET_ACCESS_KEY: <base64-encoded-secret-key>
  AWS_ENDPOINTS: <base64-encoded-endpoint>
Apply the secret:
kubectl apply -f minio-credentials.yamlPush the changes to your Git repository:
git add apps/longhorn/
git commit -m "Add custom values for Longhorn"
git push
Deploy Longhorn with ArgoCD
Create an ArgoCD application manifest for Longhorn:
apiVersion: argoproj.io/v1alpha1
kind: Application
metadata:
  name: longhorn
  namespace: argocd
spec:
  project: default
  sources:
    - repoURL: 'https://charts.longhorn.io/'
      chart: longhorn
      targetRevision: 1.7.2
      helm:
        valueFiles:
          - $values/apps/longhorn/custom-values.yaml
    - repoURL: 'https://github.com/pablodelarco/kubernetes-homelab'
      targetRevision: main
      ref: values
  destination:
    server: 'https://kubernetes.default.svc'
    namespace: longhorn-system
  syncPolicy:
    automated:
      prune: true
      selfHeal: true
    syncOptions:
      - CreateNamespace=true
Save this file as longhorn.yaml and apply it:
kubectl apply -f longhorn.yamlLeveraging multiple sources in ArgoCD adds flexibility by integrating the latest Helm charts with custom configurations, enabling seamless updates while maintaining a scalable and adaptable setup.
Part 2: Deploying MinIO
What is MinIO?
When it comes to object storage in Kubernetes, MinIO is a go-to solution. It’s open-source, high-performance, and S3-compatible — making it an ideal choice for both homelabs and production environments.
Key Features:
- S3 API Compatibility: Works seamlessly with S3-compatible tools and applications.
- Backup Storage: Acts as a robust and scalable target for Longhorn backups or other Kubernetes workloads.
- Homelab-Friendly: Easily integrates with existing NAS infrastructure via NFS shares, leveraging the resources you already have.

Step 1: Configure NFS Storage for MinIO
To use MinIO with NFS for storing backups, we’ll define a StorageClass:
apiVersion: storage.k8s.io/v1
kind: StorageClass
metadata:
  name: nfs
provisioner: nfs
parameters:
  server: 192.168.1.42                      # Replace with your NAS IP
  path: /volume1/minio-backup               # Path to the NFS folder
reclaimPolicy: Retain
volumeBindingMode: Immediate
Why Use a StorageClass?
- A
StorageClassenables dynamic provisioning of PersistentVolumes (PVs). Kubernetes handles the creation of PVs and binding them to PersistentVolumeClaims (PVCs) without requiring manual setup. - The
ReclaimPolicy: Retainensures your backup data isn’t deleted when PVCs are removed, offering an extra layer of safety.
Apply the StorageClass: kubectl apply -f nfs-storageclass.yaml.
Step 2: Configure MinIO Custom Values
Save the following as custom-values.yaml in your repository:
nameOverride: "minio"
fullnameOverride: "minio"

clusterDomain: cluster.local

image:
  repository: quay.io/minio/minio
  tag: RELEASE.2024-12-18T13-15-44Z
  pullPolicy: IfNotPresent

mcImage:
  repository: quay.io/minio/mc
  tag: RELEASE.2024-11-21T17-21-54Z
  pullPolicy: IfNotPresent

mode: standalone

rootUser: ""
rootPassword: ""
existingSecret: minio-login

persistence:
  enabled: true
  storageClass: nfs
  accessMode: ReadWriteMany
  size: 150Gi
  annotations: {}

service:
  type: LoadBalancer
  port: "9000"
  nodePort: 32000
  annotations: {}
  loadBalancerSourceRanges: {}

consoleService:
  type: LoadBalancer
  port: "9001"
  nodePort: 32001
  annotations: {}
  loadBalancerSourceRanges: {}

securityContext:
  enabled: true
  runAsUser: 65534
  runAsGroup: 100
  fsGroup: 100
  fsGroupChangePolicy: "OnRootMismatch"

metrics:
  serviceMonitor:
    enabled: true

resources:
  requests:
    memory: 2Gi
    cpu: 500m
  limits:
    memory: 4Gi
    cpu: 1

customCommands: []
Deployment Challenge: MinIO Permission Issues
While deploying MinIO with an NFS-backed storage, I encountered a BackOff error due to a mismatch between MinIO's securityContext settings and the ownership of the NFS-mounted directory.
Solution: Updating the securityContext to use runAsUser: 65534, runAsGroup: 100, and fsGroup: 100 resolved the issue, ensuring proper alignment with the NFS storage permissions.
This issue highlighted the importance of configuring storage permissions correctly when working with Kubernetes.
Step 3: Deploy MinIO with ArgoCD
Add the MinIO Helm repository:
helm repo add minio https://charts.min.io/
helm repo update
Define the ArgoCD application for MinIO:
apiVersion: argoproj.io/v1alpha1
kind: Application
metadata:
  name: minio
  namespace: argocd
spec:
  project: default
  sources:
    - repoURL: 'https://charts.min.io/'
      chart: minio
      targetRevision: 5.4.0
      helm:
        valueFiles:
          - $values/apps/minio/custom-values.yaml
    - repoURL: 'https://github.com/pablodelarco/kubernetes-homelab'
      targetRevision: main
      ref: values
  destination:
    server: 'https://kubernetes.default.svc'
    namespace: minio
  syncPolicy:
    automated:
      prune: true
      selfHeal: true
    syncOptions:
      - CreateNamespace=true
Push the configuration to your Git repository, then sync the application in ArgoCD. Verify the deployment with:
kubectl get all -n minioIn case there is any problem, you can check the logs of the ArgoCD application by executing: kubectl describe application minio -n argocd
Step 4: Using MinIO for Longhorn Backups
We’ve already declared the backup target and credential secret in the custom-values.yaml. However, if you prefer to configure this manually, follow these steps:
- Open the Longhorn UI and navigate to Settings > General.
- Enter the following details:
- Backup Target:
s3://k8s-backups - Backup Target Credential Secret:
minio-credentials
Conclusion
With Longhorn and MinIO, your Kubernetes homelab now features resilient, scalable storage for backups and object storage. This setup ensures your data is secure, accessible, and disaster-ready, all managed declaratively with GitOps.
In the next post, we’ll enhance our homelab with Prometheus and Grafana for observability and monitoring. See you in Part 3! 🚀
If you’d like to connect or discuss more, feel free to follow me on LinkedIn!
]]>This is my first post, and I couldn’t be more excited to share this journey with you!
I’ve always been amazed by cloud and virtualization technologies, so I decided to dive into Kubernetes and containerization. However, a few months ago, I found myself frustrated by how abstract and theoretical Kubernetes felt in online courses. I realized the best way to truly understand it was to build something real. That’s how the idea of a Kubernetes homelab came to life — a hands-on project to turn my curiosity into practical skills by breaking things, fixing them, and learning along the way.
In this series, I’ll share my journey of building a Kubernetes homelab from scratch — the tools, the wins, the obstacles, and the lessons — all based on personal, real-world experiences rather than typical tutorials.
All the configurations and code snippets I use in this series can be found in my GitHub repository: Kubernetes Homelab.
In this first stage, I opted to deploy the cluster on bare metal due to the limited specs of my setup, but I plan to extend my homelab by adding more nodes as VMs to explore scalability and test different technologies and configurations.
1. What Am I Building? The High-Level Roadmap
Here’s the vision I started with:
- Set up a K3s cluster: A lightweight Kubernetes cluster using a Beelink Mini PC as the control plane node and worker nodes distributed across additional devices like Raspberry Pis.
- Persistent Storage: Leverage Longhorn for distributed storage and backups. Integrate with a NAS for additional S3-compatible storage using MinIO.
- Networking and Ingress: Use MetalLB for LoadBalancer functionality and Tailscale for secure ingress.
- Monitoring and Observability: Deploy Prometheus and Grafana for visualizing cluster health and workload performance.
- GitOps Automation: Adopt ArgoCD for GitOps workflows, ensuring all configurations are declarative and version-controlled.
- Applications: Run a suite of homelab apps like Uptime Kuma, Grafana, Prometheus or Home Assistant for practical use cases.
- Federation: Experiment with federated Kubernetes clusters interconnected via Tailscale.

2. Why a Kubernetes Homelab?
For me, this project combines two things I love:
- Learning by Doing: I’ve always believed the best way to learn a technology is to build with it. A homelab gives me a real-world environment to test tools, optimize workflows, and troubleshoot problems without production pressure. It’s an opportunity to move beyond theory and work hands-on with practical challenges.
- Freedom to Experiment: Unlike work environments with constraints, a homelab is a space I can freely break and rebuild. I’m experimenting with federating clusters via Tailscale, testing GitOps workflows with ArgoCD, and exploring Kubernetes on diverse hardware setups. It’s a dynamic environment, constantly evolving as I add apps and tools to push its limits and build confidence in managing cutting-edge technology.
3. My Hardware Setup
Here’s what I started with:
- Beelink Mini S12 Pro
- Intel N100, 16GB RAM, 500GB NVMe SSD.
- Serves as the control plane node and also a worker node for the cluster.
2. Raspberry Pi 4
- 4GB RAM with 120GB SSD.
- Configured as a lightweight worker node.
3. Synology NAS
- Integrated via MinIO for S3-compatible storage and NFS shares, and used to store the Longhorn backups.
4. Networking
- Stable LAN with MetalLB handling LoadBalancer IPs and Tailscale for secure connectivity.
4. Getting Started: Setting Up the K3s Cluster
To kick things off, I started by setting up a K3s cluster — a lightweight Kubernetes distribution perfect for homelabs. Here’s how I approached it:
Why K3s?
K3s is a lightweight Kubernetes distribution specifically designed for edge computing and resource-constrained environments. Unlike the standard Kubernetes distribution, K3s reduces complexity by integrating essential components, making it an excellent choice for homelabs where simplicity and efficiency matter. Compared to Minikube or kubeadm, K3s excels in being production-grade and lightweight, with a minimal resource footprint.
Step 1: Install K3s on the Beelink Mini PC
I used the Beelink Mini S12 Pro as my control plane node. Installing K3s was straightforward:
curl -sfL https://get.k3s.io | sh -

sudo systemctl status k3s
This command installs K3s and starts the service. Verify it’s running with:
kubectl get nodesYou should see your control plane node listed as Ready.
Step 2: Add the Raspberry Pi as a Worker Node
To add a worker node, I retrieved the token from the control plane:
sudo cat /var/lib/rancher/k3s/server/node-tokenThen, on the Raspberry Pi:
curl -sfL https://get.k3s.io | K3S_URL=https://<control-plane-ip>:6443 K3S_TOKEN=<token> sh -Now the Raspberry Pi should be connected to the cluster. Verify with:
kubectl get nodesYou should now see both nodes listed.
Step 3: Troubleshooting
While setting up my Kubernetes cluster, I encountered a “permission denied” error with /etc/rancher/k3s/k3s.yaml. Here's how I resolved it.
- Copy the kubeconfig file to your home directory:
mkdir -p ~/.kube sudo cp /etc/rancher/k3s/k3s.yaml ~/.kube/config
sudo chown $(id -u):$(id -g) ~/.kube/config chmod 600 ~/.kube/config
2. Set the KUBECONFIG environment variable:
export KUBECONFIG=~/.kube/config5. What’s Next?
In the next post, I’ll focus on Persistent Storage, which is a critical aspect of any Kubernetes setup. I’ll cover:
- Leveraging Longhorn for distributed storage and backups to enhance resilience and mimic real-world production environments.
- Integrating with a NAS using MinIO for S3-compatible storage, adding flexibility for backups and data sharing across nodes.
These tools will strengthen your homelab and provide practical insights into real-world storage strategies.
6. Let’s Build This Together
This homelab is a journey, not just a project. I’ll document every step — the wins, the obstacles, and the lessons.
If you’re building your own homelab, I’d love to hear from you. Share your thoughts, ideas, and questions in the comments. Let’s learn and build together.
Stay tuned for the next post! 🚀
]]>Last week, OpenNebula Community celebrated the 11th edition of the OpenNebula Conference. You can watch all the sessions on demand on their website or YouTube channel, where you can find a specific playlist (so you don’t miss a thing). |
 Last week, OpenNebula Community celebrated the 11th edition of the OpenNebula Conference. You can watch all the sessions on demand on their website or YouTube channel, where you can find a specific playlist (so you don’t miss a thing). |
The conference featured over 55 speakers and 35 participating organizations, covering topics such as Cloud, AI, Automation, and more. They also discussed future plans for OpenNebula Systems, including a new partnership program. The event included 24 sessions with panels, use cases, and solution keynotes. Let them know which sessions you enjoyed the most and your key takeaways. |

Kopia es una herramienta libre, moderna y rápida para hacer copias de seguridad. Al igual que otras herramientas como Borg o Restic, Kopia permite tomar snapshots de los datos del usuario y guardarlos en un repositorio.
Tipos de repositorio
Kopia ofrece diferentes tipos de repositorio para almacenar las copias de seguridad:
- Directorio local.
- Servidor SFTP o WebDAV.
- Proveedores de almacenamiento en la nube.
- Servicios soportados por Rclone.
La herramienta almacena los backups de manera eficiente utilizando técnicas de deduplicación y compresión opcionales. Además, ofrece seguridad mediante cifrado y proporciona una interfaz sencilla tanto en la línea de comandos como en una interfaz gráfica.
Cuando se necesita recuperar datos de una copia de seguridad, es posible montar el snapshot correspondiente y acceder al contenido utilizando las herramientas habituales.
Instalación de Kopia
Dado que Kopia es una aplicación reciente, no está incluida en los repositorios oficiales de Ubuntu. Sin embargo, la instalación es sencilla. Puedes descargar el paquete .deb desde el repositorio oficial de Kopia y luego instalarlo en tu sistema utilizando el siguiente comando:
wget https://github.com/kopia/kopia/releases/download/v0.13.0/kopia_0.13.0_linux_amd64.deb -O /tmp/kopia.deb

dpkg -i /tmp/kopia.deb
Configuración del repositorio
A continuación, veremos cómo configurar un repositorio utilizando Contabo Object Storage como ejemplo. Para ello, necesitarás tener una cuenta en Contabo Object Storage y crear un bucket con el nombre de tu host. Asegúrate de obtener las credenciales de acceso, incluyendo el access key, secret key y endpoint.
Una vez que tengas estos datos, puedes ejecutar el siguiente comando para crear el repositorio en Kopia:
kopia repository create s3 --bucket=<nombre del bucket> --access-key=<access key> --secret-access-key=<secret key> --endpoint=eu2.contabostorage.com
No olvides reemplazar <nombre del bucket>, <access key>, <secret key> y eu2.contabostorage.com con los valores correspondientes proporcionados por Contabo Object Storage.
Configuración de políticas de retención
Kopia tiene una política de retención por defecto que controla la cantidad de snapshots almacenados. Sin embargo, puedes ajustar esta política según tus necesidades. A continuación se muestra un ejemplo de cómo establecer tus preferencias de retención:
kopia policy set --global --compression=zstd
kopia policy set --global --keep-annual 0
kopia policy set --global --keep-monthly 3
kopia policy set --global --keep-weekly 4
kopia policy set --global --keep-daily 7
kopia policy set --global --keep-latest 20
Estos comandos establecerán la compresión en zstd y definirán los períodos de retención para los backups anuales, mensuales, semanales, diarios y los snapshots más recientes. Puedes ajustar estos valores según tus necesidades específicas.
Script de respaldo
A continuación se muestra un ejemplo de un script de respaldo para Kopia, utilizando variables para los valores de acceso y configuración:
#!/bin/bash

export KOPIA_PASSWORD="<contraseña>"

ACCESS_KEY="<access key>"
SECRET_KEY="<secret key>"
ENDPOINT="eu2.contabostorage.com"
BUCKET_NAME="<nombre del bucket>"

# Conectar al repositorio S3
kopia repository connect s3 --bucket="$BUCKET_NAME" --access-key="$ACCESS_KEY" --secret-access-key="$SECRET_KEY" --endpoint="$ENDPOINT"

# Crear snapshot
kopia snapshot create /home/*/web/*/public_html --description "Websites $HOSTNAME"

# Ejecutar mantenimiento
kopia maintenance run --full

# Desconectar del repositorio
kopia repository disconnect
Asegúrate de reemplazar <contraseña>, <access key>, <secret key>, <endpoint> y <nombre del bucket> con los valores correspondientes. Además, asegúrate de establecer correctamente las rutas y los comandos según tu configuración específica.
Configuración del cron
Una vez que hayas creado el script de respaldo, puedes programar su ejecución utilizando el cron. Aquí tienes un ejemplo de cómo configurar el cron para que ejecute el script cada 15 minutos:
(crontab -l 2>/dev/null; echo "*/15 * * * * /etc/backup.sh") | crontab -
Asegúrate de que el script de respaldo se encuentre en la ubicación correcta (/etc/backup.sh) para que el cron pueda ejecutarlo adecuadamente.
Uso básico de Kopia
Listado de snapshots
Para listar los snapshots almacenados en el repositorio, puedes utilizar el siguiente comando:
kopia snapshot list
Acceso a los snapshots
Puedes acceder a los contenidos de un snapshot utilizando el siguiente comando:
kopia mount <snapshot-ID> <directorio-de-montaje>
Reemplaza <snapshot-ID> con el ID del snapshot que deseas montar y <directorio-de-montaje> con la ruta del directorio donde deseas montar el contenido.
Conclusiones
Kopia es una herramienta poderosa y eficiente para realizar copias de seguridad de manera segura. Con su soporte para diferentes tipos de repositorio, políticas de retención flexibles y características avanzadas, Kopia te brinda la confianza y tranquilidad de que tus datos estarán protegidos y disponibles para su recuperación en caso de cualquier eventualidad. Sigue los pasos mencionados en este artículo para configurar Kopia en tu entorno y asegurar la integridad de tus datos más valiosos. ¡No esperes más y comienza a respaldar tus datos con Kopia!
]]>One of the most important questions when it comes to dealing with GitOps is knowing where to store your secrets and how to manage them securely. Some of the tools available for this purpose are Secrets Manager and External Secrets. However, I was looking for something simpler for my
]]>
One of the most important questions when it comes to dealing with GitOps is knowing where to store your secrets and how to manage them securely. Some of the tools available for this purpose are Secrets Manager and External Secrets. However, I was looking for something simpler for my team. Argo Vault Plugin (AVP) is an easy-to-use tool for managing secrets in GitOps solutions under Argo and Kubernetes. Additionally, you can also use other secrets management tools like AWS Secrets Manager or others instead of Vault.
On the other hand, I must say that the installation of AVP was not as easy compared to other tools such as secrets-manager (https://github.com/tuenti/secrets-manager) or external-secrets (https://github.com/external-secrets/kubernetes-external-secrets).
If you would like to learn more about AVP, including how it works, I recommend following the official documentation at https://argocd-vault-plugin.readthedocs.io/en/stable/. In that tutorial, I will explain and summarize how to install the tool using HELM, covering the two options that we tried. It will be a straightforward, step-by-step process.
Installing AVP in Argo CD
When reading the official website at https://github.com/argoproj-labs/argocd-vault-plugin/blob/main/docs/installation.md, we can observe that there are four different ways to set up the Argo Vault Plugin. This variety of options might pose a challenge in determining the most suitable approach for our specific needs. Therefore, it is essential to evaluate each method carefully to determine which one is the best fit for us.
In order to use the plugin in Argo CD, you have four distinct options available:
- Installation via
argocd-cmConfigMap using Kustomization or Helm - Installation via
argocd-cmConfigMap creating a customargocd-repo-serverimage - Installation via a sidecar container using Kustomization or Helm
- Installation via a sidecar container creating a custom sidecar image with AVP
But two of these solutions can be installed via Kustomization or Helm. Therefore, this tutorial is focused on people who are using Argo installations through Helm, rather than ArgoCD installations with Kustomization.
What we try and choose?
- Installation via
argocd-cmConfigMap using Helm and not kustomization - Installation via a sidecar container using Helm and not kustomization
In this tutorial, we used Helm, which is interesting because when we attempted to install AVP using Kustomization, we encountered numerous warnings after applying the kustomize command. These warnings arose because the previous installation of ArgoCD was done with Helm instead of Kustomization or raw Kubernetes and all the argo cluster was in an inconsistence state .
If you are not using Helm, you can attempt to install the Argo Vault Plugin using the provided links and commands. However, it is recommended to follow the official documentation for more detailed instructions. If you are doing that please skip that tutorial.
# argocd vault plugin using kustomization kubectl apply -k bootstrap/overlays/argocd-vault-plugin/ |
https://github.com/argoproj-labs/argocd-vault-plugin/tree/main/manifests/cmp-configmap
Finally, we chose the HELM method and installed AVP using Sidecar and Configmap. Since we made that decision, we focused solely on HELM installation. During the process, we encountered some challenges as there were not many examples available on the internet, and we noticed numerous open issues on the https://github.com/argoproj-labs/argocd-vault-plugin/issues page.
I was almost done with the sidecar installation, but after switching to argocd-cm configmap, I gained a better understanding of the setup, and it finally started working. I believe that if I had continued with the sidecar method, it would have been successfully with next examples of the article related with the sidecar installation with helm.
So we opted for the old method (argocd-cm configmap) because it is easier to debug, has more documentation and more examples available in the moment that I write that article. However, in future Argo installations, we may consider revisiting the sidecar method, as it is newer and expected to be more stable and bug-free.
Also It's worth mentioning that we tested AV version 1.11, 1.12, and 1.14, along with Argocd 2.6.7 and helmchart 5.29.1.
Installation via argocd-cm ConfigMap using Helm
summary
I installed the ArgoCD Vault Plugin using the configmap solution, which turned out to be the easiest installation method out of the two I tested. It was a straightforward process that involved just two steps.
- Create k8s
Secretwith authorization configuration that Vault plugin will use. - we have to install ArgoCD from the official Helm Chart but with extra configuration that provides modifications one sidecar container and one configmap update.
And now the argo vault plugin is inside the argocd-repo-server POD.
Step 1
About the first step, you can see a secret example , that secret was simply created using a "kubectl apply -f secret", here the AVP_ROLE_ID, and AVP_SECRET_ID must be done by some method that you will prefer. In my case, I am using a GITLAB pipeline but you can do it manually or with other solutions. Here a chicken and egg situation. How to boostrap that first step with the first secrets that unlock the other secrets.
kind: Secret apiVersion: v1 metadata: name: argocd-vault-plugin-credentials type: Opaque stringData: AVP_TYPE: "vault" VAULT_ADDR: "https://vault.internal.ag" AVP_AUTH_TYPE: "approle" AVP_ROLE_ID: "XXXXXXXXXXXXXXXXXXXXXXXXXXXXXXXXXXXX" AVP_SECRET_ID: "XXXXXXXXXXXXXXXXXXXXXXXXXXXXXXXXXXXX" |
Step 2
That step is the regular helm installation of ARGOCD but in the argocd-stg.yaml we added some specific new lines that will be in the following second box code block example.
helm repo add argo https://argoproj.github.io/argo-helm # argocd installation using HELM helm upgrade \ --wait \ --install argocd \ --namespace $NAMESPACE \ --version 5.29.1 \ -f bootstrap/scripts/values/argocd-stg.yaml \ --set "configs.cm.dex.config.connectors.config.caData=$ARGOSECRET" \ argo/argo-cd |
...
...
configs:
  cm:
    create: true
  ....
  ....
  ....
    # argo vault plugin
    configManagementPlugins: |
      - name: argocd-vault-plugin
        generate:
          command: ["argocd-vault-plugin"]
          args: ["generate", "./"]
      - name: argocd-vault-plugin-helm
        generate:
          command: ["sh", "-c"]
          args: ['helm template "$ARGOCD_APP_NAME" -n "$ARGOCD_APP_NAMESPACE" . | argocd-vault-plugin generate -']
      # This lets you pass args to the Helm invocation as described here: https://argocd-vault-plugin.readthedocs.io/en/stable/usage/#with-helm
      # IMPORTANT: passing $helm_args effectively allows users to run arbitrary code in the Argo CD repo-server.
      # Only use this when the users are completely trusted. If possible, determine which Helm arguments are needed by
      # your users and explicitly pass only those arguments.
      - name: argocd-vault-plugin-helm-with-args
        generate:
          command: ["sh", "-c"]
          args: ['helm template "$ARGOCD_APP_NAME" -n "$ARGOCD_APP_NAMESPACE" ${helm_args} . | argocd-vault-plugin generate -']
      # This lets you pass a values file as a string as described here:
      # https://argocd-vault-plugin.readthedocs.io/en/stable/usage/#with-helm
      - name: argocd-vault-plugin-helm-with-values
        generate:
          command: ["bash", "-c"]
          args: ['helm template "$ARGOCD_APP_NAME" -n "$ARGOCD_APP_NAMESPACE" -f <(echo "$ARGOCD_ENV_HELM_VALUES") . | argocd-vault-plugin generate -']
      - name: argocd-vault-plugin-kustomize
        generate:
          command: ["sh", "-c"]
          args: ["kustomize build . | argocd-vault-plugin generate -"]
    # end argo vault plugin


...
...
...

## Repo Server
repoServer:
  name: repo-server
  replicas: 2
  # argo vault plugin CMP
  envFrom:
   - secretRef:
       name: argocd-vault-plugin-credentials
  rbac:
    - verbs:
        - get
        - list
        - watch
      apiGroups:
        - ''
      resources:
        - secrets
        - configmaps

  initContainers:
  - name: download-tools
    image: alpine:3.8
    command: [sh, -c]

    # Don't forget to update this to whatever the stable release version is
    # Note the lack of the `v` prefix unlike the git tag
    env:
      - name: AVP_VERSION
        value: "1.14.0"
    args:
      - >-
        wget -O argocd-vault-plugin
        https://github.com/argoproj-labs/argocd-vault-plugin/releases/download/v${AVP_VERSION}/argocd-vault-plugin_${AVP_VERSION}_linux_amd64 &&
        chmod +x argocd-vault-plugin &&
        mv argocd-vault-plugin /custom-tools/
    volumeMounts:
      - mountPath: /custom-tools
        name: custom-tools

  volumes:
    - name: custom-tools
      emptyDir: {}

  volumeMounts:
    - name: custom-tools
      mountPath: /usr/local/bin/argocd-vault-plugin
      subPath: argocd-vault-plugin
  ## end argo vault plugin CMP
....
....
.... |
Installation via sidecar plugin using Helm
I found some interesting links on the internet, but for me, the best example is the one provided in this GitHub repository: https://github.com/luafanti/arogcd-vault-plugin-with-helm. Additionally, the best documentation to follow for this type of installation of the AVP sidecar plugin using Helm can be found here: https://dev.to/luafanti/injecting-secrets-from-vault-into-helm-charts-with-argocd-49k. I highly recommend you to follow these resources. Essentially, in this article, I will be explaining the same process.
summary
I installed the ArgoCD Vault Plugin using a sidecar container.
- Create k8s
Secretwith authorization configuration that Vault plugin will use. - Create k8s
ConfigMap - we have to install ArgoCD from the official Helm Chart but with extra configuration that provides modifications required to install Vault plugin via sidecar container.
Now the argocd-repo-server has sidecar container avp-helm with one container more
so the POD "argocd-repo-server" instead to have 1/1 will have 2/2. The official AVP documentation recomends to follow this web page https://argo-cd.readthedocs.io/en/stable/operator-manual/config-management-plugins/ to understand how argo plugins are working through sidecar container.
Without AVP:
argocd-repo-server-66757788cb-f5nwd 1/1 |
With AVP:
argocd-repo-server-66757788cb-f5nwd 2/2 |
In the next steps 1, 2, and 3, I will summarize what I have gathered from the other articles.
Step 1
So like we did in the previous installation method. we need the secret
kind: Secret apiVersion: v1 metadata: name: argocd-vault-plugin-credentials type: Opaque stringData: AVP_TYPE: "vault" VAULT_ADDR: "https://vault.internal.io" AVP_AUTH_TYPE: "approle" AVP_ROLE_ID: "XXXXXXXXXXXXXXXXXXXXXXXXXXXXXXXXXXXX" AVP_SECRET_ID: "XXXXXXXXXXXXXXXXXXXXXXXXXXXXXXXXXXXX" |
Step 2
Comparing the previous installation, here we have a new step to do . You can do it using a simple kubectl apply resource or foor example if you love to use everything with HELM you can use the raw incubator helm chart to create raw k8s resources. More info https://github.com/helm/charts/tree/master/incubator/raw
kubectl apply -f bootstrap/overlays/argocd-vault-plugin/argocd-vault-plugin-cmp.yaml |
apiVersion: v1
kind: ConfigMap
metadata:
  name: cmp-plugin
data:
  avp-kustomize.yaml: |
    ---
    apiVersion: argoproj.io/v1alpha1
    kind: ConfigManagementPlugin
    metadata:
      name: argocd-vault-plugin-kustomize
    spec:
      allowConcurrency: true

      # Note: this command is run _before_ anything is done, therefore the logic is to check
      # if this looks like a Kustomize bundle
      discover:
        find:
          command:
            - find
            - "."
            - -name
            - kustomization.yaml
      generate:
        command:
          - sh
          - "-c"
          - "kustomize build . | argocd-vault-plugin generate -"
      lockRepo: false
  avp-helm.yaml: |
    ---
    apiVersion: argoproj.io/v1alpha1
    kind: ConfigManagementPlugin
    metadata:
      name: argocd-vault-plugin-helm
    spec:
      allowConcurrency: true

      # Note: this command is run _before_ any Helm templating is done, therefore the logic is to check
      # if this looks like a Helm chart
      discover:
        find:
          command:
            - sh
            - "-c"
            - "find . -name 'Chart.yaml' && find . -name 'values.yaml'"
      generate:
        # **IMPORTANT**: passing `${ARGOCD_ENV_helm_args}` effectively allows users to run arbitrary code in the Argo CD
        # repo-server (or, if using a sidecar, in the plugin sidecar). Only use this when the users are completely trusted. If
        # possible, determine which Helm arguments are needed by your users and explicitly pass only those arguments.
        command:
          - sh
          - "-c"
          - |
            helm template $ARGOCD_APP_NAME -n $ARGOCD_APP_NAMESPACE ${ARGOCD_ENV_HELM_ARGS} . |
            argocd-vault-plugin generate --verbose-sensitive-output -
      lockRepo: false
  avp.yaml: |
    apiVersion: argoproj.io/v1alpha1
    kind: ConfigManagementPlugin
    metadata:
      name: argocd-vault-plugin
    spec:
      allowConcurrency: true
      discover:
        find:
          command:
            - sh
            - "-c"
            - "find . -name '*.yaml' | xargs -I {} grep \"<path\\|avp\\.kubernetes\\.io\" {} | grep ."
      generate:
        command:
          - argocd-vault-plugin
          - generate
          - "."
      lockRepo: false
-- |
Important note: maybe here we need to use the latest examples of AVP or maybe you will need to check if there is a new change or updates.
Step 3
now the last step is a regular helm installation but with some values update like we did in the previous installation in the step 2.
# argocd installation using HELM helm upgrade \ --wait \ --install argocd \ --namespace $NAMESPACE \ --version 5.29.1 \ -f bootstrap/scripts/values/argocd-stg.yaml \ --set "configs.cm.dex.config.connectors.config.caData=$ARGOSECRET" \ argo/argo-cd |
...
...
...
## Repo Server
repoServer:
  name: repo-server
  replicas: 2
  # argo vault plugin
  envFrom:
   - secretRef:
       name: argocd-vault-plugin-credentials
  rbac:
    - verbs:
        - get
        - list
        - watch
      apiGroups:
        - ''
      resources:
        - secrets
        - configmaps
  initContainers:
    - name: download-tools
      image: registry.access.redhat.com/ubi8
      env:
        - name: AVP_VERSION
          value: 1.14.0
      command: [sh, -c]
      args:
        - >-
          curl -L https://github.com/argoproj-labs/argocd-vault-plugin/releases/download/v$(AVP_VERSION)/argocd-vault-plugin_$(AVP_VERSION)_linux_amd64 -o argocd-vault-plugin &&
          chmod +x argocd-vault-plugin &&
          mv argocd-vault-plugin /custom-tools/
      volumeMounts:
        - mountPath: /custom-tools
          name: custom-tools
  extraContainers:
    # argocd-vault-plugin with Helm
    - name: avp-helm
      command: [/var/run/argocd/argocd-cmp-server]
      image: quay.io/argoproj/argocd:v2.6.7
      securityContext:
        runAsNonRoot: true
        runAsUser: 999
      volumeMounts:
        - mountPath: /var/run/argocd
          name: var-files
        - mountPath: /home/argocd/cmp-server/plugins
          name: plugins
        - mountPath: /tmp
          name: cmp-tmp
        # Register plugins into sidecar
        - mountPath: /home/argocd/cmp-server/config/plugin.yaml
          subPath: avp-helm.yaml
          name: cmp-plugin
        # Important: Mount tools into $PATH
        - name: custom-tools
          subPath: argocd-vault-plugin
          mountPath: /usr/local/bin/argocd-vault-plugin
  volumes:
    - configMap:
        name: cmp-plugin
      name: cmp-plugin
    - name: cmp-tmp
      emptyDir: {}
    - name: custom-tools
      emptyDir: {}
  ## end argo vault plugin
...
...
...
|
After finish the installation, remember that we need to choose between these 5 plugins that we have now available to render the new vault path secrets.
- argocd-vault-plugin
- argocd-vault-plugin-helm
- argocd-vault-plugin-helm-with-args
- argocd-vault-plugin-helm-with-values
- argocd-vault-plugin-kustomize
Conclusions
Why AVP instead secrets-manager or external-secrets:
- it is not necessary any CRD, any k8s secret resource deployed, any special k8s resource to install.
- Argocd is rendering all the secrets before to deploy the HELM. It is a previous step before.
- One of the most important reasons is because now is easy more human readable the helm and how to extract the secrets from vault
- easier than secrets-manager and external-secrets
- handicap: the installation was complicated because the documentation was not well updated with the last versions and was mainly focus in kustomize not helm. Now having this documentation ready could be easier. Hope that could help.
- another handicap. sometimes important secrets must be in a k8s resource secret instead having these environment variables like is doing this tool. So here could be interesting to use both solutions.
Also it is important to mention that using “argocd-cm” could be easier method out of the two but it is important to mention that this option is planned to be removed. “drop support for argocd-cm Config Management Plugins in favor of sidecars” argoproj/argo-cd#8117"
Helm examples with AVP
- argocd-vault-plugin-helm
- argocd-vault-plugin-helm-with-args
- argocd-vault-plugin-helm-with-values
---
apiVersion: argoproj.io/v1alpha1
kind: Application
metadata:
  name: secrets-manager
spec:
  destination:
    namespace: yournamespace
    server: https://kubernetes.default.svc
  project: yourproject
  source:
    repoURL: https://chartmuseum.internal.io
    chart: secrets-manager
    targetRevision: 1.0.2
    plugin:
      name: argocd-vault-plugin-helm-with-values
      env:
        - name: HELM_VALUES
          value: |
            createCustomResource: false
            resources:
              limits:
                cpu: 100m
                memory: 128Mi
              requests:
                cpu: 100m
                memory: 128Mi
            secretsManager:
              watchNamespaces: "yournamespace"
              vault:
                url: https://vault.internal.io
                roleId: <path:kv-v2/data/yoursecretpath/gitlab#VAULT_ROLE_ID>
secretId: <path:kv-v2/data/yoursecretpath/gitlab#VAULT_SECRET_ID> |
how to debug Argo Vault Plugin
Inside the POD or Sidecar of argocd-repo-server, you can run the following
kubectl exec argocd-repo-server-74846c5b99-hl678 -c repo-server -it /bin/sh $ env| grep AVP |wc -l 4 |
to check if your VAULT variables are well spread it.
and also you can run the AVP binary inside the argocd-repo-server
kubectl exec argocd-repo-server-74846c5b99-hl678 -c avp-helm -it /bin/sh kubectl exec [POD] [COMMAND] is DEPRECATED and will be removed in a future version. Use kubectl exec [POD] -- [COMMAND] instead. $ argocd-vault-plugin generate . |
Interesting Documentation
https://argocd-vault-plugin.readthedocs.io/
https://piotrminkowski.com/2022/08/08/manage-secrets-on-kubernetes-with-argocd-and-vault/
https://luafanti.medium.com/injecting-secrets-from-vault-into-helm-charts-with-argocd-43fc1df57e74
https://itnext.io/argocd-secret-management-with-argocd-vault-plugin-539f104aff05
https://github.com/jkayani/avp-demo-kubecon-2021
https://www.opsmx.com/blog/how-to-integrate-argo-cd-and-vault-for-managing-secrets-in-gitops/
]]>
¡El siguiente Meetup de Barcelona Cybersecurity & Cloudadmins Barcelona ya está aquí!
Registro aquí https://www.meetup.com/cloud-admins-barcelona/events/293260777/
i2CAT nos abre sus oficinas (Carrer del Gran Capità, 2-4) para acoger nuestro próximo meetup . Tendrá lugar el 18 de Mayo
]]>
¡El siguiente Meetup de Barcelona Cybersecurity & Cloudadmins Barcelona ya está aquí!
Registro aquí https://www.meetup.com/cloud-admins-barcelona/events/293260777/
i2CAT nos abre sus oficinas (Carrer del Gran Capità, 2-4) para acoger nuestro próximo meetup . Tendrá lugar el 18 de Mayo a las 18:45 y contaremos con Aubay como patrocinador del evento. Durante el evento, el equipo de i2CAT nos presentarán todos los proyectos en los que están trabajando de AI aplicada al area de la ciberseguridad.
Contaremos con la intervención de Albert Calvo (AI Research Engineer - i2CAT) que hará una breve introducción al área de investigación emergente de AI aplicado al mundo de ciberseguridad explicando el estado del arte en IA y tendencias. A continuación se dará paso a Santiago Escuder (Junior Researcher - i2CAT) y Xavier Marrugat (Professional Cybersecurity researcher - i2CAT) & Alex Sanchez (Junior Researcher - i2CAT) donde brevemente explicaran dos iniciativas open-source donde se proponen diferentes técnicas de Inteligencia Artificial para ayudar al analista para la toma de decisiones.
El primer caso de uso presentado por Santiago Escuder titulado Detección de Web Bots utilizando el movimiento del ratón, en el cual se propone un nuevo dataset de movimientos de ratón de bots y de humanos para la creación de modelos de IA. Por otro lado Xavier Marrugat y Alex Sanchez nos explicará el proyecto “SIEVA: Siem visibility assesment” donde se propone una herramienta open source para evaluar la visibilidad de la información que reciben los SIEM en entornos productivos y clasificar, mediante tècnicas de Inteligencia Artificial, sus diferentes fuentes de datos de forma automática, relacionándolas a las técnicas del framework de MITRE ATT&CK.
Ponentes:
Albert Calvo - AI Researcher en la fundación i2CAT y PhD Candidate en la Universitat Politécnica de Catalunya (UPC). Albert centra su investigación en la intersección entre Inteligencia Artificial y el mundo de la ciberseguridad proponiendo nuevas técnicas de análisis. Además Albert tiene una amplia experiencia en proyectos europeos y competitivos.
Santiago Escuder - Junior Researcher en la fundación i2CAT con un màster en inteligencia artificial por la Universidad Politècnica de Catalunya ETSETB (UPC). Santi participa en proyectos de Inteligencia Artificial aplicada a la ciberseguridad.
Alex Sanchez - Junior Researcher en la fundación i2CAT. Recientemente graduado en Ingeniería Informática por la Universidad Politècnica de Catalunya (UPC). Alex está interesado en el mundo de la investigación de Inteligencia Artificial participando en diferentes proyectos de ciberseguridad y new space.
Xavier Marrugat - Cybersecurity Engineer en la fundación i2CAT con un grado en Ingeniería Informática por la Universidad Politècnica de Catalunya - FIB (UPC). Xavier aporta su experiencia en ejercicios ofensivos para el desarrollo e implementación de proyectos innovadores en el ámbito de la ciberseguridad.
Después de la presentación, tendremos tiempo para discutir sobre el tema y compartir ideas con el resto de los asistentes. Por supuesto, con ¡comida y bebida!
¡Os esperamos!
Disclaimer: Con la aceptación de este evento, das consentimiento a Barcelona Cybersecurity para poder publicar imágenes en las cuales aparezcan individualmente o en grupo que con carácter comercial y de promoción se puedan realizar con nuestra asociación.
Event topics
Research & Development EngineerCommunityCybersecurityArtificial Intelligence
Registro aquí https://www.meetup.com/cloud-admins-barcelona/events/293260777/
]]>The sustained digitalisation of any businesses is a must, yet it also makes them more vulnerable towards cyber attacks. However, and unlike larger enterprises, micro- and small-sized businesses often lack the resources or expertise to implement digital security measures. Solutions on this front must deliver as easy and pre-configured as possible security measures to guide the inexperienced protecting their environment.
One option to this is provided by the PALANTIR R&D project, focusing on cyber-resilience of SMEs and compliance with the relevant data privacy and protection regulations.
It proposes a cybersecurity framework combining data protection, incident detection and recovery aspects under the same platform. The platform tailors its deployment to the requirements and capacity of the business, and thus offers lightweight (built-in), cloud (e.g. public or self-hosted, private) and edge security solutions to that end. Coupled with its risk assessment framework, the platform identifies weaknesses and provides the services to address them via a Security Capability catalogue and a Service Matcher, interacting to identify, bill and maintain SLA for the best suited curated security service. This significantly simplifies the processes of selection, configuration, deployment, and lifecycle management that otherwise would be required by the operator.
In this regard, the underlying infrastructure uses common hardware, feasible for small organisations or particulars. It also leverages open-source tools to provide an automated identification of threats and close guidance on which security measures apply.
The most prominent open-source tool in use is Kubernetes, which OSM requires to be tailored; i.e. extended with two tools for easier management: OpenEBS and MetalLB.
OpenEBS is devoted to simplifying complex volume management, using available storage on the Kubernetes worker nodes as local or distributed (i.e. replicated) Persistent Volumes.
MetalLB is a network load balancer for bare-metal clusters, using the LoadBalancer services and working both at L2 and BGP modes. With MetalLB, a given node advertises the security service to the local network, so it can reach the same segments where other appliances run.
Tightly coupled with this is the OSM service orchestrator, another tool that lies at the core; which abstracts the security services as generic packages and allow automated clients to automatically operate them over time.
For instance, it can deploy them, configure during instantiation (day 0), boot (day 1) or runtime (day 2) through the usage of Canonical’s Juju charms (a mechanism to operate resources at heterogeneous clouds in an abstract manner), scale the services based on monitoring conditions and alerting or, given these are no longer used or were tampered with (as identified internally by an internal integrity assessment within the platform).
More information on these tools can be find as follows:
]]>The Cloudadmins TechDays are educational and networking events organized by Cloudadmins.org and local partners/sponsors. Join our technical experts and the local Cloudadmins Community, learn about relevant use cases, and get into Enterprise Opensource solutions and platforms.
Date: 30/11/2022 18h-20h CEST
What to expect from this TechDay?
]]>
The Cloudadmins TechDays are educational and networking events organized by Cloudadmins.org and local partners/sponsors. Join our technical experts and the local Cloudadmins Community, learn about relevant use cases, and get into Enterprise Opensource solutions and platforms.
Date: 30/11/2022 18h-20h CEST
What to expect from this TechDay?
See Amazon EKS and CD tools in action!
Where is this TechDay?
We're excited to announce that this event will be onsite! Many thanks to UserZoom. Great!

Userzoom Technologies, Avinguda Diagonal, 618, 08021 Barcelona https://goo.gl/maps/sj4cupY99YAg4UHe7
AGENDA
18:00h - UserZoom opendoors - Networking
[HYBRID: ONSITE and ZOOM Webinar]
18:30h - Welcome and Agenda - (Jordi Guijarro - Cloudadmins.org)
18:35pm - Local sponsor: Userzoom.com (Màrius Duch - UserZoom)
PPT -> http://devopsyseguridadcloud.cloudadmins.org/Cloudadmins Barcelona_ GitOps TechDay.pptx
18:45pm - AWS EKS Security (Manuel Mendoza - AWS Spain)
PDF -> http://devopsyseguridadcloud.cloudadmins.org/EKS-Security_meetup.pdf
19:10pm - Usecase: SecaaS in Kubernetes (Carolina Fernández - i2CAT)
PDF -> http://devopsyseguridadcloud.cloudadmins.org/GitOps Techday Barcelona 2022-11-30.pdf
[EXCLUSIVE ONSITE]
19:30pm - Do You Want To Work In Your Dream Job? (Alejandro Sanchez - EngineerGame.com)
PDF -> http://devopsyseguridadcloud.cloudadmins.org/Engineer%20Game%20-%20Cloudadmins.pdf
20:00pm - Networking, Beers and some food.
Register ->https://www.meetup.com/cloud-admins-barcelona/events/289416376/
Please, note that this event will be conducted in Spanish.
Share a coffee with us and support our activities here -> https://ko-fi.com/cloudadmins#
And remember to subscribe to our newsletter here https://www.cloudadmins.org/ and receive the first chapter of our cloudadmins.org book ("Devops y seguridad Cloud") - Editorial UOC

It’s great to attend the OpenNebulaCon, this year taking place online from May 31 – June 2, 2022, yet being a speaker… is even better! 🤓 Come share your insights and experiences with the OpenNebula Community. Whether you are an OpenNebula expert or a first-timer with a fresh look, it will be great to have your insight.
This is a great opportunity to connect with your peers and to collaborate with the broader OpenNebula Community, and we will provide you with the resources and platform for you to share your knowledge and gain some pointed recognition, at the same time. Presentation topics are wide open, although we have a few ones that we would like to suggest.
If you have a dynamic perspective or unique experiences to share, submit a proposal until April 8th! 🗓️
We look forward to hearing from you!
]]>Kubernetes es a día de hoy el orquestador de contenedores open-source más usado y es por ello que han ido apareciendo un gran número de herramientas con las que gestionar un cluster de Kubernetes via terminal. Muchas de estas herramientas son para hacernos la vida un poco más fácil en el proceso de gestión de un cluster y es por ello que quiero hacer una pequeña guía de las que mas utilizo en UserZoom y que considero más interesantes.
kubectl
Cliente oficial para linea de comandos de Kubernetes con lo que podremos realizar cualquier acción que queramos en nuestro cluster.
Ejemplos de uso:
kubectl get podskubectl get replicationcontroller webkubectl get secret SECRET_NAME -o jsonpath='{.data.SECRET_KEY}' | base64 -dkube-shell
Esta herramienta trabaja conjuntamente con kubectl y nos facilita información sobre los argumentos que podemos usar en kubectl así como funciones de auto-completado para evitar tener que memorizar todos los argumentos disponibles e ir mas rápido trabajando con ellos.
Ejemplo de uso:

kubectx / kubens
Estas herramientas también trabajan conjuntamente con kubectl. En este caso, kubectx nos permitirá cambiar de context muy fácilmente y kubens lo mismo pero con los namespaces.
Ejemplo de uso:


k9s
Si bien las anteriores herramientas nos sirven para realizar un acción concreta con un comando y podrían ser usadas en cualquier script que queramos. La herramienta k9s nos brinda la opción de gestionar el cluster de Kubernetes a tiempo real con un menú muy intuitivo via terminal.
Ejemplo de uso:
kind
Kind es una herramienta para ejecutar uno o varios clusters locales de Kubernetes utilizando "nodos" de contenedores Docker. Esta herramienta se diseñó principalmente para probar Kubernetes, pero se puede usar para desarrollo local o CI.
Ejemplo de uso:
minkube
Minikube es otra herramienta para ejecutar uno o varios clusters locales de Kubernetes. Este tipo de herramientas nos facilitaran mucho la vida para testear nuestra aplicación o si somos principiantes y queremos empezar a jugar con kubernetes.
Ejemplos:
minikube start
minikube dashboardminikube service hello-minikubeThe Cloudadmins TechDays (now turned virtual due to the COVID-19 pandemic) are educational and networking events organized by Cloudadmins.org and local partners/sponsors. Join our technical experts and the local Cloudadmins Community, learn about relevant use cases, and get into Enterprise Opensource solutions and platforms.
Date: 24/11/2021
The Cloudadmins TechDays (now turned virtual due to the COVID-19 pandemic) are educational and networking events organized by Cloudadmins.org and local partners/sponsors. Join our technical experts and the local Cloudadmins Community, learn about relevant use cases, and get into Enterprise Opensource solutions and platforms.
Date: 24/11/2021 16h CEST
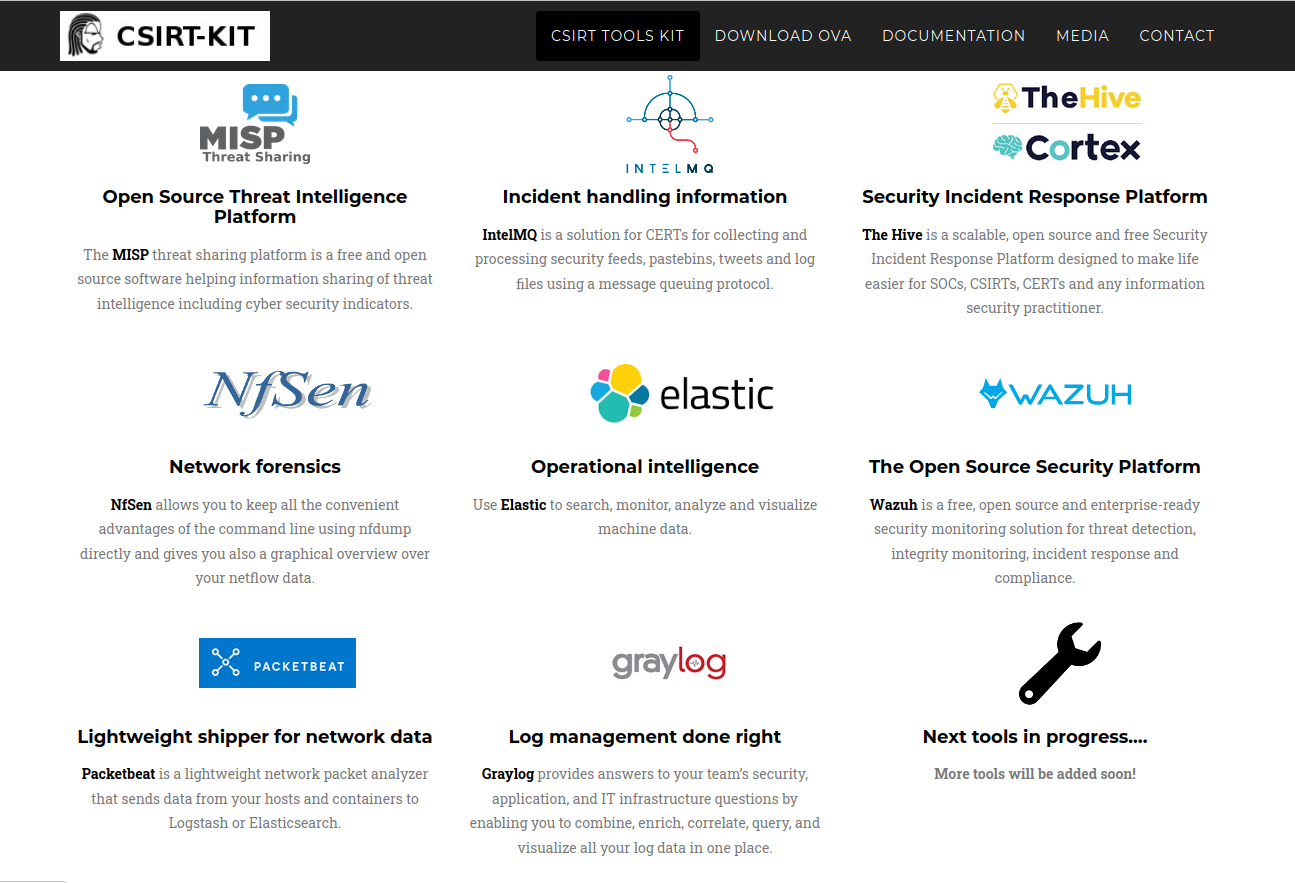
CSIRT-kit and Cancamusa in action!

CSIRT-kit: Your Security Response Toolkit with a collection of tools in a plug&play live image to provide first steps to new incident handling teams. https://csirt-kit.org
SecSamDev/cancamusa: Dynamically create a custom Windows based laboratory or clone a real Windows Network. https://github.com/SecSamDev/cancamusa
AGENDA
16:00pm — Welcome - Jordi Guijarro (Cloudadmins.org)
16:05pm - New sponsor: Userzoom.com (Marius - Cloudadmins.org)
16:10pm — CSIRT-KIT Server version ( Borja Guaita y Rodrigo Zamora - https://csirt-kit.org)
16:30pm — Cancamusa: Windows based labs deployment (Samuel Garcés [S2Grupo] - https://github.com/SecSamDev/cancamusa)
16:55pm — Q&A
Please, note that this event will be conducted in Spanish.
Share a coffee with us and support our activities here -> https://ko-fi.com/cloudadmins#
https://www.twitter.com/cloudadms
The Cloudadmins TechDays (now turned virtual due to the COVID-19 pandemic) are educational and networking events organized by Cloudadmins.org and local partners/sponsors. Join our technical experts and the local Cloudadmins Community, learn about relevant use cases, and get into Enterprise Opensource solutions and platforms.
Date: 24/11/
The Cloudadmins TechDays (now turned virtual due to the COVID-19 pandemic) are educational and networking events organized by Cloudadmins.org and local partners/sponsors. Join our technical experts and the local Cloudadmins Community, learn about relevant use cases, and get into Enterprise Opensource solutions and platforms.
Date: 24/11/2021 16h CEST
What to expect from this e-TechDay?
CSIRT-kit and Cancamusa in action!
CSIRT-kit: Your Security Response Toolkit with a collection of tools in a plug&play live image to provide first steps to new incident handling teams. https://csirt-kit.org
SecSamDev/cancamusa: Dynamically create a custom Windows based laboratory or clone a real Windows Network. https://github.com/SecSamDev/cancamusa
AGENDA
16:00pm — Welcome - Jordi Guijarro (Cloudadmins.org)
16:05pm - New sponsor: Userzoom.com (Marius - Cloudadmins.org)
16:10pm — CSIRT-KIT Server version ( Borja Guaita y Rodrigo Zamora - https://csirt-kit.org)
16:30pm — Cancamusa: Windows based labs deployment (Samuel Garcés [S2Grupo] - https://github.com/SecSamDev/cancamusa)
16:55pm — Q&A
Register ->https://www.meetup.com/Cloud-Admins-Barcelona/events/281632679/
Please, note that this event will be conducted in Spanish.
Share a coffee with us and support our activities here -> https://ko-fi.com/cloudadmins#
https://www.twitter.com/cloudadms
The Cloudadmins TechDays (now turned virtual due to the COVID-19 pandemic) are educational and networking events organized by Cloudadmins.org and local partners/sponsors. Join our technical experts and the local Cloudadmins Community, learn about relevant use cases, and get into Enterprise Opensource solutions and platforms.
Date: 15/9/
]]>
The Cloudadmins TechDays (now turned virtual due to the COVID-19 pandemic) are educational and networking events organized by Cloudadmins.org and local partners/sponsors. Join our technical experts and the local Cloudadmins Community, learn about relevant use cases, and get into Enterprise Opensource solutions and platforms.
Date: 15/9/2021 19h CEST
What to expect from this e-TechDay?
n8n.io in action! What is n8n?

n8n (pronounced n-eight-n) helps you to interconnect every app with an API in the world with each other to share and manipulate its data without a single line of code. It is an easy to use, user-friendly and highly customizable service, which uses an intuitive user interface for you to design your unique workflows very fast. Hosted on your server and not based in the cloud, it keeps your sensible data very secure in your own trusted database
AGENDA
19:00pm — Welcome - Jordi Guijarro (Cloudadmins.org)
19:05pm — OpenRPA's: The n8n project ( Aitor Roma and Miquel Colomer- https://n8n.io/ community)
19.30pm — Automation Use-cases
Cybersecurity: CSIRT-KIT.org project new version and n8n tool (Sergi Majoral - Andorra Telecom/CSIRT-KIT.org)
SRE: Workflow Automation (Aitor Roma - Cloudadmins.org Barcelona)
20:10pm — Q&A
Please, note that this event will be conducted in Spanish.
And remember to subscribe to our newsletter here https://www.cloudadmins.org/ and receive the first chapter of our cloudadmins.org book ("Devops y seguridad Cloud") - Editorial UOC
Share a coffee with us and support our activities here -> https://ko-fi.com/cloudadmins#


About this e-TechDay
The OpenNebula TechDays (now turned virtual due to the COVID-19 pandemic) are educational and networking events organized by OpenNebula user groups and local partners. Join our technical experts and the local community to learn about the novelties in OpenNebula 6.0 “Mutara” and how to
]]>About this e-TechDay

The OpenNebula TechDays (now turned virtual due to the COVID-19 pandemic) are educational and networking events organized by OpenNebula user groups and local partners. Join our technical experts and the local community to learn about the novelties in OpenNebula 6.0 “Mutara” and how to deploy and orchestrate at the edge application containers as lightweight microVMs. Find out more about specialized virtual machine images targeting specific applications (Unikernels) and also about the new virtualization technology developed by Amazon Web Services(AWS): Firecracker! 🚀
Program
- 3:00 pm – Introduction [ES|EN]
- 3:15 pm – Orchestrating containers with the new OpenNebula 6.0 – Christian González (OpenNebula) [ES]
- 4:00 pm – Firecracker: the microVM journey continues – Diana-Maria Popa (AWS) [EN]
- 5:00 pm – Unikernel hands-on tutorial – Xavier Peralta (CSUC) [ES]
- 5:30 pm – Q&A [ES|EN]
Speakers
- Christian González has been working as Cloud Engineer at OpenNebula since early 2018, becoming one of the project’s core developers and creating drivers and integrations with third-party technologies. Apart from participating in complex deployments and training services for corporate customers, Christian is in charge of OpenNebula’s integration with the Docker Hub marketplace and also with Firecracker, a combination that allows OpenNebula to orchestrate application containers using this new microVM tech developed by AWS.
- Diana-Maria Popa is a software development engineer with Amazon Web Services (AWS). She has been a Firecracker maintainer since its inception. Over the past year, her work was mainly focused on enabling Firecracker to run on ARM systems.
- Xavier Peralta has a Technical Engineering in Computer Systems from the Polytechnic University of Catalonia (UPC). At CSUC since 2013, he is currently Systems Expert Leader at the Operations & Cybersecurity unit, and Task Leader in the European UNICORE project.
Reserve yout seat! https://opennebula.io/techdays/e-techday-barcelona-2021/
