The post Make the Move from Drupal to WordPress Without Losing a Single Ranking appeared first on Codeable.
]]>Most organizations reach this decision for practical reasons. Drupal is a powerful CMS, but it demands developer involvement for tasks that WordPress handles through its admin interface. Even with the recent launch of the Drupal CMS (Starshot), which aims to make the platform more accessible to non-technical users, there still remains a significant gap in day-to-day editorial flexibility compared to WordPress.
While moving your site from Drupal to WordPress, the content transfer itself is actually the straightforward part. Plugins and scripts can move posts, pages, taxonomies, and media between databases reliably. The real risk sits in your URL structure. Search engines have spent months or years crawling and indexing your Drupal site’s URLs, building the ranking equity that drives your organic traffic. A mishandled redirect map can lead to missing taxonomy archives, broken image paths in sites/default/files, and pagination URLs that return 404s, and can trigger ranking losses that take months to recover from.
This guide walks through the full migration process, from initial site audit to post-launch monitoring.
Steps to migrate from Drupal to WordPress
A Drupal to WordPress migration follows seven phases: audit, backup, content mapping, staging setup, content transfer, SEO preservation, and post-launch validation. Each phase builds on the one before it, so skipping ahead usually means backtracking later.
1. Run a full site audit
Before you move anything, you need a complete snapshot of your existing Drupal site, including every URL, every page title, every meta description, and every status code. This SEO site audit becomes your SEO baseline, the document you’ll compare against once the WordPress version goes live.
Open a crawling tool like Screaming Frog or Sitebulb, enter your site’s URL (for example, https://example.com), and let it crawl the entire site. Depending on your site’s size, this could take anywhere from a few minutes to a couple of hours. When it finishes, export the full results as a spreadsheet.
This export should capture:
- Every URL the crawler found, including paginated pages, taxonomy term archives, and author pages.
- The HTTP status code for each URL (200, 301, 404, etc.).
- Page titles and meta descriptions.
- Internal linking structure that describes which pages link to which.
- Any existing redirects that are already in place.
Hold onto this file. It serves two purposes. First, after the migration, you’ll re-crawl the new WordPress site and compare the two exports side by side. You’re checking that the same important pages still exist, still carry their titles and descriptions, and aren’t returning 404 errors. Second, if organic traffic shifts after launch, this baseline helps you pinpoint whether the migration caused the change or whether something else is responsible. Without it, you’re left guessing.
One detail that’s easy to overlook: make sure the crawl includes image URLs and files hosted under paths like sites/default/files/. These paths will change after migration, and you’ll need the original list when building your redirect map in a later step.
2. Create a full backup of your Drupal site
A Drupal backup requires exporting both the database and the file system. Your content, users, menus, and site configuration all live in the database. Your uploaded images, PDFs, documents, and other media are in the filesystem. You need both pieces, or your backup will be incomplete.
Back up the database
The most common method is Drush, Drupal’s command-line tool. If you have terminal access to your server, navigate to the Drupal root directory and run:
drush sql:dump > backup.sqlThis creates a .sql file containing every database table, including all your nodes, fields, taxonomy terms, user accounts, menu structures, and configuration. If you don’t have command-line access, you can export the database through your hosting control panel.
Back up the files
Copy the entire sites/default/files/ directory. This folder holds everything your content references: images embedded in articles, downloadable PDFs, uploaded documents, and any other media. If your Drupal site uses additional public file directories, retrieve those as well.
You can download this directory through SFTP using a client like FileZilla, through your hosting provider’s file manager, or from the command line with tools like rsync or scp. The method depends on your hosting setup, but the goal is the same – to obtain a complete local copy of every uploaded file.
Store both backups off the server
Move them to cloud storage, an external drive, or your local machine. If something goes wrong mid-migration, the database to restore your content and configuration, and the files directory to restore every image and document are your full rollback option.
3. Map your Drupal content structure to WordPress
Content mapping documents how every Drupal content type, field, taxonomy, and URL pattern translates to its WordPress equivalent. This step prevents surprises later, as every gap you identify now is one fewer broken page after launch.
Start with your URL patterns
Drupal stores content internally as paths like /node/123, but most sites use path aliases to create cleaner URLs — something like /blog/how-to-migrate or /resources/white-paper-title. WordPress handles this through its Permalinks settings (found under Settings → Permalinks), where you define a URL structure such as /%postname%/ or /blog/%postname%/.
Your goal here is to keep URL changes to a minimum. Compare your current Drupal aliases against the permalink structure you plan to use in WordPress. Where they can match, great, because that’s one less redirect to manage. Where they’ll differ, document the change. Every URL that shifts needs a 301 redirect later, and you can’t build accurate redirects without knowing exactly what’s changing.
Pay close attention to patterns that are easy to miss:
- Taxonomy term pages (e.g.,
/category/designin Drupal becoming/category/design/with a trailing slash in WordPress). - Paginated archive pages (e.g.,
/blog?page=2vs./blog/page/2/). - File and image paths under
sites/default/files/will move towp-content/uploads/in WordPress. - Author profile URLs, which often follow completely different patterns between the two platforms.
Map your content types
List every Drupal content type your site uses, from Article, Basic Page, News, Event, Case Study, whatever your site has. For each one, decide what it becomes in WordPress:
- Posts work well for date-driven, chronological content like blog articles and news updates.
- Pages suit static content like your About page, Contact page, or service descriptions.
- Custom post types are the right fit for anything that doesn’t fall neatly into Posts or Pages – things like Events, Team Members, Testimonials, or Product listings. You’ll typically create these with a plugin like Advanced Custom Fields (ACF) or Pods.
If your Drupal site uses custom fields (through modules like Field API or Paragraphs), note which fields each content type uses and how they’ll translate. A simple text field maps directly. A Drupal entity reference field pointing to related content will need more thought. As WordPress doesn’t have a native equivalent, you’ll likely use ACF relationship fields or a similar solution.
Plan your taxonomy mapping
Drupal organizes classification through vocabularies (e.g., “Topics,” “Regions”) and terms within each vocabulary (e.g., “Marketing,” “Europe”). WordPress uses the categories and tags taxonomies and supports registering custom taxonomies.
Review each Drupal vocabulary and decide where it fits:
- A primary vocabulary used for broad grouping (like “Department” or “Content Type”) usually maps to WordPress categories, which are hierarchical.
- A secondary vocabulary used for more granular labeling (like “Topics” or “Keywords”) typically maps to WordPress tags, which are flat.
- If you have more than two vocabularies, or if a vocabulary is tied to a custom post type, you’ll want to create custom taxonomies in WordPress to keep the same organizational logic.
Write all of this down in a single document or spreadsheet. Drupal content type in one column, WordPress equivalent in the next, with notes on any fields, taxonomies, or URL changes that need special handling. This becomes the reference your migration tool or developer will work from.
4. Set up a staging environment
A staging environment is a private copy of your WordPress site where you run the entire migration before touching your live domain. Every import, every test, every fix happens here first.
Never migrate directly onto a production server. If an import goes sideways due to corrupted data, missing images, or a plugin conflict, you want that to happen on a site nobody else can see. Your live Drupal site remains untouched and fully operational all this time.
You have a few options for where to set this up:
- A staging subdomain on your host. Many managed WordPress hosts (like Kinsta or WP Engine) offer one-click staging environments. You can also create one manually at something like
staging.example.com. This is a good choice because the server environment closely matches your future production setup. - A local development environment. Tools like LocalWP, DevKinsta, or Docker let you run WordPress on your own computer. This works well for experimentation, though you’ll need to account for server differences when you eventually move to your host.
Once the staging site is ready, install a clean copy of the current WordPress version (6.9 at the time of writing). Keep the installation lean by adding only the theme you intend to use and the plugins you’ve specifically chosen for the migration and your final site setup. Loading random plugins or themes introduces variables that complicate debugging if anything breaks during import.
Content imports, redirect testing, layout checks, and plugin configuration all happen on the staging site. Only once you’ve thoroughly tested the result and confirmed that content, URLs, media, and functionality all look correct, do you point your live domain to the new WordPress installation.
5. Choose your migration method
There are two primary approaches for site migration: plugin-based import and manual migration via database queries and scripts. Most real-world projects end up using a hybrid approach, running a plugin to handle bulk transfers and then manually cleaning custom fields, SEO metadata, or edge cases afterwards.
Here’s how each method works.
Method 1: Plugin-based migration
The FG Drupal to WordPress plugin is the most widely used tool for this job. The free version handles standard content types, categories, tags, and media. The Premium version adds user migration, Drupal password hash handling, custom post type support, menu import, comment migration, and automatic 301-redirect creation. For most sites, the Premium version plus relevant add-ons is worth the investment.
On your staging WordPress site:
- Install and activate the plugin. Search for “FG Drupal to WordPress” under Plugins → Add New, install it, and activate. If you’ve purchased Premium or add-ons, upload those through the same screen.
- Connect to your Drupal database. Navigate to Tools → Import → Drupal. The plugin will ask for your Drupal database connection details: hostname, database name, username, password, and table prefix. You can find these values in your Drupal site’s
sites/default/settings.phpfile, inside the$databasesarray. Enter the credentials and let the plugin test the connection to confirm it can read the Drupal data. - Configure your import settings. This is where your content mapping document from Step 3 pays off. You’ll specify which Drupal content types should import as WordPress Posts, which as Pages, and which as custom post types. Choose whether to bring in media files, how to map Drupal vocabularies to WordPress categories or tags, and whether to import user accounts. If you’re using Premium, you can also enable password migration so users don’t get forced into a password reset on day one.
- Run the import and verify the results. Once the import finishes, check the numbers first. Do the post and page counts match what you expected from your audit? Then spot-check individual pages. Open a handful of articles and confirm that body content came through cleanly, images display correctly, featured images are assigned, and taxonomy terms are attached to the right posts. Pay attention to any content that used Drupal-specific formatting or embedded media, as these are the areas most likely to need manual cleanup.
A few things FG Drupal to WordPress does not do, even with Premium: it won’t recreate Drupal Views logic (those filtered, sorted content listings), it won’t migrate complex Paragraphs or Field Collection layouts into structured WordPress equivalents, and it won’t catch internal links that use absolute paths pointing to files under sites/default/files/. These gaps are normal; they’re where manual work or specialist help can be used.
Method 2: Manual migration
If your Drupal site is heavily customized or you need fine-grained control over exactly how data maps to WordPress, manual migration gives you that precision. It’s also significantly more technical and time-consuming, so this path is best suited for developers comfortable with SQL, PHP, and command-line tools.
At a high level, the process involves:
- Export content from the Drupal database. Write SQL queries to pull data from core tables like
node_field_data(for node titles, types, and timestamps),node__body(for body content), andpath_alias(for clean URLs). Export taxonomy data from the relevant vocabulary and term tables. - Export media files and metadata. Copy the entire
sites/default/files/directory to your local machine or staging server. Then export metadata from thefile_managedtable so you have a record of every file’s original path, filename, and MIME type. - Import content into WordPress. Write scripts or use WP-CLI commands like
wp post createto insert posts and pages into the WordPress database. A useful practice here: store each post’s original Drupal node ID in a custom field (e.g.,_drupal_nid). You’ll reference this later when building your redirect map from old URLs to new ones. - Create and assign taxonomies. Use functions like
wp_insert_termto create your categories and tags, then attach them to the correct posts usingwp_set_post_terms. Your content mapping document tells you which Drupal vocabulary maps to which WordPress taxonomy. - Migrate media files. Move the downloaded files into
wp-content/uploads/, organizing them into WordPress’s year/month folder structure if you prefer. Run a search-and-replace across the database to update old file paths (e.g.,sites/default/files/image.jpg) to new WordPress paths (e.g.,wp-content/uploads/2026/03/image.jpg). Then register the files in the WordPress media library usingwp media importvia WP-CLI or a plugin. - Fix internal links. Run a final search-and-replace across post content to catch any internal links still pointing to old Drupal URL patterns. Tools like Better Search Replace, or WP-CLI’s
wp search-replacecommand work well for this.
In practice, most migrations land somewhere in between. You run the FG plugin to handle bulk content, media, and taxonomy transfers – the work it does well and quickly. Then you manually address the gaps: cleaning up custom field data that didn’t map correctly, importing SEO metadata from Drupal’s Metatag module into your WordPress SEO plugin, fixing media paths the plugin missed, or writing scripts for any content relationships that need custom handling. This hybrid approach gives you speed where automation works and precision where it doesn’t.
6. Preserve SEO
301 redirects permanently point old Drupal URLs to new WordPress URLs, preserving link equity and search rankings. This step, combined with permalink configuration and metadata migration, is what separates a migration that holds its traffic from one that tanks it.
Configure permalinks to match your Drupal URL patterns
In your WordPress staging site, go toSettings → Permalinks and choose a structure that mirrors your existing Drupal aliases as closely as possible. If your Drupal articles lived at /blog/post-title, set your WordPress permalink structure to /blog/%postname%/. If they sat at the root like /post-title, use /%postname%/.
The closer your new URLs match the old ones, the fewer redirects you’ll need to manage. Every redirect you can avoid is one less point of failure and one less millisecond of latency for both users and search engine crawlers.
Set up 301 redirects for every URL that changes
Despite your best efforts with permalinks, some URLs will inevitably change. Taxonomy term pages, author archives, paginated URLs, and media file paths almost always end up with different patterns in WordPress. Every one of these needs a 301 redirect from its old Drupal path to its new WordPress destination.
You have a few options for managing redirects:
- Plugin-based redirects. Tools like Redirection or Rank Math let you add redirect rules through the WordPress admin. This is the simplest approach for small-to-medium sites with a few hundred redirects.
- Server-level redirects. For very large sites (thousands of redirects) or better performance, add redirect rules directly in your
.htaccessfile (Apache) or Nginx configuration. Server-level redirects execute before WordPress even loads, which makes them faster and less resource-intensive.
Cross-reference your list of original Drupal URLs against the new WordPress URLs and build your redirect rules from the differences. Don’t forget the paths that are easy to overlook: image and file URLs that moved from sites/default/files/ to wp-content/uploads/, taxonomy archives that gained or lost a trailing slash, and any pagination patterns that changed format.
Migrate SEO metadata
Titles and meta descriptions from Drupal’s Metatag module need to move into the corresponding fields in your WordPress SEO plugin, whether that’s Yoast SEO, Rank Math, or another option. If you used the FG Drupal to WordPress Premium plugin with its SEO add-on, some of this may have transferred automatically.
Either way, spot-check a sample of your highest-traffic pages to confirm the metadata came through accurately. Missing or duplicated meta descriptions across dozens of pages will show up as issues in Google Search Console and can dilute your click-through rates.
Submit a fresh XML sitemap
Generate a new XML sitemap through your SEO plugin. Most WordPress SEO plugins create and maintain this automatically once activated. Then submit it to both Google Search Console and Bing Webmaster Tools. This tells search engines to crawl your new URL structure right away rather than waiting to discover it organically, which speeds up reindexing.
Rebuild structured data
If your Drupal site used structured data or JSON-LD markup for things like articles, FAQs, breadcrumbs, or organization info, rebuild equivalent schema on the WordPress side. Most SEO plugins include built-in schema generators, or you can use a dedicated tool like Schema Pro. Without this step, any rich results you were earning in search (star ratings, FAQ dropdowns, breadcrumb trails) will disappear after migration.
7. Post-migration monitoring and validation
Post-migration validation compares your new WordPress site against the pre-migration baseline to catch broken URLs, missing metadata, and ranking drops before they compound into larger problems.
Re-crawl and compare
Once the new WordPress site is live on your production domain, run a fresh crawl with the same tool you used in Step 1. Export the results and place them side by side with your original Drupal crawl data.
You’re looking for three things:
- Key pages still exist. Every high-traffic and high-authority page from your Drupal site should have a working equivalent on the WordPress site, either at the same URL or properly redirected to a new one.
- Redirects resolve correctly. Old Drupal URLs should return 301 status codes pointing to the right WordPress destinations. Watch for redirect chains (a 301 that points to another 301) and redirect loops, as both waste crawl budget and dilute link equity.
- No large clusters of 404 errors. A few stray 404s are normal. A batch of 50 or 100 indicates that something systematic was missed, often in taxonomy archives, paginated pages, or media file paths.
Monitor Google Search Console
Over the first four weeks after launch, check Google Search Console regularly for:
- Crawl errors: New 404s, server errors, or redirect issues that Google’s crawler has flagged.
- Indexing drops: Pages that were previously indexed but have fallen out of Google’s index.
- Impression changes: Sudden dips in impressions for your most important pages or queries. A gradual shift is expected as Google recrawls and reprocesses your site. A sharp, immediate drop usually points to a redirect or indexing problem that needs attention.
Track organic traffic for 60 to 90 days
Open your analytics tool and keep an eye on organic sessions, landing page performance, and keyword rankings over the first two to three months. Some short-term fluctuation is normal as Google needs time to recrawl URLs, process redirects, and update its index. What you want to see is overall visibility stabilizing within the first few weeks and your top-performing content holding its positions.
If you spot problems during this window, fix them promptly. Adjust redirects, fill in missing titles and meta descriptions, or correct broken internal links. The faster you address these issues, the less lasting impact they’ll have on your organic performance.
When to bring in expert help
The steps above will carry a standard Drupal blog or news site through to a successful WordPress launch. But certain site characteristics push a migration past the point where plugins and careful planning are enough on their own. If your Drupal site checks any of these boxes, bringing in a specialist is likely the smarter investment:
- Your site uses Paragraphs or Field Collections extensively. These nested, component-based content structures don’t map to WordPress’s flat post table without custom transformation logic.
- Content volume exceeds 10,000 nodes, or your media library runs into multiple gigabytes. Browser-based imports will time out at this scale, and partial imports create messy cleanup work.
- You’re running a multilingual architecture with translation relationships that need to preserve hreflang tags across the migration.
- You have an active user database where forcing password resets would generate support tickets and churn. Drupal and WordPress hash passwords differently, so accounts can’t simply be copied over without a tool or bridge designed for hash migration.
- The site includes e-commerce functionality, such as product catalogs, order histories, customer accounts, and payment or subscription continuity, which add significant complexity.
- You rely on membership tiers or editorial permission structures that go beyond WordPress’s default user roles.
- You’re migrating from Drupal 7, which uses an older database schema that current plugins handle less reliably than Drupal 8, 9, 10, or 11.
An experienced migration developer handles what plugins can’t. That includes building custom Gutenberg blocks that mirror Paragraph layouts, writing WP-CLI and shell scripts that bypass browser-based import limitations, mapping Drupal entity references through custom SQL and wp_postmeta manipulation, creating authentication bridges so users can log in with their existing passwords without a forced reset, and configuring WooCommerce with payment gateway setup and order history migration for e-commerce sites.
Your migration roadmap starts here
The principle that holds this entire process together: treat URL continuity as the spine of your migration, and the content transfer becomes mechanical. Map every Drupal URL to its WordPress destination and set your redirects.
If your site is straightforward with standard content types and moderate volume, start with the content mapping step and work through this guide step by step. The tools and process outlined here will get you to a clean WordPress launch with your rankings intact.
For e-commerce migrations or more complex sites, Codeable offers fixed-price WooCommerce migration packages starting at $2,000 for basic stores, $4,000+ for established stores with larger catalogs, and custom quoting for enterprise operations. Each package includes a free migration assessment, so you understand the full scope and cost before committing a dollar.
For non-e-commerce sites where you’re unsure whether your Drupal setup is too complex for a DIY approach, Codeable handles those too. A 1-hour consultation starting at $69 lets you walk through your specific site architecture with an experienced WordPress developer who can flag risks, estimate effort, and recommend the right approach for your situation.
Either way, you don’t pay for development work until you’ve seen the scope and agreed to the price.
Get your free migration assessment from Codeable and find out exactly what your Drupal to WordPress migration will take, before you touch a single file.

20 000+ businesses of every shape and size have already trusted us to hire WordPress developers and scale their growth.
The post Make the Move from Drupal to WordPress Without Losing a Single Ranking appeared first on Codeable.
]]>The post Why Businesses Should Consider Hiring a WordPress Developer appeared first on Codeable.
]]>WordPress professionals dive deep into the WordPress core, customizing and enhancing your website to meet specific business objectives. They develop custom plugins, integrate third-party applications, and optimize sites for speed and SEO. To find top-tier WordPress talent, you can explore curated platforms that connect businesses with rigorously vetted WordPress developers who have years of professional experience and can develop the exact solution you need.
In this article, we’ll cover everything regarding WordPress developers, what they do, the benefits of working with one, and how to hire the perfect professional for your website to unlock its full potential.
What is a WordPress developer?

A WordPress developer specializes in building, customizing, and maintaining websites using the WordPress Content Management System (CMS).
This role goes beyond merely setting up a site and involves tailoring the website to meet specific business needs and solving complex problems that arise during its development and operation.
WordPress developers come in various forms, each bringing unique strengths to the table:
- Freelance developers: Often hired for specific projects or tasks, offering flexibility and specialized skills.
- Agency-based developers: Work within teams to provide comprehensive services for larger or more complex projects.
- In-house developers: Employed by companies to continuously improve and maintain their WordPress websites, ensuring the site evolves with the business.
WordPress developers also fall into distinct specialist categories based on their technical focus.
- Full-stack developers handle both front-end design and back-end functionality.
- Theme developers create custom visual designs and user interfaces.
- Plugin developers build custom features that extend WordPress capabilities.
- Technical specialists focus on performance optimization, security, or migrations.
- Finally, no-code implementers configure sites using page builders and existing tools without writing code.
What does a WordPress developer do?
The responsibilities of a WordPress developer can be vast and varied, touching on every aspect of creating and managing a website. Here’s what their role typically involves:
- WordPress theme development: They can craft custom themes to ensure the site matches the brand’s visual identity and functional requirements.
- WordPress plugin development: They extend the functionality of WordPress sites beyond their out-of-the-box capabilities with bespoke plugins.
- Site maintenance and performance optimization: They update your site regularly to ensure it runs smoothly, quickly, and efficiently across all devices.
- Ensuring website security and compliance: They implement security measures to protect the site from threats and ensure it complies with relevant laws and regulations.
A key part of a WordPress developer’s job is to work closely with stakeholders – whether they are clients, marketing teams, or internal management – to understand and deliver on the business objectives. This collaboration ensures that the website not only looks good but also performs well in terms of user engagement, SEO, and conversion rates.
The services they provide can lead to improved website usability, stronger brand identity, and, ultimately, increased business success in the digital realm.m.
Why you should hire a WordPress developer

While a general WordPress developer might be adept at navigating the platform’s basics, a specialized WordPress developer brings an extra layer of expertise. They’ll have a deep focus on specific areas such as WordPress site performance, migration, or troubleshooting. Also, their familiarity with the core languages, tools, and frameworks used in WordPress equips them to tackle complex challenges and provide bespoke solutions.
If you’re unsure where to find such specialized talent, platforms like Codeable can be extremely valuable. Codeable has a comprehensive developer directory where you can search for the right candidate with the expertise you need.
Additionally, having a developer on call for ongoing support and maintenance can alleviate the stress of technical issues, allowing you to focus more on running your business. This is why, as your digital footprint expands, the value of having a skilled WordPress developer by your side becomes increasingly apparent, making it a wise investment for any business aiming for digital success.
Let’s explore exactly what specialized WordPress developers bring to the table:
1. Customization and efficiency
Specialized developers deliver custom solutions efficiently using current WordPress best practices and optimization techniques. This updated knowledge translates into higher-quality work done more efficiently, ensuring that your business receives a customized website tailored to your specific needs.
Whether it’s incorporating the latest SEO strategies or developing a custom plugin to enhance functionality, a specialist’s ability to deliver precise solutions leads to a more effective online presence and, potentially, a higher return on investment.
2. Technical expertise
WordPress developers handle complex technical tasks using clean code in PHP, HTML, CSS, and JavaScript to ensure robust, stable websites. Their deep understanding of WordPress core, APIs, and modern development practices enables them to write clean, maintainable code that handles complex technical requirements efficiently.
From custom functionality that integrates with your existing systems to technically optimized implementations, specialized developers prevent technical debt and ensure long-term site stability.
3. Enhanced performance and speed
Developers optimize website loading times, responsiveness, and interactivity to improve user experience and search engine rankings. A specialized WordPress developer understands the intricacies of UX design and how these optimizations work together. This expertise not only improves how visitors perceive your site but also positively affects your search engine rankings.
4. Superior security and reliability
Expert developers implement robust security measures, conduct regular audits, and protect websites against vulnerabilities and attacks. WordPress developers apply multiple layers of protection to shield your website from threats. By regularly updating your site, conducting security audits, and employing best practices, a developer ensures your business remains secure and reliable for your customers.
Security and reliability
Cybersecurity threats are an ever-present concern for online businesses. Expert WordPress developers are adept at implementing robust security measures to protect your website from vulnerabilities. By regularly updating your site, conducting security audits, and employing best practices, a developer ensures your business remains secure and reliable for your customers.
5. SEO optimization and visibility
Developers build websites with SEO best practices from the ground up, optimizing site structure and speed for higher search engine rankings.
A solid technical SEO foundation includes clean code structure, proper heading hierarchy, optimized meta tags and URLs, and fast loading times. These elements enable search engines to crawl and index your website effectively. Developers ensure SEO is built into the site architecture rather than added afterward, resulting in sustained organic traffic growth and improved visibility for your business.
6. Scalability for business growth
Developers build websites with scalability in mind, ensuring they grow and adapt to increased traffic and new feature demands. A specialized WordPress developer ensures your site architecture supports these future demands. Whether it’s integrating new features, handling increased traffic, or expanding your content, proper foundational planning prepares your site for whatever the future holds.
7. Time and cost savings
Professional WordPress development prevents costly mistakes and frees your team to focus on core business activities while delivering better long-term ROI.
While hiring a developer requires initial investment, the alternative often costs more in hidden ways. DIY approaches lead to time-consuming troubleshooting, poorly written code requiring expensive fixes later, and business owners focused on WordPress problems instead of business growth. Professional developers complete work efficiently, write maintainable code that prevents technical debt, and handle ongoing issues quickly. This frees your team to focus on revenue-generating activities rather than website management.
8. Ongoing technical support and maintenance
Developers provide ongoing technical support, managing updates and troubleshooting issues like plugin conflicts and performance optimization.
Regular maintenance includes plugin updates, security patches, compatibility testing, and performance monitoring. Developers handle technical issues proactively, preventing problems before they impact your site’s availability or security. This ongoing support ensures your website remains functional and protected as WordPress and plugins evolve. Beyond technical support, developers also provide valuable insights into WordPress trends and best practices that guide your online strategy.
Addressing common business pain points
WordPress developers address specific business challenges that exceed DIY capabilities. They solve limited in-house technical skill gaps when teams lack WordPress expertise. They deliver high-quality bespoke features not available in standard themes or plugins. They provide scalable long-term solutions that grow with business demands. They ensure professional-grade security and performance that template sites cannot match.
When to hire a WordPress developer
Consider hiring a WordPress developer when specific business needs exceed basic website capabilities. Professional development becomes necessary for custom functionality, complex integrations, or performance optimization requirements.
Several scenarios indicate when professional WordPress development delivers clear value:
- Hire when you need features beyond what standard themes and plugins can provide.
- Hire when you lack the time or technical skills to manage WordPress effectively.
- Hire when your site requires custom functionality like booking systems, payment integrations, or CRM connections.
- Hire when security, speed, and mobile-friendliness are critical business requirements.
- Hire when you want a unique, high-performing site that stands out from template-based competitors.
These scenarios share a common thread: the gap between what you need and what DIY solutions can reliably deliver. Custom code, third-party integrations, and performance optimization require expertise that takes years to develop. Attempting these tasks without proper knowledge often leads to broken functionality, security vulnerabilities, or sites that frustrate visitors with slow load times.
Codeable’s rigorously vetted developers specialize in a range of elementary and complex scenarios, with 97% having 6+ years of professional WordPress experience. The platform maintains a 4.7-star Trustpilot rating and is officially recommended by WordPress.com, WooCommerce, and Kinsta. Codeable’s matching process connects you with developers experienced in your specific requirements and timeline constraints.
You may not need a developer for simple informational sites using pre-built themes if you’re comfortable with page builders like Elementor. Basic website needs without custom functionality requirements can often be handled through WordPress’s built-in features and standard plugins.
WordPress developers vs. general web developers
WordPress developers differ from general web developers through specialized platform expertise. General web developers build websites using various technologies like custom HTML, Ruby, or Python frameworks. WordPress developers focus specifically on the WordPress ecosystem. They understand WordPress core architecture, theme hierarchy, plugin APIs, and platform-specific optimization techniques deeply.
This specialization matters for your project’s success. A WordPress developer knows how themes and plugins interact with each other. They understand the WordPress database structure and how to query it efficiently. They follow WordPress coding standards that keep your site compatible with future updates.
General web developers may need extra time to learn these WordPress-specific details before starting your project. WordPress specialists already have this knowledge. They build complex, custom solutions efficiently because they work within the platform daily. When issues arise, they diagnose problems faster because they’ve likely solved similar WordPress challenges before.
For businesses committed to WordPress, hiring a platform specialist delivers better results than working with a generalist who treats WordPress as one tool among many.
What to look for when evaluating WordPress developers
When evaluating WordPress developers for your project, assess both technical competencies and professional capabilities that indicate reliable, maintainable solutions.
Core technical foundations
WordPress developers master PHP (WordPress’s core language), JavaScript for interactivity, HTML5 for structure, CSS3 for styling, and MySQL for database management. These technologies form the foundation of every WordPress site. A developer lacking proficiency in any of these areas will struggle to build or troubleshoot effectively.
WordPress-specific expertise
They understand WordPress architecture deeply, including custom post types, taxonomies, theme hierarchy, plugin APIs, REST API for headless implementations, and WooCommerce for e-commerce solutions. This specialized knowledge separates WordPress developers from general web developers. Look for experience with custom theme development, plugin development and customization, SEO optimization, and security hardening specific to the WordPress platform.
Development tools and practices
Professional developers use version control systems like Git to manage code changes and collaborate with teams. They employ debugging tools for troubleshooting and performance optimization techniques for speed and user experience. Security best practices, including regular audits and vulnerability assessments, should be standard in their workflow.
Professional competencies
Effective developers demonstrate systematic problem-solving, clear client communication, and efficient project management to deliver solutions that meet business requirements on time. Technical skills mean little without the ability to understand your needs, explain solutions clearly, and manage project timelines reliably.For detailed technical requirements and career path information, see our guide on WordPress developer roles and responsibilities.
Codeable: Your gateway to hiring WordPress experts
Finding the right WordPress developer for your project can often feel like searching for a needle in a haystack. From assessing technical skills to ensuring reliability and cultural fit, the hiring process is fraught with challenges that can consume valuable time and resources. This is where Codeable comes into play, offering a streamlined, dependable solution for businesses seeking top-tier, specialized WordPress talent.
Codeable stands out from the crowd with its rigorous vetting process, designed to ensure that only the most capable and reliable WordPress developers are made available to clients. Codeable screens developers through technical exams and live coding tests before acceptance. Only developers with proven WordPress and WooCommerce expertise pass the rigorous vetting process. This pre-screening eliminates the time businesses spend evaluating developer technical capabilities themselves. By prioritizing quality over quantity, Codeable guarantees access to a pool of experts who are proficient in WordPress and experienced in delivering projects that meet and exceed client expectations.

Codeable’s project-matching system connects your project with qualified developers who have a proven track record in your specific area of need. Whether you require theme customization, plugin development, or a comprehensive e-commerce solution, the platform matches you with the right specialist.
Codeable offers structured starting points through fixed-price packages for common business needs:
- WordPress maintenance packages ($100–$1,000+/month) provide ongoing site care with dedicated developer support.
- Technical audits ($599–$1,500+) deliver comprehensive performance and security assessments.
- WooCommerce-specific services address store optimization and checkout improvements.
- Consultation sessions ($69) provide expert guidance before larger commitments.
For larger projects, ongoing development needs, or staff augmentation, Codeable offers retainer arrangements and dedicated developer relationships. Contact Codeable directly to discuss custom engagement models that scale with complex or enterprise requirements.
Through Codeable, businesses have access to a wide variety of expert WordPress services. The platform hosts professionals skilled in every aspect of WordPress development, from minor tweaks and performance optimization to full-scale website development and complex e-commerce integrations. Whatever your WordPress needs, Codeable has experts ready to bring your vision to life, ensuring your website not only looks great but also performs exceptionally well. Codeable is listed on the official WooCommerce Marketplace as a trusted partner and is recommended by hosting providers like Kinsta for quality WordPress development.
And because clear, effective communication is crucial to the success of any project, Codeable places a strong emphasis on ensuring smooth interactions between business owners and developers. The platform features built-in communication tools designed to facilitate easy discussion of project details, timelines, and expectations. This focus on transparency and openness helps prevent misunderstandings and ensures that projects are completed to the satisfaction of all parties involved.
Take the next step: Find your WordPress solution with Codeable
Ensuring your website meets and exceeds modern standards for design, functionality, and user experience is vital to your success. Choosing the right WordPress development approach depends on your specific needs, timeline, and budget.
Ready to start?
Choose the approach that fits your current needs:
Explore fixed-price packages → Start with maintenance, audits, or WooCommerce services at transparent fixed rates.
Get expert consultation ($69) → Discuss your requirements with a WordPress expert before committing to a full project.
Post a custom project → For unique needs, get matched with vetted developers and receive personalized estimates.All Codeable projects include quality guarantee and dedicated support throughout your project and fast matching with qualified developers in under one day.
All Codeable projects include quality guarantee and dedicated support throughout your project and fast matching with qualified developers in under one day.
Submit your project to Codeable today and elevate your website, engage your audience, and achieve your digital ambitions. Your path to a standout online presence is just a click away!
20 000+ businesses of every shape and size have already trusted us to hire WordPress developers and scale their growth.
The post Why Businesses Should Consider Hiring a WordPress Developer appeared first on Codeable.
]]>The post Website Migration to WordPress Without Breaking Your Site or Your SEO appeared first on Codeable.
]]>WordPress migrations use three approaches: automated plugins for standard sites, manual file and database transfer for large or custom builds, and professional services for complex WooCommerce stores.
No method is “better” than the others. It’s about aligning your approach with your site’s architecture before you start moving files and discovering incompatibilities mid-process.
This guide provides two things most migration tutorials skip. First, a decision framework that maps your site size, complexity, and technical comfort to the right method before you waste time on an approach that won’t work. Second, the SEO and DNS configurations that prevent ranking drops and downtime after migrations that appear successful initially but fail in the details.
💡We’re focusing exclusively on WordPress-to-WordPress migrations between hosting providers or domains. Cross-platform migrations from Webflow, Wix, Shopify, or proprietary systems involve distinct workflows and data-mapping challenges. If you’re switching hosting providers while staying on WordPress or changing domains, this guide can help.
Choose your migration method before you start
WordPress site migration uses three primary methods: automated plugins, manual file and database transfer, and professional migration services. The best approach depends on your site’s size, technical complexity, and business requirements.
The biggest time-waster in any migration is starting down one path and realizing halfway through that it does not fit your site. Picking the right method upfront saves you hours of backtracking and frustration.
The plugin route is ideal for small to medium WordPress sites running standard themes and commonly used plugins. Tools like All-in-One WP Migration or Duplicator handle the export, transfer, and import process through a guided interface. If your site has a straightforward setup without heavy customizations, this is the fastest and simplest path forward.
The manual route gives you full control over every file and database record. This is the better choice for large sites, heavily customized builds, or situations where migration plugins hit server limits or throw persistent errors. It requires working with SFTP and phpMyAdmin directly, but it also means nothing is hidden behind a plugin’s automated process.
Professional migration services make sense when time is tight, the technical complexity exceeds your comfort level, or your WooCommerce store has active subscriptions that need uninterrupted billing continuity. A specialist handles the risk so you do not have to.
How long does it take to migrate a WordPress website?
Migration duration depends on your method and site size. Plugin migrations for standard sites typically complete in 1–3 hours, including testing. Manual migrations with SFTP and database transfer take one to three days, depending on database size and integrations. Professional services typically deliver within several days to two weeks, factoring in discovery, execution, and post-migration validation.
Prepare your site for migration
Before migrating, create a full off-site backup, delete unused themes and plugins to reduce file size, and disable caching and security plugins that interfere with exports. Document your menu structure, form configurations, and third-party integrations to verify everything transfers correctly.
Create and test your backup
A backup that hasn’t been tested for restoration is just wishful thinking. Here’s what you need:
- Export both your filesystem and database to a location separate from your current host.
- Download a complete copy of your
wp-contentfolder, which contains themes, plugins, and uploaded media. - Export your database through phpMyAdmin or your hosting control panel.
- Test the backup by restoring it to a staging environment before starting the actual migration.
Clean up your database
WordPress accumulates junk that slows migrations and triggers timeout errors. Remove these before you start:
- Post revisions that bloat your database without adding value.
- Expired transients, which are temporary cached data that plugins create and forget to delete.
- Orphaned metadata from plugins you’ve uninstalled, but that left database entries behind.
Use WP-Optimize or access your hosting control panel to clear this clutter. A leaner database migrates faster and causes fewer import failures.
Disable plugins that block migration tools
Plugin interference blocks exports and corrupts transfers. Turn these off temporarily:
- Caching plugins like WP Super Cache and W3 Total Cache create static file versions that confuse migration tools.
- Security plugins, including Wordfence Security and Sucuri Security, block the file access required by migration plugins.
You can reactivate these once you’ve verified that the migration succeeded.
Document critical configurations
Take inventory of settings that don’t always transfer cleanly:
- Menu locations and structure.
- Contact form settings and email notifications.
- Ad placement codes and tracking pixels.
- SEO plugin settings from Yoast or Rank Math, including meta titles, descriptions, and canonical URLs.
- Third-party integrations with payment processors, email marketing platforms, and CRM systems.
Verify destination server requirements
Check that your new host meets these specifications:
- PHP 7.4 or higher.
- MySQL 5.7 or MariaDB 10.3 minimum.
- Memory allocation at 256MB or above.
- PHP execution time limit of at least 300 seconds for import operations.
These requirements determine whether your migration completes successfully or fails with cryptic timeout errors.
Protect your SEO before the move
SEO preservation during migration requires maintaining URL structures and setting up 301 redirects for any URLs that must change. Transfer your Yoast or Rank Math settings, verify your XML sitemap regenerates correctly, and submit the new site to Google Search Console within 24 hours of going live.
A website migration can wipe out months or years of search engine rankings if you skip the preparation work. The single most important rule is this: maintain your existing URL structures wherever possible. Changing URLs without proper redirects destroys rankings because Google treats every unmatched URL as a brand-new, unranked page.
The five pillars of migration SEO protection are:
- URL preservation: Maintain existing permalink structures to protect rankings.
- Redirect setup: Create 301 redirects only for URLs that must change.
- Metadata transfer: Export Yoast or Rank Math settings to the new site.
- Google notification: Use Search Console’s Change of Address tool for domain changes.
- Post-launch audit: Check indexing status at 24 hours, 1 week, and 1 month.
The good news is that with the right prep work done before you execute the migration, you can preserve your search visibility and even improve it on the other side.
Build your redirect map first
Before you touch a single file, you need a complete picture of your current site’s URL structure. Use a crawler tool like Screaming Frog to export every URL on your existing site into a spreadsheet.
Once you have the full list, prioritize the URLs that matter most. These are pages that:
- Receive the most organic traffic according to Google Analytics.
- Have backlinks pointing to them from other websites.
- Rank on page one or two for your target keywords.
For each of these legacy URLs, define a 1:1 mapping to its new WordPress equivalent. This spreadsheet serves as your redirect map and is the single most valuable document in your entire migration project.
Set up 301 redirects for every URL that changes
A 301 redirect is a permanent redirect that tells search engines the old page has moved to a new address. It passes the majority of the original page’s ranking power to the new URL.
Only URLs that must change need a redirect. If you can keep the same URL slug in WordPress, do it. For everything else, implement your redirects using the Redirection plugin in WordPress or through server-level .htaccess rules. Server-level redirects are faster, but the plugin is easier to manage if you have hundreds of URLs to handle.
Transfer your metadata accurately
Your page titles, meta descriptions, Open Graph tags, and schema markup all need to carry over to the new WordPress site. If you are moving from another platform that stores this data, export it and re-import it into an SEO plugin like Yoast or Rank Math.
Both plugins support importing settings from other platforms and from each other. Run a spot-check on your highest-traffic pages after import to confirm that titles and descriptions match the originals exactly.
Signal domain changes to Google
If your migration also involves a domain name change, use Google Search Console’s Change of Address tool. This feature directly notifies Google that your site has moved from one domain to another, which speeds up the re-indexing process and reduces the window where rankings may fluctuate.
Run a post-migration SEO audit schedule
Your work is not finished at launch. Follow this timeline to catch issues early:
- 24 hours after launch. Submit your updated XML sitemap to Google Search Console. Check for any crawl errors or 404 pages that appear in the coverage report.
- 1 week after launch. Review your redirect map against live URLs to confirm every redirect is firing correctly. Monitor Google Search Console for any spikes in “Page not found” errors.
- 1 month after launch. Compare organic traffic and keyword rankings against your pre-migration baseline. Investigate any pages that have dropped and verify their redirects, metadata, and indexing status.
This structured audit schedule gives you three clear checkpoints to identify and fix problems before they cause lasting damage to your search rankings.
Manual migration step by step
Manual WordPress migration transfers site files via SFTP and the database via phpMyAdmin, providing full control over every record. This method is the go-to approach when automated plugins hit size limits, when you need to exclude specific data, or when you want to understand exactly what is happening under the hood. Here is the complete process, broken into four stages.
Back up and transfer your files via SFTP
Start by connecting to your source (current) server using an SFTP client like FileZilla or Cyberduck. SFTP is the secure version of FTP. It encrypts your login credentials and all file data during transit, which standard FTP does not do.
Before you download anything, go into your SFTP client’s settings and enable “Show Hidden Files.” This step is easy to miss, but it is critical. Your .htaccess file is hidden by default and contains Apache permalinks and server-level security rules. If you skip it, your URLs and redirects will break on the new server.
Next, compress your wp-content folder into a ZIP archive directly on the server before downloading it. This folder holds your themes, plugins, uploads, and media files, which can include thousands of small files. Downloading them individually increases the risk of file corruption and takes significantly longer. A single ZIP transfer is faster and more reliable.
Once the download is complete, verify that the file counts in your local copy match the source. Then connect your SFTP client to the destination (new) server and upload everything to the root directory. This is typically /public_html or /www, but check with your hosting provider if you are unsure.
Export and import your database via phpMyAdmin
Your database holds all of your site’s content, settings, user accounts, and plugin configurations. Log in to phpMyAdmin on your source server and select your WordPress database from the sidebar.
- To export, choose the “Quick” method with SQL format for a standard migration. This works well for most sites.
- If your database is large or includes data you want to exclude, like log tables or expired transients, choose the “Custom” export method instead.
- Under the custom options, make sure “Add DROP TABLE” is checked. This setting allows you to re-run the import cleanly if the first attempt fails, because it automatically removes existing tables before recreating them. Without it, you will get “table already exists” errors that block the import.
On the destination server, you need to prepare a home for the database before importing:
- Create a new, empty database through your hosting control panel.
- Create a new database user with a strong, unique password.
- Grant “All Privileges” to that user on the new database.
Now open phpMyAdmin on the destination server, select the new empty database, and import your SQL file. Keep an eye on the process for timeout errors, especially if your file is over 50 MB. If the import times out, ask your host to increase the max_execution_time and upload_max_filesize PHP values, or use a command-line tool like WP-CLI to import the file instead.
Configure wp-config.php for the new environment
The wp-config.php file tells WordPress how to connect to its database. After moving your files, open this file in a text editor and update four values to match the new database credentials you just created:
DB_NAME— the name of your new database.DB_USER— the username you created.DB_PASSWORD— the password for that user.DB_HOST— usually set to localhost, but some hosting providers require a specific IP address or hostname. Check your host’s documentation if localhost does not work.
While you have the file open, consider regenerating your Authentication Keys and Salts. Paste the new keys over the existing ones. This forces all active sessions to log out and regenerates cookies, which is a good security practice any time a site changes servers.
Update URLs without breaking serialized data
WordPress stores full, absolute URLs throughout its database, specifically in the wp_posts, wp_postmeta, and wp_options tables. If your domain or directory path has changed, every one of these stored URLs must be updated to match the new address.
The catch is: a simple SQL find-and-replace will corrupt your data. WordPress plugins store settings as serialized data, which includes a character count for each string value. When you change oldsite.com to newsite.com and the string length changes, those character counts no longer match. WordPress then cannot read the data, and your plugin settings, widget configurations, and theme options break silently.
You need a serialization-aware tool that recalculates these character counts automatically. There are a couple of reliable options for this:
- Better Search Replace plugin. Install it on the new WordPress site, enter your old and new URLs, and run a dry run first to preview how many replacements will be made. Once you confirm the results look correct, run it for real.
- Search-Replace-DB standalone script. This is the better option when you cannot access
wp-admin, but you do have database access. Upload the script to your server in a folder with a random, non-obvious name (something like/sr-db-x7k9m/rather than/search-replace/). Automated bots constantly scan for this script by its default folder name, and finding it gives an attacker full access to your database.
🚨Delete the Search-Replace-DB script immediately after you finish using it. Leaving it on your server is a serious security risk, even if you renamed the folder. Once your URL replacements are confirmed and the site is loading correctly, remove every file associated with the script.
Migration plugins that handle your site size
Migration plugins automate WordPress file and database transfers through a guided interface, handling exports, transfers, and imports without requiring direct server access. The right plugin for your project depends on your site’s size, your hosting environment, and how comfortable you are with technical configuration.
Here are four widely used options, each with a different strength.
These plugins are recommended based on their functionality and community reputation, irrespective of any affiliations Codeable may have.
All-in-One WP Migration

All-in-One WP Migration and Backup exports an entire WordPress site, including content, themes, plugins, and media, as a single downloadable file. Its drag-and-drop interface works on almost any server environment with minimal configuration, making it the most beginner-friendly option. The trade-off is that the free version enforces an import site size limit of 512 MB (this may be 128 MB or less for older plugin versions and custom server configurations), which can block medium-to-large sites from completing the import without a paid extension.
Migrate Guru
Migrate Guru handles large WordPress sites up to 200GB by processing the migration on its own external servers rather than your hosting environment. This avoids overloading your server resources during the transfer. You will need to provide an email address, as the plugin sends status updates and completion notifications via email rather than displaying progress in the browser.
Duplicator Pro

Duplicator Pro offers direct server-to-server transfers and a highly customizable installer that gives you granular control over every step. It is the most flexible option, but it has a steeper learning curve. You will need to manually create the destination database and user before running the installer, similar to the manual method.
UpdraftPlus
UpdraftPlus is primarily a backup plugin with a migration add-on. If you already use it for scheduled backups, adding migration capabilities keeps your workflow in a single tool. It handles the export, transfer, and restore processes through a familiar interface.
Regardless of which plugin you choose, follow a zero-downtime workflow. Keep your old site live and fully functional until the new site is verified, tested, and confirmed working. Only point your domain to the new server after everything checks out.
When free plugins hit their limits
Free WordPress migration works for sites under approximately 256 MB using All-in-One WP Migration’s free tier. Larger sites can use Migrate Guru, which handles sites up to 200GB at no cost by processing the migration on external servers. Manual migration via SFTP and phpMyAdmin is always free but requires technical comfort with database exports and wp-config.php editing.
Multisite installations add another layer of complexity. Not all migration plugins support WordPress Multisite networks, and those that do may require specific compatibility checks before you begin. In many cases, multisite migrations need a manual approach to ensure that each subsite’s data, uploads, and configurations transfer correctly.
If a plugin throws repeated errors after troubleshooting, such as timeout failures, incomplete imports, or database connection issues, stop and reassess. Fighting against server limits rarely ends well. At that point, switching to the manual method or bringing in a professional WordPress developer is a faster and safer path to a successful migration.
Point your domain without downtime
DNS (Domain Name System) records connect your domain name to a server’s IP address. Once your files and database are in place on the new server, updating these records is the final technical step that directs traffic to the new location.
Log in to your domain registrar (the service where you purchased your domain, such as Namecheap or GoDaddy) and locate the DNS management panel. You need to update two records:
- Change your A Record to point to your new hosting provider’s server IP address.
- Update the CNAME record for the
wwwsubdomain so bothyourdomain.comandwww.yourdomain.comresolve to the new server.
Some hosting providers require a Nameserver (NS) change instead of an A Record update. If that applies to you, there is an important extra step: manually copy your existing MX and TXT records into the new host’s DNS zone before making the switch. MX records control where your email is routed. If you skip this, your professional email (Google Workspace, Microsoft 365, or similar) will stop receiving messages immediately after the nameserver change takes effect.
Why DNS takes 24–48 hours
Every DNS server around the world caches your domain’s records for a set period defined by the TTL (Time to Live) value. When you update your records, those cached copies do not refresh instantly. Each server must wait until its cached version expires before fetching the new information. This staggered refresh process across global servers is called propagation, and it can take up to 48 hours to complete everywhere.
You can speed this up by lowering your TTL to 300 seconds (5 minutes) a day or two before you make the DNS change. This tells DNS servers to cache your records for a much shorter period, so they pick up the new IP address faster once you switch.
Keep both servers running during the transition
During propagation, some visitors will still be directed to your old server while others reach the new one. To prevent anyone from hitting a dead page:
- Keep your old hosting account active throughout the propagation window.
- Only cancel your previous hosting after you have confirmed that propagation is complete and all traffic is reaching the new server.
If your migration also involves a domain name change, make sure you have already updated every URL instance in your WordPress database and wp-config.php file before touching DNS. The database URL replacement described earlier in this guide should be completed first, so the new site is fully functional the moment traffic arrives.
Test before you announce the migration
Post-migration testing validates that all content, functionality, and integrations work correctly on the new server before any visitor sees the site. Your files are transferred, the database is imported, and DNS is pointed, but the migration is not finished until every check on this list passes. Your old site should remain live until then.
Content and functionality checks
Start with the content your visitors interact with daily. Run a full broken link scan using the Broken Link Checker plugin, Screaming Frog, or a web-based tool like the Ahrefs broken link checker. Even a small number of broken internal links can frustrate users and signal quality issues to search engines.
Next, work through these checks page by page on your highest-traffic content:
- Verify that all images load correctly. This includes media library images and any image URLs that were hardcoded directly into post content or theme files. Missing images are one of the most common post-migration issues.
- Test every contact form. Submit a test entry and confirm three things: the success message displays to the user, the email notification arrives in the correct inbox, and the submission data logs properly in your form plugin’s entries.
- Run a site search using known terms. If the search returns no results or broken results, it usually means the database import was incomplete, or the search index needs to be rebuilt.
- Check embedded content. Load pages that contain embedded videos, iframes, Google Maps, or third-party widgets and confirm they render and function as expected.
E-commerce and user verification
If your site runs WooCommerce or any other e-commerce plugin, this stage is non-negotiable. A broken checkout means lost revenue from the moment you go live.
- Run a full test purchase. Walk through the entire buying process from adding a product to the cart, through checkout, payment processing, and order confirmation. Do not skip any step.
- Verify payment gateway connections using real test transactions through your gateway’s sandbox or test mode. Confirm that payment data processes correctly and that order status updates as expected in the WordPress admin.
- Test user login and logout flows. Log in as different user roles – Admin, Editor, Subscriber – and confirm each role sees the correct dashboard and permissions.
- Confirm the password reset flow works. Trigger a password reset email, click the link, and set a new password. If this fails, your site’s email sending configuration likely needs attention on the new server.
Security and SEO verification
The final round of checks protects both your visitors’ safety and your search engine visibility.
Mixed content errors are one of the most frequent post-migration problems. These occur when an HTTPS page tries to load assets (images, scripts, stylesheets) over HTTP. Modern browsers block these requests, which can break page layouts and functionality. Use your browser’s developer console to scan for mixed content on key pages.
Then confirm the following:
- SSL certificate is active, and the padlock icon displays in the browser address bar on every page.
robots.txtallows crawling. If you used a staging environment during development, it may still contain aDisallow: /rule that blocks all search engines. Remove this before going live, or your site will disappear from search results.- XML sitemap is accessible and contains the correct, updated URLs. Visit
yourdomain.com/sitemap.xmlto verify. - Meta titles and descriptions display correctly on your most important pages. Spot-check at least your homepage, top landing pages, and any page that ranks well in search. Compare them against your pre-migration records to confirm nothing was lost or overwritten during the transfer.
Only after every item on this list passes should you consider the migration complete and begin directing live traffic to the new site.
Fix common migration errors fast
Post-migration errors typically fall into five predictable categories: server configuration issues, database mismatches, memory limits, credential errors, and broken URL references. Most are resolved within minutes once you identify the pattern. Here are the five issues you are most likely to encounter, along with the fastest way to resolve each one.
Internal Server Error (500)
This is usually caused by mod_rewrite issues or a corrupted .htaccess file.
- Connect to your server via SFTP, rename the existing
.htaccessfile to.htaccess_backup, and then log into your WordPress admin. - Navigate to Settings → Permalinks and click Save Changes without modifying anything.
- WordPress will generate a fresh
.htaccessfile automatically.
Character encoding problems (garbled special characters)
If accented characters, symbols, or non-English text appear as gibberish, the issue is a database charset mismatch between the export and import. This typically happens when a UTF-8 database is imported as latin1, or the other way around. Re-export the database with the correct character encoding selected, then import it again to the destination server.
White screen of death
A blank white page with no error message usually points to PHP memory limits being exceeded or a plugin conflict on the new server.
Add the following line to your wp-config.php file to increase available memory:
define('WP_MEMORY_LIMIT', '256M');If the white screen persists, the problem is likely a plugin conflict.
- Connect via SFTP, navigate to
/wp-content/plugins/, and rename plugin folders one at a time to deactivate them. - Reload the site after each rename to identify which plugin is causing the failure.
Database connection errors
The message “Error establishing a database connection” means WordPress cannot reach its database. Open wp-config.php and verify that DB_NAME, DB_USER, DB_PASSWORD, and DB_HOST match the credentials you created on the new server exactly. Also, confirm that the database user has been granted full privileges on the correct database.
Broken images and internal links
If images are missing and internal links lead to 404 pages, the stored URLs in your database still reference the old domain. Run a serialization-aware search-and-replace using the Better Search Replace plugin or the Search-Replace-DB script, as described earlier in this guide.
A standard SQL find-and-replace will corrupt serialized data, so always use a tool designed for WordPress databases.
When to hire migration help and what it costs
A DIY migration works well for straightforward sites, but it becomes a false economy when the complexity or business stakes are high. The time you spend troubleshooting edge cases, the risk of extended downtime, and the potential for data loss can quickly outweigh the cost of professional help.
Consider hiring a specialist if your project involves any of the following:
- Large databases with complex relationships between custom post types, taxonomies, and metadata that require careful mapping during transfer.
- Bespoke theme and plugin integrations that connect to external APIs or contain proprietary business logic tied to your operations.
- Zero-downtime requirements for high-traffic sites where even a few minutes of inaccessibility means measurable revenue or reputation loss.
- WooCommerce stores with active subscriptions. Payment tokens are stored with the payment gateway and need supported export paths. A mistake here causes billing interruptions for your existing subscribers.
- Security-compromised sites that need malware remediation as part of the migration process.
Your options across the price spectrum
Professional migration help comes in several forms, and the right fit depends on your site’s complexity and budget.
- Hosting provider migration services are often included free with a new hosting plan. These work well for straightforward moves between standard WordPress environments, but they rarely cover custom database work or cross-platform transfers.
- Automated migration tools like Cart2Cart and LitExtension handle standard e-commerce data transfers well, typically costing $200–$500 depending on the number of products and order records. They are a solid middle ground for store owners moving product catalogs, customer records, and order histories between supported platforms.
- Curated freelancer platforms are the right choice when your migration requires vetted expertise and hands-on problem-solving for complex configurations.
- Full-service agencies serve enterprise-level needs where the migration is part of a larger digital transformation project.
Codeable for WooCommerce and WordPress migrations
For complex WordPress and WooCommerce migrations, Codeable — an official WooCommerce development partner — offers multiple migration packages, depending on your needs.
For custom or complex migrations, you can post a project and get matched with a vetted migration specialist within a day. Hourly rates run $80–$120 USD, and your expert will scope the project based on your specific requirements.
For straightforward store migrations, Codeable offers Full Store Migration packages starting at $2,000 that cover data and design preservation.
Both options include escrow payment protection, a 28-day bug-fix warranty, and access to specialists vetted through Codeable’s rigorous 6-step screening process, which accepts only the top 2% of WordPress developer applicants.
Your site is live, and your SEO is safe
A successful WordPress migration follows a predictable sequence: choose the right method for your site’s size and complexity, prepare your redirect map and metadata exports, protect your SEO before touching a single file, execute the transfer with the appropriate tools, point your DNS without downtime, and validate everything systematically before going public.
None of this requires drama. It requires a clear plan matched to your situation.
For WooCommerce stores or complex migrations where the stakes are high, Codeable’s vetted WordPress migration specialists can handle the entire move for you. Post your project today to get started!
20 000+ businesses of every shape and size have already trusted us to hire WordPress developers and scale their growth.
The post Website Migration to WordPress Without Breaking Your Site or Your SEO appeared first on Codeable.
]]>The post The Essential Roles and Responsibilities of a WordPress Developer appeared first on Codeable.
]]>Thankfully, this is where trained developers come in. A developer is important for implementing these intricate features, ensuring site security, and enhancing performance. In this article, we’ll look at the role of a WordPress developer, what they do, and see whether they are right for you. Whether you’re considering becoming one, hiring internally, or simply trying to understand how the role actually works in practice, we’ve got you covered.
What does a WordPress Developer do? Exploring core responsibilities
A WordPress developer is a software specialist who builds, customizes, and maintains websites on the WordPress platform, working across both the front end (themes, user interfaces) and the back end (PHP, databases, plugins, and server-side logic).
Unlike general front-end web developers who work across many platforms and frameworks, WordPress developers specialize in WordPress’s architecture, including its theme and plugin system, PHP-based hook system, and WordPress APIs. In practice, this means they are hired to build and launch WordPress sites, create custom functionality, fix errors, improve performance, and keep sites secure and reliable over time.
Hiring a WordPress developer is great when you need to create fully functional, high-performance websites. Their responsibilities include a variety of tasks, from creating new websites to troubleshooting errors and optimizing performance.
Building WordPress websites from scratch
Building WordPress websites from scratch can involve various approaches. While some developers choose custom development, not every project needs this. You might choose to have your site built from scratch if you prioritize top performance or if you anticipate needing specific functionalities that require a developer’s expertise to implement effectively.
A skilled developer will assess your requirements and recommend the most suitable approach, whether it involves custom development or using pre-built themes. They will then configure your website, from selecting the optimal hosting environment to installing appropriate plugins, ensuring it meets your needs efficiently.
From an initial client brief to a live site, WordPress development projects typically follow a structured workflow that moves through the following stages.
Obviously, it won’t be the exact same for every website, but the steps usually include:
- Project brief: Project briefs connect clients and developers, making it easier to communicate project goals and requirements. Clients express their objectives and desired features, giving developers information to define the project’s scope. While clients explain what they want to accomplish and the features they need, developers convert these into practical steps to effectively bring the project vision to life.
- Choosing hosting: Choosing a host involves more than finding the right environment; it involves configuring the setup to ensure optimal performance. This may include implementing a Content Delivery Network (CDN) if necessary and setting up control panel access for users. By tailoring the hosting environment and configurations to the website’s specific needs, developers ensure smooth operation and enhanced user experience.
- Custom theme development: Using development best practices to code custom themes that align with the project requirements.
- Choosing the right security tools: Protecting a website from potential threats and vulnerabilities requires selecting the right security tools, which may include firewalls, malware scanners, and secure authentication methods.
Building custom WordPress functionalities
Trained WordPress developers use programming languages like PHP, JavaScript, and others to build:
- Custom plugins that extend WordPress’s core capabilities allow developers to implement features like eCommerce, membership portals, or event management solutions tailored to the client’s requirements.
- Bespoke content management: Custom post types, taxonomies, and content management workflows allow clients to manage their content efficiently. WordPress developers can design intuitive interfaces and backend systems that streamline content creation and organization.
- Custom integrations using the WordPress API: Developers can use the WordPress API to integrate websites with third-party systems that lack a WordPress plugin. In day-to-day work, this often means building custom REST API endpoints, connecting WordPress to CRMs, ERPs, or payment systems, and synchronizing data between platforms to enhance the website’s functionality and data exchange capabilities.
- Adding custom code to existing template files: Developers can enhance website functionality by adding custom code snippets to template files such as functions.php. They can implement custom functionality like integrating social media feeds or implementing custom tracking scripts for analytics purposes, for example.
As you can see, HTML and CSS alone are not enough for professional WordPress development. PHP is required to build and customize themes, plugins, and WordPress core functionality. MySQL knowledge is needed to work with WordPress databases, including custom tables, queries, and stored content.
Most WordPress developers also work in local development environments such as Local by Flywheel, MAMP, or Docker to build and test sites safely before deployment. They use Git for version control and code editors like VS Code or PhpStorm to manage, review, and deploy changes across environments.
For complex custom builds, Codeable’s Consultation package can help teams get expert input on scope and feasibility before committing to full development.
Building new WordPress extensions: Plugins, themes, and modules
The community surrounding this popular Content Management System (CMS) is why there is so much innovation and dedication to the software. This innovation drives the WordPress ecosystem, and its developers are at the forefront of creating extensions that enhance the platform’s capabilities:
- Plugin development: From ideation to deployment, developers conceptualize, code, and test plugins that address specific needs. Adherence to WordPress coding standards ensures compatibility and reliability across diverse environments.
- Theme development: Custom themes can bring websites to life and reflect brand identity and user experience goals. WordPress developers design responsive and aesthetic themes that captivate audiences and provide navigation.
As career specializations, theme developers focus primarily on visual presentation, user experience, and front-end technologies such as HTML, CSS, and JavaScript. Plugin developers focus more on back-end logic, extending WordPress core functionality through PHP, custom data handling, and system integrations. Both paths require a deep understanding of WordPress coding standards, security practices, and the platform’s extensibility model.
Troubleshooting WordPress errors
Beyond building new features, a large part of a WordPress developer’s day-to-day work involves diagnosing and resolving technical issues across live sites. As with any software, WordPress websites may encounter errors and issues. Developers must be able to:
- Identify common errors: From the notorious white screen of death to plugin conflicts and database connection issues, developers encounter a variety of unique challenges that need to be addressed.
- Have effective problem-solving strategies: These experts use debugging tools (like WP_Debug and Query Monitor), log files, and their understanding of WordPress’s architecture to identify root causes and implement effective solutions.
Reviewing or debugging WordPress codebase
Maintaining the integrity of the codebase is important when protecting website performance and security. Developers do this by:
- Code review: Thorough code reviews are conducted to identify and rectify bugs, performance bottlenecks, and security vulnerabilities. Collaborative tools and peer feedback facilitate continuous improvement and adherence to best practices.
- Debugging techniques: Proficiency in debugging tools and plugins allows developers to navigate complex codebases. By isolating issues and tracing execution paths, developers expedite the resolution process and uphold the integrity of WordPress sites.
For businesses that want an expert-led assessment before committing to fixes, platforms like Codeable also offer Audit packages that help identify root causes and prioritize next steps.
Optimizing websites for performance and SEO rankings
In WordPress, performance optimization means improving load speed, responsiveness, and code efficiency through caching, compression, and clean execution.
Optimizing websites for performance and SEO rankings is important for ensuring a good user experience and maximizing visibility in search engines. A fast-loading, smoothly running website not only provides visitors with a positive user experience, encouraging them to stay longer on your site but also increases the likelihood of your website ranking higher in search engine results pages (SERPs) and attracting more organic traffic.
WordPress developers use optimization techniques to elevate this:
- Performance optimization: Caching mechanisms, image optimization, and script minification are just a few strategies to enhance website speed and responsiveness. By reducing load times and improving user experience, developers can help you boost engagement and retention on your website. Ongoing optimization also includes security hardening, since compromised or unstable sites are slow, unreliable, and vulnerable to search penalties. This typically involves configuring firewalls, running malware scans, enforcing SSL, and keeping WordPress core, themes, and plugins up to date.
- SEO best practices: WordPress developers closely monitor SEO best practices, optimizing site structure, implementing technical SEO audits, and incorporating schema markup into website code to provide search engines with more detailed information about the content to improve search engine rankings. Mobile optimization and compliance with accessibility standards further amplify the site’s reach and impact.
WooCommerce development
WooCommerce is a powerful eCommerce platform for WordPress. WooCommerce developers specialize in creating and managing online stores using this platform. A WooCommerce developer can help with:
- Customization: They customize online stores to fit each business’s unique needs, adding custom designs and features.
- Theme development: They create visually appealing and user-friendly themes for online stores.
- Plugin development: They develop custom plugins to add specific functionalities or integrate with other systems.
- Optimization: They optimize online stores for speed and performance, ensuring fast loading times and smooth navigation.
- Payment integration: They integrate secure payment gateways (like PayPal), allowing businesses to accept payments securely.
- Product and order management: They help businesses manage product catalogs and orders efficiently, including adding, editing, categorizing products, and streamlining the order fulfillment process.
For store owners, Codeable’s WooCommerce Audit package can surface storefront performance issues, checkout friction, payment and shipping misconfigurations, and HPOS readiness before investing in development.
Providing website maintenance and support
Ongoing maintenance and support tasks include:
- Routine maintenance: Regular updates, backups, and security checks protect WordPress sites against vulnerabilities and threats. Developers implement patches and security protocols to improve site defenses and ensure uninterrupted operation.
- Client support: WordPress developers assist clients with keyword updates, feature enhancements, and scalability initiatives.
WordPress developers are also expected to communicate clearly with non-technical clients about timelines, trade-offs, and technical limitations. They regularly scope work, translate business requirements into technical tasks, and manage expectations around cost, complexity, and delivery. Explaining technical issues in plain language and providing actionable recommendations is a core part of professional WordPress work. Strong client communication is especially critical for freelancers and agencies managing multiple projects and stakeholders at once.
Common types of WordPress developers
Within WordPress development, different roles represent distinct professional specializations that focus on different parts of the WordPress stack. The most common types of WordPress developers are Frontend, Backend, and Fullstack developers.
Frontend developers specialize in bringing designs to life and ensuring an engaging user experience. Their responsibilities include:
- User interface design: Crafting visually appealing interfaces that captivate users and reflect the brand’s identity.
- Theme customization: Customizing themes to align with client requirements, ensuring consistency and coherence across all pages. Unlike general front-end web developers, WordPress front-end specialists work inside the WordPress theme system, using PHP templates, the block editor, and theme hooks in addition to HTML, CSS, and JavaScript.
- Responsiveness: Ensuring websites function perfectly across various devices and screen sizes.
Backend developers, on the other hand, work behind the scenes, managing aspects such as:
- Server-side development: Handling server-side logic, implementing WordPress core functions, and ensuring smooth operation.
- Database management: Managing databases, optimizing queries, and ensuring data integrity and security.
- Architecture management: Designing and maintaining the architecture that powers the site’s capabilities, including scalability and performance optimization.
Fullstack developers combine front and backend development skills, making them versatile assets in WordPress projects. Their capabilities include:
- Project overhauls: Taking on project overhauls, from redesigning user interfaces to optimizing backend operations.
- End-to-end site creation: Creating websites from scratch, handling everything from initial concept to final deployment.
Exploring common income avenues for WordPress developers
WordPress developer compensation varies widely based on experience level, location, and whether someone works freelance, in an agency, or in a product company.For a detailed breakdown of real-world salary ranges across regions and career stages, see our guide on how much WordPress developers make.
Versatile skill sets can unlock multiple revenue opportunities, catering to different aspirations and career paths – but what are these, and what are some common income avenues for WordPress developers?
Opportunities span agencies, freelance marketplaces, SaaS companies, and product businesses building plugins, themes, and headless frontends on top of WordPress.
But it’s important to know that basic WordPress development skills can be learned in a few months with focused study and hands-on practice. Reaching expert level – where developers design architectures, build complex plugins, and solve production-scale problems – typically takes several years of real-world experience.
Building and selling WordPress extensions
Creating custom plugins and themes tailored to niche markets or broader audiences can be a lucrative income avenue for WordPress developers. The benefits of this include:
- Alignment with market demands: Successful extension development hinges on understanding current market demands and WordPress trends, ensuring relevance and appeal to potential buyers.
- Passive income potential: Sales on marketplaces or direct channels offer the potential for passive income streams, providing developers with ongoing revenue even after initial development efforts.
- Maintenance and updates: Regular maintenance and updates are essential to sustain sales and uphold customer satisfaction.
Working with a WordPress development agency
Joining a WordPress development agency offers benefits such as consistent work, team collaboration, and exposure to a diverse range of projects. Advantages include:
- Portfolio development: A great portfolio with relevant skills and experiences is important for attracting top-tier agency opportunities, highlighting past projects and achievements to demonstrate proficiency.
- Mentorship and professional development: Established agencies often provide mentorship and opportunities for professional growth, fostering a supportive environment for skill enhancement and career advancement.
- Compensation models: Agencies may offer various compensation models, including salary, contract-based arrangements, or profit-sharing options. Understanding current WordPress developer salary ranges can help developers negotiate fair compensation packages that provide flexibility and financial stability.
Working as a freelancer on a for-hire platform
Freelance WordPress experts are hired to build and redesign sites, customize plugins and themes, fix performance and security issues, configure WooCommerce stores, handle migrations, and provide ongoing maintenance. This makes freelancing one of the most versatile career paths in WordPress, covering both one-off projects and long-term site management.
Freelancing on for-hire platforms offers flexibility, diverse project opportunities, and control over workload and income potential. Things to think about are:
- Building reputation: Success on for-hire platforms hinges on building a strong reputation through client reviews, successful project completion rates, and active engagement within the platform’s community.
- Challenges and solutions: Freelancers have to think about irregular income, self-promotion, and time management, employing strategies to mitigate risks and maximize opportunities.
- Platform comparison: Numerous for-hire platforms are available to freelancers, each with its own fees, specialization areas, and community support. Comparing platforms such as Upwork, Freelancer, Toptal, and Codeable can help freelancers make informed decisions based on their preferences.
- Fees: Platforms like Upwork and Freelancer typically charge freelancers a percentage-based service fee on completed projects, meaning you have to give a certain amount of the money you have earned once you complete a project.
- Specialization: Niche platforms like Codeable focus exclusively on WordPress development, offering specialized opportunities for developers in this field. In contrast, general tech platforms like Upwork cater to a broader range of freelance services across various industries and sectors. These general platforms are generally saturated, making it harder to find work.
- Community support: Platforms with community support systems, such as Codeable, provide freelancers with access to a thriving community of fellow professionals, networking opportunities, and resources for skill development and career growth.
Codeable is dedicated exclusively to WordPress, offering a vetted network of developers, quality projects, and a reliable client-developer matching system.
As a developer at Codeable, you have the flexibility to set your own hourly rate for a project. The client then pays a 17.5% service fee on top of this to cover the cost of the platform. This means what you charge for a project is what you earn – a win/win for everyone!
Codeable: Your Leading Marketplace for WordPress Developers
When it comes to WordPress development, Codeable is the best place to start. With a commitment to excellence and a rigorous vetting process, Codeable matches clients with top-tier WordPress developers, ensuring quality and reliability every time.
For WordPress developers looking for somewhere to sell their skills and assist a diverse range of clients, Codeable is the perfect platform. Whether your focus is on theme customization, plugin development, or performance optimization, Codeable provides opportunities to apply a wide range of WordPress development skills.
Want to know more about how Codeable hires? Check out Codeable’s hiring policy for more information on how you could be part of the community, and what life inside the network really looks like.
If you’re wondering whether you should hire a WordPress developer to boost your site’s performance, you’re in the right place. A simple way to get started is with Codeable’s consultation package. It’s an easy, no-pressure way to talk through your project, clarify what you actually need, and understand your next best steps before committing.
When you’re ready, you can kick off your project with confidence and see what your WordPress site is truly capable of.
Get matched with the right developer who is a perfect fit for your WordPress and WooCommerce needs.
Start a projectThe post The Essential Roles and Responsibilities of a WordPress Developer appeared first on Codeable.
]]>The post WordPress SEO Audit Steps Experts Use to Fix Real Issues appeared first on Codeable.
]]>This guide covers what a complete audit includes, from crawlability checks to content analysis. It walks through methods for conducting one, whether you’re running plugin scans or working with an expert who interprets the data for you. And it explains the standard process professionals use to sequence fixes so each improvement builds on the last.
The steps here apply whether you’re running the audit yourself or evaluating what a specialist delivers. The goal isn’t a one-time checklist you forget about. It’s a repeatable system tied to measurable outcomes, which helps you understand why green lights in your SEO plugin can coexist with flat rankings and what to do about it.
Get matched with the developer
that is perfect fit for your WordPress or WooCommerce needs.
Start a project
What a WordPress SEO audit consists of
A complete WordPress SEO audit evaluates four interconnected layers: technical foundation, site speed, content quality, and site architecture. Each layer depends on the one before it. Fixing content issues while crawling problems persist means search engines may never see your improvements. Optimizing internal links before consolidating thin pages just redistributes weak signals.
This dependency chain also explains a common frustration: your SEO plugin shows green lights everywhere, yet traffic stays flat. Plugins check individual pages. They can’t diagnose site-wide patterns. Crawl waste from WordPress-generated archives goes undetected. Plugin conflicts that silently change your indexing rules won’t trigger a warning. Content cannibalization, where multiple posts compete for the same search term, stays invisible. REST API endpoints consuming crawl budget on large sites never get flagged.
Technical foundation: crawling and indexing
The audit starts here because nothing else matters if search engines can’t find your pages. This layer examines how search engines discover and process your site, including:
- Robots.txt configuration. Misconfigured rules can accidentally block important pages or waste crawl budget on irrelevant ones.
- XML sitemap accuracy. Your sitemap should list pages you actually want indexed, not outdated URLs, redirects, or pages marked noindex.
- Noindex settings across post types. WordPress lets you apply noindex rules to entire content types, such as tags, author archives, or attachment pages. The audit verifies these settings match your intent.
- Redirect chains. When one redirect points to another, which points to another, the chain wastes crawl budget and dilutes link equity.
- Canonical tags and domain resolution. Conflicting canonicals cause duplicate content issues, and your site should resolve all versions (http, https, www, non-www) to a single canonical URL.
WordPress often has specific issues that generic audits miss. Plugin conflicts can create competing meta robots rules. Sitemap bloat from auto-generated archives and attachment pages inflates your sitemap with low-value URLs. On larger sites, REST API endpoints and XML-RPC can consume crawl budget meant for your actual content.
Speed and Core Web Vitals
Google uses Core Web Vitals as a ranking signal, and visitors abandon slow pages before they see your content. The audit measures performance against three metrics:
- Largest Contentful Paint (LCP) measures how quickly the main content loads. Good LCP happens within 2.5 seconds.
- Cumulative Layout Shift (CLS) measures visual stability when late-loading elements push content around. A score below 0.1 is good.
- Interaction to Next Paint (INP) measures responsiveness when someone clicks or taps. Good INP is under 200 milliseconds.
WordPress-specific factors that shape these metrics include hosting and TTFB (shared hosting often struggles under traffic spikes), caching configuration (page caching and object caching via Redis or Memcached), theme and page builder overhead that loads unused CSS and JavaScript on every page, and uncompressed images, which are the most common cause of slow LCP.
Database bloat deserves particular attention. The wp_options table stores autoloaded settings retrieved on every page load. The wp_posts table accumulates revisions that slow down crawling and admin tasks. The wp_postmeta table often contains orphaned metadata from deleted plugins.
Content quality and cannibalization
Content cannibalization happens when multiple posts compete for the same keyword. Instead of one strong page ranking well, several weaker pages split the signal. The audit cross-references your content against Search Console data to identify queries where multiple URLs appear, or rankings fluctuate as Google switches between competing pages.
WordPress creates duplicate content issues that site owners often overlook. Category and tag archives generate pages with content that overlaps your main posts. Attachment pages, created for every uploaded image, are indexed by default despite having almost no content. Pagination splits archive pages across numbered URLs that search engines may treat as duplicates without proper canonical handling.
The audit also evaluates E-E-A-T signals (Experience, Expertise, Authoritativeness, Trustworthiness), checking whether author bios exist, sources are cited, and content delivers genuine value beyond keyword targets.
Site architecture and internal linking
Site architecture is the hierarchical structure of pages, navigation paths, and internal links that determines how authority flows through your site.
This layer evaluates how authority flows through your site. The audit examines orphan pages with no internal links pointing to them, click depth (pages buried four or more clicks deep signal lower importance to search engines), navigation structure alignment with business goals, and breadcrumb implementation for both user orientation and search engine context.
Many WordPress sites have weak internal linking because themes don’t promote content discovery by default. The audit identifies opportunities to add contextual links, connect pillar pages to supporting content, and direct internal links toward your most valuable pages.
Additional audit layers
Depending on your site’s goals, the audit may extend further.
- Schema markup review checks for validation errors, plugin conflicts, and missing structured data types that could qualify pages for rich results.
- Mobile usability testing evaluates tap targets, form functionality, and conversion points on actual devices.
- Backlink profile analysis assesses link quality patterns, flags potentially toxic links, and identifies broken outbound links.
- Behavioral analysis uses heatmaps and session recordings to reveal why users bounce, where they click, and how far they scroll, connecting technical findings to real user behavior.
Methods for conducting a WordPress SEO audit
Knowing what an audit covers is one thing. Deciding how to actually run one is another. You have three main options, each with different costs, time requirements, and depth of analysis. The right choice depends on your site’s complexity, your technical comfort level, and how much is at stake if something goes wrong.
Plugin-based scans
A plugin-based scan is an automated check performed by WordPress SEO plugins like Yoast, Rank Math, and AIOSEO. These tools provide on-page analysis, meta tag management, and basic site health checks that are valuable for day-to-day optimization. They catch missing meta descriptions, flag readability issues, and remind you to add alt text to images. For routine content publishing, they’re genuinely useful.
But plugins have significant blind spots. They check pages, but they don’t diagnose sites.
What plugin-based scans miss:
- Site-wide crawl patterns. Plugins can’t see how Googlebot moves through your site or where crawl budget gets wasted.
- Plugin conflicts. When two plugins create competing rules, such as one setting noindex while another sets index, your SEO plugin won’t flag it.
- Internal linking gaps. Plugins don’t map your site structure or identify orphan pages disconnected from the rest of your content.
- Core Web Vitals failures tied to hosting or themes. Your plugin might suggest optimizing images, but it can’t diagnose whether your slow LCP stems from server response time or theme bloat.
- Content cannibalization. Plugins analyze one page at a time. They have no view into whether five of your posts compete for the same keyword.
- User behavior signals. No plugin tracks rage clicks, scroll depth, or why visitors bounce from your highest-traffic pages.
Tool-assisted DIY audits
A tool-assisted DIY audit is a manual review that combines multiple external tools to catch issues plugins miss. Google Search Console provides indexing data and identifies crawl errors. Screaming Frog crawls your site the way search engines do, revealing redirect chains, broken links, and duplicate content. PageSpeed Insights measures Core Web Vitals against real user data.
Running these tools yourself gives you far more visibility than any single plugin. You can export crawl data, cross-reference it with Search Console queries, and identify specific URLs causing problems.
The limitation is interpretation. Tools provide data, but understanding what matters requires context. Screaming Frog might flag 200 issues, but which ten actually affect your rankings? Which can you safely ignore? That prioritization takes experience.
Tool-assisted DIY audits work well for:
- Sites under 50 pages where complexity is manageable.
- Site owners with technical comfort who can interpret crawl reports.
- Limited budgets where time is more available than money.
Expert-led audits
Professional audits use the same tools but add human interpretation, WordPress-specific diagnosis, and strategic prioritization. An SEO expert doesn’t just flag that your TTFB is slow; they identify whether the cause is hosting, database bloat, or a specific plugin and recommend the right fix.
This level of analysis becomes necessary when issues move beyond what you can solve from the WordPress dashboard. Database optimization often requires direct SQL queries. Theme evaluation means understanding how your template loads assets and whether switching would actually improve performance. Complex migrations need redirect mapping that preserves years of link equity.
Expert-led audits are appropriate for:
- Sites with heavy customization or custom post types.
- Plugin complexity where conflicts are likely.
- Business-critical traffic where mistakes cost revenue.
- Situations requiring diagnosis that automated tools can’t provide.
Professional audits deliver prioritized recommendations, explain why each issue matters, and often include walkthrough calls so you understand exactly what needs to happen next.
How to run a WordPress SEO audit
If you’re conducting your own audit, a clear sequence matters more than checking every possible item. The steps below follow the same order professionals use, and the process assumes you have access to Google Search Console, a crawling tool like Screaming Frog, and PageSpeed Insights.
Set aside a few hours for this. Rushing through an audit produces a messy list of issues with no sense of priority. Taking your time lets you document findings properly, group related problems together, and spot patterns that only emerge when you look at data across your whole site.
Step 1: Set up your tools and gather baseline data
Start in Google Search Console. Export your current indexing status from the Pages report and pull a list of queries you’re ranking for from the Performance report. This baseline gives you a reference point to measure improvements against.
Configure Screaming Frog to check response codes, canonical tags, meta robots directives, and page titles. If you have the paid version, connect the Google Analytics and Search Console APIs before crawling. This lets you cross-reference technical issues with actual traffic data to identify which errors affect revenue-generating pages.
Step 2: Audit crawlability and indexing
Run your crawl and work through these checks:
- Site operator search. Type site:yourdomain.com into Google to see what’s actually indexed. Look for pages that shouldn’t be there and note any important pages that seem missing.
- Search engine visibility. In WordPress, go to Settings > Reading and confirm “Discourage search engines from indexing this site” is unchecked.
- Robots.txt review. Check yourdomain.com/robots.txt for blocked resources. CSS and JavaScript should be crawlable.
- XML sitemap validation. In Search Console, review URLs that are “Submitted but not indexed” or “Excluded by noindex tag.”
- Redirect chains. Filter crawl results by 3XX status codes and flag any redirect pointing to another redirect.
- Domain resolution. Test all URL versions (http, https, www, non-www) to confirm they resolve to a single canonical version.
Enable near-duplicate detection in your crawl settings to catch cannibalization issues.
Step 3: Evaluate speed and Core Web Vitals
Run PageSpeed Insights on your homepage, top landing pages, and conversion pages. Prioritize field data over lab data, as field data reflects real user experience from actual visitors.
For failing metrics, trace WordPress-specific causes:
- Poor LCP. Check hero image size, server response time, and hosting quality.
- CLS failures. Look for images without dimensions, late-loading fonts, and ad units that inject after page load.
- INP issues. Review JavaScript from themes, plugins, and third-party scripts like chat widgets.
If TTFB is slow across your site, check database health. Post revisions and expired transients accumulate over time and drag down response times.
Step 4: Review content and internal linking
In Search Console’s Performance report, look for pages competing for the same queries—this signals cannibalization. Filter for keywords ranking positions 2 through 15 to identify “striking distance” opportunities where minor improvements might push you onto page one.
From your crawl data, identify:
- Orphan pages with no internal links pointing to them.
- Deep pages beyond four clicks from the homepage.
- Thin archives from tags, categories, or attachment pages.
Check that high-priority pages receive internal links from your strongest content.
Step 5: Check schema, mobile, backlinks, and user behavior
Run key pages through Google’s Rich Results Test to validate schema markup and catch conflicts between theme and plugin output.
Test mobile usability on actual devices to check tap target spacing, form functionality, and CTA visibility above the fold.
If backlinks are a concern, run your domain through Ahrefs or SEMrush. Look for patterns rather than individual links, and check for broken outbound links on your own site.
If you have heatmap tools like Hotjar or Microsoft Clarity, review high-traffic pages for rage clicks, scroll drop-off points, and ignored CTAs. This behavioral data reveals friction that technical audits miss.
Mobile usability testing
Don’t rely on desktop browser simulations. Test your site on actual phones and tablets.
Check these elements on real devices:
- Tap targets. Buttons and links need enough spacing that users can tap them accurately. If your menu items sit too close together, mobile visitors will hit the wrong link.
- Form functionality. Fill out your own contact forms and checkout flows on mobile. Test whether keyboards appear correctly, required fields validate properly, and submission actually works.
- CTA visibility. Can users see your call-to-action buttons without scrolling? On mobile, above-the-fold space is limited. Important conversion points need to appear early.
Backlink profile analysis
If link quality is a concern, run your domain through Ahrefs or SEMrush. The goal isn’t to review every individual link, because that’s impractical for most sites. Instead, look for patterns. Are your links coming from relevant sites in your industry, or from random directories and unrelated blogs? Is your anchor text distribution natural, or does it look manipulated?
Flag potentially toxic links if you see clusters from spammy sources, but don’t panic over a few low-quality links. Google is generally good at ignoring these. The disavow tool exists for serious problems, not routine cleanup.
While you’re checking backlinks, also review broken outbound links on your own site. Links pointing to pages that no longer exist create a poor user experience and can signal neglect to search engines.
User behavior analysis
If you have heatmap tools installed – Hotjar and Microsoft Clarity are popular options – review high-traffic pages for behavioral signals. These tools reveal friction that technical audits miss entirely.
Look for:
- Rage clicks. Users repeatedly clicking on elements that don’t respond usually indicates something looks clickable but isn’t, or a feature is broken or too slow to register.
- Scroll drop-off points. Where do visitors stop scrolling? If most users never reach your CTA at the bottom of the page, that placement isn’t working.
- Ignored CTAs. Buttons with zero or minimal clicks suggest they’re either invisible, confusing, or irrelevant to what visitors actually want.
This behavioral data connects your technical audit findings to real user experience. A page might pass every technical check and still fail to convert because visitors can’t figure out what to do next.
Step 6: Document findings
Compile issues into a single document grouped by audit layer. For each issue, record:
- The specific URL affected. Avoid vague notes like “some pages have slow LCP.”
- The issue itself. “Homepage LCP is 4.2 seconds due to uncompressed hero image” is actionable. “Site is slow” is not.
- The severity. Is this blocking indexation, hurting conversions, or a minor cleanup item?
This document serves as your input for prioritization; without it, audits become scattered notes that might go untouched.
How to prioritize and fix audit findings
An audit flags dozens of issues, sometimes hundreds. The value isn’t in the list itself. It’s in knowing what to fix first and what to ignore entirely.
Without prioritization, most audits stall. Site owners feel overwhelmed by the volume of problems and either tackle items randomly or freeze up and fix nothing. A clear framework turns that list into a sequenced action plan with realistic expectations about what moves your results.
The impact-effort matrix
Map each finding based on the value it delivers versus the resources required to fix it. This creates four categories that guide your decisions.

Quick wins (high impact, low effort): Fix these immediately. Examples include indexation errors on important pages, redirect chains wasting crawl budget, and meta title updates for keywords ranking positions 5 through 15.
Big bets (high impact, high effort): Plan these strategically with development and design resources and budget. Examples include hosting migration, theme replacement to fix Core Web Vitals, and content consolidation projects.
Fill-ins (low impact, low effort): Save these for slower periods when priorities are complete. Examples include broken links on low-traffic pages, alt text on old posts, and minor metadata improvements on archived content.
Avoid (low impact, high effort): Skip these entirely, as they pull resources from work that matters. Examples include chasing perfect plugin scores on low-traffic pages and optimizing content that gets ten visits per month.
Standard process for fixing issues
Sequence matters as much as prioritization. Fix foundational issues before dependent optimizations, or you waste effort on improvements that won’t stick.
- Crawlability and indexing first. Resolve robots.txt issues, fix redirect chains, and clean up sitemap errors. Nothing else matters if search engines can’t find your pages.
- Speed and rendering second. Address Core Web Vitals failures, especially LCP and CLS. Once pages are indexed properly, fast load times create the foundation for everything that follows.
- Content and architecture third. Consolidate cannibalized content, add internal links, and fix orphan pages. These changes build on a stable technical foundation.
- Schema and refinements last. Implement structured data, update meta descriptions for CTR, and polish mobile experience. These finishing touches enhance pages already performing at baseline.
For technical changes, such as PHP updates, plugin modifications, and theme adjustments, use a staging environment first. One incompatible plugin update can take down your entire site if pushed live without testing.
Monitoring cadence
Audits are point-in-time snapshots. Your site changes, Google’s algorithms change, and new issues emerge over time. Without ongoing monitoring, problems accumulate until the next audit reveals months of missed opportunities.
Set a monitoring schedule based on your site’s traffic and importance:
- Monthly checks for high-traffic sites. Review Search Console for new crawl errors, indexing drops, or ranking changes. Monitor Core Web Vitals for regressions after plugin or theme updates.
- Quarterly technical crawls to catch issues that develop gradually, such as redirect chains that grow link by link, orphan pages that accumulate as content expands, sitemap bloat as new archives appear.
- Annual full audits or after any major site change. Redesigns, migrations, hosting changes, and major plugin overhauls all warrant a fresh audit to catch problems before they compound.
The goal is catching issues early, when they’re quick wins, rather than letting them grow into big bets that require significant resources to fix.
When to call in experts
DIY audits fit straightforward sites under 50 pages where you have the technical comfort to run crawling tools, interpret the data, and implement fixes yourself. If your site uses standard themes and plugins without heavy customization, and you have the time to work through findings methodically, you can make real progress on your own.
Expert help becomes necessary when issues move beyond what you can solve from the WordPress dashboard, such as:
- Database bloat requiring direct SQL queries to clean up orphaned metadata or excessive post revisions.
- Theme replacement to fix Core Web Vitals failures baked into your current template’s architecture.
- Complex redirect mapping during migrations where years of link equity need preserving.
- Sites with custom post types, heavy plugin dependencies, or configurations where conflicts hide in places automated tools don’t flag.
These scenarios need human judgment that automated tools can’t replicate. Someone has to interpret what the data means for your specific situation and decide which fixes actually matter.
Finding that expertise isn’t straightforward. General SEO agencies often lack WordPress-specific knowledge, while WordPress developers may not understand search algorithms deeply enough to prioritize fixes correctly. You need someone who is technical enough to diagnose database issues and theme conflicts, strategic enough to know which problems actually suppress rankings.
Codeable connects you with vetted WordPress SEO experts who specialize in exactly this kind of work. Every developer on the platform passes a rigorous screening process, and you can review detailed profiles showing completed projects and client feedback before hiring. The single-price estimate model means no bidding wars or hidden costs; you get transparent pricing and direct communication with the specialist handling your audit.
Codeable offers three SEO packages to match different needs:
- Expert SEO Consultation ($59): A one-hour call with an SEO specialist covering your specific questions, competitor analysis, keyword research tips, and immediate steps to improve rankings. Ideal if you need strategic direction before committing to a full audit.
- Local or Small SEO Audit ($499): A complete technical audit for local businesses or sites under 20 pages. Includes Google and Bing Search Console checks, review of broken links, page speed, indexed pages, canonical tags, metadata, schema, Google My Business and citation checks, competitor and keyword research, link audit, and a follow-up call to discuss next steps.
- National or Large SEO Audit ($999): The same thorough analysis for sites with 20+ pages or national reach. Covers full technical review, search console checks, on-page elements, competitor research, link audit, and a consultation call for in-depth insights.
All three options give you expert interpretation and a clear action plan without ongoing retainer commitments.
At the end of the day, whether you run the audit yourself or bring in a specialist, the goal stays the same: identify what’s actually holding your site back and fix those issues in the right order. If your plugin scores look fine but rankings aren’t moving, the answers are usually hiding in site-wide patterns that page-level tools miss.
Start with a Codeable SEO consultation to get expert eyes on your specific situation, or book a full audit for a prioritized roadmap you can act on immediately.
20 000+ businesses of every shape and size have already trusted us to hire WordPress developers and scale their growth.
The post WordPress SEO Audit Steps Experts Use to Fix Real Issues appeared first on Codeable.
]]>The post From Shopify to WordPress – How It Works, What Breaks, and What It Really Costs appeared first on Codeable.
]]>This guide covers both paths — what each takes to execute, what breaks along the way, and what it actually costs. We separate integration from migration, providing the numbers and trade-offs you need to plan with certainty.
A quick note: This guide refers to self-hosted WordPress.org, not WordPress.com. WordPress.org gives you full ownership of your site’s code and database. WordPress.com is a managed hosting service with tiered plans and less control over your environment. For an e-commerce migration, self-hosted WordPress.org paired with WooCommerce is the standard path.
Integration vs. migration: understanding your options
Integration connects Shopify to WordPress using a plugin. Migration exports your data from Shopify and imports it into WooCommerce as a full platform replacement. These are completely different projects with different costs, timelines, and outcomes.
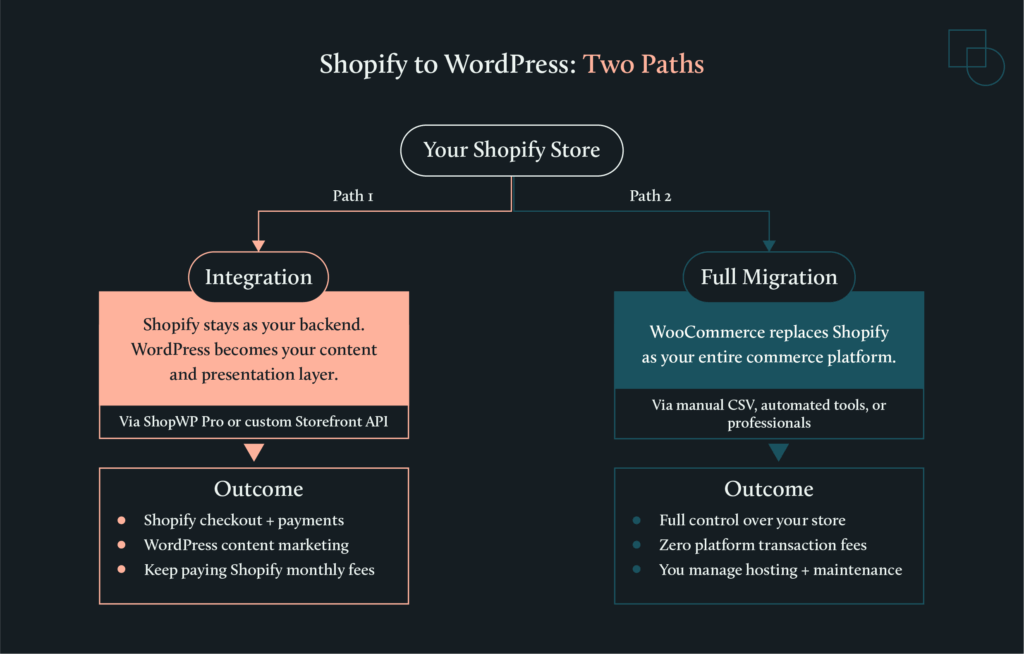
Integration keeps Shopify as your backend engine. Shopify handles your checkout, payments, inventory, and order management. WordPress becomes your content layer, giving you access to its advanced blogging and CMS tools to present your products alongside long-form content.
Migration is a total move. You export your data from Shopify and import it into WooCommerce. Once the move is finished, WooCommerce becomes your entire commerce platform. You gain full control over every part of your store and eliminate Shopify’s monthly platform fees, but you take on the responsibility of managing your own hosting and maintenance.
Methods to migrate or integrate Shopify with WordPress:
- Integration: Use the ShopWP Pro plugin to display products on WordPress while keeping Shopify for inventory management and secure checkout. (Note: Shopify’s official Buy Button has been deprecated and is no longer reliable. Shopify also has a native plugin that lets you sell on WordPress, where Shopify handles the backend checkout, and WordPress is the frontend CMS. However, this plugin is not very well-rated by existing Shopify users.)
- Manual Migration: Export your products, customers, and orders from Shopify via CSV and use WooCommerce’s built-in importer to move data for free.
- Automated Migration: Use tools like Cart2Cart or LitExtension to transfer standard store data in a few hours for a small fee.
- Professional Help: Hire vetted developers for complex stores with custom apps or high stakes to ensure a fixed-estimate, risk-reduced transition.
When each path makes sense
Choosing between these two depends on your business goals, your technical comfort level, and your annual revenue.
Integration fits when:
- You want WordPress for content marketing, but Shopify’s checkout and payment handling work well for you.
- You prefer managed infrastructure and don’t want to handle server security or software updates.
- Your store is running smoothly and isn’t hitting any of Shopify’s technical or design limitations.
- Your annual revenue is under $50,000. At this level, Shopify’s convenience usually outweighs the cost of its monthly fees.
Migration to WooCommerce fits when:
- You want to eliminate platform transaction fees. Shopify charges between 0.5% and 2% on every sale unless you use Shopify Payments. WooCommerce has zero platform fees, meaning you only pay your payment gateway’s standard rates.
- You have high revenue, such as $100k per month. At this scale, the savings from removing transaction fees can pay for the entire migration and your monthly hosting costs.
- You need deeper customization that Shopify themes and apps cannot provide. WooCommerce is open source, so you can modify any part of the code to build custom features or integrate with any third-party system.
- You want content and commerce on one platform. If SEO and blogging drive your sales, having one admin area for everything simplifies your daily work.
- You want total ownership and portability. With WooCommerce, you own your data and can switch hosting providers whenever you want. On Shopify, the platform controls your store’s environment, and if they change pricing or policies, your options are limited.
- You sell products with complex compliance requirements. CBD, vape, alcohol, firearms accessories, and supplements are allowed on Shopify but face significant restrictions, including mandatory attestations, Shopify Payments exclusions, and strict labeling rules. WooCommerce has no platform-level restrictions, giving you full control over compliance decisions (though payment processors and hosting providers may have their own policies).
To put this into perspective, imagine a small brand that is happy with Shopify’s secure checkout but feels frustrated because it can’t create the long-form articles it needs to rank on Google. For them, integration is the better move.
On the other hand, an established store paying over $200 per month in Shopify app fees, fighting against rigid design limits, and wanting to fully own their platform, should choose migration.
Method 1: Connecting Shopify to WordPress
Shopify-WordPress integration displays your Shopify products on a WordPress site while Shopify handles checkout, inventory, and order management. This lets you use WordPress’s content management strengths without giving up Shopify’s commerce infrastructure.
How to connect
The official “Shopify” plugin for selling on WordPress is not very well-rated, and the Shopify Buy Button, which relied on Shopify’s JavaScript Buy SDK, has become increasingly unreliable.
Shopify deprecated the Buy SDK’s underlying Checkout APIs, with critical functionality breaking as of July 2025. Many merchants report issues with altered code, cart persistence problems, and checkout failures.
The reliable option, at the time of writing this article, is ShopWP Pro, a third-party plugin that uses Shopify’s Storefront API rather than the deprecated Buy SDK. ShopWP Pro is now premium-only (the free version was discontinued years ago), with pricing starting at $199/year for a single site.
Here is the general process to get your store connected:
- Purchase and install ShopWP Pro: Download the plugin and install it on your WordPress site.
- Connect your Shopify store: Navigate to ShopWP Pro > Connect within the WordPress dashboard. This will initiate the process to connect the Shopify store as your backend.
- Install the ShopWP app on Shopify: Confirm the installation and click the ‘Connect Site’ button. Enter your WordPress site’s domain and confirm the connection. Go back to your WordPress site to check if the connection is successful. You should see the Shopify store name if the connection is active.
- Sync your products and data: ShopWP pulls all your product data from Shopify, including collections, variants, tags, images, metafields, etc., and stores it in WordPress. You can sync all products as a one-time activity or set up syncing at regular intervals.
- Display products on your site: Use ShopWP’s multiple display options, such as the Layout Builder, Gutenberg blocks, or shortcodes, to insert products and collections into your pages and posts.
Your Shopify store stays live throughout the entire setup. There is no downtime, so you won’t miss out on sales while you build your new frontend.
Headless commerce option
For brands that need total creative freedom or have development resources, you can use a “headless” architecture with Shopify’s Storefront API directly. In this setup, Shopify acts strictly as your product database and checkout engine, while WordPress serves as a fully custom presentation layer.
This method bypasses plugins entirely. Your developers write custom code to fetch product data from Shopify’s Storefront API and display it however you want on WordPress. It offers the highest level of speed and creative control, but it requires professional developer resources and ongoing maintenance.
| When headless makes sense: You have an in-house development team or budget for custom development. You need a highly customized storefront that plugins can’t achieve. You’re a large, content-heavy brand where performance is critical. You want to avoid plugin dependencies and subscription fees. | When ShopWP is the better choice: You want a working integration without custom development. Your budget doesn’t support ongoing developer maintenance. You need to launch quickly. Standard product display layouts meet your needs. |
Subdomain or main domain?
Before you launch your integrated site, you need to decide where your store will live. This decision affects your SEO.
- Subdomain (shop.yourdomain.com): This is often easier to set up technically. However, search engines may treat the subdomain as a separate entity, which can split your domain authority and make it harder to rank.
- Main domain (yourdomain.com/shop): Keeping everything on your main domain concentrates your SEO value in one place. It requires more careful URL planning to avoid technical conflicts, but it is generally better for long-term growth.
Method 2: Full migration to WooCommerce
A full migration exports your store data from Shopify and imports it into WooCommerce, which becomes your entire commerce platform. This is an “all-in” transition that gives you complete control, but it requires a clear plan to ensure you don’t lose data or revenue along the way.
What transfers and what you’ll rebuild
Data migration is rarely a clean “copy-paste” because Shopify and WooCommerce organize information using different database structures. You need to know what moves automatically and what requires a fresh start.
These items transfer reliably:
- Products: Your basic item details, descriptions, and categories move over, though images and variants need careful mapping.
- Customer records: Names, emails, addresses, and phone numbers transfer easily.
- Order history: Your past sales move over as records, though internal database IDs may change to avoid conflicts with existing WordPress content.
- Reviews: These can move if you export them from your current review app and import them into a compatible WooCommerce plugin.
These items require rebuilding:
- Customer passwords: Shopify uses proprietary encryption (hashing) that WordPress cannot read. You cannot migrate passwords. Plan a “welcome to our new site” email campaign asking customers to reset their passwords on first login.
- Payment and shipping settings: These configurations must be set up from scratch within the WooCommerce settings panel.
- Theme and design: Shopify themes use the Liquid templating language. WordPress themes use PHP. The two are incompatible, so you cannot export a Shopify design. You will need to choose a new WooCommerce theme and customize it to match your brand. Lightweight themes like Astra or GeneratePress are good starting points for stores migrating from Shopify’s Dawn theme. Stores using feature-heavy themes like Impulse may find Shoptimizer or Flatsome to be closer equivalents.
- App functionality: You must find reliable WooCommerce plugin equivalents for any Shopify apps you currently use.
These items never transfer automatically:
- Custom Shopify app data, specialized product configurators, and proprietary data models require professional help to move.
| Data Type | Status | Notes |
| Products & descriptions | ✅ Transfers | Basic product data moves reliably via CSV or automated tools. |
| Product images | ✅ Transfers | May require re-linking to variants in some cases. |
| Categories & tags | ✅ Transfers | Maps to WooCommerce product categories and tags. |
| Product variants | ✅ Transfers | Requires careful column mapping in manual CSV imports. |
| Customer records | ✅ Transfers | Names, emails, addresses, phone numbers move easily. |
| Order history | ✅ Transfers | Imports as records; internal IDs may change. |
| Reviews | ✅ Transfers | Export from review app → import to plugin. |
| Customer passwords | ⚠️ Rebuild | Shopify uses proprietary hashing – WordPress cannot decrypt. All customers must reset on first login. |
| Payment gateway setup | ⚠️ Rebuild | Configure from scratch in WooCommerce settings. |
| Shipping configuration | ⚠️ Rebuild | Recreate zones, rates, and rules in WooCommerce. |
| Theme & design | ⚠️ Rebuild | Shopify Liquid ≠ WordPress PHP. Choose a new theme and customize. |
| App functionality | ⚠️ Rebuild | Find WooCommerce plugin equivalents (e.g., Recharge → WooCommerce Subscriptions). |
| Tax rules & settings | ⚠️ Rebuild | Set up tax classes and rates in WooCommerce or use a tax plugin. |
| Custom Shopify app data | ❌ Never transfers | Requires professional custom development. |
| Product configurator logic | ❌ Never transfers | Must be rebuilt from scratch in WooCommerce. |
| Proprietary data models | ❌ Never transfers | Requires professional help to recreate. |
| Shopify Flow automations | ❌ Never transfers | Recreate using WooCommerce automation plugins or custom code. |
| Gift card balances | ❌ Never transfers | Manual process required; consider honoring balances separately. |
| Loyalty points / rewards | ❌ Never transfers | Export data and import into a WooCommerce loyalty plugin. |
Manual CSV import
Manual CSV migration is the free method of moving data from Shopify to WooCommerce. It is best for small catalogs with under 500 products, tight budgets, and owners who have time to spare.
Shopify to WordPress manual migration process:
- Export your products, customers, and orders from the Shopify Admin as CSV files.

- Use the built-in product importer in WooCommerce (found under Products → Import) to map Shopify’s column headers to WooCommerce’s fields.

- Note that Shopify uses different header names. For example, “Body (HTML)” maps to “Description” and “Option1 Value” maps to “Attribute 1.”
Challenges: Expect significant manual work to fix issues with product variants, custom fields, and images that don’t link correctly to specific variants.
Timeline and cost: This can take days or weeks of manual cleanup, depending on your store’s size. The cost is free in terms of money, but it will require a significant amount of your time.
Automated migration tools
Automated migration tools are the standard choice for stores with a typical setup that want to move quickly without custom development work.
How to migrate Shopify to WordPress with automated tools
Services like Cart2Cart or LitExtension connect to both platforms via API to handle the technical data transfer while your Shopify store stays live.

- What they handle: These tools move products, customers, orders, categories, reviews, and CMS pages.
- What they miss: They cannot move your theme design, custom app data, or payment configurations.
- Timeline and cost: The migration itself takes a few hours, though you still need time for testing. Costs typically range from $69 to $300, depending on the volume of data.
💡Tip: Most automated tools offer a free demo migration. Run the demo first to verify your data transfers correctly before committing to a paid migration.
Professional migration
A professional migration is best for complex stores where the cost of a technical failure is much higher than the developer’s fee. You should seek expert migration help if you use custom Shopify apps, have intricate data models, or lack the technical resources to manage the move yourself.
When hiring for a migration of this scale, you generally have three options:
- Open freelancer marketplaces (like Upwork or Fiverr) offer rates from $15 to $75 per hour, but the quality is unpredictable. You carry the risk of vetting the developer yourself, and there is often no post-project warranty.
- Full-service agencies provide project management, redundancy, and formal processes, but budgets typically start at $5,000 and can exceed $50,000 for enterprise projects.
- Vetted developer platforms like Codeable sit in between. You get access to pre-screened WooCommerce specialists at $80 to $120 per hour, with fixed-price estimates instead of open-ended hourly billing. Escrow protection and a 28-day warranty are built into the process, reducing your project risk.
Red flags when hiring: Be cautious of any developer who cannot clearly explain their migration process, lacks a portfolio of similar WooCommerce projects, or refuses to provide a fixed-price estimate.
Codeable’s WooCommerce migration packages include:
- Basic Store Migration: Starting at $2,000 for smaller stores moving from another platform.
- Advanced Store Migration: Starting at $4,000 for established stores with large catalogs and complex requirements.
- Custom Enterprise Migration: Custom quoting for large marketplaces or complex e-commerce operations.
- 1-hour Consultation: For $69, you can discuss your specific needs with a vetted WooCommerce developer before committing to a path.
All of these professional options include fixed pricing, escrow protection, and a quality guarantee.
Protecting your SEO and domain
SEO preservation during a Shopify-to-WordPress migration requires 301 redirects that map every old URL to its new WordPress equivalent. Without this step, every link indexed by Google will return a 404 error, and your search rankings can drop overnight.
Preserving rankings
Ranking loss usually happens because of broken redirects, changed URLs that aren’t mapped properly, site downtime, or slower page speeds. Because Shopify enforces a rigid directory structure (like /products/product-name) and WordPress permalinks are fully customizable (like /product/product-name), your links will almost certainly change.
To keep your traffic safe, follow these steps:
- Create a redirect map: Build a complete list mapping every old Shopify URL to its new WordPress equivalent before you launch. Crawl your existing Shopify site to ensure you capture every live URL.
- Use 301 redirects: Implement permanent 301 redirects, which tell Google that your pages have moved for good and to transfer their ranking power to the new links. Use a WordPress plugin like Redirection or add rules to your .htaccess file.
- Maintain metadata: Ensure your page titles and meta descriptions stay consistent or improve during the move. An SEO plugin like Yoast SEO or Rank Math gives you direct control over this.
- Test every link: Thoroughly test your redirects and monitor Google Search Console for any crawl errors in the weeks after going live.
- Match Shopify’s speed: Shopify provides a highly optimized, cached hosting environment. To maintain equivalent performance on WordPress, use quality managed hosting from providers like Kinsta or WP Engine. Budget $30 to $100 per month for hosting that keeps your page speed competitive.
Transferring your domain
You can keep your domain name when you leave Shopify. The process depends on where you bought it.
If you purchased your domain through Shopify, you will need to:
- Unlock the domain before you cancel your subscription.
- Get an authorization code and enter that code at your new domain registrar to begin the move.
- Watch for the 60-day lock. ICANN rules prevent you from transferring a domain if you bought or moved it in the last 60 days.
- Use a workaround if locked. If you are within the lock period, you can still launch your site by updating the DNS A records in Shopify to point to your new WordPress host. The domain stays registered with Shopify, but traffic flows to your new site.
🚨Important: Do not cancel your Shopify subscription until your domain transfer is fully complete. You need admin access to manage DNS records during the transition.
If your domain is already registered elsewhere (like Namecheap or GoDaddy), the process is simpler: just update your DNS records to point to your new WordPress hosting provider.
Costs: Shopify vs. self-hosted WooCommerce
WooCommerce software is free to download, but running a professional store requires hosting, extensions, and maintenance that replace Shopify’s bundled subscription. You are moving from a predictable monthly “tax” model on Shopify to a capital-heavy ownership model on WordPress.
Ongoing costs
Your monthly expenses will change depending on which platform you choose. Shopify offers convenience through managed services. WooCommerce offers lower fees in exchange for more responsibility.
| Cost item | Shopify | WooCommerce |
| Software/subscription | $39–$399+/month (not including Plus) | $0 (open source) |
| Hosting | Included | $30–$100+/month (managed hosting) |
| Transaction fees | 2.9% + 30¢ (+0.5%–2% if external gateway) | 2.9% + 30¢ (0% platform fee) |
| Key plugins/apps | ~$20–$50/month each | ~$75–$300/year each |
| Security and SSL | Included | Included in managed hosting |
| Maintenance | $0 | Variable (based on developer time) |
Note: These are recommended price ranges for typical small-to-midsize stores.
For small-to-medium-sized stores, Shopify’s convenience typically outweighs its fees. For stores with high transaction volumes and high earnings, the savings from eliminating Shopify’s transaction fees can be significantly high enough to cover the migration, hosting, and ongoing developer costs.
Migration costs
The cost to move your data depends on your store’s complexity and how much of the work you are willing to do yourself.
- Manual migration: Free in terms of money, but requires a significant investment of your own time to map columns and clean up data.
- Automated tools: Services like Cart2Cart generally cost between $69 and $300, with the price scaling based on the number of products and customers you move.
- Professional migration: For complex stores, hiring an expert is the safest route. Codeable projects typically use rates of $80 to $120 per hour, with basic store migrations starting around $2,000.
Hidden costs to budget for
Beyond the obvious migration fees, there are several costs that can catch store owners off guard if they aren’t prepared.
- Theme customization: You will need to spend time or money adjusting a new WordPress theme to match your existing brand identity.
- Plugin configuration: Setting up new WooCommerce equivalents for your old Shopify apps takes technical effort. Advanced features such as subscriptions or bookings incur separate licensing costs.
- Testing and QA: Budget time to test your checkout flow, shipping rules, and payment gateways on multiple devices. Check product display across browsers, verify customer account access, and confirm that order history is accurate.
- Post-launch fixes: Set aside a small contingency budget for any minor bugs or layout issues that appear in the first two to four weeks after launch. Most migration problems surface in this window.
Post-migration checklist
A successful launch does not end when your new site goes live. Use this checklist to verify everything is working correctly in the first weeks after migration.
- Test checkout flow: Complete a test purchase from start to finish on both desktop and mobile.
- Verify payment gateways: Confirm your payment processor is accepting and settling transactions correctly.
- Check product display: Review product images, variants, descriptions, and pricing across multiple browsers and devices.
- Confirm customer accounts: Verify that customers can create accounts, reset passwords, and view their order history.
- Monitor redirects: Watch Google Search Console for 404 errors and fix any broken redirects immediately.
- Review site speed: Run your new site through Google PageSpeed Insights and compare it to your old Shopify site’s performance. Address any issues with your hosting provider.
Support expectations vary depending on how you migrated. Automated tools typically provide limited support tickets. Unvetted freelancers may offer no post-launch support unless contracted separately. Codeable includes a 28-day warranty covering scope-related bugs. Full-service agencies typically include one to three months of post-launch support.
Next steps
Both paths, integrating Shopify checkout into WordPress or migrating fully to WooCommerce, require a clear plan to avoid technical pitfalls like broken SEO links or corrupted data.
If your store uses custom apps, specialized product configurators, or complex data models, attempting to handle the move in-house can lead to costly errors.
For these high-stakes projects, working with a professional WordPress developer ensures your migration is planned with precision and delivered with fixed estimates.
Not sure which path fits? A $69 consultation lets you talk through your requirements with an experienced WooCommerce developer before committing. All Codeable packages come with escrow protection, a quality guarantee, and a 28-day warranty.
Ready to start your move? Explore Codeable’s WooCommerce migration packages.
30 000+ businesses of every shape and size have already trusted us to hire WordPress developers and scale their growth.
The post From Shopify to WordPress – How It Works, What Breaks, and What It Really Costs appeared first on Codeable.
]]>The post How to Outsource Web Development the Right Way in 2026 appeared first on Codeable.
]]>Outsourcing looks like the obvious fix. It can be. But the horror stories that hold you back – projects that doubled in cost, developers who vanished mid-build, code so shoddy it had to be scrapped entirely – are also true.
The difference between outsourcing success and budget-burning failure usually comes down to decisions made before any work begins.
This guide covers that decision phase. You’ll learn what outsourcing actually delivers (and what it doesn’t), how to determine whether it fits your situation, and which engagement model (fixed price, time-and-materials, or dedicated team) best matches your project’s scope. We’ll also walk through how to evaluate vendors before you sign anything, so you can spot red flags early.
By the end, you’ll have a framework for deciding whether to outsource, what structure works for your requirements, and what to look for in a development partner.
When to outsource versus keeping work in-house
Outsourcing web development is the practice of hiring external talent to handle part or all of your development work. This can range from a single specialist fixing a specific bug to an entire team building your site from scratch. The arrangement delivers speed, specialized skills, and on-demand scaling without adding permanent headcount to your payroll.
Here’s what outsourcing does not do: it doesn’t eliminate the need for oversight, and it won’t make product decisions for you. Someone on your side still needs to define requirements, review deliverables, and approve milestones. The vendor executes, but you have to direct.
Why companies choose to outsource
The reasons businesses turn to external developers have shifted over the years. Cost savings still matter, but they’re no longer the only driver. Here’s what typically pushes organizations toward outsourcing:
- Converting fixed costs to variable expenses. Instead of carrying full-time salaries, benefits, and equipment costs year-round, you pay only for the work you need, when you need it.
- Accessing specialists you can’t hire full-time. AI integration, WCAG 2.2 accessibility compliance, and headless WordPress architecture are skills that command premium salaries. Outsourcing lets you tap them on a project basis.
- Moving faster through established workflows. Experienced vendors have built and launched dozens (sometimes hundreds) of similar projects. They’ve solved the problems you’re about to encounter.
When outsourcing makes sense
Certain scenarios strongly favor bringing in external developers rather than hiring internally:
- You’re building an MVP with limited runway. Startups with 90 days of funding can’t afford two months of recruiting followed by onboarding. Outsourcing gets work started within days.
- You need to scale without permanent hires. A major launch might require five extra developers for three months. Outsourcing lets you add capacity, then scale back without layoffs.
- Your team lacks specific expertise. WCAG 2.2 accessibility compliance requires 4.5:1 color contrast ratios and semantic HTML structure. AI integration demands prompt engineering skills. Headless WordPress needs React proficiency. Hiring full-time specialists for one-time needs rarely makes financial sense.
- Internal bottlenecks are delaying launches. When your existing developers are buried in maintenance work, outsourcing new builds keeps projects moving without burning out your team.
When should you keep development in-house?
Outsourcing isn’t always the right call. Some situations genuinely require permanent team members:
- The work is core to your ongoing operations. If web development is central to your product or revenue model and not just a support function, you need people who live and breathe your business daily.
- Proprietary knowledge must stay internal. Trade secrets, sensitive algorithms, or competitive advantages that shouldn’t leave your organization belong with employees bound by stronger confidentiality obligations.
- Constant iteration benefits from a deep institutional context. Products requiring daily adjustments based on a nuanced understanding of customer behavior, internal systems, or company strategy work better with developers embedded in your culture.
- You need immediate, unpredictable availability. When urgent fixes can’t wait for a contractor’s response time or time zone alignment, having someone on staff matters.
- Long-term cost math favors hiring. If you have consistent, full-time development needs stretching beyond 18–24 months, the economics often shift toward building an internal team.
The “missing middle” problem
Finding reliable development help is essentially choosing between agencies and specialized service providers.
Open marketplaces offer thousands of freelancers at rates ranging from $15 to $150 per hour. The sheer volume creates a race-to-bottom dynamic where low bids win, and quality varies wildly. You might land an excellent developer. You might also spend weeks vetting candidates, only to end up with missed deadlines and unusable code.
Traditional agencies sit at the other extreme. They deliver polished work with project managers, QA processes, and accountability, but their overhead pushes minimum project budgets to $25,000 or higher. For a mid-sized WordPress build, that pricing often doesn’t make sense.
Curated platforms exist to bridge this gap. Codeable, for example, focuses exclusively on WordPress projects. The platform accepts only 2% of developer applicants. Pricing uses a single-estimate model rather than competitive bidding. An escrow system holds funds until work is approved, and developers must fix in-scope bugs for 28 days after delivery. These structures provide agency-level safeguards without agency-level overhead.
Outsourcing vs. in-house development: Costs
Understanding the true cost of web developers requires looking beyond hourly rates and salaries.
Total cost of in-house developers
Salary is just the starting point. The fully loaded cost of an in-house developer, including benefits, equipment, software licenses, office space, and payroll taxes, runs approximately 2.7 times their base salary. For example, a developer earning $120,000 annually actually costs your company closer to $324,000 when everything is factored in.
Recruitment adds significant upfront expense. Agency fees typically run 15–30% of a candidate’s first-year salary. For that same $120,000 developer, expect to pay $18,000 to $36,000 just to make the hire. Time-to-hire for engineering roles averages 5 to 8 weeks. During that vacancy period, projects stall, existing team members pick up the slack, and launch dates slip.
Retention creates ongoing cost exposure. Every departure triggers another recruiting cycle, plus onboarding time before the new hire becomes fully productive.
How outsourcing changes the math
Outsourcing converts these fixed liabilities into variable, predictable expenses. You pay for deliverables or hours worked, not benefits, not equipment, not office space. The vendor handles recruitment, training, and infrastructure on their end. If a developer leaves their team mid-project, they provide a replacement from their bench. That’s their problem to solve, not yours.
What developers cost by region
Rates vary significantly depending on where your developers are located. Here’s what to expect:
- North American developers charge $100–200 per hour. Premium rates reflect high local costs and strong IP protections.
- Western European developers charge $80–150 per hour. Similar quality to North America, with GDPR compliance built into their workflows.
- Eastern European developers charge $50–100 per hour. Poland, Ukraine, and Romania offer strong technical education and rigorous engineering culture.
- Latin American developers charge $40–80 per hour. Mexico, Brazil, and Colombia align well with US time zones, ideal for real-time collaboration.
- South and Southeast Asian developers charge $25–60 per hour. India, Vietnam, and the Philippines deliver scale and cost efficiency for larger projects. However, time zone alignment can be an issue.
Typical WordPress projects range from $5,000–25,000, depending on complexity, the number of custom features, and the third-party integrations required.
A note for technical readers
If you can evaluate code quality yourself, including reviewing pull requests, assessing architecture decisions, and spotting security issues, curated platforms offer something different than hand-holding. They give you access to vetted talent pools and faster matching without the vetting burden falling on you. You’ll likely prefer time-and-materials billing and run standups yourself rather than paying for project management overhead.
Should I outsource or hire in-house for a website?
The right choice depends on your timeline, budget, project duration, and internal capacity. Here’s how the two options compare:
| Factor | Outsourcing | In-house hire |
|---|---|---|
| Time to start work | Hours to days. | 5 to 8 weeks average. |
| Upfront cost | Project deposit or first sprint. | $18,000–$36,000 recruitment fees. |
| Ongoing cost structure | Variable – pay per project or hour. | Fixed – salary plus 1.42x multiplier. |
| Flexibility to scale | Add or remove capacity as needed. | Layoffs required to scale down. |
| Specialized skills | Access global experts on demand. | Limited to who you can recruit locally. |
| Knowledge retention | Ends with engagement unless documented. | Stays with organization. |
| Management overhead | Some oversight required. | Full integration into the team and culture. |
| Risk if person leaves | Vendor provides replacement. | New recruiting cycle begins. |
Outsource when you need to move fast, require specialized skills for a defined period, or can’t justify the fully loaded cost of a permanent hire. Keep work in-house when the role is core to your ongoing operations, involves proprietary knowledge that shouldn’t leave your organization, or requires constant iteration that benefits from deep institutional context.
For WordPress projects specifically, Codeable experts typically respond within hours and complete full project scoping in roughly a day. Compare that to 5 to 8 weeks of recruiting for an in-house hire, and the time-to-first-useful-work difference becomes significant, especially when launch dates are fixed and the runway is limited.
Choose the engagement model that fits your scope
The engagement model you select determines how you’ll pay, how much flexibility you’ll have, and who carries the risk if things change mid-project. Most outsourcing failures stem from picking a model that doesn’t match how stable (or unstable) your requirements actually are. Get this decision right, and everything else becomes easier.
Fixed price
Fixed price outsourcing is an engagement model where the total project cost is set upfront regardless of actual hours worked. You agree on deliverables, timeline, and budget before work begins. The vendor commits to that number.
This model works best when your project scope is completely defined and won’t change. A five-page marketing site with approved designs, a landing page with a locked creative brief, or a straightforward WooCommerce setup with known requirements – these are ideal fixed-price candidates.
The trade-off is limited flexibility. Once the scope is set, changes require formal change requests with additional costs. If you’re still figuring out what you want, a fixed price will frustrate both you and your developer.
Time and materials
Time-and-materials outsourcing is an engagement model in which you pay for actual hours worked and any direct costs incurred. There’s no predetermined total as the final cost depends on how long the work takes.
Choose time-and-materials when requirements will evolve based on user feedback. A site redesign where discovery is ongoing, an MVP that will pivot based on early testing, or a complex integration where unknowns will surface during development. These situations need flexibility that a fixed price model can’t provide.
One shift worth noting: AI efficiency gains are changing how some vendors approach hourly billing. If AI tools let a developer complete a 10-hour task in 3 hours, pure hourly billing penalizes efficiency. Some vendors now offer outcome-based pricing, where payments are triggered by delivered milestones rather than hours logged. Ask about this during vendor conversations.
Dedicated team
A dedicated team engagement is a model where contracted developers work exclusively on your projects over an extended period. You get consistent people who learn your codebase, understand your business context, and operate as an extension of your internal team, without the hiring overhead.
Use dedicated teams for ongoing work lasting three months or longer. Six months of iterating on a membership site, continuous WooCommerce enhancements, or long-term product development all fit this model well. You maintain oversight and direction while the vendor handles HR, benefits, and backfill if someone leaves.
Matching your situation to the right model
The decision framework is straightforward:
- Choose fixed price when the project scope is completely frozen.
- Select time and materials when requirements will evolve based on user feedback.
- Use dedicated teams for ongoing work lasting three months or longer.
Fixed price vs. time and materials for web development
| Model | Best for | Budget control | Flexibility | Risk bearer |
|---|---|---|---|---|
| Fixed price | Locked scope, clear deliverables. | High; cost set upfront. | Low; changes cost extra. | Vendor |
| Time and materials | Evolving requirements, discovery phases | Variable; depends on hours. | High; adjust as you learn. | Client |
Where Codeable fits
Codeable operates as a curated platform focused on WordPress and adjacent technologies like React. Developers on the platform charge $80–120 per hour. The platform adds a 17.5% service fee to all projects. Instead of competitive bidding, you receive a single-price estimate based on expert assessment of your requirements.
Payment flows through escrow, and funds are held until you approve the completed work. Developers must fix in-scope bugs for 28 days after delivery. These mechanics provide agency-level accountability without agency-level minimums.
For buyers unsure where to start, Codeable offers fixed-price packages for common needs: site maintenance, performance audits, WooCommerce setup, and security reviews. These remove the guesswork of scoping a custom project. A consultation package is often the smartest first step, so you get expert direction on what your project actually requires before committing budget to a full build.
Vetting vendors before you commit
Vendor selection is where outsourcing projects succeed or fail. The work you do before signing a contract matters more than anything that happens after. A thorough vetting process takes time upfront but prevents expensive surprises later.
What should be in a web development contract?
A professional vendor contract should include IP assignment clauses, a milestone-based payment structure, a defined change request process, and clear warranty terms. These are NOT negotiable extras, but rather baseline indicators that a vendor operates professionally. If any of these elements are missing or vague, treat it as a warning sign.
Ask specifically about:
- IP assignment. Who owns the code after delivery? The answer should be you, unambiguously, with no licensing restrictions.
- Payment milestones. Payments should tie to delivered work, not calendar dates. A typical structure might be 25% upfront, 50% at development completion, and 25% after launch approval.
- Change request process. How are scope changes handled? What’s the approval workflow? What are the cost implications? Get this documented before you need it.
- Warranty terms. What’s covered after launch? For how long? What falls outside the warranty scope?
Scope clarity
Vendors should articulate exactly what’s included and excluded in their estimate. Look for specificity on deliverables, third-party integrations, and performance targets. A solid estimate specifies the exact pages being built, identifies which plugins or APIs will be integrated, and sets measurable benchmarks, such as “Largest Contentful Paint under 2.5 seconds.”
Vague estimates lead to disputes. If a vendor can’t tell you precisely what you’re getting, they can’t deliver it reliably either.
Quality benchmarks
Ask how vendors approach technical quality. Specifically:
- Core Web Vitals. What are their targets for LCP, INP, and CLS? How do they test and optimize?
- WCAG 2.2 compliance. Do they build to Level AA standards? WCAG 2.2 AA compliance requires 4.5:1 color contrast ratios, keyboard navigation support, and proper heading hierarchy.
- Code review practices. Do they use pull requests? Automated linting? Peer review before deployment?
Request sample work from similar projects. Ask for a code review checklist if they have one. Quality-focused vendors will share these materials readily.
AI governance
AI tools now generate significant portions of production code. This creates a new risk category: “Shadow AI.” If a developer pastes your proprietary code into a public LLM like ChatGPT to debug it, that code may enter the model’s training data. Your business logic becomes exposed.
Ask vendors directly: How do you govern AI tool usage? Enterprise-grade vendors use private AI instances that don’t retain data. They maintain explicit contractual prohibitions against public LLM usage for client work. They train their teams on what’s permitted and what isn’t. If a vendor can’t articulate their AI governance policy, they probably don’t have one.
Communication and capacity fit
Consider practical collaboration factors:
- Time zone overlap. How many shared working hours do you have? Real-time communication matters more for agile projects than for fixed-scope builds.
- Response time expectations. What’s their standard turnaround for messages? For urgent issues?
- Your internal capacity. Do you have someone available to answer questions, review work, and make decisions promptly? Outsourcing doesn’t mean zero involvement.
Real-time AI translation tools have dissolved most language barriers, but cultural alignment still matters. Communication styles, holiday schedules, and working norms vary by region. Factor these into your decision.
Post-launch terms
Understand what happens after the project ends:
- Warranty window. How long does coverage last? What qualifies as a bug versus a new feature request?
- Ongoing support options. Is maintenance available? At what rates? With what response times?
- Continuity risk. What happens if your primary developer becomes unavailable? Does the vendor have backup resources familiar with your project?
Start small to test fit
Before committing to a full build, consider a low-stakes entry point. A small initial project lets you evaluate code quality, communication responsiveness, and working style without betting your entire budget on an unknown relationship.
Red flags that should kill a deal
Some warning signs are obvious only in hindsight. Others are visible before you sign, if you know where to look. These red flags should make you pause, ask harder questions, or walk away entirely.
🚩Vague scope in estimates
A professional estimate names specific deliverables. It lists exact pages, identifies which integrations are included, and sets measurable performance targets. If a vendor’s proposal reads like “build website per discussions” or “development as needed,” you’re looking at future disputes.
Don’t confuse vagueness with flexibility. Rather, it’s a lack of clarity that will cost you later. When expectations aren’t documented, every ambiguity becomes a negotiation. Budget overruns follow.
🚩Lowest-cost positioning
The cheapest bid rarely delivers the best outcome. Open marketplaces create race-to-bottom dynamics where winning work requires undercutting competitors. That pressure has to go somewhere, and it usually manifests as corners cut, tests skipped, or documentation ignored.
This is the classic agency-versus-freelancer dilemma playing out in real time. Agencies charge more but provide project management, QA processes, and accountability structures. Cheap freelancers offer lower rates but leave you managing quality control yourself. When a freelancer’s bid seems too good to be true, you’re often paying the difference later in revision cycles, missed deadlines, or code that needs to be rebuilt entirely.
Premium pricing correlates with accountability. Vendors charging sustainable rates can afford to do the job properly. They have the margin to fix problems without fighting you on every revision. This doesn’t mean expensive always equals good, but suspiciously cheap should trigger scrutiny.
🚩No references or portfolio gaps
Reluctance to share past work signals risk. So does an inability to connect you with previous clients. Every experienced vendor has projects they’re proud of and clients willing to vouch for them.
Ask for references on projects similar to yours. Contact them. Ask what went well, what didn’t, and whether they’d hire the vendor again. If a vendor can’t or won’t provide this, find out why, or find someone else.
🚩Unclear communication norms
How quickly should you expect responses? Who’s your primary contact? How often will you meet? What channels will you use?
If these questions aren’t addressed before signing, assume the answers won’t improve after. Communication breakdowns cause more project failures than technical shortcomings. A vendor who won’t commit to response times and meeting cadence upfront is telling you something about how they operate.
🚩Overpromising on timeline
When a vendor promises aggressive timelines without discussing scope trade-offs, prepare for one of two outcomes: missed deadlines or compromised quality. Usually both.
Realistic timelines account for discovery, revisions, testing, and the unexpected issues that surface in every project. If a vendor’s estimate sounds too fast, ask what they’re assuming. Ask what happens if those assumptions prove wrong. Optimism isn’t a project plan.
🚩No AI governance policy
If you ask about AI governance and get a blank stare or a vague answer, that vendor hasn’t thought through the risks. Your proprietary code could end up in training datasets. Your competitive advantage could leak. This is an operational reality that professional vendors address explicitly.
🚩Assuming “vetted” guarantees perfection
Curated platforms reduce risk. They don’t eliminate it. Even with rigorous vetting, individual developers vary in communication style, availability, and fit for your specific project.
Platform reputation isn’t a substitute for your own due diligence. Conduct fit checks. Review portfolios. Have a real conversation before committing. Establish clear expectations in writing. The vetting process got them onto the platform, but your process determines whether they’re right for you.
Red flags at a glance
| Warning sign | What it looks like | Why it matters |
|---|---|---|
| Vague scope | “Build website per discussions” with no specifics. | Undefined deliverables become budget disputes. |
| Lowest-cost positioning | Bids significantly undercutting market rates. | Corner-cutting and quality compromises follow. |
| No references | Reluctance to share past clients or similar work. | Hides a poor track record or a lack of experience. |
| Unclear communication | No commitment to response times or meeting cadence. | Problems surface too late to fix affordably. |
| Overpromised timeline | Aggressive deadlines without scope trade-offs. | Missed dates or rushed, buggy deliverables. |
| No AI governance | Can’t explain policies on LLM usage or data handling. | Your proprietary code could leak to public models. |
| Over-reliance on “vetted” | Skipping due diligence because the platform is reputable. | Platform vetting doesn’t guarantee individual fit. |
Making the call
You now have a framework for outsourcing web development without guesswork. Match your engagement model to your scope stability. Pick your vendor type based on budget, internal technical capacity, and project complexity.
You’ve got the triggers that signal when outsourcing makes sense, the cost benchmarks to evaluate quotes, the model options to structure engagements, and the evaluation criteria to vet vendors before signing.
For WordPress projects where you’re unsure where to begin, Codeable’s fixed-price packages offer a low-risk starting point. Maintenance engagements, performance audits, security reviews, and WooCommerce setups let you test the waters without scoping a full custom build. A consultation package gets you expert direction on what your project actually requires – before you commit significant budget.
Once you have that clarity, post your project and move forward with confidence.
30 000+ businesses of every shape and size have already trusted us to hire WordPress developers and scale their growth.
The post How to Outsource Web Development the Right Way in 2026 appeared first on Codeable.
]]>The post WordPress White Screen of Death Causes and Quick Fixes Explained appeared first on Codeable.
]]>The WordPress white screen of death (WSoD) is a blank page that appears when PHP encounters a fatal error from plugin conflicts, memory exhaustion, or corrupted files, stopping execution before rendering any page content. It’s one of the most common WordPress errors, and one of the most unnerving because it offers zero clues about what went wrong.
Unlike a 404 page or a database connection error, the WSoD doesn’t point you in any direction. Your browser might show “This page isn’t working” or simply render nothing at all. The site looks completely offline to your visitors, and you can’t tell if the problem is a simple fix or something more serious.
Fortunately, this is a common WordPress issue and is almost always fixable.
This guide walks you through diagnosing and resolving the WSoD, whether or not you still have access to your WordPress admin dashboard. You’ll learn how to enable debugging to reveal the actual error, isolate plugin and theme conflicts, increase memory limits, and restore corrupted files. You’ll also learn when a problem exceeds basic troubleshooting and requires expert help.
🚨Note: This guide assumes you can access your hosting file manager or connect via FTP to view your WordPress installation files. You don’t need advanced coding skills, but you should be ready to rename critical folders and edit configuration files.
What is the WordPress white screen of death?
The WordPress white screen of death (WSoD) is a blank browser page caused by a fatal PHP error that stops WordPress from executing before any content can render. In newer WordPress versions (5.2 and later), you might instead see a “There has been a critical error on this website” message, but the underlying cause is the same. WordPress runs on PHP, a server-side programming language. When PHP encounters a fatal error, such as a missing file, a syntax mistake, or a memory shortage, it stops running immediately.
On production servers, error messages are hidden from visitors for security reasons. So instead of seeing a helpful error message, your browser receives… nothing. Just an empty response.
The crash usually occurs during WordPress’s startup sequence, when the system loads critical files in this order:
- wp-config.php loads first with your database credentials and site settings.
- Plugin files load next, executing any code they contain.
- Theme files load last, including functions.php, where custom code often lives.
If any file in this chain triggers a fatal error, everything after it fails to load, including the HTML that would normally display your site.
Different browsers interpret this empty response differently. Chrome might show “This page isn’t working” with an HTTP 500 error. Firefox often renders a completely blank white page. Safari may display a connection error. These variations can make the WSoD confusing to identify, but the root cause is identical across all browsers.
The key insight here is that your browser can’t diagnose this problem. It only knows the server didn’t respond with a webpage. To find out what actually went wrong, you need server-side diagnostics, specifically, WordPress debug mode, which we’ll cover in the fix section below.
What causes the WordPress white screen of death?
The WordPress white screen of death appears when PHP encounters a fatal error from plugin conflicts, theme problems, memory exhaustion, or corrupted files. Here are the most common causes:
- Plugin conflicts. A recently installed or updated plugin clashes with your WordPress version, PHP version, or another plugin. This is the most frequent cause of WSoD, particularly after automatic updates run overnight.
- Theme errors. A syntax error in your theme’s functions.php file, often from a missing semicolon or mismatched bracket, crashes PHP immediately. Theme incompatibility with your server’s PHP version can also trigger this.
- PHP memory exhaustion. Your site runs out of allocated memory while processing a request. This happens frequently with WooCommerce stores, page builders, or sites running many plugins simultaneously. The default WordPress memory limit of 40 MB isn’t sufficient for resource-intensive operations.
- Corrupted core files. A failed automatic update can leave WordPress core files truncated or missing entirely. If the update process was interrupted by a server timeout, critical files may be incomplete.
- Corrupted .htaccess file. A syntax error in your .htaccess file or an infinite redirect loop prevents Apache from properly processing requests.
- Failed update lockout. WordPress creates a temporary .maintenance file during updates. If an update is interrupted, this file may remain in your root directory, blocking access to your entire site.
- PHP version incompatibility. Your server’s PHP version is either too old or too new for your installed plugins or themes. Some older plugins break on PHP 8.x, while outdated PHP versions lack features newer plugins require.
- File permission issues. The server can’t read the required PHP files because permissions were changed during a migration, a backup restore, or a hosting switch. Folders need 755 permissions, and files need 644 permissions for WordPress to function.
How to fix the WordPress white screen of death
If your WordPress site shows a white screen, start by checking whether you can access your admin dashboard at yourdomain.com/wp-admin. If the admin loads but your frontend doesn’t, the problem is likely theme-related. If both are inaccessible, a plugin conflict or memory issue is more probable.
The fixes below are ordered from least invasive to most invasive. Start at the top and work your way down, as most WSoD issues resolve within the first few steps. Each method targets a specific cause, so the error message you uncover (once debugging is enabled) will point you toward the right solution.
Before making any changes, read the backup section first. One wrong edit can compound the problem, and having restore points means you can always undo your work.
Before you start: back up everything

Before editing any files, download copies of the three files you’re most likely to modify: wp-config.php, .htaccess, and your theme’s functions.php. Save these to your local computer so you can restore them if something goes wrong.
If your hosting provider offers one-click backups through cPanel, Plesk, or a custom dashboard, create a full site backup now. This captures your database and all files in their current state, because even a broken state is better to have saved than lost entirely.
Improper edits during troubleshooting can turn a simple fix into extended downtime. A missing character in wp-config.php or an accidental deletion can create new errors on top of the original problem. With backups in place, you can always restore and start fresh.
💡If you’re uncomfortable connecting via FTP or editing PHP files directly, this is a reasonable point to consider professional help. Codeable’s WordPress experts can diagnose WSoD issues and provide a fixed-price estimate, typically responding within a few hours.
Enable WordPress debugging mode
WordPress debugging is a mode that replaces blank screens with specific error messages showing the problematic file and line number. By default, WordPress hides these errors on live sites for security reasons. Turning on debug mode makes the actual problem visible.
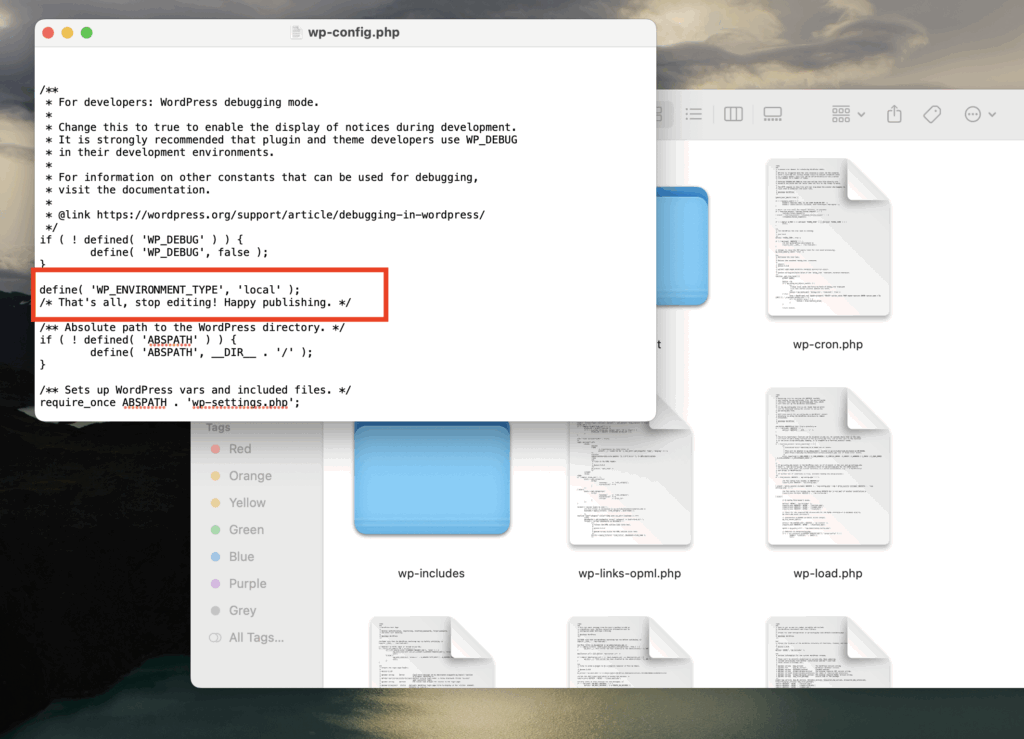
- Connect to your site via FTP or your hosting file manager and open
wp-config.phpfrom your site’s root directory. - Look for the line that says
/* That's all, stop editing! Happy publishing. */and add the following code just above it:
define( 'WP_DEBUG', true );define( 'WP_DEBUG_LOG', true );define( 'WP_DEBUG_DISPLAY', false );
- This configuration logs all errors to a file at
/wp-content/debug.logwithout displaying them publicly on your site. Your visitors won’t see error messages, but you’ll have a complete record of what’s failing. - Save the file and reload your website.
- Then navigate to
/wp-content/via FTP and download thedebug.logfile. - Open it in any text editor and search for “Fatal error” entries. These lines specify exactly which file and line number caused the crash.
- Common error messages you might find:
- “Allowed memory size exhausted” means your site needs more PHP memory.
- “Call to undefined function” indicates a missing plugin or corrupted file.
- “Parse error: syntax error” points to a typo in PHP code, usually in functions.php or a plugin file.
The error message tells you where to focus your fix. If it names a plugin file, you have a plugin conflict. If it references your theme, that’s your culprit.
How do I fix the white screen without admin access?
If you can’t access wp-admin, disable all plugins by renaming the plugins folder via FTP. This forces WordPress to deactivate every plugin at once. This method works because WordPress can only run plugins it can find. When the folder name changes, WordPress treats all plugins as missing and skips them during startup.
- Connect to your server via FTP (using FileZilla, Cyberduck, or your hosting file manager) and navigate to
/wp-content/. - Find the folder named
pluginsand rename it toplugins_old. - Now reload your website.
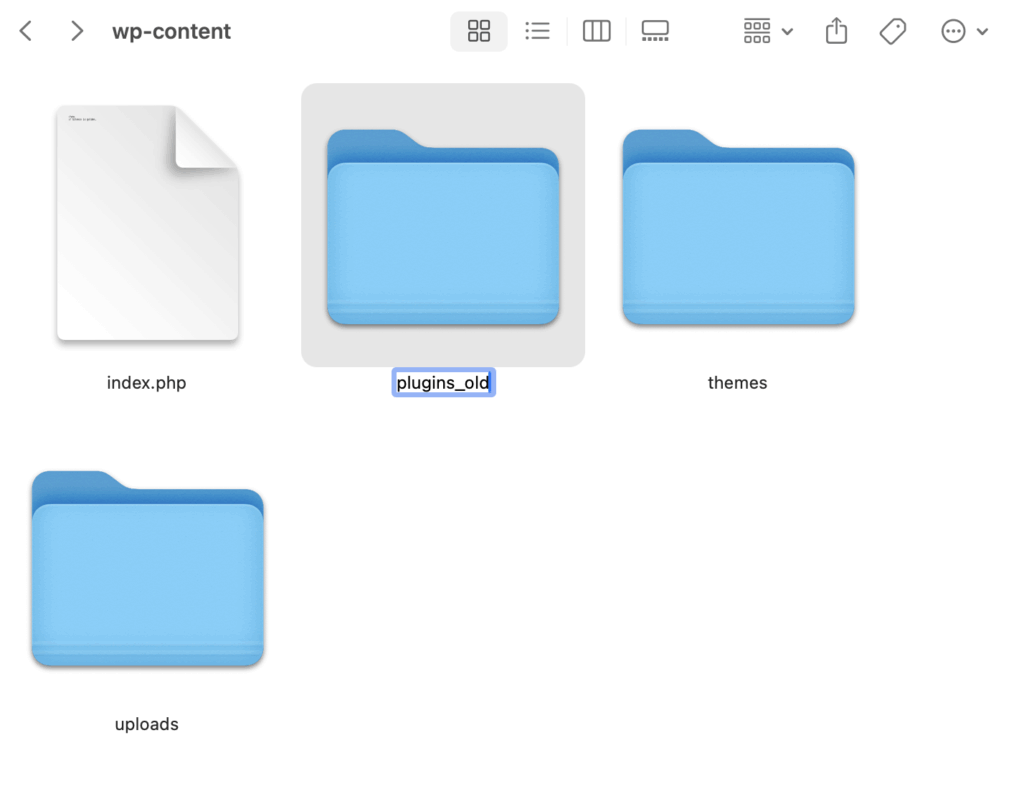
If your site loads: A plugin caused the crash. You’ve confirmed the problem category; now identify which specific plugin is responsible.
- Rename
plugins_oldback toplugins. Your site will break again, that’s expected. - Now go inside the plugins folder and rename individual plugin folders one at a time, reloading your site after each rename.
- When the site starts working, you’ve found the problematic plugin.
- You can either keep it disabled, look for an update, or find an alternative plugin that provides similar functionality.
If the WSoD persists: The issue isn’t plugin-related.
- Rename
plugins_oldback toplugins(so your plugins remain intact) and proceed to theme diagnostics in the next section.
Binary search method: If you have 20+ plugins, testing each one individually takes forever. Instead, rename half of your plugin folders at once. If the site loads, the problem is in the half you renamed. If it doesn’t load, the problem is in the half that are still active. Keep dividing in half until you isolate the culprit. This approach finds the problem in 4-5 steps instead of 20.
Don’t forget mu-plugins: Check /wp-content/mu-plugins/ as well. Must-use plugins load automatically and don’t appear in your regular plugins list. They’re often used by managed hosting providers or security tools, and they can cause WSoD just like regular plugins. Rename this folder to mu-plugins_old if standard plugin deactivation didn’t solve the problem.
Switch to a default theme
When the admin loads but the frontend shows white, the cause is theme-related. If disabling plugins didn’t resolve your WSoD, your active theme is the next suspect, particularly if you recently edited functions.php or updated the theme.
- Via FTP or your hosting file manager, navigate to
/wp-content/themes/. - Find your active theme’s folder and rename it (for example, change
theme-nametotheme-name_old). - WordPress will automatically fall back to a default theme, such as Twenty Twenty-Four or Twenty Twenty-Three, if one exists in your themes folder. Reload your site after renaming.
If your site loads: Your theme contains the error. The problem is most likely a syntax error in functions.php, like a missing semicolon, unclosed bracket, or broken code snippet.
- Download your theme’s functions.php file, review recent changes, and fix the syntax issue before renaming the folder back.
If the WSoD persists: The issue isn’t theme-related. Rename your theme folder back to its original name and investigate core files or server configuration next.
No default theme installed?
- Download a default theme like Twenty Twenty-Four from WordPress.org.
- Extract the ZIP file, and upload the theme folder to
/wp-content/themes/via FTP. - Then, rename your active theme to trigger the fallback.
Clear browser and WordPress cache
Caching can make a WSoD appear to persist even after you’ve successfully fixed the underlying problem. Your browser or a caching plugin might still serve the old, broken version of the page.
Start with a quick test: open your site in an incognito or private browser window. This bypasses your browser’s cached files. If the site loads in incognito but not in your regular browser, clear your browser cache, and you’re done.
If you’re running a caching plugin, you’ll need to manually delete its cache files via FTP since you can’t access the WordPress dashboard:
- WP Rocket: Delete the entire
/wp-content/cache/wp-rocket/folder. - W3 Total Cache: Delete all folders inside
/wp-content/cache/. Also, openwp-config.phpand remove the linedefine('WP_CACHE', true);if present. - Autoptimize: Delete
/wp-content/cache/autoptimize/. - LiteSpeed Cache: Delete
/wp-content/cache/litespeed/.
Server-level caching from your hosting provider (common with WP Engine, Kinsta, and SiteGround) requires clearing through your hosting dashboard or contacting support.
What does allowed memory size exhausted mean?
If debug.log shows “Allowed memory size exhausted,” add define('WP_MEMORY_LIMIT', '256M'); to wp-config.php. This increases the memory WordPress can use and resolves most memory-related WSoD errors.
WordPress attempts to set a memory limit of 40MB for single sites and 64MB for multisite installations, but these defaults often aren’t sufficient for modern sites running WooCommerce, page builders, or multiple active plugins. The 256MB limit has become the standard recommendation across the WordPress community.
Method 1 — wp-config.php (most reliable):
Open wp-config.php and add this line before /* That's all, stop editing! */:
define( 'WP_MEMORY_LIMIT', '256M' );Method 2 — php.ini or .user.ini:
If your host allows PHP configuration, create or edit a .user.ini file in your WordPress root directory and add:
memory_limit = 256MMethod 3 — .htaccess (Apache servers only):
Add this line to your .htaccess file:
php_value memory_limit 256M🚨Warning: The .htaccess method causes a 500 Internal Server Error on servers running PHP-FPM. If you see a new error after adding this line, remove it immediately and use one of the other methods instead.
If none of these methods increase your available memory, your hosting provider has set a hard limit at the server level. You’ll need to contact their support team to request an increase or consider upgrading to a plan with higher resource allocations.
Check and fix file permissions
Incorrect file permissions can cause a 500 error or WSoD, especially after migrating your site to a new host or restoring from a backup. When permissions are too restrictive, the server can’t read PHP files. When they’re too open, some hosts block access for security reasons.
Standard WordPress permissions are:
- Folders: 755 (owner can read, write, execute; others can read and execute).
- Files: 644 (owner can read and write; others can only read).
- wp-config.php: 440 or 400 (more restrictive since this file contains database credentials).
To fix permissions using FileZilla or another FTP client:
- Right-click your WordPress root folder.
- Select “File Permissions” or “CHMOD.”
- Enter 755 in the numeric value field.
- Check “Recurse into subdirectories.”
- Select “Apply to directories only.”
- Click OK.
Repeat this process for files: enter 644, check “Recurse into subdirectories,” and select “Apply to files only.”
After updating permissions, reload your site to check if the WSoD is resolved.
Resolve failed auto-update issues
If WordPress was running an automatic update when the server timed out or lost connection, your site may be stuck in maintenance mode. WordPress creates a temporary lock file during updates that should disappear automatically, but sometimes it doesn’t.
- Via FTP, navigate to your WordPress root directory (the same folder containing wp-config.php) and look for a file named
.maintenance. - This file might be hidden depending on your FTP client settings, so enable “Show hidden files” if you don’t see it.
- Delete the
.maintenancefile. This removes the lock and allows WordPress to load normally again. - Reload your site. If it comes back online, the interrupted update was your only problem. However, if the WSoD persists or you see new errors, the update may have corrupted core files before the timeout occurred.
- In that case, proceed to the “Re-upload WordPress core files” section below to replace potentially damaged files with fresh copies.
Check for PHP syntax errors or restore a backup
If debug.log shows “Parse error: syntax error” followed by a file path and line number, you have a code error in that exact location. PHP can’t execute the file because something in the code structure is broken.
Common causes include:
- A missing semicolon at the end of a line.
- Mismatched brackets or parentheses.
- A broken code snippet copied from a tutorial with formatting issues.
- Unclosed quotation marks in a string.
Download the file referenced in the error via FTP and open it in a code editor like VS Code, Sublime Text, or even Notepad++.
Navigate to the line number mentioned in the error. Look for obvious syntax problems. Code editors often highlight errors with red underlines or color changes.
Fix the issue, save the file, and re-upload it via FTP.
If you can’t identify the error or you’re unsure what changed, restore the file from your backup instead. This is where version control systems like Git prove invaluable, as you can see exactly what changed and revert specific edits without losing other work.
Regenerate your .htaccess file
The .htaccess file controls how Apache handles incoming requests, including pretty permalinks, redirects, and security rules. A syntax error in this file causes immediate failure before WordPress or PHP even starts loading.
- Via FTP, find the
.htaccessfile in your WordPress root directory. - Rename it to
.htaccess_oldto deactivate it. - Reload your site.
If your site loads: The .htaccess file was corrupt or contained a problematic rule. You’ve found the cause.
If the WSoD persists: The problem lies elsewhere. Rename .htaccess_old back to .htaccess and continue troubleshooting other areas.
- To regenerate a fresh .htaccess file, log in to your WordPress admin dashboard (which should now be accessible).
- Go to Settings → Permalinks and click “Save Changes” without modifying anything.
- WordPress automatically generates a new .htaccess file with default rules.
Important: Without a valid .htaccess file, your homepage might load, but internal pages will show 404 errors. Don’t skip the regeneration step once you’ve confirmed .htaccess was the problem.
Re-upload WordPress core files
If a failed update corrupted core files, you can replace them manually without losing your content, themes, or plugins. This process overwrites only the WordPress system files while leaving your customizations intact.
Download a fresh copy of WordPress from wordpress.org/download/ and extract the ZIP file on your local computer.
🚨Critical step: Before uploading anything, delete the wp-content folder from the extracted files. Never overwrite your server’s wp-content folder – this contains your themes, plugins, uploads, and everything that makes your site unique.
Also, remove wp-config.php from the extracted files. Your existing wp-config.php contains your database credentials and site settings, and you don’t want to replace it with a blank template.
Now upload the remaining files and folders via FTP:
- The entire
wp-adminfolder. - The entire
wp-includesfolder. - All PHP files in the root directory (wp-login.php, wp-cron.php, index.php, etc.).
Set your FTP client to overwrite existing files when prompted. This replaces potentially corrupted core scripts with verified fresh copies while preserving your configuration and content.
Increase PHP text processing limits
Sites with very long posts, complex shortcodes, or content generated by page builders can exceed PHP’s regex processing limits. When this happens, PHP fails silently, with no error message, just a white screen on that specific page.
If the WSoD only appears on certain long-content pages while shorter pages load fine, this is likely your issue.
Add these lines to your wp-config.php file before /* That's all, stop editing! */:
ini_set('pcre.recursion_limit', 20000000);ini_set('pcre.backtrack_limit', 10000000);
These settings increase the limits for PHP’s PCRE (Perl Compatible Regular Expressions) engine, which WordPress and many plugins use to process text content. The default values are often too low for pages containing thousands of words or nested shortcode structures.
Save the file and reload the problematic page to test.
Contact your hosting provider
If all fixes fail and your debug.log file is empty or shows no relevant errors, the problem likely exists at the server level, which is outside WordPress entirely.
Contact your hosting support team with specific questions rather than just reporting “my site is down”:
- “Are there any errors in the Apache or Nginx logs for my domain?”
- “Is my account hitting memory limits or I/O throttling?”
- “Is ModSecurity or another firewall blocking requests to my site?”
- “Has there been a recent PHP version change on the server?”
Server-side issues that cause WSoD include PHP version incompatibility (your host upgraded PHP without warning), physical memory limits on shared hosting, firewall false positives blocking legitimate WordPress requests, and database server connectivity problems.
Your hosting provider has access to server logs and configuration settings that you can’t see from the WordPress side. A quick support ticket often resolves issues that would otherwise take hours to diagnose.
When to call in a WordPress expert
Not every WSoD requires professional help, but some situations genuinely do. Knowing when to stop troubleshooting yourself and bring in an expert can save you hours of frustration and prevent accidental damage to your site.
When DIY stops making sense
Consider getting professional help if:
- You’re not comfortable with FTP or editing PHP files. The fixes in this guide require accessing server files directly. If that feels risky or unfamiliar, there’s no shame in handing it off.
- The site is business-critical, and downtime is costing money. Every hour your WooCommerce store or lead-generation site stays down results in lost revenue. A professional can often resolve issues faster than trial-and-error troubleshooting.
- You’ve tried multiple fixes and still can’t identify the cause. If you’ve worked through this entire guide without success, the problem may involve custom code, server configuration, or plugin interactions that require deeper investigation.
- You’re worried about making things worse. This is a valid concern. One wrong edit to wp-config.php or an accidental file deletion can compound the original problem.
Immediate fixes via Codeable
Codeable connects you with pre-vetted WordPress specialists who handle WSoD issues regularly. Here’s how it works:
- Post a project describing your white screen issue. Include when it started, what you’ve already tried, and any error messages from debug.log.
- Receive a fixed-price estimate typically within a few hours. No hourly billing surprises.
- Get matched with a specialist who has demonstrated expertise in WordPress troubleshooting and diagnostics.
- 28-day bug-fix warranty means if the same issue returns after the fix, it’s covered at no additional cost.
Codeable developers provide fixed-price estimates for WordPress fixes, averaging 3-5 hours for the first engagement on urgent issues.
Prevent future WSoD with ongoing maintenance
Once your site is back online, consider ongoing maintenance to prevent future emergencies rather than just reacting to them.
Codeable maintenance plans include:
- Plugin and theme updates tested on staging before applying to your live site, catching conflicts before they cause downtime.
- Regression testing to verify nothing breaks after updates.
- Daily offsite backups so you always have a recent restore point.
- Proactive monitoring that catches issues before they escalate into full white screen failures.
Plans start at $100/month for basic coverage, which often costs less than a single emergency fix.
Choose Codeable for your WSoD fix
The difference between Codeable and general freelance marketplaces comes down to vetting and accountability. Codeable accepts only the top 2% of WordPress developers who apply, and each expert has proven experience diagnosing complex WordPress issues. You’re not gambling on an unknown freelancer, but rather working with someone whose skills have been verified.
The fixed-price model also eliminates the anxiety of hourly billing during an emergency. You know exactly what the fix will cost before work begins, and the 28-day warranty protects you if the problem resurfaces. For business owners watching their site stay offline, that certainty matters.
A white screen doesn’t have to mean hours of stress or lost sales. Whether you resolve it yourself using this guide or bring in a Codeable expert to handle it quickly, the goal is the same: get your site back online and keep it running smoothly. Take the path that makes the most sense for your situation, your technical comfort level, and your business needs.
Find a WordPress expert on Codeable.
20 000+ businesses of every shape and size have already trusted us to hire WordPress developers and scale their growth.
The post WordPress White Screen of Death Causes and Quick Fixes Explained appeared first on Codeable.
]]>The post What Agencies Should Know About White Label WordPress Development appeared first on Codeable.
]]>Your design team is running at capacity. Your developer is handling maintenance across multiple client sites. Hiring full-time means committing to salaries and overhead that your project pipeline can’t consistently support.
One approach to consider is white label WordPress development.
White label WordPress development is a delivery model that lets agencies resell WordPress builds completed by a third-party team under the agency’s brand. Agencies use white label development to increase delivery capacity without adding full-time headcount.
This guide gives you the decision framework that any agency will find helpful before choosing a partner. You’ll learn what white label actually means operationally, which pricing models match your situation, how to spot reliable partners, and when marketplace platforms serve you better than traditional fulfillment teams.
What is white label WordPress development?
White label WordPress development is a business model that lets an agency hire third-party WordPress developers and deliver the work under the agency’s brand. Agencies use white label development to fulfill WordPress projects while keeping client relationships in-house.
The agency acts as the front-facing provider while an external team handles technical execution behind the scenes. Your client never knows that another company built their site. All communication, invoicing, and support flows through your agency’s systems and branding.
The complete white label process
The white label delivery model follows a structured workflow designed to maintain brand continuity.
- The agency onboards the client and owns the relationship.
- The agency collects requirements, scope, timelines, and brand inputs from the client.
- The partner signs an NDA and confidentiality agreement with the agency.
- The partner develops the site without direct client contact unless explicitly allowed.
- The agency reviews the work, conducts quality assurance, and delivers the final product under agency branding.
- Post-launch support runs through the agency’s systems and brand identity.
The partner team stays completely invisible throughout this process. They receive specifications from you, build according to your standards, and hand back completed work for you to present. Your client interacts only with your team.
Why NDAs are central to this model
Non-disclosure agreements protect the foundation of white label arrangements. The NDA establishes legal boundaries that preserve your client relationships and competitive position.
NDAs prevent partners from contacting clients, disclosing client lists, or revealing pricing structures. These agreements protect your competitive position and preserve client relationships. Without proper NDAs, partners could undermine your business by approaching clients directly.
White label vs marketplace vs freelancer vs in-house
Although these terms are often used interchangeably, different delivery models serve different agency needs. Understanding the distinctions helps you choose the right approach for your situation.
Delivery models compared
| Model | Who owns the client relationship? | Developer identity visibility | Best for | Main risk |
| True white label | Agency owns exclusively. | Completely invisible to the client. | High-volume agencies needing consistent team rhythm across many client sites. | Partner quality variance and limited developer choice. |
| Marketplace (Codeable-style) | Agency owns, developer visible on the platform. | Developer maintains professional identity and profile. | Complex builds requiring specialist expertise and platform protections. | Requires project-by-project scoping and vetting. |
| Direct freelancer | Variable, often shared. | Fully visible, may work directly with the client. | Agencies with established freelancer relationships and strong project management. | Freelancer availability, reliability, and lack of backup options. |
| In-house team | Agency owns completely. | Internal employees. | Agencies with consistent workload justifying fixed costs. | Highest overhead, management burden, and capacity constraints. |
Services covered in white label WordPress development
White label WordPress services are outsourced deliverables that agencies resell as their own. Quality partners deliver client-ready work meeting professional standards without requiring extensive revisions.
Custom development
Pre-built WordPress themes seem convenient until you realize they’re slowing down every page load. They pack in dozens of features designed to appeal to thousands of different users. You need maybe five of those features. The rest is dead weight.
Custom theme development builds from a blank canvas or a minimal starter framework. This approach avoids code bloat from pre-built themes that include dozens of unused features. Partners write only the CSS, JavaScript, and PHP required for your specific design and functionality needs.
The result is faster page load times and cleaner codebases. Custom themes load only the essential assets required for your specific user journey. This focus on lean code directly correlates to faster load times and better Core Web Vitals scores.
Similarly, off-the-shelf plugins solve common problems well. But when your client needs something specific, such as custom pricing logic, specialized data structures, or proprietary workflow automation, generic plugins fall short.
Custom plugin development creates bespoke functionality tailored to client requirements. Partners build plugins that handle unique business logic, data structures, or workflow automation. The code follows WordPress coding standards and uses proper hooks and filters to avoid conflicts with other plugins.
E-commerce engineering
Basic WooCommerce stores are straightforward. Add products, set up payment processing, and launch. But what happens when your client is managing 5,000 SKUs and processing hundreds of orders daily?
White label partners handle end-to-end WooCommerce development, including complete store setup, payment gateway integration, and inventory management. They implement high-scale implementations with thousands of products and optimize database queries for sites processing significant transaction volumes.
Partners configure checkout flows to reduce cart abandonment, with streamlined forms, saved payment methods, and one-click purchasing. They implement dynamic pricing rules for wholesale tiers, subscription models, or promotional offers. Their shipping integrations go beyond basic rate tables. Partners connect directly to carrier APIs for real-time calculations, automate label printing, and sync order data with fulfillment centers. Your client’s warehouse receives order details automatically, rather than through manual entry.
Performance optimization
Google measures three Core Web Vitals that directly affect search rankings. White label performance optimization targets these metrics specifically.
The technical work includes configuring caching systems (Redis, Memcached) that store database results in fast memory, setting up Content Delivery Networks that serve files from servers closer to each visitor, and removing unnecessary scripts from pages that don’t need them.
When traffic spikes hit, proper caching makes the difference between smooth operation and a crashed site. Database queries get answered from memory instead of hammering your MySQL server repeatedly with identical requests. This stabilizes site performance even during traffic spikes.
Security, maintenance, and support
Security plugins are a start, but they’re not enough. Professional security services include vulnerability assessments that find weaknesses before attackers do. When sites get compromised, partners remove malware and implement hardening measures to prevent reinfection.
Web Application Firewalls block malicious traffic before it reaches your server. Two-factor authentication stops unauthorized admin access. Security headers protect against common attack vectors.
Maintenance keeps everything running smoothly month after month:
- WordPress core, plugin, and theme updates with compatibility testing first.
- Visual regression testing that catches layout breaks before they reach clients.
- Staging environments where changes get tested safely.
- Uptime monitoring with alerts when sites go down.
- Security scans that identify vulnerabilities as they emerge.
- Performance tracking to catch degradation early.
This creates recurring revenue for your agency. Clients pay monthly for peace of mind. Your white label partner handles the technical work. You maintain the relationship and take credit for reliable service.
Support channels vary by provider but commonly include ticketing systems, email, and chat. Some providers offer phone support for premium tiers. Partners document all maintenance activities and provide monthly reports showing completed updates, security scans, and performance metrics.
Advanced capabilities
Headless WordPress architecture decouples the content management backend from the frontend presentation layer. The WordPress admin interface manages content while a JavaScript framework like React or Next.js handles the user-facing site. Content flows through the WordPress REST API or WPGraphQL.
This architecture delivers faster page loads, better security through reduced attack surface, and the ability to publish content simultaneously to websites, mobile apps, and other platforms. Partners need proficiency in both PHP for WordPress configuration and modern JavaScript for frontend development.
Complex integrations connect WordPress to external business systems. Partners build custom API connections to synchronize customer data with CRM platforms like Salesforce or HubSpot. They automate order transmission to ERP systems like SAP or NetSuite. They create middleware that handles authentication, data transformation, and error handling between systems.
These integrations enable real-time inventory updates, automated invoice generation, and unified customer records across platforms. Partners write code that maintains data integrity during synchronization and provides logging for troubleshooting.
Delivery tiers
White label providers typically offer three service levels based on customization depth.
- Templated builds use pre-designed themes with minor branding adjustments (colors, typography) and content population. Ideal for limited budgets and standard needs.
- Semi-custom builds combine commercial themes/page builders (Elementor/Beaver Builder) for layout with custom plugins for unique business logic. A middle-tier balance of cost and tailored features.
- Fully custom builds are coded from scratch (HTML, CSS, JS, PHP) without third-party themes or builders, ensuring maximum performance, complete design control, and IP ownership.
Agency benefits of white label development
White label WordPress development solves specific business problems agencies face when trying to grow without proportionally increasing overhead. The model creates measurable improvements in capacity, profit margins, launch speed, quality consistency, and risk management.
Scale delivery without hiring
Recruiting expert WordPress developers on a full-time or long-term basis can be expensive and slow. You’ll spend months running job postings, conducting interviews, and onboarding new hires. The process costs thousands before a single line of code gets written.
White label partnerships skip all of that. You get immediate access to development capacity without the recruitment cycle:
- Submit requirements today, connect with developers this week.
- No waiting for candidates to finish notice periods.
- No onboarding into your systems and culture.
- Flexible bandwidth that expands and contracts with workload.
Scale up during busy quarters, scale down during slow periods. Your fixed costs stay predictable while development capacity adjusts to actual project volume.
Here’s what that looks like in practice. A small agency managing five client sites takes on fifteen more without hiring full-time developers. The same internal team handles sales, account management, and creative strategy. White label partners absorb the development workload as new clients sign contracts.
Protect focus on high-value work
Agencies generate the most value through client relationships, strategic thinking, and creative direction. Technical execution is necessary, but doesn’t differentiate your agency in competitive pitches. Your internal team concentrates on discovery sessions that uncover client business objectives. They develop strategic recommendations that align websites with revenue goals. They create design systems that express brand identity. They manage ongoing client relationships that generate referrals and upsells.
Partners handle the technical execution:
- Building code that implements your designs.
- Conducting quality assurance testing before delivery.
- Managing technical dependencies like hosting configuration and SSL certificates.
- Executing development tasks according to your specifications.
Improve speed to launch
Sequential workflows slow project timelines. Waiting for design approval before starting development adds weeks to every project. White label partnerships enable parallel workstreams that compress schedules.
Design and development teams work simultaneously on different project phases. Your WordPress designers finalize homepage concepts while partners build the underlying architecture. Content writers prepare copy while developers configure custom post types to house that content. Multiple disciplines progress in parallel instead of waiting in queue.
Repeatable components accelerate delivery:
- Starter themes for frequent use cases like service business sites or portfolio showcases.
- Plugin libraries for standard functionality like contact forms and testimonials.
- Reusable code that reduces development time for routine builds.
- Documented build kits that maintain consistency across similar projects.
Reduce delivery risk
Single freelancer dependency creates vulnerability. If your go-to developer gets sick, takes a vacation, or accepts a full-time position, your projects stall. You scramble to find replacement talent while clients wait for updates. White label agencies provide team depth and backup coverage. Multiple developers with similar skill sets can step into projects if someone becomes unavailable. Project continuity doesn’t depend on one person’s calendar.
Quality improvements come from structured processes:
- Consistent testing protocols that check functionality across devices and browsers.
- Performance validation before delivery.
- Accessibility standards verification.
- SEO technical requirements review.
- Documented handoff procedures at each project phase.
Predictable workflows reduce surprises. Partners follow standardized processes for requirement gathering, milestone reviews, and final delivery. You know exactly what to expect at each project phase because the workflow is repeatable.
Increase profitability with the right pricing and process
Better internal team utilization improves profit margins. Your account managers can handle more clients when they don’t wait for developer availability. Your designers complete more projects when they aren’t blocked by technical constraints. Higher throughput generates more revenue per employee.
Stable development capacity enables expanded service offerings:
- Ongoing care plans with reliable maintenance task completion.
- Conversion rate optimization services backed by quick implementation.
- SEO retainers bundled with technical site improvements.
- Content management packages supported by functional backend systems.
White label development shifts cost structures from fixed to variable. In-house developers require salaries whether you have ten projects or two projects that month. White label partnerships bill based on actual project volume. Your costs scale with revenue instead of creating overhead during slow periods.
White label WordPress development pricing models and costs
White label WordPress pricing is a set of engagement models agencies use to buy delivery capacity and resell it profitably. Agencies use pricing models to match cash flow, project volume, and risk tolerance.
The pricing structure you choose affects more than just what you pay. It determines how you fund projects, when costs hit your books, what margin you can maintain, and how much administrative overhead you carry. Understanding these mechanics helps you select models that support your business operations instead of creating cash flow problems.
Subscription model
- How it works: Unlimited task completion for a flat monthly fee. Submit tasks as needed through the provider’s system.
- Best for: Agencies needing 10+ hours monthly of routine tasks across multiple client sites.
- Cash flow impact: Predictable monthly expense regardless of actual usage.
- Key considerations: Risk of overpaying during slow months. Document task submission dates and completion times. Works when the steady task flow would exceed equivalent hourly costs.
Dedicated developer retainer model
- How it works: Agencies with consistent, high-volume project pipelines and predictable monthly needs.
- Best for: Specific developers assigned to your agency monthly. Same developers learn your standards and client preferences over time.
- Cash flow impact: Fixed monthly cost regardless of usage.
- Key considerations: Provides team continuity without hiring costs. Unused hours may roll over or expire based on contract terms. You waste money if hours go unused. Overflow charges apply if projects exceed capacity. Document hour allocation and rollover policies.
Hourly (on-demand) model
- How it works: Variable workload, sporadic development needs, overflow situations, or testing new partners.
- Best for: Submit tasks as needed. Receive quotes for actual work. Pay only for completed work. No minimum commitments.
- Cash flow impact: Payment tied to actual work delivered.
- Key considerations: Provides flexibility without long-term contracts. No retainer fees or unused capacity waste. Risk estimate accuracy issues and scope creep. Response times vary by provider urgency tiers. Document detailed time logs and task descriptions. Works for agencies building capacity gradually.
Fixed-price projects
- How it works: One-off builds with clear scope definitions and well-defined deliverables.
- Best for: Total cost established before work begins. Partner estimates effort based on specifications. Payment follows milestone completion rather than hourly tracking.
- Cash flow impact: Milestone-based, can spread over project duration.
- Key considerations: You know the exact developer costs before committing, which simplifies client proposals. The partner absorbs risk if the work takes longer than estimated. You absorb risk if requirements were incomplete and change orders pile up. Requires comprehensive project briefs, milestone billing, change control processes, and written acceptance criteria. Vague requirements increase the partner’s risk buffer and raise costs. Document comprehensive specifications and change orders. Precise specifications reduce uncertainty and lower quotes.
Codeable’s marketplace pricing: Codeable uses a single-price estimate that averages offers from interested experts. Recommended developer rates range from $80 to $120 per hour. An additional 17.5% per-project platform service fee helps vet and train highly-qualified developers on the platform. You fund via escrow before work starts or by milestone for larger builds. The service fee is non-refundable even if developer fees are returned through dispute resolution.
Cash flow mechanics
Payment structure impacts working capital and financial risk.
| Method | Pros | Cons |
| Escrow | Lowers payment default risk for developers, potentially leading to better rates. Protects the agency against paying for incomplete work. | Ties up agency capital (full upfront funding required). |
| Milestone | Spreads cash flow for the agency. Aligns payment with project progress. Balances risk for both parties. | Needs detailed acceptance criteria to avoid disputes over deliverables. |
| Net-30 invoicing | Allows agency to collect from clients first (float period), aiding tight cash flow. Improves agency cash float. Eliminates invoice overhead (for partner). | May incur higher rates from partners (offsetting their cash flow impact). Creates partner payment pressure. |
| Subscription | Predictable expenses for the agency. Eliminates invoice overhead (for agency). | Creates waste during slow periods (fixed fee regardless of volume). Risks underutilization of costs. |
Hidden costs and margin maintenance
The quoted development rate is not your total cost; additional expenses affect actual margins on resold services. Internal project management and QA time represent real, unbilled costs; track these hours to understand true project costs. Rework and revision cycles quickly erode margins, necessitating detailed project briefs and strong partner quality control. Scope creep exposure differs by pricing model: fixed-price projects absorb unbilled work, while hourly projects pass costs to clients, requiring constant budget monitoring.
How to choose and test a white label development partner?
A white label WordPress partner is a third-party delivery team that builds and supports WordPress work under an agency’s brand and NDA. Agencies use partner evaluation frameworks to reduce brand risk and ensure consistent quality.
Selecting the wrong partner damages client relationships and wastes time on rework. The evaluation process should systematically assess capabilities, reliability, and cultural fit before committing to significant projects.
Decision framework for partner evaluation
Remove emotion from partner selection with a structured scorecard. Rate each criterion on a consistent scale so you can compare options objectively instead of going with your gut.
Portfolio relevance and track record
Don’t just browse portfolio screenshots. Look for completed projects similar to your typical client work. A partner with impressive e-commerce builds might struggle with membership sites or lead generation platforms. You need diversity across the project types you actually sell.
Check completion dates to verify the work is recent. WordPress evolves quickly. Portfolio pieces from 2019 show outdated practices that won’t serve your current clients well. Focus on work completed within the past 18 months.
Verify claimed results when possible. Ask for client references who can confirm the performance metrics, timeline adherence, and communication quality the partner advertises.
Verified reviews and testimonials
Third-party review platforms like Clutch, Google Business, or Trustpilot provide more credible feedback than testimonials on the partner’s own website. Look for patterns across multiple reviews rather than focusing on individual comments.
Pay attention to how partners respond to negative reviews. Professional responses that acknowledge issues and explain resolutions indicate maturity. Defensive responses or no responses suggest poor accountability.
Communication speed and clarity
Test responsiveness during the sales process. If a partner takes three days to respond to initial inquiries, expect similar delays during active projects. Quality partners respond within 24 hours for general questions and within hours for urgent issues.
Evaluate the clarity of written communication. Unclear requirements lead to misaligned deliverables. Partners should ask clarifying questions when specifications are vague rather than making assumptions.
QA process rigor
Request documentation of the partner’s quality assurance workflow. Structured QA processes include device testing checklists, browser compatibility matrices, performance benchmarking, and security scanning.
Ask what happens when defects are found after delivery. Clear warranty periods and bug fix processes indicate professional operations. Vague promises about “making it right” create disputes later.
Pricing transparency
Detailed pricing breakdowns help you understand what drives costs. Partners should explain how they calculate estimates, what’s included in base rates, and what triggers additional charges.
Hidden fees erode margins. Ask specifically about platform fees, revision charges, rush project premiums, and scope change pricing before signing contracts.
NDA willingness and confidentiality terms
Professional white label partners expect NDA requests and have standard templates ready. Resistance to confidentiality agreements indicates they may not understand white label business models or have conflicting client visibility goals.
Review NDA scope carefully. Strong agreements prohibit the partner from contacting your clients, using client names in their marketing, displaying completed work publicly, or disclosing pricing information.
Partner evaluation scorecard
| Criteria | Weight | What good looks like | Score |
| Portfolio relevance | High | 5+ similar projects completed in the past 18 months | /10 |
| Verified reviews | High | 4.5+ stars across 20+ reviews on third-party platforms | /10 |
| Communication speed | Medium | Sub-24-hour response to inquiries, clear written communication | /10 |
| QA process rigor | High | Documented testing checklists and warranty policies | /10 |
| Pricing transparency | Medium | Itemized estimates with clear scope and fee structure | /10 |
| NDA willingness | High | Standard NDA template provided without pushback | /10 |
| Total score | /60 |
Differentiators agencies care about
Beyond baseline capabilities, specific operational factors determine whether a partnership functions smoothly long-term.
- Timezone coverage: Partners in matching timezones enable real-time communication and same-day issue resolution.
- WordPress expertise: Partners must track WordPress core updates (3-4 times yearly) including block editor changes, REST API improvements, and security patches. Active community engagement through WordCamps and developer blogs brings cutting-edge knowledge to your projects.
- Team size: Large teams provide redundancy when developers are unavailable. Small teams offer closer relationships and deeper knowledge of your standards. Ask about developer turnover rates, as high turnover means constantly re-explaining requirements.
- Contract terms: Month-to-month agreements enable quick exits but allow partner price increases with minimal notice. Long-term contracts lock in pricing and capacity but reduce flexibility.
- Tooling compatibility: Partners should integrate with your existing project management systems (Asana, ClickUp, Slack, Basecamp) and file sharing platforms (Google Drive, SharePoint, Dropbox) rather than forcing tool adoption. Confirm compatibility before starting.
Red flags when evaluating partners
Certain warning signs predict partnership problems before they occur.
🚩 Refuses NDA or pushes back on confidentiality: Professional white label providers expect strict confidentiality requirements. Resistance indicates misaligned expectations about brand invisibility or suggests the partner plans to market their involvement with your clients.
🚩 No specific portfolio examples: Vague project descriptions without screenshots, metrics, or client names make verification impossible. Quality partners showcase real work with measurable outcomes.
🚩 Poor communication during sales: Sales interactions predict project communication quality. Delayed responses, unclear answers, or difficulty scheduling calls during the sales process are amplified during active projects when timelines are tight.
🚩 Unclear pricing and scope definition: Estimates that lack itemization or change significantly during negotiations suggest poor scoping practices. Unclear pricing creates budget disputes when bills arrive.
🚩 No quality guarantees or warranty window: Partners confident in their work offer defined warranty periods covering bugs and defects. Absence of warranties means you absorb all post-launch fix costs, even when issues stem from poor initial development.
Trial periods and risk mitigation
Testing partnerships with small projects reduces risk before committing to major client work.
Pilot project approach
Start with a low-stakes internal project or minor client update. A simple plugin customization or landing page build tests the complete workflow without risking major client relationships.
Evaluate these factors during pilots:
- Requirement gathering thoroughness and clarifying question quality.
- Milestone communication frequency and proactive status updates.
- Delivered quality compared against your internal standards.
- Revision responsiveness when changes are needed.
- Documentation completeness for handoff to your team.
With Codeable, the shared workroom and escrow system let you test the scoping process and developer fit with a contained project before scaling up. You can post a small project, review developer profiles and estimates, and experience the full workflow with limited financial exposure.
Reference verification
Ask for agency references specifically, rather than general client testimonials. Agencies understand white label dynamics differently than direct clients. They can speak to NDA compliance, brand invisibility, and workflow integration in ways that end clients cannot.
Prepare specific questions for references:
- How long have you worked with this partner?
- What project types have they completed for you?
- How do they handle missed deadlines or quality issues?
- Have they ever contacted your clients directly?
- Would you trust them with your most important client project?
Reference calls reveal the operational reality that marketing materials obscure.
| 💡FAQs What should a white label NDA include? A white label NDA should prohibit the partner from contacting your clients directly, using client names in marketing materials, displaying completed work publicly without permission, and disclosing your pricing or internal processes. The agreement should specify that all deliverables are your intellectual property and define confidentiality periods extending beyond the project completion. Should I choose a US-based white label WordPress partner? US-based white label WordPress partners provide timezone alignment for real-time communication and same-day issue resolution. International partners often offer lower hourly rates but create communication delays across time zones. Choose based on whether your projects benefit more from cost savings or responsive collaboration. Some agencies use US-based partners for complex builds requiring frequent communication and international partners for routine maintenance with clear specifications. |
Quality controls and warranties that matter
White label QA is a repeatable process that verifies code quality, site health, security, responsiveness, and SEO readiness before client delivery. Agencies use QA frameworks to protect their brand reputation and meet deadlines.
The agency owns the client promise regardless of who completes the technical work. Partner quality and reliability directly impact your reputation and client renewal rates. Understanding what quality controls should exist helps you hold partners accountable.
QA standards you should expect before delivery
Quality assurance is a structured system that prevents client-facing defects and launch delays through systematic verification at each project phase.
Core QA areas partners should cover:
- Code quality: Adherence to WordPress coding standards, peer code review by senior developers, version control hygiene with meaningful commit messages, and documentation for custom functionality.
- Responsive readiness: Testing across mobile devices and tablets, browser compatibility verification in Chrome, Firefox, Safari, and Edge, layout and interaction checks at common breakpoints, and basic accessibility compliance if included in scope.
- Site performance checks: Page load benchmarking against baseline targets, image optimization validation using compression and proper formats, script and stylesheet minification, and caching or CDN configuration alignment where applicable.
- Security baseline: Defined update strategy for WordPress core and plugins, vulnerability scanning using tools like WPScan, implementation of security hardening measures, and secure credential handling in code and documentation.
- Technical SEO validation: Redirect mapping for migrations to preserve link equity, metadata support for titles and descriptions, robots.txt and XML sitemap configuration, crawlability verification, and 404 error elimination.
How to ensure reliable delivery
Reliability means predictable timelines, consistent communication, and clear accountability when issues arise. Quality partners build systems that make this repeatable rather than relying on individual developer heroics.
Delivery predictability:
- Milestone check-ins at defined project phases with deliverables reviewed before proceeding.
- Weekly status reports summarizing completed work, current progress, and upcoming tasks.
- Demo cadence, providing early visibility into work in progress to catch misalignments before final delivery.
- Scope freeze and change control processes, defining when specifications lock and what triggers re-estimation.
Quality guarantees and recourse:
- Revision loops specifying how many change rounds are included and turnaround expectations.
- Warranty windows covering bug fixes for 28 to 90 days post-launch, with clear bug versus feature definitions.
- Service level agreements establishing response times by issue severity.
- Dispute resolution and escrow protection when deliverables don’t meet specifications.
Managing variance risk:
Quality varies even in vetted networks. Build relationships with multiple proven partners rather than depending on a single source. Document your quality standards internally as reference materials. Assign consistent QA ownership on your side—the same person reviewing deliverables catches quality drift early and provides continuity in feedback.
| 💡FAQs How do agencies ensure white label WordPress quality? Agencies ensure quality by requiring documented QA processes from partners, defining acceptance criteria before projects start, conducting independent QA reviews before client delivery, establishing clear bug versus change request definitions, and building relationships with multiple partners. Test deliverables against your own standards rather than trusting partner QA alone. What QA checks should a white label WordPress partner run? Partners should run code quality reviews against WordPress standards, responsive design testing across devices and browsers, performance benchmarking, security vulnerability scanning, technical SEO validation – including redirects and metadata, accessibility compliance where scoped, and cross-browser compatibility testing. Partners should provide documentation proving these checks occurred. What’s included in a white label launch checklist? A launch checklist verifies all specified features function correctly, responsive design displays properly across devices, page load speeds meet targets, security hardening is implemented, SSL certificates are active, redirects preserve SEO equity, metadata supports indexing, forms and transactions work, and staging matches production. The checklist requires sign-off before deployment. What should a white label warranty include? Warranties should cover bug fixes for functional defects where work doesn’t match approved specifications, typically for 28 to 90 days post-launch. Define what qualifies as a bug versus a feature request, establish response times by severity, and clarify whether warranty work includes testing and deployment or just code fixes. Warranties exclude issues from client modifications, post-launch plugin conflicts, or hosting changes. How do I avoid unreliable white label WordPress developers? Verify references from other agencies, start with small pilot projects, require documented QA processes, establish clear communication expectations in contracts, use escrow payment systems, and maintain relationships with multiple partners. Track on-time delivery rates and quality metrics to identify reliability patterns. How do I run a pilot project with a white label partner? Select a low-stakes internal project or minor client update, define clear specifications and acceptance criteria upfront, establish the same communication and review processes you’d use for major projects, evaluate requirement gathering quality, monitor milestone adherence, assess deliverable quality against your standards, test revision responsiveness, and review documentation completeness. Pilot projects should mirror real workflows while limiting risk. |
Codeable for white label WordPress development
Codeable is a curated marketplace connecting agencies with pre-vetted WordPress developers. Each developer maintains their professional identity and public profile, showing expertise, ratings, and completed projects. This transparency lets you select developers based on specific skills rather than accepting whoever a white label agency assigns.
Codeable excels for expert-level work where vetted talent, escrow protection, and a 28-day warranty reduce risk more than flat monthly pricing or total brand invisibility would. The platform has 650+ expert WordPress developers who can handle complex builds, tricky migrations, and specialized WooCommerce implementations.
For ad hoc projects: Post your requirements and receive matched expert recommendations within 24 hours. Start with a contained project to test developer fit before scaling up.
For ongoing staff augmentation: Agencies looking to embed dedicated WordPress developers into their team on a retainer basis can contact Codeable directly at [email protected]. This approach bypasses the project-by-project workflow and connects you with developers suited for long-term partnerships, weekly or monthly retainers, and continuous development needs.
In addition, Codeable’s fixed service packages provide structured access to expert developers for common agency needs. These pre-scoped offerings establish baseline pricing for typical project types while maintaining the platform’s quality guarantees and escrow protection.
Ready to access vetted WordPress experts for your next project?
Stop turning down complex WordPress builds because you lack specialized development capacity. Codeable connects you with pre-vetted experts backed by escrow protection and quality guarantees that protect your agency’s reputation.
Get started with Codeable or explore a custom package that fits your specific agency needs.
20 000+ businesses of every shape and size have already trusted us to hire WordPress developers and scale their growth.
The post What Agencies Should Know About White Label WordPress Development appeared first on Codeable.
]]>The post Shopify vs WooCommerce and What Breaks First When Things Go Wrong appeared first on Codeable.
]]>Here’s the verdict upfront: Shopify is rented infrastructure. You pay monthly for managed hosting, security, and checkout. They control the environment and handle the technical work. WooCommerce is self-hosted software. You install it on WordPress, own your code, and manage maintenance yourself.
Shopify trades control for predictability. You can’t modify core checkout logic, but you won’t ever get a server-crash alert during a flash sale. WooCommerce trades ease of setup for complete flexibility. You control every line of code and integration point. But if you need a custom feature for a plugin that’s specific to your site, coding and debugging it is your responsibility.
As the Shopify vs WooCommerce comparison goes beyond a features debate, the main question is: which responsibilities do you want to own?
This article is for three audiences at different decision points.
- First-time store builders who need realistic setup timelines, total cost projections, and clarity on which technical tasks require expert help.
- WordPress site owners who want to understand how each platform affects existing SEO authority, whether current hosting handles transactions, and what integration work is required to maintain a unified experience.
- Growing store operators who need detailed breakdowns of where each platform constrains growth, the real math behind migration, and practical paths forward that don’t disrupt operations.
Each section maps the specific trade-offs, costs, and responsibilities relevant to your situation.
Quick decision: which one fits you in 60 seconds?
Shopify handles hosting, security, updates, and support in exchange for monthly fees and working within their ecosystem. WooCommerce runs on WordPress, where you choose hosting, manage updates, and own your code and data completely. Neither is universally better. The right choice depends on which responsibilities you want to manage versus delegate.
Choose Shopify if you want managed simplicity
Shopify is the right choice when you want to focus entirely on running your store without thinking about servers, security, or technical infrastructure. You’re renting infrastructure and accepting limitations on data access, checkout modification, and payment processor choice. Monthly fees increase as you scale, but Shopify handles technical operations while you handle business operations. Launch in days with built-in themes, checkout flows, and payment processing. No server configuration required.
Choose WooCommerce if you want complete control
WooCommerce is the right choice when you need complete control over the customer journey, want to own your data and code, and value flexibility over managed convenience. You’re owning infrastructure and accepting responsibility for hosting selection, update management, and technical troubleshooting. Costs are more variable, but you’re never locked into platform decisions that constrain growth. You build exactly what your business needs. No platform fees on transactions. No restrictions on how you structure products, pricing, or customer experiences.
Which platform fits your needs?

Shopify fits best for:
Beginners prioritizing speed to launch over customization depth.Teams without technical resources or development expertise.Stores with straightforward requirements that fit Shopify’s app ecosystem.Businesses that value managed infrastructure and predictable monthly costs.Operations where checkout customization needs are minimal, or you’re willing to pay Plus pricing.
WooCommerce fits best for:
WordPress users extending existing content sites with commerce functionality.Teams with technical skills or reliable access to development resources.Stores requiring deep customization beyond pre-built solutions.Content-driven strategies leveraging WordPress SEO advantages for organic traffic.Businesses wanting data ownership and independence from vendor decisions.
A note on WooCommerce’s expertise requirement: WooCommerce can be a great fit for businesses that value ownership and flexibility, but it often needs specialist help as complexity grows. You’re responsible for finding developers who understand WordPress, WooCommerce architecture, and how to troubleshoot conflicts between plugins. This is where vetted WooCommerce specialists and predictable delivery become important. You need experts who can step in fast when issues arise.
Making the decision
Neither choice is wrong. The wrong choice is picking a platform that doesn’t match your operational preferences. Evaluate your tolerance for technical responsibility, your budget for platform fees versus development work, and whether your business model fits standard e-commerce patterns or requires custom solutions.
| 💡 FAQs Is Shopify better than WooCommerce? Shopify is better for managed simplicity and speed to launch. WooCommerce is better for control, customization, and owning your store’s code and data. Which is cheaper: Shopify or WooCommerce? Shopify is often cheaper to start, but costs can rise with apps and transaction rules. WooCommerce has more variable costs (hosting, extensions, maintenance), but fewer platform constraints. Do you need hosting for WooCommerce? Yes. WooCommerce runs on WordPress.org, so you choose and pay for hosting, plus you manage updates and performance. Does WooCommerce charge transaction fees? WooCommerce doesn’t charge platform transaction fees. You pay your payment processor’s fees. Shopify may add platform fees depending on your plan and payment setup. Which is better for SEO: Shopify or WooCommerce? WooCommerce can be stronger for content-led SEO because it runs on WordPress and supports deeper SEO control. Shopify covers SEO basics well, but is more structured and less flexible. What’s the core trade-off? Shopify trades flexibility for predictable managed operations. WooCommerce trades ease for ownership and customization, along with more responsibility. |
Shopify vs WooCommerce: Pricing
The pricing models for these platforms are fundamentally different. Shopify charges predictable monthly subscription fees. WooCommerce is free software with variable costs you control.
Shopify operates as a Software-as-a-Service (SaaS) platform:
- Monthly fees range from $39 to $399 for the basic plans, covering hosting, security, updates, and support. Shopify Plus costs around $2,300 to $2,500 per month for a 3-year plan.
- Additional transaction fees of 0.5% to 3% if using gateways other than Shopify Payments.
- Transparent, consistent costs month to month.
WooCommerce is self-hosted software:
- No platform fees or transaction percentages from WooCommerce itself.
- You lease hosting space from providers like Kinsta or WP Engine.
- You pay for hosting, domain, SSL certificates, and any premium extensions or themes.
- You maintain the WordPress software yourself rather than using a closed SaaS ecosystem.
The difference matters because your costs scale differently on each platform. Shopify’s fees rise with transaction volume and feature needs. WooCommerce’s costs rise with hosting requirements and development time.
The real costs in year 1 and year 3
Platform economics shift dramatically as your business grows from startup to established operation. What seems affordable at launch can become expensive at scale, and what feels complex initially can deliver better value over time.
Startup costs
For a small store just launching, Shopify often presents lower barriers to entry. A Shopify Basic plan at $39 per month includes hosting, SSL, and core commerce features. Add two or three paid apps for email marketing, reviews, and inventory management at $20 to $60 per month total. Your first-year cost lands between $700 and $1,200 before payment processing fees.
For example, WooCommerce on entry-level managed WordPress hosting can cost $10 to $30 per month. A quality paid theme can cost $60 to $100 as a first-time purchase. Essential extensions for shipping, payments, and marketing might add another $100 to $300 per year. Your first-year cost ranges from $400 to $800, but you’ll likely need a developer for initial setup and configuration, which adds $500 to $2,000 depending on complexity.
The math at this stage slightly favors Shopify for pure simplicity. You’re paying for the convenience of not managing technical details.
Growth costs
As your store processes more orders and requires more sophisticated features, the cost structures diverge.
A growing Shopify store typically moves to the Shopify Grow plan at $105 per month or the Shopify Advanced plan at $399 per month to reduce transaction fees and gain features. Your app stack expands to handle advanced inventory, customer segmentation, subscription billing, and analytics. Monthly app costs can easily reach $200 to $500. If you’re using an external payment gateway instead of Shopify Payments, you’re paying 0.5% to 2% in platform transaction fees on top of processor fees. Over 3 years, you’re looking at $9,000 to $18,000 in platform and app costs alone, before factoring in transaction fee percentages.
WooCommerce on managed hosting at this stage costs $50 to $150 per month. You’ll invest in premium extensions for subscriptions, memberships, advanced shipping, and possibly a page builder at $300 to $800 per year. Occasional development work for custom features or troubleshooting might cost $1,000 to $3,000 annually. Your three-year total lands between $7,500 and $15,000. The variable here is development time. If you need frequent custom work, costs climb. If your setup is stable, they stay predictable.
Established store budgets at scale
At high transaction volumes, the economics shift decisively.
For enterprise businesses and multi-brand companies, Shopify Plus starts at $2,300 per month and scales with revenue. Large stores often spend $3,000 to $5,000 monthly when factoring in advanced apps, custom development on Shopify’s platform, and specialized integrations. Over three years, you’re looking at $72,000 to $180,000. The benefit is a fully managed infrastructure with dedicated support and enterprise SLAs. The trade-off is you’re locked into their ecosystem and pricing structure.
On the other hand, WooCommerce at enterprise scale runs on premium managed hosting at $200 to $500 per month, or possibly more, depending on the host. You’ll invest more heavily in custom development, annual maintenance retainers with WordPress specialists, and possibly hire an in-house developer if transaction volume justifies it. Premium extensions, security tools, and performance optimization might easily add another $2,000 to $5,000 annually. Three-year costs range from $24,000 to $60,000, depending on how much custom work you require. You own the code, control the data, and aren’t subject to platform fee increases, but you’re responsible for assembling and managing the team that keeps everything running.
Total cost of ownership comparison
Here’s how costs compare across business sizes over one and three years:
| Business size | 1-year estimate (Shopify) | 1-year estimate (WooCommerce) | 3-year estimate (Shopify) | 3-year estimate (WooCommerce) |
| Startup | $700 – $1,200 | $900 – $2,500 | $2,100 – $3,600 | $2,700 – $7,500 |
| Growing | $3,000 – $6,000 | $2,500 – $5,000 | $9,000 – $18,000 | $7,500 – $15,000 |
| Established | $24,000+ | $8,000 – $15,000 | $72,000+ | $24,000 – $45,000 |
The pattern is clear. Shopify delivers predictable costs and managed convenience at every stage, but it becomes significantly more expensive as you scale. WooCommerce requires more upfront investment in expertise but offers better long-term economics if you’re willing to own the technical responsibility.
Shopify vs WooCommerce: Store setup and ease of use
The time investment required to launch differs significantly between these platforms. Shopify prioritizes speed to launch. WooCommerce requires more upfront configuration but offers deeper control once you’re running.
Shopify’s guided setup process
Shopify offers a guided 30-to-60-minute setup for basic stores. You create an account, choose a theme from their library, add products through a simple form interface, and configure basic shipping and payment options. The platform walks you through each step with tooltips and prompts. Security certificates, hosting configuration, and core software updates happen automatically in the background. You never touch server settings or worry about plugin compatibility.
This managed approach means you focus entirely on adding products, writing descriptions, and setting up your initial marketing. For first-time store owners with no technical background, this speed to launch is a major advantage. You can go from idea to accepting orders in a single afternoon.
WooCommerce’s configuration requirements
WooCommerce setup for small stores typically takes 3 to 5 hours for those with basic WordPress skills. You start by installing WordPress on your hosting account, then add the WooCommerce plugin through the WordPress dashboard. The setup wizard guides you through basic configuration, but you’re making more decisions: choosing payment gateways, configuring tax rules, setting up shipping zones, and selecting which pages handle cart and checkout functions.
You’ll spend additional time choosing and customizing a WooCommerce-compatible theme, installing extensions for features, and testing the entire checkout flow to ensure everything works correctly. Note that this estimate is for small-to-medium stores. Setup complexity can increase substantially for enterprise stores that need custom features. If you’re new to WordPress, expect to spend time learning how the admin interface works, how plugins interact, and where to find specific settings.
The payoff for this upfront investment is complete control over every aspect of your store’s behavior and appearance.
Ongoing maintenance differences
Shopify manages all security patches and core updates automatically. You receive new features and improvements without taking any action. Your only maintenance tasks involve updating apps when developers release new versions and occasionally reviewing theme compatibility if you switch themes.
WooCommerce requires ongoing updates. WordPress core software releases updates every few months. Your theme and each installed plugin release updates on their own schedules. Before applying updates, you need to verify compatibility, ideally testing on a staging site first to avoid breaking your live store. This isn’t daily work, but it does require checking for updates weekly and allocating time monthly to apply them safely.
For stores with custom code or numerous plugins, this coordination becomes more involved. You’re responsible for ensuring that a WooCommerce update doesn’t conflict with your payment gateway plugin, and that a WordPress core update doesn’t break your custom checkout fields. Many store owners handle this themselves initially, then hire WordPress specialists to manage updates as complexity grows.
Shopify vs WooCommerce: Website speed and performance
Speed isn’t inherent to the platform. It’s a result of implementation quality and infrastructure choices. Both platforms can deliver fast experiences, but the path to getting there differs completely.
Shopify’s managed performance infrastructure
Shopify provides managed, predictable speed out of the box. Every store runs on Shopify’s global server infrastructure with an integrated Content Delivery Network (CDN) that serves static assets from locations close to your customers. You don’t configure caching rules or optimize server response times. Shopify handles it.
What Shopify manages automatically:
- 99.98% uptime SLA, keeping your store accessible during traffic spikes.
- Automatic infrastructure scaling during high-volume sales events.
- CDN integration serving content from global server locations.
- Server capacity provisioning without manual intervention.
Page speed on Shopify depends primarily on your theme choice and how many third-party apps you install. Heavy themes with excessive JavaScript or numerous tracking scripts will slow your store regardless of Shopify’s infrastructure. Choose a well-coded theme, limit app installations to what you actually use, and compress product images before uploading. Follow these practices, and Shopify delivers consistently fast load times.
The limitation is that you can’t optimize beyond what Shopify’s platform allows. While you can optimize Liquid code, reduce JavaScript, and improve theme performance within Shopify’s framework, you can’t implement server-level caching policies, modify core server configurations, or use performance optimization techniques that require direct hosting environment access. Even advanced options like Shopify Functions and Hydrogen operate within Shopify’s controlled ecosystem rather than giving you raw server control.
WooCommerce’s performance depends on your choices
WooCommerce speed is entirely dependent on your hosting choice. Install WooCommerce on budget shared hosting, and you’ll struggle with slow page loads and database query times. Use high-quality managed WordPress hosting, and you can match or exceed Shopify’s performance benchmarks.
Premium managed WordPress hosts provide server-level caching, CDN integration, and optimized PHP configurations specifically tuned for WooCommerce. These hosts handle the technical infrastructure similar to how Shopify does, but you’re paying for hosting separately and maintaining more control over the configuration.
Technical factors affecting WooCommerce performance:
- Theme code quality and efficiency determine baseline speed.
- Plugin script loading strategies impact page weight and HTTP requests.
- Image compression and lazy loading reduce initial load times.
- Database query optimization handles growing product catalogs.
- Page caching, object caching, and CDN configuration control final delivery speed.
This means WooCommerce can be extremely fast, but achieving that speed requires getting the right hosting plan and either having technical knowledge or working with WordPress performance specialists. You can implement advanced caching, database indexing, and server-side optimizations that aren’t possible in Shopify’s closed environment. You can choose hosting providers based on geographic location to minimize latency for your specific customer base.
Which is faster?
Shopify is faster to launch with good performance and requires no ongoing optimization work. If you want predictable performance without technical involvement, Shopify delivers immediately.
WooCommerce can be faster at scale when properly implemented, but requires expertise and quality hosting to achieve that speed. If you need maximum control over speed optimization or want to implement advanced performance strategies, WooCommerce provides the access to do it, assuming you have the expertise or budget to hire specialists who do.
Shopify vs WooCommerce: Customization and checkout control
Control over your store’s functionality and checkout experience often drives the final platform decision. WooCommerce delivers unlimited customization at any price point. Shopify locks significant functionality behind Plus pricing and platform restrictions.
WooCommerce’s open-source flexibility
WooCommerce offers full code access with no vendor lock-in. You can modify every line of PHP, adjust every database query, and customize every pixel of the checkout flow. Want to add a custom field that calculates shipping based on product weight and customer loyalty tier? Build it. Need to integrate directly with your warehouse management system’s API? You have complete access to make it happen.
Unlimited checkout customization is available at any price point. You’re not gated by plan tiers. A store on $15 per month hosting has the same technical freedom as one on $500 per month enterprise hosting. This is a fundamental advantage that Shopify can’t match without charging $2,000+ monthly for Plus.
What you can customize in WooCommerce:
- Replace default product pages with completely custom layouts tailored to your brand.
- Modify how the cart calculates totals based on complex business rules unique to your operations.
- Add custom order statuses that trigger specific workflows in your business systems.
- Build conditional checkout fields that appear based on custom products, cart contents, customer type, or purchase history.
- Integrate directly with third-party APIs for inventory, shipping, accounting, or CRM systems.
- Create multi-step validation processes with custom approval workflows.
- Implement dynamic pricing based on customer attributes, purchase volume, or membership tiers.
- Design custom payment workflows routing to different processors based on order type or geography.
- Build subscription models with usage-based billing or custom renewal logic.
- Develop multi-vendor marketplace functionality with commission structures.
The possibilities extend as far as your business requirements demand. There are no artificial walls blocking functionality based on what you pay monthly. The platform doesn’t dictate how you run your business.
Shopify’s theme and app ecosystem
Shopify offers customization through its theme and app ecosystem. The platform provides a theme editor with a visual interface for changing layouts, colors, and basic structural elements. You can add custom CSS and limited JavaScript without touching core code. Thousands of apps in the Shopify App Store extend functionality for email marketing, inventory management, customer reviews, and specialized features.
This model works adequately for standard e-commerce needs that fit within Shopify’s predetermined structure. Most basic stores can achieve acceptable results through theme selection and app installation.
Severe limitations appear when you need to customize core functionality:
Significant checkout modifications require Shopify Plus. On standard Shopify plans, you can adjust checkout branding and add limited custom fields through apps, but you cannot fundamentally alter the checkout flow, add complex conditional logic, or integrate custom pricing calculations that aren’t supported by existing apps.
Checkout modifications locked behind Plus pricing:
- Multi-step validation processes before order confirmation.
- Dynamic pricing based on customer attributes or purchase history.
- Custom payment workflows that route to different processors based on order type.
- Integration with legacy systems that need to approve orders before processing.
- Removal or reordering of standard checkout steps.
- Custom discount logic beyond what Shopify’s standard rules support.
If your business model requires any of these workflows, you’re either paying enterprise pricing or rebuilding your business processes to fit Shopify’s constraints. This is the core limitation that makes WooCommerce the superior choice for businesses with unique requirements.
Even with Plus, you’re still working within Shopify’s closed ecosystem. You can’t access the underlying code. You can’t modify database structures. You can’t implement optimizations that require server-level access. The platform fundamentally limits how much control you have over your own store.
WooCommerce delivers flexibility without platform fees
WooCommerce gives you the same unlimited customization capability whether you’re spending $15 monthly on hosting or $500. There are no plan upgrades required to unlock functionality. No features are held hostage behind enterprise pricing tiers. The platform doesn’t charge extra fees for building the exact store your business needs.
This creates a massive long-term advantage. As your business grows and requires more sophisticated features, WooCommerce scales with you without platform pricing increases. You invest in development work to build what you need, but that’s a one-time cost that becomes a permanent asset you own. Shopify forces you into higher monthly tiers or expensive contracts to access basic customization capabilities.
Expert customization support when you need it
Codeable serves as an official WooCommerce development partner, connecting you with vetted WordPress and WooCommerce experts who have proven track records solving technical challenges. You receive a single-price estimate model that eliminates bidding wars and unclear pricing, plus a 28-day code warranty that protects your investment.
Specialized packages for WooCommerce customization:
- Conflict testing identifies and resolves plugin compatibility issues.
- Technical performance audits analyze your setup and provide optimization roadmaps.
- Custom site development for checkout modifications, integrations, and unique workflows.
- Migration packages for moving from Shopify to WooCommerce with SEO preservation.
This support structure transforms WooCommerce’s flexibility from a theoretical possibility into a practical reality. You get the unlimited customization advantages without the risk of poor implementation or unreliable developers.
Payments, platform fees, and shipping costs
Payment processing economics directly impact your profit margins. WooCommerce charges zero platform fees and gives you complete payment flexibility. Shopify locks you into their payment system or penalizes you with transaction fees for using alternatives.
WooCommerce’s complete payment freedom
WooCommerce charges no platform transaction fees ever. You pay only your payment processor’s rates with no additional platform percentage layered on top. If you use Stripe, you pay 2.9% plus $0.30 per transaction. On $10,000 in monthly sales, your processing fees are approximately $320. That’s it.
Payment advantages you control on WooCommerce:
- Switch payment processors anytime without platform penalties or migration restrictions.
- Negotiate custom rates with payment gateways as your transaction volume grows.
- Use multiple processors simultaneously for different customer segments or regions.
- Offer Stripe for credit cards, PayPal for customers who prefer it, and direct bank transfers for wholesale orders.
- Integrate specialized processors for cryptocurrency, regional payment methods, or industry-specific solutions.
- Build custom payment routing logic based on order value, customer type, or geographic location.
Shipping calculations work the same way. Install a shipping plugin, connect to carrier APIs for real-time rates, or build custom shipping tables based on your specific fulfillment costs. You control the entire calculation logic without platform restrictions.
Shopify’s payment restrictions and penalties
Shopify with Shopify Payments charges only processor rates similar to Stripe, with no extra platform fee. Competitive credit card processing rates decrease as you move to higher plan tiers. The problem appears when you choose an external payment gateway instead of Shopify Payments.
Shopify adds platform fees of 0.5% to 2% on top of your processor’s fees, depending on your plan tier. On the Basic plan, that’s an additional 2% per transaction. For $10,000 in monthly sales using an external gateway, you pay processor fees plus a $200 platform fee to Shopify.
When Shopify’s platform fees hurt most:
- You have established relationships with specific payment processors.
- You’ve negotiated custom rates based on your transaction volume.
- You operate in regions where Shopify Payments isn’t available.
- You sell low-margin products where an extra 2% destroys profitability.
- You need specialized processors for industry-specific requirements.
This creates a forced choice: use Shopify’s preferred payment system or pay a penalty on every single transaction.
The economics favor WooCommerce decisively as transaction volume increases. At $100,000 in monthly sales using an external gateway on Shopify Basic, you’re paying $2,000 monthly just in platform fees before counting actual payment processing costs. WooCommerce charges zero platform fees at any volume.
Shopify vs WooCommerce: Support
Support structures differ fundamentally between these platforms. Shopify centralizes support through its own team with increasingly limited access for standard plan users. WooCommerce doesn’t offer centralized platform support but instead relies on a distributed ecosystem: hosting providers handle server issues, plugin developers support their extensions, the WordPress community provides forums and documentation, and platforms like Codeable connect you with vetted specialists for custom development and technical challenges.
Shopify’s restricted centralized support
Shopify’s support has become significantly more limited for standard plan users. As of 2025, phone and email support are no longer available for Basic, Grow, or Advanced plans. Standard plan users must rely on AI-powered chat support, which requires working through an automated assistant before reaching a human agent.
What Shopify support covers:
- Platform navigation and basic feature usage.
- Billing and account management questions.
- Limited theme customization guidance.
- App installation troubleshooting (but not app-specific issues).
- Payment gateway setup assistance.
Shopify Plus users get direct phone support, email ticketing, and dedicated Merchant Success Managers. For everyone else, you’re working through chat queues with estimated wait times and limited escalation options.
Store owners report declining support quality across forums and review sites. Common complaints include longer wait times, generic responses from support agents lacking deep technical knowledge, and AI assistants that make it difficult to reach human support for complex issues. You’re essentially a passenger on Shopify’s infrastructure with no access to underlying server configurations or core code when something breaks at that level.
WooCommerce’s specialized support ecosystem
WooCommerce support is distributed across multiple specialized providers, each handling their area of expertise with deep technical knowledge. This ensures you’re never locked into a single vendor’s declining support quality or limited capabilities.
Where to get expert WooCommerce support:
- Premium managed WordPress hosts provide 24/7 support specifically for server issues, performance problems, and infrastructure questions.
- Plugin developers offer direct support for their specific extensions with expertise in exactly how their code works.
- WordPress community maintains extensive forums, documentation, and troubleshooting guides for general questions.
- Premium extensions include dedicated support channels with the developers who built them.
- Professional developers through Codeable handle custom code, complex integrations, and technical audits with guaranteed results.
The distributed model means you choose best-in-class providers for each component. If your hosting support declines, switch to a different host within days. If a plugin developer isn’t responsive, replace their plugin with a better-supported alternative. You’re never trapped, hoping a single vendor improves their support quality or removes restrictions based on your plan tier.
Premium managed WordPress hosts typically offer chat, phone, and email support at all plan levels, not just enterprise tiers. You get direct access to specialists who understand WordPress architecture without tier-based restrictions.
Data ownership and complete portability
WooCommerce stores are fully portable with complete code and data control. Your entire store lives in a WordPress database you can export, migrate, and control completely. Product data, customer information, order history, and all custom code belong to you. If you decide to switch platforms, move to a different hosting, or merge multiple stores, you have complete access to make it happen.
Shopify stores are deliberately difficult to migrate away from. While you can export basic product and customer data through CSV files, much of your store’s functionality lives in apps that don’t export cleanly. Custom checkout scripts, complex discount rules, and workflow automations must be rebuilt from scratch on a new platform. Shopify’s proprietary data structures don’t translate directly to other systems.
This lock-in is intentional. Shopify’s business model depends on you staying on their platform and paying monthly fees indefinitely. Making it difficult to leave protects their recurring revenue.
Moving from Shopify to WooCommerce
Codeable offers migration packages specifically designed to handle Shopify to WooCommerce transitions with SEO preservation, subscription token handling when supported, and post-migration training.

What migration packages include:
- Complete data transfer of products, customers, and order history.
- URL structure mapping and 301 redirect implementation to maintain search rankings.
- Theme design matching or improvement to preserve brand consistency.
- Plugin selection and configuration to replace Shopify app functionality.
- Checkout flow testing to ensure payment processing works correctly.
- Training sessions for your team on managing WooCommerce.
Migration timelines typically run 4 to 8 weeks, depending on store complexity. With experienced developers, the process can be quicker, particularly if the need for migration is urgent. For stores paying Shopify Plus fees for adequate support or hitting platform limitations, the long-term cost savings and increased flexibility justify the investment.
What breaks first and who owns the fix
Most platform comparisons focus on features and pricing. Few tell you where things actually break in production and whose job it is to fix them. The key difference: Shopify’s limitations force you into expensive workarounds or platform lock-in. WooCommerce’s challenges can be permanently solved because you control the entire stack.
Shopify’s platform limitations and forced upgrades
Shopify’s managed infrastructure introduces hard constraints that become friction points as your store grows.
Critical Shopify limitations you cannot solve:
- Checkout customization blocked behind Plus pricing. Significant modifications require Shopify Plus at $2,000+ monthly. No middle ground exists.
- Payment processor penalties. Using gateways other than Shopify Payments triggers platform fees of 0.5% to 2% on every transaction.
- 100 variant cap per product. A t-shirt with 5 sizes, 8 colors, and 3 fabric types exceeds this limit. Workarounds create poor customer experiences.
- App stack sprawl. Stores using 8 to 12 apps easily pay $300 to $600 monthly in app fees. When apps conflict, you’re dependent on third-party developers with no code access.
When something breaks that Shopify controls, you submit a support ticket and wait. The platform’s closed architecture means you’re always dependent on others to solve problems.
WooCommerce’s solvable challenges with complete control
Every WooCommerce problem can be permanently solved because you have full access to code, hosting, and infrastructure.
Common challenges and their permanent solutions:
- Hosting performance: Migrate to managed WordPress hosting with WooCommerce-specific optimization. You control your provider and can upgrade anytime.
- Update coordination: Test updates on staging sites (available with most managed hosts) before deployment to production. When conflicts arise, identify and permanently fix the code.
- Plugin conflicts: Full code access lets you or your developer modify conflicting code and implement permanent fixes.
- Backup configuration: Configure automated daily backups through hosting or plugins. Most premium hosts include this as standard.
The fix is implementing automated daily backups with off-site storage and regular restoration testing to verify backups actually work.
What you own and manage on WooCommerce:
- Hosting provider selection and server configuration.
- WordPress, WooCommerce, and plugin update management.
- Security hardening, including firewall rules and malware scanning.
- Performance tuning from caching to database optimization.
- Backup strategy and disaster recovery planning.
When something breaks, you have complete access to diagnose and fix it. The responsibility is yours, but so is the control.
The accountability difference
Shopify: Dependent on platform decisions and upgrade paths. Limitations like variant caps, checkout restrictions, and transaction fees can’t be solved, only worked around or paid to bypass.
WooCommerce: Complete control over permanent solutions. Every challenge can be definitively solved because you control the entire stack.
The trade-off: Shopify offers convenience by removing control. WooCommerce provides control that enables permanent solutions.
Scaling your WooCommerce store with confidence through Codeable
WooCommerce delivers ownership, flexibility, and superior long-term economics when you have access to expert help that removes technical risk. Codeable eliminates this uncertainty entirely.
I’ve used UpWork, I’ve used freelancer.com too. The fact that you have pre-vetted developers and you specialize in one thing and you do that one thing well, is what makes Codeable different.”
– Luke Kennedy | CEO, SCAN2CAD
As an official WooCommerce development partner and the only WordPress-exclusive freelancer platform with a 2.2% acceptance rate, Codeable connects you directly with elite experts who specialize in WooCommerce architecture. These specialists have built hundreds of WooCommerce stores and solved every technical challenge you’re likely to encounter.
What makes Codeable different:
- Direct access to vetted WooCommerce specialists with 6+ years of professional experience.
- Single-price estimates showing exact project costs upfront with no bidding wars.
- 28-day code warranty protecting your investment after launch.
- Secure escrow system holding payment until you confirm work meets requirements.
- Specialized packages from $150 conflict testing to $750 performance audits to complete migrations.
Setting up a WooCommerce store becomes straightforward when you work with Codeable’s vetted experts. Instead of navigating hosting decisions, plugin selection, and theme configuration alone, you partner with specialists who have implemented these exact setups dozens of times.
Your Codeable expert handles the technical foundation while you focus on product strategy and launch marketing. When setup is complete, you receive training on managing products, processing orders, and handling day-to-day operations.
Codeable’s model provides expert-level WooCommerce development on demand with transparent pricing and guaranteed results. You pay for the work you need when you need it, backed by warranties that ensure quality delivery.
Start building your WooCommerce store with Codeable.
Post your project to receive a free estimate from vetted WooCommerce experts who will handle setup, configuration, and launch while you focus on growing your business.
20 000+ businesses of every shape and size have already trusted us to hire WordPress developers and scale their growth.
The post Shopify vs WooCommerce and What Breaks First When Things Go Wrong appeared first on Codeable.
]]>