Ich habe einen Windows Server 2025, auf dem eine Linux VM mit Docker-Containern läuft. Für das Deployment meiner statischen Photo-Gallery wollte ich eine sichere Lösung ohne viele offene Ports. Die Antwort: SSH-Tunneling - ein einzelner SSH-Port für alles.
Das Setup
- Windows
Ich habe einen Windows Server 2025, auf dem eine Linux VM mit Docker-Containern läuft. Für das Deployment meiner statischen Photo-Gallery wollte ich eine sichere Lösung ohne viele offene Ports. Die Antwort: SSH-Tunneling - ein einzelner SSH-Port für alles.
Das Setup
- Windows Server 2025 mit öffentlicher IP
- Linux VM auf dem Windows Server (intern, keine öffentliche IP)
- Docker-Container mit nginx auf der VM
- Lokaler Rechner (Windows/Linux) für Deployment
Ziel
- Deployment via
rsynczur Linux VM - RDP-Zugriff zum Windows Server (ohne offenen RDP-Port)
- Zugriff auf Docker-Services (Portainer etc.)
- Alles über einen einzigen SSH-Port (22222)
Warum SSH-Tunneling?
Vorteile
✅ Ein Port für alles - Nur SSH Port 22222 nach außen offen
✅ Sicherer - Weniger Angriffsfläche als 5+ offene Ports
✅ Weniger Bot-Traffic - Non-Standard-Port drastisch weniger gescannt
✅ Flexibel - RDP, SSH, Portainer, MySQL etc. über Tunnel erreichbar
✅ Einfach - SSH-Key-Auth, keine VPN-Komplexität
Alternative: VPN
WireGuard wäre sicherer und professioneller, aber:
- ~30 Minuten Setup vs. 5 Minuten SSH
- Für ein privates Deployment-Setup ist SSH völlig ausreichend
Warum Port 22222 statt 22?
Nachteile eines öffentlichen SSH-Ports auf Port 22
- Tausende Bot-Angriffe pro Tag - Automatisierte Scanner suchen Port 22
- Log-Spam - Logs voll mit fehlgeschlagenen Login-Versuchen
- Server-Last - SSH muss ständig Anfragen abweisen
Port 22222 reduziert das drastisch
- ✅ 99% weniger Bot-Traffic - Scanner suchen nur Standard-Ports
- ✅ Saubere Logs - Echte Probleme fallen sofort auf
- ✅ Leicht zu merken - 5x die 2
Hinweis: Das ist "Security by Obscurity" - nicht technisch sicherer, aber praktisch viel angenehmer im Alltag.
Schritt 1: OpenSSH Server auf Windows Server 2025
Installation
# Als Administrator:

# Prüfen ob verfügbar:
Get-WindowsCapability -Online | Where-Object Name -like 'OpenSSH.Server*'

# Installieren:
Add-WindowsCapability -Online -Name OpenSSH.Server~~~~0.0.1.0

# Dienst aktivieren:
Set-Service -Name sshd -StartupType 'Automatic'
Start-Service sshd

# Prüfen:
Get-Service sshd
# Sollte: Status = Running
Konfiguration auf Port 22222
# Config bearbeiten:
notepad C:\ProgramData\ssh\sshd_config

# Zeile ändern (# entfernen!):
Port 22222

# Speichern und Dienst neu starten:
Restart-Service sshd

# Prüfen ob Port offen:
netstat -an | findstr "22222"
# Sollte zeigen: TCP 0.0.0.0:22222 ... LISTENING
Windows Firewall
# Firewall-Regel erstellen:
New-NetFirewallRule -Name "OpenSSH-Server-In-TCP-22222" `
    -DisplayName "OpenSSH Server (sshd) Port 22222" `
    -Enabled True -Direction Inbound -Protocol TCP `
    -Action Allow -LocalPort 22222

# Alte Port-22-Regel deaktivieren (optional):
Disable-NetFirewallRule -Name "OpenSSH-Server-In-TCP"

# Prüfen:
Get-NetFirewallRule -DisplayName "*22222*" | Format-List
Wichtig: Die Firewall-Regel ist sofort aktiv, kein Neustart nötig!
Cloud-Provider Firewall
In der Cloud-Console deines Providers:
- Server auswählen → Firewall/Security Groups
- Neue Regel: TCP Port 22222, Quelle: 0.0.0.0/0 (oder nur deine IP)
- Port 22 kann geschlossen bleiben
Ersten Test durchführen
# Von deinem lokalen Rechner:
Test-NetConnection -ComputerName SERVER-IP -Port 22222

# Sollte zeigen: TcpTestSucceeded : True

# Oder mit telnet/nc:
telnet SERVER-IP 22222
# oder
nc -zv SERVER-IP 22222
Schritt 2: SSH-Key-Authentifizierung
Auf dem lokalen Rechner
# Vorhandenen Key nutzen oder neuen erstellen:
ssh-keygen -t ed25519 -f C:\Users\USERNAME\.ssh\id_ed25519

# Bei "passphrase" ENTER drücken (kein Passwort für automatisches Deployment)
# Oder Passwort setzen und später mit ssh-agent verwalten

# Public Key anzeigen:
type C:\Users\USERNAME\.ssh\id_ed25519.pub
# Ausgabe kopieren (komplett!)
Linux/Mac:
# Key erstellen:
ssh-keygen -t ed25519 -f ~/.ssh/id_ed25519

# Public Key anzeigen:
cat ~/.ssh/id_ed25519.pub
Auf dem Windows Server
Per RDP verbinden und:
# Ordner erstellen (falls nicht vorhanden):
mkdir C:\ProgramData\ssh -ErrorAction SilentlyContinue

# Authorized Keys Datei bearbeiten:
notepad C:\ProgramData\ssh\administrators_authorized_keys

# Public Key einfügen (komplette Zeile)
# Speichern

# WICHTIG: Berechtigungen setzen
icacls C:\ProgramData\ssh\administrators_authorized_keys /inheritance:r
icacls C:\ProgramData\ssh\administrators_authorized_keys /grant "SYSTEM:(F)"
icacls C:\ProgramData\ssh\administrators_authorized_keys /grant "Administrators:(F)"
Warum diese Berechtigungen? OpenSSH auf Windows verweigert die Key-Auth, wenn andere Benutzer Zugriff auf die Datei haben. Die icacls-Befehle stellen sicher, dass nur SYSTEM und Administrators lesen können.
Testen
# Windows:
ssh -p 22222 Administrator@SERVER-IP

# Linux/Mac:
ssh -p 22222 Administrator@SERVER-IP

# Sollte OHNE Passwort einloggen! 🎉
Passwort-Authentifizierung deaktivieren (optional, aber empfohlen)
Auf dem Windows Server:
# sshd_config bearbeiten:
notepad C:\ProgramData\ssh\sshd_config

# Folgende Zeilen ändern/hinzufügen:
PasswordAuthentication no
PermitRootLogin no
MaxAuthTries 3

# Speichern und Dienst neu starten:
Restart-Service sshd
Schritt 3: SSH-Config für einfachen Zugriff
Windows
# Erstellen/Bearbeiten:
notepad C:\Users\USERNAME\.ssh\config
Linux/Mac
# Erstellen/Bearbeiten:
nano ~/.ssh/config
Config-Inhalt
# Windows Server mit Tunneln
Host myserver
    HostName SERVER-IP-ADDRESS
    Port 22222
    User Administrator
    IdentityFile ~/.ssh/id_ed25519

    # RDP-Tunnel (Windows Server)
    LocalForward 3389 localhost:3389

    # SSH-Tunnel zur VM
    LocalForward 2223 VM-INTERNAL-IP:22

    # Portainer-Tunnel
    LocalForward 9000 VM-INTERNAL-IP:9000

    # Optional: MySQL
    LocalForward 3306 VM-INTERNAL-IP:3306

# Linux VM über Tunnel
Host vm-docker
    HostName localhost
    Port 2223
    User vm-username
    # Erfordert aktiven Tunnel zu 'myserver'
VM-IP herausfinden:
Auf dem Windows Server:
# Hyper-V:
Get-VMNetworkAdapter -VMName <vm-name> | Select IPAddresses

# Docker:
docker inspect <container-name> | findstr IPAddress

# WSL2:
wsl hostname -I
Was ist LocalForward?
LocalForward erstellt einen Port auf deinem lokalen Rechner, der den Traffic durch den SSH-Tunnel zum Ziel leitet:
LocalForward 3389 localhost:3389
             │    │        └─ Port auf Server
             │    └─ Host vom Server aus gesehen
             └─ Port auf lokalem Rechner
Bedeutet: localhost:3389 auf deinem Rechner → SSH-Tunnel → localhost:3389 auf dem Server (RDP)
Schritt 4: Tunnel nutzen
SSH zum Windows Server
# Tunnel starten (Terminal bleibt offen):
ssh myserver

# Jetzt laufen im Hintergrund:
# - RDP auf localhost:3389
# - VM-SSH auf localhost:2223
# - Portainer auf localhost:9000
Wichtig: Das Terminal muss offen bleiben, solange du die Tunnel nutzen willst!
RDP über Tunnel
# In neuem Terminal/Tab:

# Windows:
mstsc /v:localhost:3389

# Linux:
remmina -c rdp://localhost:3389

# Mac:
open rdp://localhost:3389
Verbindet zu Windows Server, OHNE offenen RDP-Port! 🔒
SSH zur VM
# In neuem Terminal/Tab:
ssh vm-docker

# Verbindet zur Linux VM über den Tunnel
Portainer/Services im Browser
http://localhost:9000
Tunnel prüfen
# Welche Ports sind lokal offen?

# Windows:
netstat -an | findstr "LISTENING"

# Linux/Mac:
netstat -tuln | grep LISTEN

# Sollte zeigen:
# 127.0.0.1:3389  (RDP)
# 127.0.0.1:2223  (VM-SSH)
# 127.0.0.1:9000  (Portainer)
Schritt 5: Deployment einrichten
VM vorbereiten
Auf der Linux VM:
# SSH-Key hinzufügen:
mkdir -p ~/.ssh
nano ~/.ssh/authorized_keys
# Public Key einfügen

# Berechtigungen:
chmod 700 ~/.ssh
chmod 600 ~/.ssh/authorized_keys

# nginx Volume-Mount-Pfad prüfen:
docker inspect nginx-container | grep Mounts -A 10
# z.B.: /var/www/html → /usr/share/nginx/html
Projekt-Config
In deinem Deployment-Projekt:
# projects/my-website/project.config
nano projects/my-website/project.config
#━━━━━━━━━━━━━━━━━━━━━━━━━━━━━━━━━━━━━━━━
# Deployment Configuration
#━━━━━━━━━━━━━━━━━━━━━━━━━━━━━━━━━━━━━━━━

# Remote server hostname or SSH config alias
REMOTE_HOST="vm-docker"

# Remote username
REMOTE_USER="vm-username"

# Remote path where the site will be deployed
REMOTE_PATH="/var/www/html/my-website"
Deployment testen
# Terminal 1: Tunnel starten
ssh myserver

# Terminal 2: Deployment
cd ~/code/MyProject
./deploy.sh -p my-website

# 🎉 Deployment läuft über den Tunnel!
Troubleshooting: rsync nicht gefunden
Wenn rsync auf Windows fehlt:
# Git for Windows installieren (bringt rsync mit)
# Oder via WSL2:
wsl rsync -avz ...

# Oder Cygwin installieren
Workflow im Alltag
# 1. Tunnel starten (einmal am Tag):
ssh myserver

# 2. Arbeiten:
# - RDP: mstsc /v:localhost:3389
# - Portainer: http://localhost:9000
# - Deploy: ./deploy.sh -p my-website
# - VM-SSH: ssh vm-docker

# 3. Tunnel läuft solange Terminal offen bleibt
Optional: Persistent Tunnel
Für dauerhaften Tunnel ohne offenes Terminal:
Linux/Mac: autossh
# autossh installieren:
sudo apt install autossh  # Debian/Ubuntu
brew install autossh      # Mac

# Tunnel starten:
autossh -M 0 -f -N myserver

# -M 0: Kein Monitoring-Port
# -f: Im Hintergrund
# -N: Keine Shell

# Beenden:
pkill autossh
Windows: Task Scheduler
# tunnel-start.ps1 erstellen:
Start-Process ssh -ArgumentList "-N myserver" -WindowStyle Hidden

# Als geplante Aufgabe:
# Task Scheduler → Create Task
# Trigger: At logon
# Action: PowerShell -File C:\Path\tunnel-start.ps1
Windows: NSSM (Non-Sucking Service Manager)
# NSSM installieren (via Chocolatey):
choco install nssm

# SSH als Windows-Dienst:
nssm install SSHTunnel "C:\Windows\System32\OpenSSH\ssh.exe" "-N myserver"
nssm start SSHTunnel

# Dienst verwalten:
nssm stop SSHTunnel
nssm remove SSHTunnel
Systemd Service (Linux)
# ~/.config/systemd/user/ssh-tunnel.service
[Unit]
Description=SSH Tunnel to Server
After=network.target

[Service]
Type=simple
ExecStart=/usr/bin/ssh -N myserver
Restart=always
RestartSec=10

[Install]
WantedBy=default.target

# Aktivieren:
systemctl --user enable ssh-tunnel
systemctl --user start ssh-tunnel

# Status prüfen:
systemctl --user status ssh-tunnel
Sicherheit
Was haben wir erreicht?
✅ Nur ein Port offen: SSH Port 22222
✅ Key-only Auth: Keine Passwörter
✅ Non-Standard-Port: Drastisch weniger Bot-Scans
✅ Verschlüsselt: Alle Verbindungen über SSH-Tunnel
✅ Keine direkten Ports: RDP, Portainer etc. nur intern erreichbar
Weitere Härtung (optional)
# sshd_config auf dem Server:
PasswordAuthentication no
PermitRootLogin no
MaxAuthTries 3
ClientAliveInterval 300
ClientAliveCountMax 2
fail2ban für zusätzlichen Schutz
Windows: IPBan (Open Source Alternative zu fail2ban)
# IPBan installieren:
# https://github.com/DigitalRuby/IPBan

# Blockiert automatisch IPs nach mehreren fehlgeschlagenen Login-Versuchen
Linux (auf der VM):
sudo apt install fail2ban

# Config für SSH:
sudo nano /etc/fail2ban/jail.local

[sshd]
enabled = true
port = 22
maxretry = 3
bantime = 3600
SSH-Key mit Passwort schützen
Wenn du deinen SSH-Key mit Passwort schützen willst (empfohlen für zusätzliche Sicherheit):
# Key mit Passwort erstellen:
ssh-keygen -t ed25519 -f ~/.ssh/id_ed25519
# Passphrase eingeben

# SSH-Agent nutzen (speichert Passwort für Session):

# Windows:
Start-Service ssh-agent
Set-Service -Name ssh-agent -StartupType Automatic
ssh-add ~/.ssh/id_ed25519
# Passwort einmal eingeben

# Linux/Mac:
eval "$(ssh-agent -s)"
ssh-add ~/.ssh/id_ed25519
# Passwort einmal eingeben

# Danach funktioniert SSH ohne Passwort-Abfrage!
Troubleshooting
Timeout bei SSH-Verbindung
# 1. SSH-Dienst läuft?
Get-Service sshd
# Sollte: Status = Running

# 2. Port prüfen:
netstat -an | findstr "22222"
# Sollte: TCP 0.0.0.0:22222 ... LISTENING

# 3. Windows Firewall prüfen:
Get-NetFirewallRule -DisplayName "*22222*"
# Sollte: Enabled = True

# 4. Cloud Firewall prüfen in Provider-Console

# 5. Von außen testen:
Test-NetConnection -ComputerName SERVER-IP -Port 22222
# Sollte: TcpTestSucceeded = True
Permission Denied (publickey)
# Public Key korrekt auf Server?
# Auf Server:
type C:\ProgramData\ssh\administrators_authorized_keys

# Berechtigungen korrekt?
icacls C:\ProgramData\ssh\administrators_authorized_keys
# Sollte nur SYSTEM und Administrators haben

# Key auf lokalem Rechner vorhanden?
# Lokal:
dir C:\Users\USERNAME\.ssh\
ssh-add -l  # Zeigt geladene Keys

# SSH mit Debug-Output:
ssh -vvv -p 22222 Administrator@SERVER-IP
# Zeigt genau wo es scheitert
Tunnel funktioniert nicht
# SSH mit Debug-Output:
ssh -vvv myserver

# Port-Forwarding aktiv?
# Lokal:
netstat -an | findstr "3389"  # RDP
netstat -an | findstr "2223"  # VM-SSH

# VM-IP korrekt in SSH-Config?
# Auf Server testen:
ping VM-INTERNAL-IP
rsync: command not found
# Windows:
# Git for Windows installieren (bringt rsync mit)
# Oder WSL2 nutzen:
wsl rsync -avz ...

# Linux/Mac:
sudo apt install rsync  # Debian/Ubuntu
brew install rsync      # Mac
Connection timed out nach einiger Zeit
# SSH-Config erweitern:
notepad ~/.ssh/config

# Hinzufügen:
Host myserver
    # ... bestehende Einstellungen ...
    ServerAliveInterval 60
    ServerAliveCountMax 3

# Hält Verbindung mit regelmäßigen "Heartbeats" aktiv
Monitoring und Logging
SSH-Logs auf Windows Server
# Event Viewer:
Get-EventLog -LogName Application -Source sshd -Newest 20

# Oder:
Get-WinEvent -LogName "OpenSSH/Operational" -MaxEvents 20

# Fehlgeschlagene Logins:
Get-WinEvent -LogName "OpenSSH/Operational" |
    Where-Object {$_.Message -like "*Failed*"}
SSH-Logs auf Linux VM
# Live-Logs:
sudo tail -f /var/log/auth.log

# Fehlgeschlagene Logins:
sudo grep "Failed password" /var/log/auth.log

# Erfolgreiche Logins:
sudo grep "Accepted publickey" /var/log/auth.log
Tunnel-Status überwachen
# Skript: check-tunnel.sh
#!/bin/bash

if netstat -tuln | grep -q ":3389"; then
    echo "✅ RDP-Tunnel läuft"
else
    echo "❌ RDP-Tunnel nicht aktiv"
fi

if netstat -tuln | grep -q ":2223"; then
    echo "✅ VM-SSH-Tunnel läuft"
else
    echo "❌ VM-SSH-Tunnel nicht aktiv"
fi
Best Practices
1. Separate Keys für verschiedene Zwecke
# Persönlicher Key (mit Passwort):
~/.ssh/id_ed25519_personal

# Deployment Key (ohne Passwort):
~/.ssh/id_ed25519_deploy

# Server-Management Key:
~/.ssh/id_ed25519_server
2. SSH-Config strukturieren
# ~/.ssh/config

# === Production Servers ===
Host prod-*
    User admin
    IdentityFile ~/.ssh/id_ed25519_server
    ServerAliveInterval 60

Host prod-web
    HostName web.example.com
    Port 22222

Host prod-db
    HostName db.example.com
    Port 22222

# === Development ===
Host dev-*
    User developer
    IdentityFile ~/.ssh/id_ed25519_dev

# === Deployment ===
Host deploy-*
    User deployer
    IdentityFile ~/.ssh/id_ed25519_deploy
3. Regelmäßige Security-Audits
# Checklist:
# ✅ Nur Key-Auth aktiviert?
# ✅ Root-Login deaktiviert?
# ✅ fail2ban/IPBan läuft?
# ✅ Logs regelmäßig prüfen?
# ✅ Unbenutzte Keys entfernen?
# ✅ Windows Updates installiert?
# ✅ SSH-Version aktuell?
4. Backup der SSH-Keys
# Keys verschlüsselt sichern:
tar czf ssh-keys-backup.tar.gz ~/.ssh/
gpg -c ssh-keys-backup.tar.gz
# Passwort eingeben

# In Cloud/USB speichern:
# ssh-keys-backup.tar.gz.gpg
Zusammenfassung
SSH-Tunneling ist eine elegante, sichere Lösung für Server-Management und Deployment:
Vorteile
- ✅ Einfach: Keine VPN-Komplexität
- ✅ Sicher: Minimale Angriffsfläche (nur ein Port)
- ✅ Flexibel: Beliebige Services tunneln
- ✅ Produktionsreif: Bewährt in vielen Projekten
- ✅ Kostenlos: Keine zusätzliche Software nötig
- ✅ Plattformübergreifend: Windows, Linux, Mac
Nachteile
- ⚠️ Terminal muss offen bleiben (außer bei Background-Lösungen)
- ⚠️ Bei Verbindungsabbruch muss neu verbunden werden
- ⚠️ Nicht ideal für viele gleichzeitige Nutzer
Wann VPN stattdessen?
- 🔐 Hochsensible Daten (Finanzen, Gesundheit)
- 👥 Mehrere Team-Mitglieder brauchen Zugriff
- 🏢 Firmen-Compliance verlangt VPN
- 🌐 Gesamtes Netzwerk soll erreichbar sein
- 🔄 24/7 Verbindung ohne manuelle Tunnel
Für Hobby-/Semi-Professional-Projekte ist SSH-Tunneling perfekt!
Ressourcen
Dokumentation
Tools
- PuTTY - SSH-Client für Windows (GUI)
- WinSCP - SCP/SFTP-Client für Windows
- Remmina - RDP-Client für Linux
- autossh - Persistent SSH-Tunnel
Sicherheit
- IPBan - fail2ban für Windows
- SSH Security Best Practices
Tags: #SSH #Windows-Server #Deployment #DevOps #Security #Tunneling #Docker #RDP
Hinweis: Diese Anleitung basiert auf echten Produktions-Erfahrungen mit einem Windows Server 2025 und Linux VM Setup. Alle Befehle wurden getestet und funktionieren.
]]>Building your TrueNas Scale kernel
]]>For building you need an OS that is
This blog post was created because my driver was missing for the Framework Desktops Ethernet driver. If you have the same setup and want to reach the same goal, you can almost blindly copy and paste everything.
Building your TrueNas Scale kernel
For building you need an OS that is almost identical for your truenas. I used in my tests Debian 12 devcontainer because it was already close enough.
Copy the current kernel config
cp /boot/config-$(uname -r) .config
That is the config that contains all the compiler flags that where used in your build of truenas scale.
Clone the kernel source
git clone https://github.com/truenas/linux.git
cd linux
Now checkout the correct version that matches your running kernel.
The version are oganized by tags with the name schema:
TS-XX.YY.Z
Where XX.YY.Z is the version of your TrueNas Scale installation.
So in my case my tag is TS-24.10.1
git checkout TS-24.10.1
Prepare the build environment
Install missing tools
apt update && apt install -y \
  build-essential \
  linux-headers-6.6.44-rt \
  dkms \
  git \
  curl \
  wget \
  pciutils \
  net-tools \
  iproute2 \
  systemd
Copy the config file
cp ../.config .config
Disable signed builds because we don't have the keys to sign the modules
scripts/config --disable CONFIG_SYSTEM_TRUSTED_KEYS
scripts/config --disable CONFIG_MODULE_SIG_KEY
scripts/config --disable CONFIG_SYSTEM_REVOCATION_KEYS
Build the module
make olddefconfig
make modules_prepare
make -j $(nproc) modules
To check if the build was successful, check if in the root of the linux folder now a file exists with the name
Module.symvers
To fix errors you can try to run
make -j1 modules. It will take way longer because it limits the build to use only a single core.
Build the driver sysext
You can download the latest driver from here
cd .. * go back to the root folder
wget -O r8126-driver.tar.bz2 https://...your dowload uri...
tar -xjf r8126-driver.tar.bz2
cd r8126-*/src/ # change to the extracted folder
Run the build and point to your custom linux kernel:
make -C ../../linux M=$(pwd) modules
After that in the current folder a file named r8126.ko should exist.
Now create the folder structure for the sysext:
mkdir -p ../build/r8126-sysext/usr/lib/modules/6.6.44-production+truenas/extra
mkdir -p ../build/r8126-sysext/usr/lib/extension-release.d
This can be copied into the build folder structure that already exists next to this readme file:
cp r8126.ko ../build/r8126-sysext/usr/lib/modules/6.6.44-production+truenas/extra/r8126.ko
After that check on you installed truenas the data that is returned by the command:
cat /etc/os-release
And create a file with the name extension-release.r8126-sysext in the folder build/r8126-sysext/usr/lib/extension-release.d/ with the following content:
ID=debian
VERSION_ID=12
SYSEXT_LEVEL=1
Modify the file if needed, for your os release data.
Now create the sysext file:
mksquashfs r8126-sysext r8126-sysext.raw -noappend -comp xz
Now you have the r8126-sysext.raw file that can be used to install the driver into TrueNas Scale.
Install
Important: All commands need to run as root. Without root they are maybe not available or will fail.
Create a pool that will survive system updates:
zfs create boot-pool/customsysext
Mount the custom sysext dataset:
zfs set mountpoint=/root/customsysext boot-pool/customsysext
Copy your custom sysext to the extensions folder
cp /mnt/usbdrive/r8126-sysext.raw /root/customsysext/
Copy for now the custom module to the extensions folder:
mkdir -p /var/lib/extensions/
cp /root/customsysext/r8126-sysext.raw /var/lib/extensions/
Refresh the system extensions:
systemd-sysext refresh
Install the driver:
insmod /usr/lib/modules/$(uname -r)/extra/r8126.ko
Now you should have temporary network access until the next reboot.
Go to the webui and create a init script.
The script should contain the following line:
zfs set mountpoint=/root/customsysext boot-pool/customsysext && mkdir -p /var/lib/extensions/ && cp /root/customsysext/r8126-sysext.raw /var/lib/extensions/ && systemd-sysext refresh && insmod /usr/lib/modules/$(uname -r)/extra/r8126.ko
This will mount the pool in where our customization lives. Then it will copy everything and will install the driver.
]]>Als Entwickler kennt man das: Man baut ein System, das jahrelang funktioniert, und plötzlich - ohne Vorwarnung - bricht alles zusammen 💔. Genau das ist mir mit meinem OneDrive-Bilddownload-Skript passiert.
Was funktionierte (bis es nicht mehr tat) ✅➡️
]]>Als Entwickler kennt man das: Man baut ein System, das jahrelang funktioniert, und plötzlich - ohne Vorwarnung - bricht alles zusammen 💔. Genau das ist mir mit meinem OneDrive-Bilddownload-Skript passiert.
Was funktionierte (bis es nicht mehr tat) ✅➡️❌
Mein Skript war simpel und elegant:
# Die "alte" OneDrive v1.0 API
curl -s "https://api.onedrive.com/v1.0/shares/${share_id}/root/children"
Drei Jahre lang lief das perfekt 🏃♂️. Bis Microsoft entschied, dass OneDrive-Share-Links plötzlich eine Authentifizierung benötigen 🔐.
Der Fehler, der alles veränderte 🚨
Error: Failed to fetch data from OneDrive.
Keine Warnung 📢, keine Migration-Guide 📖, keine Dokumentation 📋. Nur ein kaputter API-Call und Millionen von frustrierten Entwicklern weltweit 😤.
Die offizielle Lösung (die keine ist) 🤦♂️
Microsoft's offizielle Antwort? "Nutzen Sie Microsoft Graph mit OAuth!" 🙄
Das Problem: Für anonyme Share-Links funktioniert das nicht ohne:
- 🏗️ Azure App-Registrierung
- 🔄 OAuth-Flow implementieren
- ✋ Benutzer-Consent einholen
- 🧠 Komplexe Token-Verwaltung
Für ein simples "Lade Bilder aus einem öffentlichen Share herunter" völlig übertrieben 🎭.
Die Suche nach Alternativen 🔍
Versuch 1: Web-Scraping 🕷️
# Fragil und unreliabel
curl -s "$share_url" | grep -oP 'downloadUrl":"[^"]+'
Versuch 2: Browser-Automation 🤖
# Funktioniert, aber langsam und resource-intensiv
selenium-webdriver --headless
Versuch 3: Aufgeben 🏳️
# Die häufigste "Lösung"
# Wechsel zu anderen Cloud-Providern
Der Durchbruch: Reverse Engineering rettet den Tag 🦸♂️
Nach drei Jahren Frust stieß ich auf ein GitHub-Repository: eugenenuke/onedrive-downloader 💎
Der Autor hatte Microsoft's eigene OneDrive-Website reverse-engineered und dabei eine versteckte API entdeckt 🕵️♂️.
Die "Badger"-API 🦡
Microsoft nutzt intern einen Service namens "Badger" für die Authentifizierung:
# 1. Token von Microsoft's internem Service holen 🎟️
curl -s -H "Content-Type: application/json" \
  -d '{"appId":"5cbed6ac-a083-4e14-b191-b4ba07653de2"}' \
  https://api-badgerp.svc.ms/v1.0/token

# 2. Token für API-Calls verwenden 🔑
curl -s -H "Authorization: Badger $token" \
  "https://my.microsoftpersonalcontent.com/_api/v2.0/..."
Die magische App-ID ✨
5cbed6ac-a083-4e14-b191-b4ba07653de2 - Das ist Microsoft's eigene App-ID für das OneDrive-Web-Interface 🏢. Dieselbe ID, die verwendet wird, wenn Sie einen OneDrive-Link im Browser öffnen 🌐.
Woher stammt diese App-ID? 🔍
Diese App-ID wurde durch Reverse Engineering der OneDrive-Website entdeckt:
- Browser DevTools Analyse 🕵️♂️: Beim Öffnen eines OneDrive-Links werden die Netzwerk-Requests sichtbar 🌐
- JavaScript-Code-Analyse 📜: Microsoft's eigener OneDrive-Client verwendet diese ID 💻
- Community-Forschung 🤝: Mehrere Open-Source-Projekte haben diese ID unabhängig gefunden 🔬
Bekannte Verwendung in anderen Projekten 📚
- 🔗 eugenenuke/onedrive-downloader - Das Original-Repository, das diese Entdeckung machte 💎
- 🐧 abraunegg/onedrive - Discussions über alternative OneDrive-APIs
- 💬 Stack Overflow Threads - Verschiedene Diskussionen über OneDrive API-Probleme 🤔
- 🤖 Reddit r/sysadmin - Community-Diskussionen über OneDrive-Automatisierung ⚙️
Technische Verifikation 🔬
Die App-ID ist legitim und offiziell, weil:
- ✅ Sie ist im Microsoft App Registration Portal registriert (intern)
- 🌐 Sie wird von office.com und onedrive.live.com verwendet
- 🔑 Sie hat spezielle Berechtigungen für Share-Link-Zugriffe
- ☁️ Sie ist in Microsoft's Azure AD B2C für anonyme Zugriffe konfiguriert
Die technischen Details ⚙️
Wie der Badger-Token funktioniert 🎭
Der JWT-Token enthält interessante Claims:
{
  "aud": "https://onedrive.com/",
  "iss": "https://badger.svc.ms/v1.0/auth",
  "appid": "5cbed6ac-a083-4e14-b191-b4ba07653de2",
  "given_name": "38",        // Zufälliger Name 🎲
  "family_name": "Snake",    // Zufälliger Name 🐍
  "exp": 1761251614          // 7 Tage Gültigkeit ⏰
}
Der vollständige Workflow 🔄
# 1. Badger Token abrufen 🎫
get_badger_token() {
    local response
    response=$(curl -s -H "Content-Type: application/json" \
        -d '{"appId":"5cbed6ac-a083-4e14-b191-b4ba07653de2"}' \
        https://api-badgerp.svc.ms/v1.0/token)

    echo "$response" | grep -oP '"token":"\K[^"]+'
}

# 2. Share-URL encodieren 🔐
encode_share_url() {
    echo -n "$1" | base64 -w 0 | tr -d '=' | tr '/' '_' | tr '+' '-'
}

# 3. API-Calls mit Token 📡
fetch_share_data() {
    local token=$(get_badger_token)
    local encoded_url=$(encode_share_url "$SHARE_URL")

    curl -s -H "Authorization: Badger $token" \
        "https://my.microsoftpersonalcontent.com/_api/v2.0/shares/u!${encoded_url}/driveitem"
}
Warum funktioniert das? 🤔
Microsoft's eigene Infrastruktur 🏗️
Die Badger-API ist nicht gehackt - es ist Microsoft's eigene, interne Infrastruktur:
- Legitime App-ID ✅: Dieselbe, die Microsoft's Website verwendet
- Offizieller Service 🏢:
badger.svc.msist Microsoft's eigener Authentifizierungsdienst - Produktive Nutzung 📊: Millionen von OneDrive-Zugriffen täglich nutzen diese API
Warum ist es undokumentiert? 🤷♂️
- 🔒 Interne API: Nur für Microsoft's eigene Anwendungen gedacht
- 🤸♂️ Flexibilität: Kann sich jederzeit ändern ohne externe Verpflichtungen
- ⚖️ Liability: Microsoft will keine Verantwortung für externe Nutzung
- 🚦 Rate Limiting: Vermeidung von Missbrauch
Die Ironie des Problems 😂
Als Microsoft-Mitarbeiter ist die Ironie besonders schmerzlich:
- 🚫 Problem: API-Dokumentation fehlt
- 💬 Ursache: Interne Kommunikation zwischen Teams
- 🕵️♂️ Lösung: Reverse Engineering von Microsoft's eigenen Tools
- 🌍 Realität: Community löst Microsoft's Dokumentationsprobleme
Was schief läuft 🎪
# OneDrive Team: "Wir brauchen Authentifizierung für Shares" 🔐
# Graph Team: "Nutzt Microsoft Graph!" 📈
# Reality Check: Graph funktioniert nicht für anonyme Shares ❌
# Developer: *reverse engineers Microsoft's website* 🕵️♂️
# Community: *teilt Lösung auf GitHub* 🤝
Risiken und Nachhaltigkeit ⚠️
Langzeitstabilität 📈
Warum die App-ID wahrscheinlich stabil bleibt 🔒:
- 🔗 Fest verdrahtet in Microsoft's OneDrive-Website
- 💥 Änderung würde Millionen von eingebetteten OneDrive-Links brechen
- 🏗️ Massive Infrastruktur-Abhängigkeiten
Risiken ⚠️:
- 📖 Undokumentiert = keine Garantien
- 🔄 Kann jederzeit geändert werden
- 📋 Keine Service Level Agreements
Monitoring-Strategie 📊
# Überwachung einbauen 👀
monitor_badger_api() {
    if ! get_badger_token >/dev/null 2>&1; then
        echo "🚨 ALERT: Badger API möglicherweise geändert!"
        # Fallback-Mechanismen aktivieren 🔄
    fi
}
Lessons Learned 🎓
Für Entwickler 👨💻
- 🛡️ Immer Fallbacks planen - APIs können jederzeit brechen
- 💎 Community ist Gold wert - Jemand hat das Problem schon gelöst
- 🕵️♂️ Reverse Engineering ist legitim - Manchmal die einzige Option
- 📊 Monitoring ist kritisch - Überwacht undokumentierte APIs
Für Microsoft 🏢
- 📢 Breaking Changes kommunizieren - Mindestens 6 Monate Vorlaufzeit
- 📖 Migration Guides bereitstellen - Zeigt den Upgrade-Pfad auf
- 🎯 Use Cases verstehen - Nicht jeder braucht komplexe OAuth-Flows
- 🤝 Community einbeziehen - Feedback vor Breaking Changes
Die Lösung heute 🎉
Mein OneDrive-Skript funktioniert wieder:
#!/bin/bash
# Moderne OneDrive Share-Download mit Badger-API 🦡
./onedrive.sh -p expose
# Downloaded 028198.jpg ✅
# Downloaded 028264.jpg ✅
# Downloaded 028269.jpg ✅
# ... 📥
# --- Done --- 🎊
Nach vielen Jahren Kampf - eine simple, funktionierende Lösung 🏆. Gefunden nicht in Microsoft's Dokumentation, sondern durch die brillante Reverse-Engineering-Arbeit der Open-Source-Community 🌟.
Fazit 🏁
Die OneDrive-Badger-API zeigt sowohl das Beste als auch das Schlechteste der modernen Softwareentwicklung:
Das Schlechte 👎:
- 💥 Undokumentierte Breaking Changes
- 🚫 Fehlende offizielle Lösungen für einfache Use Cases
- 😤 Jahre der Entwickler-Frustration
Das Gute 👍:
- 🌟 Brillante Community-Lösungen
- ⚙️ Funktionale, wenn auch undokumentierte APIs
- 💡 Beweis, dass Reverse Engineering Innovation treiben kann
Manchmal muss man Microsoft's eigene Tools reverse engineeren, um Microsoft's APIs zu nutzen 🤯.
Willkommen in der modernen Softwareentwicklung! 🤷♂️
💌 Falls Sie als Microsoft-Mitarbeiter lesen - bitte dokumentiert die Share-API offiziell. Die Community wird es Ihnen danken!
Ressourcen 📚
Primäre Quellen 🎯
- 🔗 eugenenuke/onedrive-downloader - Das GitHub-Repo, das alles möglich machte
- �️♂️ Original fetch_onedrive_url.sh - Der Quellcode mit der App-ID
Microsoft Dokumentation 📋
- Microsoft Graph API: Offizielle API-Dokumentation - Die offizielle (aber unvollständige) Lösung 🔗
- 🔐 OneDrive Share URL Encoding: Share Links API - Einer der wenigen dokumentierten Teile 📖
- 🏢 Azure App Registrations: App-Registrierung Guide - Offizielle App-Registrierung ⚙️
Community-Projekte 🤝
- 🔧 abraunegg/onedrive: Linux OneDrive-Client - Linux OneDrive-Client mit ähnlichen Herausforderungen 🐧
- 💬 API Discussions: OneDrive API Discussions - Community-Diskussionen über API-Probleme 🗣️
- 📱 SDK Issues: OneDrive SDK Issues - Bekannte SDK-Limitationen ⚠️
Weitere technische Referenzen 🔬
- 🌐 Browser DevTools: F12 → Network Tab beim Öffnen von OneDrive-Links 🕵️♂️
- 📜 JavaScript-Konsole:
console.log(window.OnedriveConfig)auf onedrive.live.com 💻 - 🔍 Badger Service:
https://badger.svc.ms/v1.0/- Microsoft's interner Auth-Service 🦡 - 🎭 JWT Decoder: jwt.io zum Analysieren der Badger-Tokens 🔓
App-ID Verifikation 🔐
Die App-ID 5cbed6ac-a083-4e14-b191-b4ba07653de2 kann in folgenden Kontexten gefunden werden:
- 🌐 OneDrive Web-Interface: Browser-Netzwerk-Requests 📡
- 🏢 Office.com: Share-Link-Authentifizierung 🔑
- 👥 Microsoft Teams: OneDrive-Integration 🤝
- 📊 SharePoint Online: Anonyme Datei-Zugriffe 📁
In der Tech-Welt fällt mir immer wieder ein Muster auf: Entscheidungen werden häufig über Ablehnung begründet.
„Ich nutze kein X, weil Y doof ist.“
Aber was wäre, wenn wir uns für Tools, Frameworks und Workflows entscheiden würden, weil sie mit uns in Resonanz stehen?
Resonanz bedeutet für mich: Ein Werkzeug passt zu mir – technisch, konzeptionell, manchmal auch intuitiv.
Es unterstützt meine Arbeitsweise, ohne sich aufzudrängen. Es fühlt sich richtig an – nicht, weil es perfekt ist, sondern weil es in meinem Kontext Sinn ergibt.
Technische Wahl – aus Resonanz, nicht aus Protest
Ich arbeite mit Podman – nicht, weil ich Docker ablehne, sondern weil Podman sich für mein Setup stimmig anfühlt.
Es fügt sich gut in meine Arbeitsweise ein: WSL, RAM-Disk, VS Code DevContainer.
Ich schätze die Rootless-Architektur, die Integration mit systemd und die Klarheit im Design.
Podman gibt mir das Gefühl, mein Setup wirklich zu verstehen und steuern zu können – ohne dass ich gegen etwas kämpfen muss.
Docker ist nicht „falsch“. Es ist einfach nicht das, was sich mit meinen Erwartungen deckt.
Was sagt meine Toolwahl über mich?
Technische Entscheidungen sind nie nur funktional – sie sagen auch etwas über die Person dahinter.
Ich mag Klarheit, Modularität, Kontrolle. Ich arbeite gern mit Dingen, die sich gut dokumentieren lassen und nachvollziehbar sind.
Ich entscheide nicht aus Trotz – sondern aus technischer und emotionaler Resonanz.
Und vielleicht ist das der eigentliche Kern: Ich wähle, was mir entspricht. Nicht, weil ich genügend Kritikpunkte an anderen Optionen gefunden habe.
Resonanzbasiertes Denken – auch außerhalb der Technik
Auch jenseits von Tools und Frameworks begegnet mir dieses Muster:
Entscheidungen werden oft über Ablehnung begründet – statt über das, was gut tut.
- Ich lese ein Buch nicht, weil der Autor unsympathisch ist – statt: Ich lese, was mich inspiriert
- Ich meide bestimmte Plattformen – statt: Ich nutze die, die mir Klarheit oder Nutzen bringen
- Ich definiere mich über Abgrenzung – statt über Gemeinsamkeiten
Mir fällt auf, wie viel Energie darauf verwendet wird, herauszufinden, was nicht passt, was stört, was nervt und was man ablehnen kann.
Aber viel seltener wird gefragt:
Was bringt mich weiter?
Was tut mir gut?
Was unterstützt mich in dem, was mir wirklich wichtig ist?
Resonanzbasiertes Denken heißt für mich:
Nicht das Störende in den Vordergrund stellen – sondern das Stimmige.
Nicht gegen etwas sein – sondern für etwas.
Resonanz im Team – und was, wenn sie fehlt?
Resonanzbasiertes Denken funktioniert nicht nur im stillen Kämmerlein.
In Teams begegnen wir Entscheidungen, die sich für uns persönlich nicht stimmig anfühlen – aber für das Team als Ganzes sinnvoll sind.
Das ist keine Schwäche des Konzepts, sondern seine Bewährungsprobe.
Was tun, wenn meine Resonanz fehlt – aber die kollektive Richtung stimmt?
Vielleicht hilft da ein Perspektivwechsel:
- Resonanz muss nicht immer individuell sein – sie kann auch geteilt werden.
- Manchmal resoniert nicht die Entscheidung selbst, sondern der Prozess, wie sie getroffen wurde.
- Und manchmal ist es stimmig, zurückzutreten, weil das größere Ganze auch zählt.
Resonanzbasiertes Denken heißt nicht: Ich bekomme immer, was sich für mich gut anfühlt.
Es heißt: Ich bleibe im Kontakt mit mir – auch wenn ich mich für das Team bewege.
Vielleicht ist das die eigentliche Kunst:
Nicht gegen sich entscheiden – sondern für etwas, das noch mehr Bedeutung hat.
Und was ist mit Moral?
„Resonanzbasiertes Denken“ ersetzt keine ethische Reflexion.
Es fragt: „Was fühlt sich stimmig an?“ – nicht: „Was ist richtig?“
Aber manchmal liegt beides nah beieinander.
Und manchmal eben nicht.
Ich glaube, dass individuelle Entscheidungen nicht den Markt verändern –
aber sie verändern mich.
Und vielleicht ist das der Anfang.
Schlusswort
Vielleicht sollten wir (nicht nur) in der Tech-Welt öfter innehalten und fragen:
„Warum passt X zu mir?“
statt:
„Was kann ich gegen Y sagen?“
Denn am Ende geht es nicht darum, gegen etwas zu sein – sondern für etwas.
Und vielleicht ist das die eigentliche Entscheidungskompetenz:
Nicht das Störende zu identifizieren – sondern das Stimmige zu erkennen.
Wer so entscheidet, wählt nicht nur ein Tool.
Sondern eine Haltung.
Ich habe hier die technische Seite dieses Gedankens beleuchtet – aber vielleicht lässt er sich auch in anderen Bereichen gewinnbringend weiterdenken.“.
Was bringt dich weiter?
Was tut dir gut?
Was unterstützt dich in dem, was du wirklich tun willst?
Herleitung "resonanzbasiertes Denken"
Der Begriff resonanzbasiertes Denken ist eine kontextuelle Neuschöpfung, die sich aus mehreren Denktraditionen speist:
- Resonanz als Konzept wurde u. a. von Hartmut Rosa geprägt, der sie als lebendige, antwortende Beziehung zur Welt beschreibt – jenseits von Kontrolle oder Konsum (vgl. Rosa 2016).
- Denken in Passung findet sich in systemischen, gestalterischen und psychologischen Ansätzen, etwa in der Frage: Was passt zu mir, meinem Kontext, meinem Ziel?
- Abgrenzung vom defizitorientierten Denken: In vielen technischen und gesellschaftlichen Diskursen wird über das „Nicht-Funktionierende“ entschieden – „Ich nutze X, weil Y schlecht ist.“ Resonanzbasiertes Denken schlägt vor, stattdessen über das Stimmige zu entscheiden – „Ich nutze X, weil es mit mir resoniert.“
Dabei ersetzt resonanzbasiertes Denken keine moralische Reflexion – es verschiebt nur den Fokus:
Von der Frage „Was ist richtig?“ hin zur Frage „Was fühlt sich stimmig an?“
Diese beiden Perspektiven können sich ergänzen – oder auch in Spannung zueinander stehen.
Resonanz ist kein moralischer Freifahrtschein.
Aber sie kann ein Kompass sein – gerade dann, wenn moralische Klarheit fehlt oder überfordert.
Die Wortbildung „resonanzbasiert“ ist dabei bewusst gewählt:
- Sie verbindet das intuitive Moment von Resonanz mit einem strukturierten Denkansatz
- Sie erlaubt eine positive Begründung von Entscheidungen, ohne andere Optionen abwerten zu müssen
- Sie öffnet den Raum für Selbstreflexion, Kontextsensitivität und Offenheit
Quellen
1. Hartmut Rosa – Resonanz als Weltbeziehung
- Rosa, Hartmut (2016): Resonanz. Eine Soziologie der Weltbeziehung. Suhrkamp Verlag, Berlin.
- Zentrale Quelle für das Resonanzkonzept: Weltbeziehung als antwortende, berührbare Verbindung – jenseits von Kontrolle oder Konsum.
2. Donald Norman – Emotionales Design
- Norman, Donald A. (2004): Emotional Design. Why We Love (or Hate) Everyday Things. Basic Books.
- Zeigt, wie technische Objekte emotional resonieren und wie das unsere Entscheidungen beeinflusst.
3. Niklas Luhmann – Systemtheorie
- Luhmann, Niklas (1997): Die Gesellschaft der Gesellschaft. Suhrkamp Verlag.
- Kommunikation als selektive Resonanz innerhalb von sozialen Systemen – hilfreich zur Einordnung individueller Passung.
4. Byung-Chul Han – Kritik an Kontrolllogik
- Han, Byung-Chul (2012): Transparenzgesellschaft. Matthes & Seitz Berlin.
- Kritisiert die Reduktion von Weltbeziehung auf Sichtbarkeit und Kontrolle – Resonanz als Tiefe und Berührbarkeit.
5. Peter Kruse – Intuition und Komplexität
- Kruse, Peter (diverse Vorträge und Interviews, z. B. auf YouTube oder in Fachmagazinen)
- Spricht über intuitive Entscheidung in komplexen Systemen – oft über Resonanz, ohne den Begriff explizit zu verwenden.
Disclaimer, there is already official documentation for that here. The special thing about this blog post is that we use the docker image and not the NPX command.
The pipeline
The pipeline is quite straight forward configure. It will just starts a container every day at 3am and run renovate.
]]>Disclaimer, there is already official documentation for that here. The special thing about this blog post is that we use the docker image and not the NPX command.
The pipeline
The pipeline is quite straight forward configure. It will just starts a container every day at 3am and run renovate.
schedules:
  - cron: '0 3 * * *'
    displayName: 'Every day at 3am (UTC)'
    branches:
      include: [main]
    always: true

trigger: none

pool:
  vmImage: ubuntu-latest

variables:
  RENOVATE_PLATFORM: azure

steps:
  - script:  |
      docker run -e "LOG_LEVEL=debug" -e "RENOVATE_PLATFORM=${RENOVATE_PLATFORM}" -e "RENOVATE_ENDPOINT=$(System.CollectionUri)" -e "RENOVATE_TOKEN=$(System.AccessToken)" renovate/renovate $(System.TeamProject)/$(Build.Repository.Name)
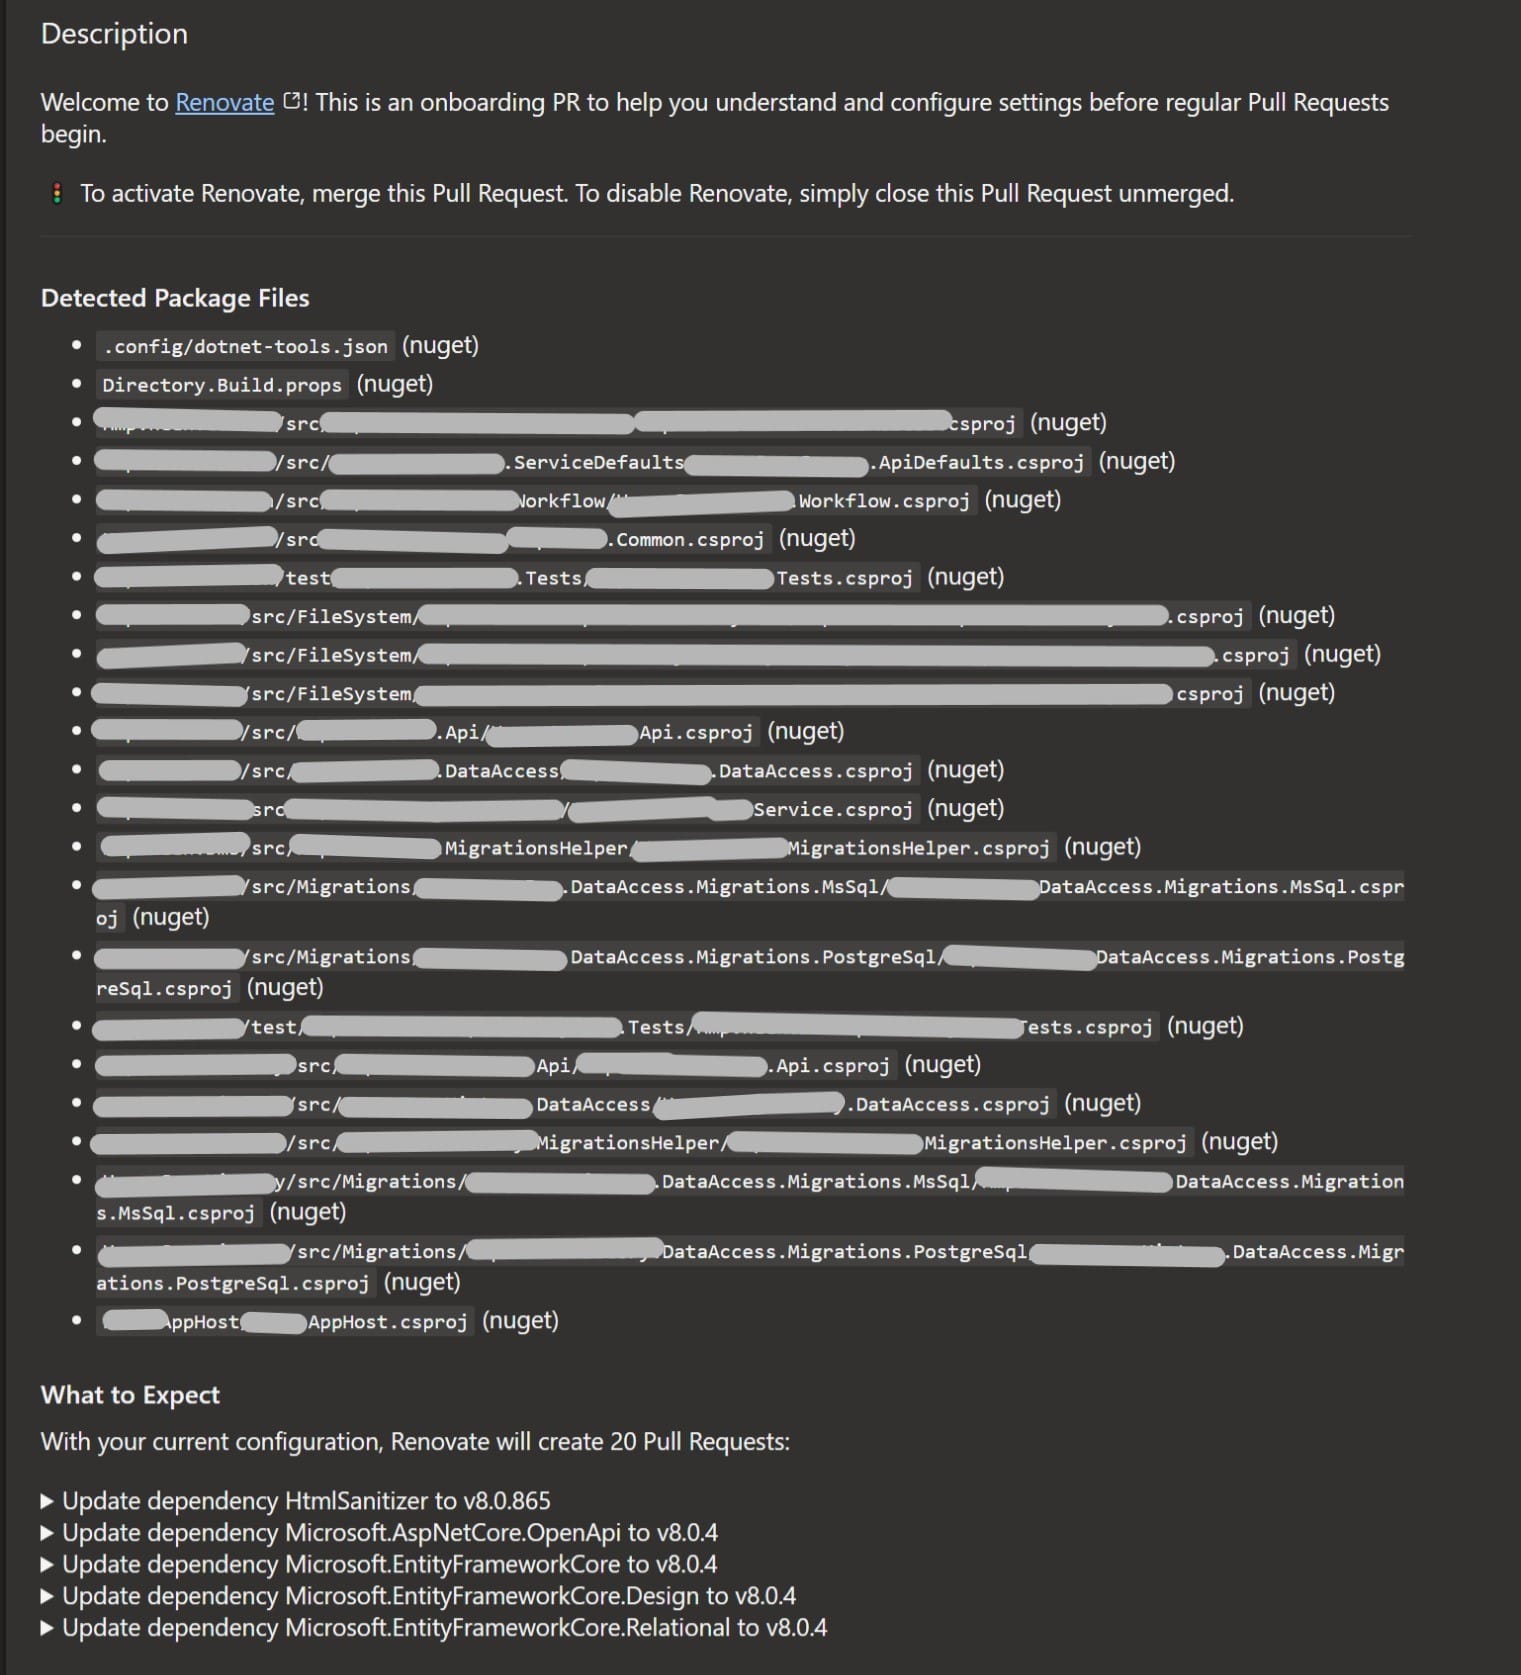
At the first run, renovate will create a pullrequest with an empty config in it.
This needs to be merged, before renovate starts really working.
Write the configuration
As the documentation is saying, there are many ways where you can place the configuration file for renovate. Here we will use the renovate.json5 file in the root of the repo. (json5 enables json comments) A good start for the config is the following:
{
  "$schema": "https://docs.renovatebot.com/renovate-schema.json",
  // Is used by renovate in a pullrequest
  "azureWorkItemId": 109,
  "packageRules": [
    {
      "description": "Automerge non-major updates",
      "matchUpdateTypes": ["minor", "patch"],
      "automerge": true
    }
  ]
}
This will configure renovate that it will always use the workitem 109 for it's pullrequests and also will create Pull-Requests with the Azure DevOps Auto-Complete feature for pull requests for "minor" and "patch" version upgrades. That's super cool, because it will respect all your pullrequests policies.
Configure permissions
Renovate needs 3 permissions in your repository. Because it will run with the configuration above as {Projectname} Build Services ({collectionname}) the configuration will look like that:

This will allow all your piplines to create branche, push commits and create pullrequests.
First Run
If you run from your working branche where you created the files for the pipeline and the config, the pipeline will create a pullrequest with a nice overview what will happen after you will merge this pullrequest:
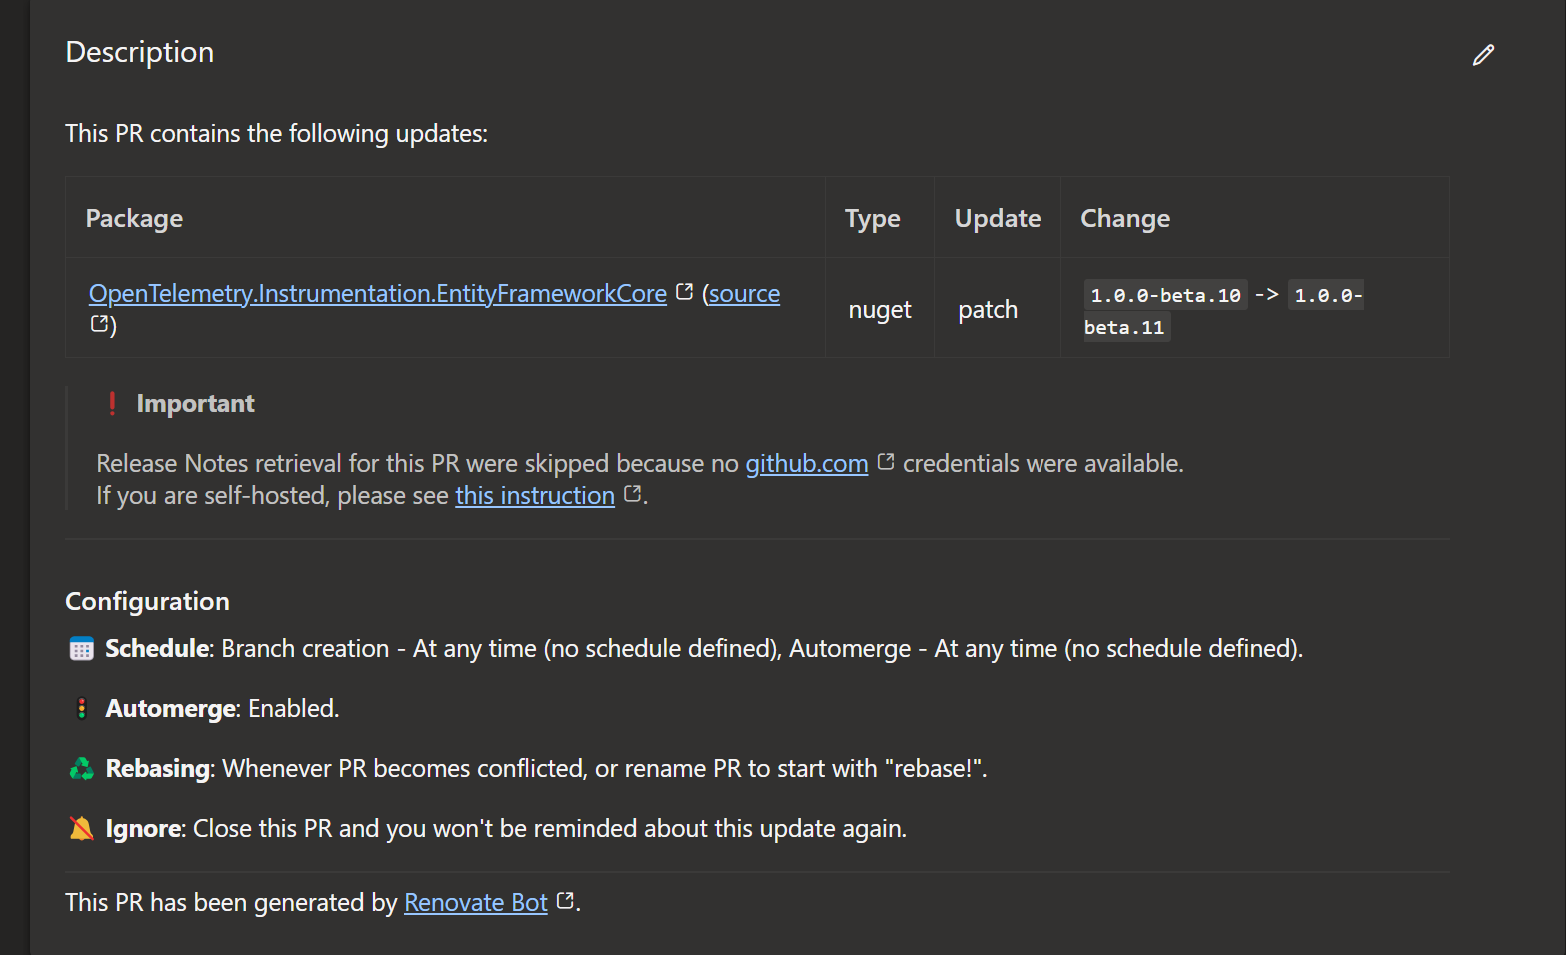
All other runs
All other runs will create for each package a separete pull request. This will look like that:
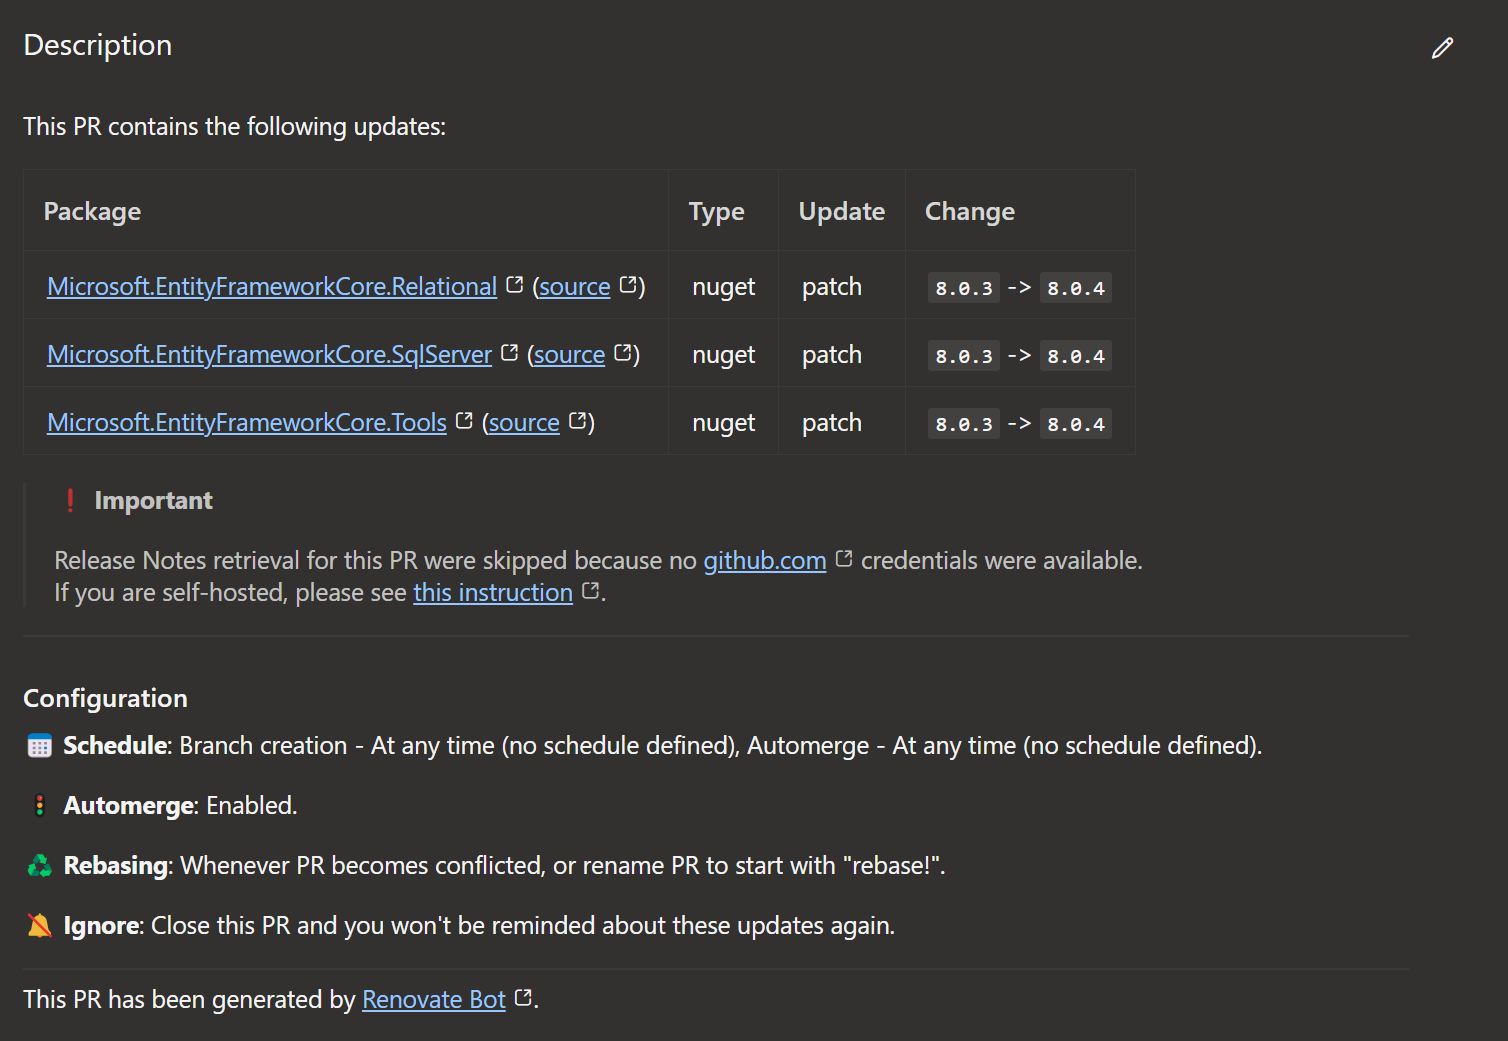
Tip to avoid merge conflicts
Some packages are always updated together. For example in the dotnet world all the EntityFramework Packages are using very often the same versionnumbers and depend on each other. To group these updates together you can change your configuration to this:
{
  "$schema": "https://docs.renovatebot.com/renovate-schema.json",
  // Is used by renovate in a pullrequest
  "azureWorkItemId": 109,
  "packageRules": [
    {
      "description": "Automerge non-major updates",
      "matchUpdateTypes": ["minor", "patch"],
      "automerge": true
    },
    {
      "matchPackagePatterns": ["Microsoft.EntityFrameworkCore"],
      "groupName": "Microsoft.EntityFrameworkCore",
      "matchUpdateTypes": ["minor", "patch"],
      "automerge": true
    }
  ]
}
This will group all updates that have in their name Microsoft.EntityFrameworkCore to a single pullrequest. That will then looks like that:
Wir gehen von einem aktuellem und frischem Ubuntu in der WSL aus.
Hier sind die Schritte, um
]]>Wir gehen von einem aktuellem und frischem Ubuntu in der WSL aus.
Hier sind die Schritte, um Podman in der Ubuntu-Umgebung mit Ramdisk zu verwenden:
Podman auf Ubuntu installieren
Standardmäßig ist das Podman-Paket im Ubuntu-Standard-Repository enthalten.
Es kann installiert werden, indem einfach der folgende Befehl geführt wird:
sudo apt install -y podman fuse-overlayfs slirp4netns
Podman ist eine Docker-kompatible Container-Engine, die auch ohne Root-Rechte funktioniert. Damit das klappt, braucht es zwei Helfer:
- fuse-overlayfs: Simuliert ein Overlay-Dateisystem in Userspace – wichtig für rootless Container.
- slirp4netns: Ermöglicht Netzwerkzugriff für Container ohne Root – z. B. für apt install im Container.
Sobald Podman installiert ist, kann dessen Funktion mit dem folgenden Befehl überprüft werden:
podman info
Beim Ausführen von podman info erscheint möglicherweise folgende Warnung:
WARN[0000] "/" is not a shared mount, this could cause issues or missing mounts with rootless containers
Diese Meldung ist unter WSL2 völlig normal und kann ignoriert werden.
WSL verwendet ein eigenes virtuelles Dateisystem, das nicht als „shared mount“ konfiguriert ist – Podman funktioniert trotzdem zuverlässig. Die Warnung hat keine Auswirkungen auf typische Entwicklungs-Workflows mit rootlosen Containern.
RAM-Disk einrichten für Podman-Storage
Eine Ramdisk ist ein temporärer Speicherbereich im Arbeitsspeicher.
Es wird ein Verzeichnis erstellt in dem die Ramdisk gemountet werden soll:
sudo mkdir /mnt/ramdisk
In die Datei /etc/fstab wird der folgende Inhalt, zum Beispiel mit sudo nano /etc/fstab ergänzt:
tmpfs /mnt/ramdisk tmpfs rw,nosuid,noatime,nodev,size=50%,mode=1777 0 0
Erklärung zum Befehl
tmpfs
Dies ist der Typ des Dateisystems. tmpfs ist ein virtuelles Dateisystem im Arbeitsspeicher (RAM-Disk), das temporäre Dateien speichert.
/mnt/ramdisk
Dies ist das Zielverzeichnis, in dem die RAM-Disk gemountet wird. In diesem Fall wird die RAM-Disk im Verzeichnis /mnt/ramdisk platziert.
tmpfs
Dies ist der Typ des Dateisystems, der wiederholt wird. Es zeigt an, dass es sich um eine RAM-Disk handelt.
rw
Dies steht für "read-write" und gibt an, dass das Dateisystem sowohl zum Lesen als auch zum Schreiben verfügbar ist.
nosuid
Dies ist eine Sicherheitsoption, die verhindert, dass ausführbare Dateien mit SUID-Berechtigungen (Set-User-ID) auf der RAM-Disk ausgeführt werden können.
noatime
Diese Option verhindert, dass der Zugriffszeitstempel (atime) für Dateien auf der RAM-Disk aktualisiert wird. Dies kann die Leistung verbessern.
nodev
Diese Option verhindert, dass Gerätedateien auf der RAM-Disk erstellt werden können.
size=XXX
XXX legt die Größe der RAM-Disk fest, z.B: 100gb.
Alternativ zur festen Größe wie size=100gb kann man auch size=50% verwenden, damit nutzt die RAM-Disk dynamisch bis zur Hälfte des verfügbaren Arbeitsspeichers.
mode=1777
dies erlaubt allen Benutzern das Schreiben ins Verzeichnis, schützt aber ihre eigenen Dateien vor dem Zugriff anderer – ideal für gemeinsam genutzte, temporäre Speicherorte.
0 0
Dies sind die Optionen für das Dumping und das automatische Dateisystem-Checken. In diesem Fall sind sie auf 0 gesetzt, was bedeutet, dass diese Funktionen deaktiviert sind.
Podman konfigurieren für RAM-Disk-Nutzung
Podman muss so konfiguriert werden, dass es die Ramdisk für temporäre Dateien verwendet.
Bearbeite dazu die Datei ~/.config/containers/storage.conf:
mkdir -p ~/.config/containers
sudo nano ~/.config/containers/storage.conf
Füge die folgenden Zeilen hinzu:
[storage]
  driver = "overlay"
  runroot = "/mnt/ramdisk/podman/run"
  graphroot = "/mnt/ramdisk/podman/graph"
[storage.options]
  mount_program = "/usr/bin/fuse-overlayfs"
Da runroot nur temporäre Daten enthält, ist es ideal, ihn ebenfalls in der RAM-Disk zu speichern – für maximale Performance.
Podman starten und testen
Zur Sicherheit sollte der Podman-Dienst noch einmal neugestartet werden:
sudo systemctl restart podman
Überprüfe, ob Podman die Ramdisk verwendet:
podman info | grep -E 'graphRoot|runRoot'
Dabei sollte der Pfad zur Ramdisk unter RunRoot und GraphRoot sehen.
Kommt ein Fehler mit Zugriffsrechten soltle man die WSL noch neustarten um sicher zu gehen das die RamDisk ordnungsgemäß eingerichtet ist. Hierfür reicht ein
sudo rebootund dann neu mit der WSL verbinden.
Einen Hello-World Container mit kann man mit podman run hello-world starten und sich dann die Liste der verfügbaren Images mit podman image ls -a anschauen.
Startet man die WSL neu (mit sudo reboot in der WSL oder wsl --shutdown in der PowerShell hat mam wieder eine frische und leere Podman Umgebung.
Bonus: Dev-Container mit VS Code nutzen
Wer mit Visual Studio Code arbeitet, kann die Dev-Container-Erweiterung nutzen und Podman als Backend konfigurieren – ideal für isolierte Entwicklungsumgebungen direkt in der RAM-Disk.
Folgende Einstellungen sollten in den Visual Studio Code Settings noch gesetzt werden:
Dev Containers: Execute In WSL wird aktiviert.
Sollte man mehrere WSL Distros im Einsatz haben oder sicher gehen wollen, dass immer die richtige verwendet wird trägt man unter Dev Containers: Execute In WSLDistro noch den Namen der gewünschten Distro.
Man kann diese Werte auch wie folgt in die Konfiguration als json eintragen:
"dev.containers.executeInWSL": true
"dev.containers.executeInWSLDistro": "Debian"
Quellen:
]]>Vorbereitung
Man benötigt das aktuelle Root-Dateisystem (rootfs) Tarball:
Besuchen Sie die Ubuntu WSL-Images Seite (für Ubuntu 22.04 und neuer).
Navigieren Sie zum Ordner, der der gew&
Vorbereitung
Man benötigt das aktuelle Root-Dateisystem (rootfs) Tarball:
Besuchen Sie die Ubuntu WSL-Images Seite (für Ubuntu 22.04 und neuer).
Navigieren Sie zum Ordner, der der gewünschten Ubuntu-Version entspricht.
Laden Sie die Datei ubuntu-x-wsl-amd64-wsl.rootfs.tar.gz herunter (ersetzen Sie x durch den Versionsbezeichner).
Installation
Installieren Sie die zweite Instanz:
Öffnen Sie die Eingabeaufforderung oder PowerShell und führen Sie den folgenden Befehl zweimal aus und ersetzen Sie <Distributionsname> und <Installationsordner> durch Ihre gewünschten Namen:
wsl.exe --import <Distributionsname> <Installationsordner> <Pfad/zur/ubuntu-x-wsl-amd64-wsl.rootfs.tar.gz>
Zum Beispiel:
wsl.exe --import DistroA FolderA ubuntu-x-wsl-amd64-wsl.rootfs.tar.gz
wsl.exe --import DistroB FolderB ubuntu-x-wsl-amd64-wsl.rootfs.tar.gz
Ausführen
Führen Sie die installierten Distributionen mit folgenden Befehlen aus:
wsl.exe -d DistroA
wsl.exe -d DistroB
Hinweise
Dieses Verfahren funktioniert für jeden GNU/Linux-Distribution-User-Space, nicht nur für Ubuntu.
Es erfolgt nicht über den Windows Store, daher werden die Installationen nicht im Store angezeigt oder aktualisiert.
Info: Diese Anleitung gilt nur für Windows 11 und der WSL in Version 0.67.6 oder höher. Ich habe dieses Vorgehen mit Ubuntu als auch Debian als WSL Distribution getestet.
Visual Studio Code, die Remote Erweiterung und die Dev Container Erweiterung muss unter Windows bereits installiert sein.
Wir starten mit einer neuen und blanken Ubuntu WSL:
wsl --install Ubuntu
Der Modus für die Linux Distribution in der WSL muss auf Version 2 gestellt sein, sonst wird Docker nicht funktionieren.
Eine Übersicht der vorhandenen Distributionen und deren Version erhält man mit:
wsl --list --all --verbose
Mit folgendem Befehl kann dieser Modus gesetzt werden:
wsl --set-version Ubuntu 2
In Ubuntu muss noch ein Nutzer mitsamt Kennwort angelegt werden.
Um dann noch sicher zu stellen, dass alles auf dem aktuellen Stand ist:
sudo apt-get -y update && sudo apt-get -y clean && sudo apt-get -y upgrade && sudo apt-get -y autoremove --purge
Jetzt sollte alles soweit vorbereitet sein und wir kommen zum eigentlichen.
Docker installieren
Im Groben folgen wir der Anleitung von Docker selbs:
https://docs.docker.com/engine/install/ubuntu/
Nicht immer nötig, aber es kann sicher nicht schaden alle vorherigen Docker Versionen zu entfernen:
for pkg in docker.io docker-doc docker-compose podman-docker containerd runc; do sudo apt-get remove $pkg; done
Um die Sache einfach zu halten kann die Installation auch mit den "convenience scripts" durchgeführt werden:
Info: Unter Debian kann es sein, dass
curlnicht installiert ist. Dies kann man mitsudo apt install curlbeheben.
curl -fsSL https://get.docker.com -o get-docker.sh
sudo sh ./get-docker.sh
Info: Um zu prüfen was das Skript machen wird kann man es auch mit
sudo sh ./get-docker.sh --dry-runausführen. Dabei werden keine Änderungen am System vorgenommen.
Docker sollte jetzt installiert sein aber es sind noch ein par Kleinigkeiten zu erledigen.
Nacharbeiten
Es kann vorkommen, dass die Gruppe docker nicht angelegt wurde. Dies gilt es zu beheben:
sudo groupadd docker
Jetzt fehlt nur noch den eigenen Nutzer zu dieser Gruppe hinzuzufügen:
sudo usermod -aG docker $USER
Um Docker lauffähig zu bekommen muss systemd verfügbar sein. Dazu muss in der /etc/wsl.conf folgender Inhalt vorhanden sein:
[boot]
systemd=true
Info: Zum bearbeiten der Datei:
sudo vi /etc/wsl.confESCi. Den text einfügen. Zum Speichern:ESC:wqEnter.
Um diese Änderungen zur Wirkung zu verhelfen muss die WSL neu gestartet werden. Dazu in einer belibigen Kommandozeile außerhalb der WSL diesen Befehl absetzen:
wsl --shutdown
Obacht: dadurch werden alle aktiven WSL Instanzen neu gestartet!
Ob Docker jetzt richtig funktioniert kann schnell überprüft werden:
docker version
Das Ergebnis sollte in Etwa so aussehen:
Client: Docker Engine - Community
 Version:           24.0.4
 API version:       1.43
 Go version:        go1.20.5
 Git commit:        3713ee1
 Built:             Fri Jul  7 14:51:00 2023
 OS/Arch:           linux/amd64
 Context:           default

Server: Docker Engine - Community
 Engine:
  Version:          24.0.4
  API version:      1.43 (minimum version 1.12)
  Go version:       go1.20.5
  Git commit:       4ffc614
  Built:            Fri Jul  7 14:51:00 2023
  OS/Arch:          linux/amd64
  Experimental:     false
 containerd:
  Version:          1.6.21
  GitCommit:        3dce8eb055cbb6872793272b4f20ed16117344f8
 runc:
  Version:          1.1.7
  GitCommit:        v1.1.7-0-g860f061
 docker-init:
  Version:          0.19.0
  GitCommit:        de40ad0
DevContainer in der WSL nutzen
Zum Test legen wir in der WSL einen Ordner an und öffnen diesen in Visual Studio Code:
mkdir test
cd test/
code .
Dadurch wird, beim ersten Mal, der Visual Studio Code Server in der WSL Distro installiert. Daraufhin wird der Ordner in Visual Studio Code unter Windows geöffnet.
Info: Man kann auch den Ordner über Visual Studio Code und dessen Remote WSL Erweiterung öffnen.
Jetzt kann man einen neuen Dev Container anlegen: CTRL + SHIFT + P -> "Add Dev Container Configuration Files".
Ist der Container angelegt fragt Visual Studio Code ob man diesen alsgleich öffnen möchte.
Hat bis hier alles funktioniert läd Docker die Images und der Dev Container wird geöffnet.
DevContainer aus Windows nutzen
Eine Kleinigkeit ist noch nötig um die Dev Container auch aus Windows heraus direkt nutzen zu können.
Folgende Einstellungen sollten in den Visual Studio Code Settings noch gesetzt werden:
Dev Containers: Execute In WSL wird aktiviert.
Sollte man mehrere WSL Distros im Einsatz haben oder sicher gehen wollen, dass immer die richtige verwendet wird trägt man unter Dev Containers: Execute In WSLDistro noch den Name der gewünschten Distro.
Man kann diese Werte auch wie folgt in die Konfiguration als json eintragen:
"dev.containers.executeInWSL": true
"dev.containers.executeInWSLDistro": "Debian"
Hat man das getan funktionieren die Kommandos für Dev Container auch in einem unter Windows gestartetem Visual Studio Code.
Quellen
Install docker using the convenience script
Linux post-installation steps for Docker Engine
Running Docker on WSL2 without Docker Desktop (the right way)
Offiziell wird WinGet auf Windows Server 2022 nicht unterstützt. Mit einigen manuellen Schritten kann man es allerdings dennoch zum Laufen bekommen.
Obacht: Über diesen Weg werden die Updates nicht automatisch installiert und man muss bei einer neuen Version selbst tätig werden.
PowerShell Script
$progressPreference = 'Offiziell wird WinGet auf Windows Server 2022 nicht unterstützt. Mit einigen manuellen Schritten kann man es allerdings dennoch zum Laufen bekommen.
Obacht: Über diesen Weg werden die Updates nicht automatisch installiert und man muss bei einer neuen Version selbst tätig werden.
PowerShell Script
$progressPreference = 'silentlyContinue'
$latestRelease = $(Invoke-RestMethod https://api.github.com/repos/microsoft/winget-cli/releases/latest).assets.browser_download_url
$latestWingetMsixBundleUri = $latestRelease | Where-Object {$_.EndsWith(".msixbundle")}
$latestWingetMsixBundle = $latestWingetMsixBundleUri.Split("/")[-1]

$latestWingetLicenseUri = $latestRelease | Where-Object {$_.EndsWith("_License1.xml")}
$latestWingetLicense = $latestWingetLicenseUri.Split("/")[-1]

Write-Information "Downloading winget to artifacts directory..."

# Microsoft.UI.Xaml.2.7.3 from NuGet
Invoke-WebRequest -Uri https://www.nuget.org/api/v2/package/Microsoft.UI.Xaml/2.7.3 -OutFile .\microsoft.ui.xaml.2.7.3.zip
Expand-Archive .\microsoft.ui.xaml.2.7.3.zip

Invoke-WebRequest -Uri $latestWingetMsixBundleUri -OutFile "./$latestWingetMsixBundle"
Invoke-WebRequest -Uri $latestWingetLicenseUri -OutFile "./$latestWingetLicense"
Invoke-WebRequest -Uri https://aka.ms/Microsoft.VCLibs.x64.14.00.Desktop.appx -OutFile Microsoft.VCLibs.x64.14.00.Desktop.appx
Add-AppxPackage Microsoft.VCLibs.x64.14.00.Desktop.appx
Add-AppxPackage .\microsoft.ui.xaml.2.7.3\tools\AppX\x64\Release\Microsoft.UI.Xaml.2.7.appx

Add-AppxProvisionedPackage -Online -PackagePath .\$latestWingetMsixBundle -LicensePath .\$latestWingetLicense -Verbose

winget -v
After the first part from the beginning of the year, there are now some new rules that are important to deploy an Azure SQL with a managed identity.
What happend?
Around the middle of the year, we started to see deployment errors in our ARM template deployments. The error was the following:
Invalid value given for parameter ExternalAdministratorLoginName. Specify a valid parameter value.
Doesn't this sound weird? It was working before. Why should it randomly break? So call with the team about, what did we do lately. Our ARM templates are often not touched for years. So that was also the case here. The last time we touched them was in february. Then something else must be changed. And that was the case. For some understanding, about how azure active directory authentification works, we changed on our Dev system the SQL admin. This shouldn't be a problem because our automated release should overwrite this change. But what was happening was the error above. 🤔
The solution
We opened so far a ticket with Microsoft to debug the issue. And actually, they change the API for how an SQL is deployed.
Before you could just change the SQL admin with the following snippet:
{
   'type': 'Microsoft.Sql/servers',
   'apiVersion': '2021-02-01-preview',
   'name': 'sqlservername',
   'location': '[resourceGroup().location]',
   'dependsOn': [],
   'identity': {
       'type': 'SystemAssigned'
   },
   'properties': {
       'publicNetworkAccess': 'Enabled',
       'administrators': {
           'login': 'some-name-in-the-sql-server',
           'sid': 'objectId of an AAD element',
           'tenantId': 'Tenant-Id',
           'azureADOnlyAuthentication': true,
           'administratorType': 'ActiveDirectory'
       }
   },
   'resources': []
}
The problem is now you can use this template only to create an SQL server. If there is already an SQL server this will not work.
The solution is to split your template. So you have one for an empty resource group and one for a full resource group. For that, we switched to bicep to have an easier overview of the template. The first template is kinda like a deployment manager. It will check with a custom PowerShell script if the SQL server already exists in a resource group. For this, it needs an identity with the right to list resources in the resource group. After that the bicep template will run the PowerShell script, which will create the variable sqlServerExists. That will be used in the last call of this bicep deployment, which just starts another deployment.
@description('Defines if the sql server already is part of the resource group.')
param sqlServerExists bool = false
@minLength(0)
@maxLength(15)
param environment string = 'pre'
@minLength(1)
param sqlServerName string = 'solimat-sql-server'

param sqlServerAdminGroupObjectId string

@description('The name from the AAD to the ID of `sqlServerAdminGroupObjectId`.')
param sqlServerAdminGroupObjectName string

var location = resourceGroup().location

resource identity 'Microsoft.ManagedIdentity/userAssignedIdentities@2022-01-31-preview' = {
  name: 'identityForCheckSqlServer'
  location: location
}

resource roleassignment 'Microsoft.Authorization/roleAssignments@2022-04-01' = {
  name: guid(tenant().tenantId, resourceGroup().id, identity.id)
  scope: resourceGroup()
  properties: {
    principalId: identity.properties.principalId
    principalType: 'ServicePrincipal'
    roleDefinitionId: '/providers/Microsoft.Authorization/roleDefinitions/acdd72a7-3385-48ef-bd42-f606fba81ae7'
  }
}

resource checkSqlServer 'Microsoft.Resources/deploymentScripts@2020-10-01' = {
  name: 'checkSqlServer'
  kind: 'AzurePowerShell'
  location: location
  identity: {
    type: 'UserAssigned'
    userAssignedIdentities: {
      '/subscriptions/${subscription().subscriptionId}/resourceGroups/${resourceGroup().name}/providers/Microsoft.ManagedIdentity/userAssignedIdentities/${identity.name}': {}
    }
  }
  properties: {
    azPowerShellVersion: '8.3'
    retentionInterval: 'P1D'
    arguments: '-resourceGroup ${resourceGroup().name}'
    scriptContent: '''
    param([string] $resourceGroup)
    Get-AzResource -ResourceGroupName $resourceGroup -ResourceType "Microsoft.Sql/servers";
    $DeploymentScriptOutputs['sqlServerExists'] = (Get-AzResource -ResourceGroupName $resourceGroup -ResourceType "Microsoft.Sql/servers") -ne $null;
    '''
  }
}

module sqlserver 'sqlserver.bicep' = {
  name: 'sqlserver'
  params: {
    environment: environment
    sqlServerName: sqlServerName
    sqlServerAdminGroupObjectId: sqlServerAdminGroupObjectId
    sqlServerAdminGroupObjectName: sqlServerAdminGroupObjectName
    sqlServerExists: checkSqlServer.properties.outputs.sqlServerExists
  }
}
The script that will be started, is the following. It will check the variable and will create the SQL server if it's not existing. If it already exists it will only add an SQL Administrator.
@description('Defines if the sql server already is part of the resource group.')
param sqlServerExists bool = false
@minLength(0)
@maxLength(15)
param environment string = 'pre'
@minLength(1)
param sqlServerName string = 'sqlservername'

param sqlServerAdminGroupObjectId string

@description('The name from the AAD to the ID of `sqlServerAdminGroupObjectId`.')
param sqlServerAdminGroupObjectName string

var SQLServerName_var = '${sqlServerName}${environment}'

resource SQLServer 'Microsoft.Sql/servers@2021-02-01-preview' = if (!sqlServerExists) {
  location: resourceGroup().location
  name: SQLServerName_var
  properties: {
    publicNetworkAccess: 'Enabled'
    administrators: {
      login: sqlServerAdminGroupObjectName
      sid: sqlServerAdminGroupObjectId
      tenantId: subscription().tenantId
      azureADOnlyAuthentication: true
      administratorType: 'ActiveDirectory'
    }
  }
  identity: {
    type: 'SystemAssigned'
  }
  dependsOn: []
}

resource SQLServerName_ActiveDirectory 'Microsoft.Sql/servers/administrators@2022-02-01-preview' = {
  parent: SQLServer
  name: 'ActiveDirectory'
  properties: {
    administratorType: 'ActiveDirectory'
    login: sqlServerAdminGroupObjectName
    sid: sqlServerAdminGroupObjectId
    tenantId: subscription().tenantId
  }
}
The problem with this solution is that currently, we don't know a way to force things like azureADOnlyAuthentication, because we don't run this part of the template after the first use. But for the rest, it will work.
So the conclusion is, ARM files for SQL Server are sadly not anymore stateless. It's important to check the state while you deploy your SQL Servers and react to it.
]]>Azure Blob Storage is an easy and cheap solution for hosting files in the cloud. But there is one thing that doesn't work well in the default configuration of a Storage Account: Video streaming.
]]>The important note here is, that this only applies to Storage Accounts that are
Azure Blob Storage is an easy and cheap solution for hosting files in the cloud. But there is one thing that doesn't work well in the default configuration of a Storage Account: Video streaming.
The important note here is, that this only applies to Storage Accounts that are
general purpose v1. In V2 everything works out of the box.
For video streaming to work nicley, the browser requires that the source (our Blob Storage) will present the Accept-Ranges header in the response of the file and know how to handle the Range header in the request. This is called partial request in the HTTP world.
Default API version of a StorageAccount in Azure is:
2009-09-19.
This is too old, according to the docs from Microsoft the minimum supported API version for range headers is 2011-08-18.
The version change can be achieved in two ways:
- Set the
x-ms-versionheader with every request to an higher version- This requires you to have full controll over the player you use and you can inject the header with JavaScript to every request the player does. (don't do this...)
- Change the default API version of your storage account
Because the first option has some drawbacks, we are going to concentrate on the second option.
Change the defaults.
To change the defaults you must deploy the following template:
{
    "$schema": "https://schema.management.azure.com/schemas/2019-04-01/deploymentTemplate.json#",
    "contentVersion": "1.0.0.0",
    "parameters": {},
    "resources": [
		{
  			"type": "Microsoft.Storage/storageAccounts/blobServices",
  			"apiVersion": "2021-09-01",
  			"name": "storageaccountname/default",
			"properties":{
				"defaultServiceVersion": "2021-08-06"
			}

		}
	]
}
This template will set the default service version to 2021-08-06 which is the latest version that was available while writing this article. And it is higher than 2011-08-18.
If you now try to download a file of your blobstorage you will see a new header in your response: Accept-Ranges. This header has the value bytes. This is perfect for browsers. Now we enabled partial request support from a browser view.
If you now upload a video to your blobstorage you can open it just over the link.
Here is an example: https://rfvk.blob.core.windows.net/asset-6c3d80d3-b845-4b91-b718-c0c6b4ed3b34/Wanderritt.v.2_1280x720_AACAudio_2722.mp4
And if you open the developer tools of your browser, and skip over the preloading bar, you will see a new request will be made that will end in a 206 response code. And in this request you will also see a Range header that contains a number. That is the byte position the download of the file should continue. That's exactly what we want.
The video codec is important
The things shown before in this blog post won't work with every video. For this solution to work, the video file must be encoded in a special way. In DaVinci Resolve you have an option to encode a video file "optimized for network". This means that the required metadata of the video like:
- how long
- what is the bitrate
are stored at the beginning of the video file and not at the end. Only if this is done the previous behavior will work.
In ffmpeg the option is called -movflags faststart and has a good explaination here:
https://manpages.org/ffmpeg
Nice to knows
This can be also helpful to support things like continue a download of a big file when it was canceled for example by network loss. So it's a good thing to enable this also for content that isn't a video.
]]>Get an ISO
MediaCreationTool
The simplest way to get MediaCreationTool is from Microsoft.
After downloading you can start it accepts the lizenz and select that you want create an ISO:

Then select what you need in architecture language and edition.

After that select you want to create an ISO. Then you can start the process.
This will take a long time. So take a coffee.
UUP DUMP
The simplest way to get an UUP DUMP is to download the UUP Media Creation Tool from the MS Store. The tool is relativly self describing and easy to use:
- First start it and select the target architecture for your portable windows:

- Now you must select a build, it helps to just take the newest stable version you can see. (This screen can load for a relativly long time)

- Select your language

- Then you should select an SKU.
3. If you want the smallest image ever you should go for the "coren"
4. If you want all the admin tools and advanced tools you love you should go with "professionaln"
5. If you want to create a portable media player remove the "n" and you get all the media codecs etc. to your drive

- On the next screen you can select a compression type we leave it just at the default option
- Now you are at the summary page and must finally select a place to store your iso.

- If click now next it is time for a break. Came back in 30mins or more. Depends on your internet connection and your storage speed.
Prepare your drive
Warning: the following steps will erase your selected drive completly. There is no way back to recover your data from that device. So double check every step you do!
- Open a terminal with admin rights.
- In that terminal we start
diskpart - In disk part we will first search for our drive we want to use as portable windows drive. To see what drives are exsisting you can type
list disk. This should give you a list like the following:
- In my case the secound partition is what I want to use. the I type
select disk 1(because the counting start at 0, so secound is 1). Check for your self wich disk is the correct one. - Now we clean the selected disk. with just typing
clean - Now we have an empty disk we create one small and a big partition.
7. small partition
8.create partition primary size=500(creates 500MB partition)
9.select partition 1(select the partition)
10.format quick fs=ntfs(format it in ntfs)
11.active(mark the partition as bootable)
12.assign letter=r(set a drive letter so we can interact with the partition later)
13. technically the small partition is only needed if you still want to use an bios and not an uefi.
12. main partition
13.create partition primary(create a partition that is as big as the rest of the drive)
14.select partition 2(select the partition 2)
15.format quick fs=ntfs(format it in ntfs)
16.assign letter=d(set a drive letter so we can interact with the partition later)
That's it. ouer drive is now prepared. To double check your drive should now look like that:

Note: the star (*) is important!
Install Windows
Now we can start with the installation. First we must mount the iso created in step 1. If you use any windows that is newer or equals Win8 you can just double click to mount it. If you use an odler windows you will found virtual disk mounting software in the internet. After mounting remember the drive letter of the ISO. The following steps will revering to it as "ISO disk"
Choose an edition
In an ISO disk image could be many windows versions integrated. So we must select one.
Note: There are also two different container formats for the image container so just be aware that commands that are trying to interact with files that end with
esdcould be in your case end withwim.
First search in the mounted iso for a file that is called install.[esd|wim]. The simplest way to do it is with an powershell by typing the following:
Get-ChildItem E:\ -Include "*install.wim", "*install.esd" -Recurse
Note:
Eis the mounting point of my "ISO disk"
It should result in the following table:

For my image you see I have two .esd files. One for x86 and one for x64. Because the PCs I want to use with my portable windows are x64 I choose that path: E:\x64\sources\install.esd
Now we have our file of intrest. From now on we need an terminal with privilege access. So open an admin terminal. (fastest way is: WIN + X A) In this terminal we run the following line:
dism /Get-WimInfo /WimFile:E:\x64\sources\install.esd
You will see now a list with all SKUs that are in your disk image.

Choose one and use the index in the next command.
Install Windows
The following command will install windows to your main partition of your portable drive. So D is here my big / secound partition. And I install Windows 10 Pro because I choose the index 6.
dism /Apply-Image /ImageFile:E:\x64\sources\install.esd /index:6 /ApplyDir:D:\
This command will take a while. mainly depending on the speed of your portable drive. After the first 5 to 10 mins you will see a progressbar.
Make it bootable
After we did install Windows we must create a boot entry too. This is realtivaly easy possible with the following command:
D:\Windows\System32\bcdboot D:\Windows /s r: /f ALL
This command takes from your new portable windows drive the command bcdboot and create for your Windows installation (D:\Windows) on the drive /s r: (this is the small partition we created earlier) a boot entry that can be readed by an BIOS and an UEFI. (/f ALL)
Boot it up
After that you can unplug your portable windows drive and plug it in another device you want to test your portable windows with. The start this other device and open the boot menu. (for the most motherboards this is F11) Then select your USB device for boot and it should boot. The first boot takes long and also includes a reboot for diffrent driver adjustments.
Note: after reboot you must reopen your boot menu again, because propertly your USB drive isn't the main boot device.
After this first reboot you should be in the OOBE Setup and can create your user account and so on.
Have fun with your portable device.
- Erweitern der Rechte des Deployment Service Principal
- Deployment des SQL Dienstes
- Service Instance bereitstellen
- Service Instance Lese-Rechte im AAD erteilen
- Apps deployen
- App User im Azure SQL anlegen
- App User im Azure SQL for MySql anlegen
- App User im Azure SQL for PostgreSQL anlegen
Erweitern der Rechte des Deployment Service Principal
Das Service Principal welches man für das Deployment seiner Anwendung benutzt über z.B. Azure DevOps, Github, etc., benötigt es die Owner Roller einer Azure AD Gruppe. Das Ziel dieser Gruppe ist es jedem Member in der Gruppe die Azure AD Rolle Directory-Readers zu geben. Dies wird später dem Deployment erlauben die Identität des SQL Servers in diese Gruppe automatisiert hinzuzufügen, so das dieser im Azure AD nach Identitäten suchen kann.
Deployment des SQL Dienstes
Das Deployment des SQL Servers ist zweistufig. Zuerst werden wir die Service Instance bereitstellen und dieser danach das Recht geben, im Azure AD nach anderen Identitäten zu suchen.
Service Instance bereitstellen
Bei dem bereitstellen der Service Instance ist darauf zu achten, dass in dem ARM Template die folgenden Eigenschaften aktiviert sind:
- Azure SQL (
Microsoft.Sql/servers)
"identity": {
    "type": "SystemAssigned"
}
- Azure SQL for MySql (
Microsoft.DBforMySQL/servers)
"identity": {
    "type": "SystemAssigned"
}
- Azure SQL for Postgre SQL (
Microsoft.DBforPostgreSQL/servers)
"identity": {
    "type": "SystemAssigned"
}
Dies vergibt während des Deployments im Azure Active Directory eine Managed Identity an den Server. Mit dieser Identity kann der Server mit dem AAD interagieren.Um die Id der Managed Identity abzufragen benötigt man eine PowerShell mit dem Module Az. Damit kann man dann folgenden Befehl ausführen:
(Get-AzResource -Name 'name des SQL Servers' -ResourceGroupName 'name der Ressourcen Gruppe').Identity.PrincipalId
Service Instance Lese-Rechte im AAD erteilen
Im vorhergehenden Schritt haben wir zum Schluss die Id der Managed Identity der Service Instance ausgelesen. Diese ID muss nun der Azure AD Gruppe hinzugefügt werden, welche im ersten Schritt erstellt wurde. Dafür benötigt man folgende PowerShell Function:
Note: Die folgende Function führt selbstständig die Befehle über die RestAPI aus, da das PowerShell Module AzureAd aktuell nicht mit Service Principals funktioniert.function Add-ManagedIdentityToAADGroup {
[CmdletBinding()]
param (
# The object id of your AAD group, you wanna add the managed identity to
[Parameter(Mandatory = $true)]
[string]
$GroupId,
# The Id of the Managed Identity your wanna add
[Parameter(Mandatory = $true)]
[string]
$MemberId,
# The client Id of your deployment service principal
[Parameter(Mandatory = $true)]
[string]
$ClientId,
# The client secret of your deplyoment service principal
[Parameter(Mandatory = $true)]
[string]
$ClientSecrect,
# The tenant Id of the landingzone
[Parameter(Mandatory = $false)]
[string]
$TenantId = '628242bd-7e70-4aa9-8ee1-72586b4540fe'
)
# oAuth body
$body = "grant_type=client_credentials&client_id=$ClientId&client_secret=$ClientSecrect&scope=https://graph.microsoft.com/.default";
# auth request with the service principal
$Token = Invoke-RestMethod -Method Post -Uri "https://login.microsoftonline.com/$TenantId/oauth2/v2.0/token" -Body $body -ContentType 'application/x-www-form-urlencoded';
# the JWT token with the AAD permissions
$valueForAuthorizationHeader = "$($Token.token_type) $($Token.access_token)";
# retrive the current group members from the group
$currentGroupMembers = Invoke-RestMethod -Method Get -Uri "https://graph.microsoft.com/beta/groups/$GroupId/members" -ContentType 'application/json' -Headers @{Authorization= $valueForAuthorizationHeader};
# check if the managed identity is already an member
if($currentGroupMembers.value.Length -gt 0 -and $currentGroupMembers.value.id.Contains($MemberId)){
# managed identity is already an member
Write-Verbose "Member already added.";
return;
}else{
# run the Post request to add the managed identity, because it is missing in the group
Invoke-RestMethod -Method Post -Uri "https://graph.microsoft.com/v1.0/groups/$GroupId/members/`$ref" -Body ('{
"@odata.id": "https://graph.microsoft.com/v1.0/directoryObjects/' + $MemberId + '"
}') -ContentType 'application/json' -Headers @{Authorization= $valueForAuthorizationHeader};
}
}
Diese Function kann man dann z.B. folgendermaßen verwenden:
Add-ManagedIdentityToAADGroup -GroupId 'c4f48ab3-1220-4714-9094-74442432589e' -MemberId '30947564-bbfb-4249-98a3-1ab5a68d8f24' -ClientId 'bae6792a-bf0b-47f6-ba7a-799328e95ce6' -ClientSecrect 'sdgkhjdfolghjahjehjpjöf' -Verbose
Das wird dazuführen, dass die Managed Identity 30947564-bbfb-4249-98a3-1ab5a68d8f24 (von der SQL Service Instance) zu der Gruppe c4f48ab3-1220-4714-9094-74442432589e (die Azure AD Gruppe mit der Rolle Diretory-Readers) hinzugefügt wird über das Service Principal bae6792a-bf0b-47f6-ba7a-799328e95ce6.
Warning: Bis die Berechtigung auf dem SQL Server und im AAD wirksam wird, können bis zu 15 min vergehen.
Apps deployen
Damit Apps sich über AAD authentifizieren können brauchen dieser erstmal wieder eine Managed Identity im Azure AD. Da es viele verschiedene Arten von Services gibt ist dieses Kapitel nur sehr grob beschrieben. Bei den meisten Azure Services reicht es allerdings im ARM Template folgendes Snipett mit hinzufügen:
"identity": {
    "type": "SystemAssigned"
}
Nach dem Deployment der App kann man die angelegte Identität wie folgt in den verschiedenen SQL Diensten anlegen:
App User im Azure SQL anlegen
Für Azure SQL braucht man nun lediglich den Namen seiner App-Ressource und kann diesen über T-SQL anlegen:
CREATE USER [name der app] FROM EXTERNAL PROVIDER
Um die Managed Identity benutzen zu können, kann man hier das Tutorial lesen. Ein Beispiel Connection-String sieht so aus:
Server=tcp:{sqlservername}.database.windows.net,1433;Initial Catalog={datenbank};Persist Security Info=False;MultipleActiveResultSets=False;Encrypt=True;TrustServerCertificate=True;Connection Timeout=30;Authentication=Active Directory Managed Identity;
App User im Azure SQL for MySql anlegen
Für Azure SQL for MySql muss man nun die ObjectId für die Manged Identity für seine Azure Ressource herrausfinden. Dies geht am besten mit:
(Get-AzResource -Name 'name der app' -ResourceGroupName 'name der Ressourcen Gruppe').Identity.PrincipalId
Hat man nun die Id zu seiner App kann man nun diese über SQL anlegen:
CREATE AADUSER 'myuser' IDENTIFIED BY 'CLIENTID_Of_App';
Um die Managed Identity benutzen zu können, kann man hier das Tutorial lesen.
App User im Azure SQL for PostgreSQL anlegen
Für Azure SQL for PostgreSQL muss man nun die ObjectId für die Manged Identity für seine Azure Ressource herrausfinden. Dies geht am besten mit:
(Get-AzResource -Name 'name der app' -ResourceGroupName 'name der Ressourcen Gruppe').Identity.PrincipalId
Hat man nun die Id zu seiner App kann man nun diese über SQL anlegen:
CREATE ROLE myuser WITH LOGIN PASSWORD 'CLIENTID_Of_App' IN ROLE azure_ad_user;
Um die Managed Identity benutzen zu können, kann man hier das Tutorial lesen
]]>Am besten installiert man wie gehabt Fiddler, wenn man weiß das der Traffik HTTP(s) ist. Hat man Fiddler installiert, so sollte man zuerst in die Settings gehen und dort im folgenden Dialog Verbindungen von externen Computern zulassen:
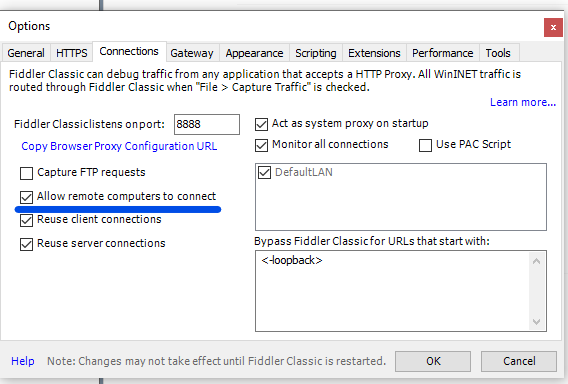
Dies ist notwendig das die Docker Container unter Windows hinter einen eigenen IP laufen und damit für Fiddler nicht zum Host selbst zählen. Als nächstes generieren wir das Zertifikat was wir benutzen damit Fiddler den HTTPs Traffik entschlüsseln kann. Dazu gehen wir in den Settings auf HTTPS und wählen aus das wir HTTPS entschlüsseln wollen. Anschließend exportieren wir den Public Teil des Zertifikates.

Ist das getan findet man das Zertificat auf dem Desktop seines PCs. Dies können wir nun in den Docker Container kopieren den wir debuggen wollen. Das geht am besten über die Docker CLI:
docker cp ~\Desktop\FiddlerRoot.cer unruffled_wilbur:/root/
unruffled_wilbut steht hier für den Docker-Container-Namen. Somit liegt das CERT nun im Docker Container. Nun müssen wir das Certificat noch im Docker Container umwandeln und als Vertrauenswürdig einstufen. Dazu führen wir die Folgenden Befehle aus:
openssl x509 -inform DER -outform PEM -in ./FiddlerRoot.cer -out fiddler.crt
cp fiddler.crt /usr/local/share/ca-certificates/fiddler.crt
chmod 644 /usr/local/share/ca-certificates/fiddler.crt
update-ca-certificates
Nach dem diese abgeschlossen sind vertraut unserer Docker Container nun dem Fiddler Proxy. Jetzt müssen wir dem Docker Container nur noch sagen das er den Proxy verwenden soll. Dabei hilft es zu wissen das der Windows Host immer unter dem Namen `host.docker.internal` erreichbar ist. Somit müssen wir nun nur noch folgenden Befehle absetzen:
export http_proxy=http://host.docker.internal:8888
export https_proxy=http://host.docker.internal:8888
export HTTP_PROXY=http://host.docker.internal:8888
export HTTPS_PROXY=http://host.docker.internal:8888
Ist dies getan kann man mit z.b. wget eine Website abrufen und sollte diese dann auch im Fiddler sehen. Dabei sollte man auch gleich den Filter auf den Process setzen. Alle Verbindung aus Docker kommen für Fiddler im aus dem selben Process.

Und schon kann man zusehen was der Docker Container so macht.
]]>Möchte man zur Kontrolle den Zustand eines aktuellen Pull Request in Azure DevOps lokal auschecken kommt man mit dem üblichen Vorgehen nicht sehr weit.
Leider gibt es in Visual Studio als auch in Azure DevOps keine einfache Möglichkeit an den Stand des Codes heranzukommen.
Die
]]>Möchte man zur Kontrolle den Zustand eines aktuellen Pull Request in Azure DevOps lokal auschecken kommt man mit dem üblichen Vorgehen nicht sehr weit.
Leider gibt es in Visual Studio als auch in Azure DevOps keine einfache Möglichkeit an den Stand des Codes heranzukommen.
Die folgende Vorgehensweise erlaubt es diese Aufgabe über die Kommandozeile zu lösen:
Eine Liste aller remote Branches erhält man wie Folgt:
git ls-remote origin
Als Ausgabe erhält man in etwa dies:
From https://[email protected]/blablubb/Sample/_git/Sample
9365678b9d99856db0fa15a88eec8f490c00c724        HEAD
28745b85ae61c484b19e166cec3da640a4f5c2c2        refs/heads/bugfix/tollerbug
9365678b9d99856db0fa15a88eec8f490c00c724        refs/heads/master
8e3c792beb109b2f786db31c7459351cefa304bc        refs/pull/12/merge
...
Möchte man jetzt den PR Branch lokal auschecken hilft dieses Vorgehen:
git fetch origin refs/pull/820/merge:pull/12
Hiermit wird ein lokaler Name für den Branch angelegt welchen man dann mit folgendem Befehl auschecken kann:
git checkout pull/12
Mit etwas Glück sieht das Ergebnis in etwa so aus:
Switched to branch 'pull/12'