Now, at this point in time, we have several updates that we want to release for you, and they require systematic releases of different parts of our infrastructure that will require a lot of time if done as before. Some of those are just not possible to update in the same manner. For this purpose we are scheduling the following times as scheduled maintenance:
Date range: Tuesday 3rd of February 2026 to Monday 9th of the February (2026.02.03 -> 2026.02.09)
Time Spans are broken into 2 segments
1st 1 hour block
| Start Time | End Time | Timezone |
|---|---|---|
| 3 AM | 4 AM | EST |
| 12 AM | 1 AM | PST |
| 08:00 | 09:00 | UTC |
| 09:00 | 10:00 | CET |
2nd 1 hour block
| Start Time | End Time | Timezone |
|---|---|---|
| 12 PM | 1 PM | EST |
| 9 AM | 10 AM | PST |
| 17:00 | 18:00 | UTC |
| 18:00 | 19:00 | CET |
As you can tell there are 2 scheduled maintenance windows with the duration of 1 (one) hour each.
We thank you for your understanding and we hope you will not experience any inconvenience as we do this. As the changes are done on the core infrastructure, please do expect intermittent status changes.
We are planning to do additional maintenance updates through the month of February so please make sure to stay alert of our updates about the same.
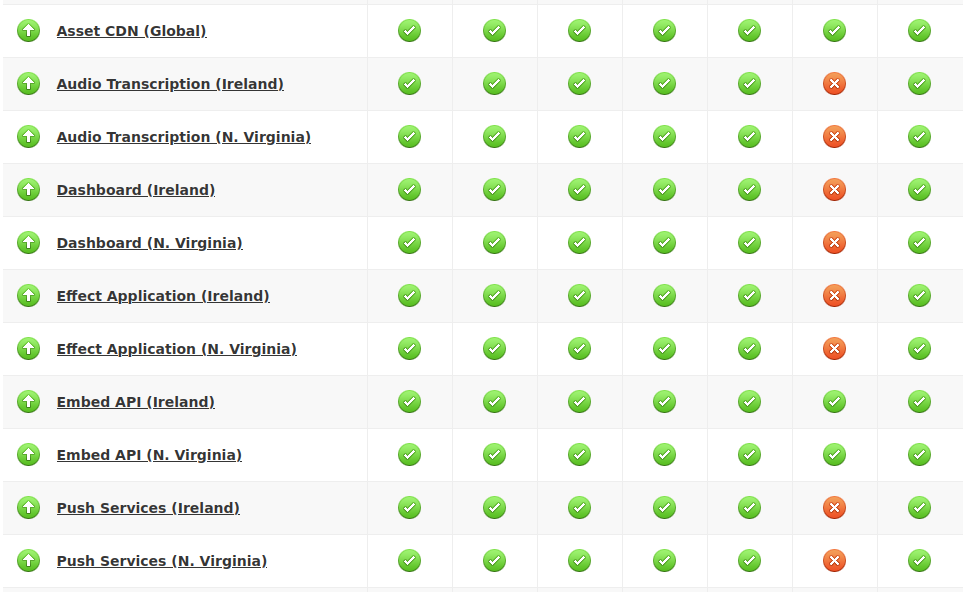
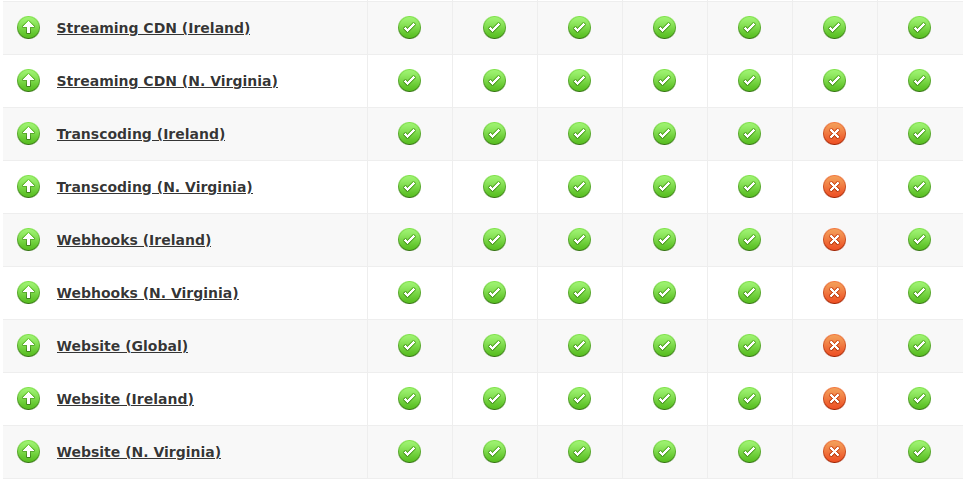
]]>Incident Effects
Anyone using our service or some parts of our website had received different errors usually in 500 range indicating issues on the server side.
Some parts of our service would still seem to work, or have worked due to the various implementations such as CDN and caching that is present not just on our side however in other layers of network globally as well.
Who was affected
This specific change affected customers in all regions – US and EU.
What happened
Due to a mistake during a quick update, the AWS account was inaccessible causing the downtime for all customers. As the update was on AWS account side there was no tests we would usually have with code.
This made:
- the update immediate
- and the error invisible
The detection and the fix
We have different kinds of reporting and even though our AWS account was not working, our reporting has kicked in and started raising alerts which lead to investigation and resolution. The fix was quickly carried out however the effect did not disappear right away. This made all of our systems unavailable for a total of 1 hour.
Aftermath
Once the issue was fixed, there was no additional action needed from our side. All the servers started up automatically, synced and everything was running smoothly.
While we know that it was account change that caused it, we did continue monitoring to see if there are any issues caused by this “restart” and luckily everything was running smoothly.
Plans for the future
It is impossible to create tests and automation that would run and confirm that a change on AWS directly would be done properly or not. This makes it hard to do checks if a typo is introduced or a change that might look innocent yet might make the service unavailable to any extent.
That said, we plan to be more careful when making these changes to make sure that the same does not happen again.
Final Thoughts
Any action (such as recording or API calls) would not have been captured by our system. In most cases the recorder itself would not have been shown on your page neither. If the upload was in the process, it would have stopped and would not be possible to restore it.
That said, we are happy that we have been able to detect it very quickly and have the entire system come back online without any hickups. It is a great lesson to keep in mind and make sure to always “measure twice and cut once” even if it is not a code or system update rather “just a quick account modification”.
]]>The goal of this post is to tell you what makes the video big as well as introduce you to a new feature at Ziggeo.
What makes file a big file?
At the end of the day the video file is just a file. It has a name, extension and the specific way it is packaged as it is created. These wrappings within the file and the file data itself can make one file bigger or smaller.
There are also different ways of how these files are stored. This is true for servers as much as for your own desktops, laptops and mobile devices. These small options that are set for you within your operating system can make one file appear larger in one system and smaller in another.
It is always a fact however that more data you have in a file the larger it will be.
What affects video size?
We have covered this in our docs, where we mentioned bitrates, framerate and resolutions. These are quite important for a video. Higher resolutions require higher bitrates. Generally your video bitrate would increase while audio might not at all.
If you imagine the video to be an empty cup, the water that you add would be the bitrate. Framerate when changed would be a multiplier of that water. This is because the framerate tells how many times the video data will be drawn in a single second. So normal 25-30 when increased to 60 is double of the normal size – depending on the way the video was formatted.
With the mobile devices being more and more powerful it is very easy to see the now old videos of under 20MB being replaced by videos of several GB just because they were captured by a new 4K Android phone.
New Ziggeo feature
Having more and more devices with high quality cameras is something we pay attention to. We always look to be a step in front of the requirements and this new feature is exactly that. For many of our customers something they might use here and there, while for others a requirement.
Until today we have supported up to 5GB file uploads. That is a single file could have been only up to 5GB in size. Above that and it would not be accepted.
You could have of course been uploading 100 of 5GB files at the same time, it was just that 5GB seemed such a way above required mark.
Today we are happy to announce that we have lifted this limit. From today, using our latest release, you can upload up to 5TB files. That is, if you wanted, you could upload 100 or more 5TB files at the same time.
Processing Terabytes
As before, the videos first get uploaded. Once they are uploaded they go through the verification stages after which they are set to be processed. The processing itself happens in practically the same way as before. There is a difference though.
For the common, smaller files we have improved transcoding so that it is faster. The very very big files, even in the ranges of Gigabytes will be processed in the Ziggeo’s award winning video processing manner that we have been using so far.
Get Your Upload Limit Increased
To do this, all you would need to do is to use v2-r41 or higher. That is it. Everything else is done for you automatically. So if you do not make any update and you are on stable, once it gets upgraded to new version you will automatically get the update for these files over 5GB in size.
If you can not wait, just grab the r41 or “latest” revision and enjoy. If you have any questions, just reach out to our support team.
]]>It is designed as 2 different widgets – a player and a recorder. You can add both to your form by going to these links:
https://www.jotform.com/widgets/ziggeo-video-player
https://www.jotform.com/widgets/ziggeo-video-recorder
If you have been using our widgets for a while now, you are already familiar with the same. However there are some interesting new things we want to share with you.
Revisions, Revisions
So far your widgets were always using the version of our JS SDK that we tag as “stable”. This is great for small teams or generally for teams and organizations that have standard requirements. If you are looking for the latest and greatest, well you had to wait a bit for it to become “stable” tag to use those. Not any more!
Starting today you can quickly and very easily change your widgets to use some other revision. The greatest part is that you can also use different embeddings (recorder and player) with different revisions of our system.

This is great if you want to move the player to latest revision and test how the recorder works in your form using the same.
Revision Options
We have described what we did and how that is helpful, however not how you can set it up. First, you will likely want to check this page: version history.
The page will show you the revision, the short information about what it brings and the date when it was pushed out. At the very top of the page it will also tell you which version is currently being used under “stable” tag.
You can insert:
“stable“, “latest” – the available tags.
“r38“, “r39“, “r40“, “r41” or any other revision. The important thing to note is the “r” with the number that you can find on the version history. If you add a value that is not recognized the widget will just show up as white field, so you will immediately know that something is wrong.
Sprechen Sie Deutsch? Parli italiano? Parlez-vous français? Do you speak English?
They are all the same, yet different language used. Some might seem familiar and some might not, and that is the beauty of our system, automatically adjusting to your preferred language. Of course now, with the option within your form, you can set the language to match the rest of your form as well.

The default is “Auto” since that will keep listening to the browser settings and set the language automatically to the preference of the person on your form. This brings the best UX. Of course, if you want to have more control over the overall design of your form, you can set this to be any language that you prefer to be used.
Making Changes to Translations
Having an option to change the language is great, however having the option to modify some words to your liking is even better. We know that sometimes the translations are good for general use, and that is how we designed them. All our translations of course have to match the needs for most of the people using the same.

So if you have a preference in using some alternative wording, now you can. Just make few modifications and that is it, you are using your language in a way you have preference for. How this is done exactly is something we will explain in the next section.
Making Custom Translations
Translations are complex. You need to know the identifier for the string you want to change, the value you wish to change to as well as the language that you are changing.
Now you might also want to change one or more values.
To make this possible and as easy as we can, we need to use arrays and JSON objects.
Getting Keys
To get the keys you should first head over to our localization page. It will make it easy for you to find the same. Scroll all the way down on the page until you reach the section titled as “Language keys and their values”. Everything above this section is not important for you as setting the object will do this for you.
If you click on the Languages dropdown you will be able to select the languages you wish to use. Just click on “All” to deselect all and then make it easy to pick one or two you prefer. This will make it easy for you to see quickly the values.
You can see the bold text representing keys, like “ba-videorecorder-chooser.record-video”. This is the text that is shown on the “Record Video” button on the recorder itself, on the initial screen. Right under it also shows you the current translation with the language on the very right.
Forming the values
The values that you would end up with should look like this:
{
	"key": "ba-videorecorder-chooser.record-video",
	"value": "Record Video",
	"lang": "en"
}
As you can see, it starts with { and ends with its counterpart }. Between the two, you would always have “key”, “value” and “lang” followed by their values, also within the double quotes. This means that your values must not include double quote.
Another thing to point out is the comma at the end of every line, except behind the last one for “lang”.
You can combine as many of these objects as you want, just remember to add comma behind every closing curly bracket ( } ) that is followed by another opening curly bracket ( { ). In the end, put all of them within the pair of square brackets indicating that they are part of array.
This looks like so:
[
	{
		"key": "ba-videorecorder-chooser.record-video",
		"value": "Record Video",
		"lang": "en"
	},
	{
		"key": "ziggeoplayer.video-not-found",
		"value": "We could not find the specified video file",
		"lang": "en"
	}
]
What next?
Keep writing to us about what you would like to see in JotForm or any other integration. Even better, write your own suggestions on our page here: feedback.ziggeo.com where you can add your thoughts, comments as well as to vote up or down on some ideas others have made.
For anything else, please do reach out to our awesome support team.
]]>So far, if you had recorded the video and had a player shown on the same page with the same video and if this is not shown in the same embedding, then you would see the video to be downloaded. From now, this can be prevented.
Our new on page caching system will allow the recorder to add the reference to the video into the global, on page cache that the player can use. As the player is set to play some video, it will first check the cache and then if not available, check out the server to get the content.
So why is this important for you?
Well the difference is that you will not be charged for this type of playback. After all the playback comes from the cache within the browser and not from our servers. This is ideal since in most cases once the recording is done the video data is already available within the page memory.
When this cache is used, the video playback also starts instantly. This is of course because there is no download that your end users would need to wait (even if it is just a fraction of second).
If the video is too large and browser decides to remove some parts of it, that is fine. With this new feature you will only download the parts that the browser is missing.
How do I get to use it?
This is very simple really. On your recorder that you want to cache the video that gets recorded, you would just add cache parameter. As you do, it will immediately set your video into the on page cache.
To use the cache to find the video your player embedding would need to have use-cache parameter set. Nothing else is needed for this to work.
The caching will work for media played using the token as well as for those using the keys.
To have it available you will need to use the latest (r41) revision of our JS SDK.
Why not make it default?
We consider this a great new feature that can help boost the experience of the person recording the video. That said, we also see it as a new feature and possibly a feature that might need few tweaks at this early stage. As always our goal is to create interesting and powerful features that will help you, without introducing something that might change your existing workflows.
]]>Presentation
Having a basic layout means not having your content presented in the best light. This is why we have made our Modern theme as a default – active even if you do not set any.
If you however browse through some of our themes you will see something interesting. They all look great in our opinion, however some will look so much better in your own website. So what we recommend is to check them out.
You can see them on our Video Recorder Themes page. Great thing is that the theme you pick for your recorder comes for your Video Player as well.
All of them are fully responsive and mobile ready. What you might not have known is that you can use one very specific parameter to assist with the same.
ziggeo-width="100%"
That 100% will make the recorder fully wide. If you just set ziggeo-width=”100″ this would be equal to 100 pixels, however with the percentage sign as well, it makes it dynamic; or fluid if you prefer.
Likewise you can set it to 80% or 90% what ever suits your need more.
You can see example here:
<ziggeorecorder
	ziggeo-width="100%"
	...>
</ziggeorecorder>
Ready Up for Mobile
Depending on when you have set up Ziggeo on your website first time, you might not have the recommended setup just yet. No worry, we will show you exactly what you should set – and why – right here.
The recommended approach is always added to our Header page in our docs.
The code that you should use when creating your on page application is this:
var ziggeo_app = new ZiggeoApi.V2.Application({
	token:"APPLICATION_TOKEN",
	webrtc_streaming_if_necessary: true,
	webrtc_on_mobile: true
});
As you can see there is token, and then there are also webrtc_streaming_if_necessary and webrtc_on_mobile.
The webrtc_on_mobile says that you want the browser to use the camera directly. The benefit of this is that the recorder used is within your website and your control. If this is not set to true or if it is not set at all, anyone using the recorder would be using the native camera to record their video.
webrtc_streaming_if_necessary on the other hand is a helping hand for the first one. It will activate the special streaming mode for those browsers that have the WebRTC standard implemented in the streaming mode. Specifically this would be iOS and their Safari.
So having those two options set within your code, means that you will have a much smoother experience.
Get Ready to Face the Camera
By default our system is designed to use the default camera. For mobile devices the default is usually the back camera. In most use cases this would also be the best camera to use. In some use cases however the front camera might be better.
For that reason we have parameter called camerafacefront.
By setting it to true, you will set your recorder to first attempt to use the front facing camera, and only if it is not available to attempt to use the back facing camera. It is good to point out that some mobile phones might have 8 cameras on them, however some still only have one.
You would set it up like bellow example:
<ziggeorecorder
	ziggeo-camerafacefront="true"
	...>
</ziggeorecorder>- Note that … within above code are just a placeholder for any other codes you would add and is not otherwise a valid code.
Permissions
We have mentioned something everyone can see and experience through use above. Now it is time to also add a tip about something that might not be as obvious to the person recording themselves, yet it is very important.
Any time you want to access camera, screen or microphone, you have to be allowed to do this first. As a person recording the video, when you are asked you can give permission to one resource (camera or mic) or to all requested resources. This is where things can get a big hairy.
If the same person forbids access, they will need to do additional steps to allow it later, since browsers remember they forbid it last time.
So if you are experiencing things like image capture option being shown on your Android instead of camera capture, or if you see error to allow access, this is what you should look into.
When doing so, the person that had forbidden access at any point should do it at two levels:
- App Permissions
- Site Settings
The “App Permissions” is page hosting your settings for Chrome, Safari or other browser. It is within the App Permissions that you would be making sure that app has access to camera. This option would block access to entire app, affecting all websites, not just yours.
“Site Settings” are within the app itself. It is usually found within the browser app and are specific to the website. With this one it is possible that camera is working on one website and not on another.
In both cases the settings you want, would be “Ask First” or “Always Allow” or any other permissive / positive setting.
If you are not sure how you can apply some changes or are new in world of video, send us an email today to [email protected] and let us know how we can be of help to you.
]]>Incident Effects
The incident effects were seen as videos that were showing ‘Under Moderation’ message, however in dashboard they would show READY status. This has affected only a small portion of the new videos that were coming in our system. This incident did not affect the existing videos nor their availability in any manner.
Who was affected
This has affected a very small portion of videos that came in, so customers that within the timeframe had more videos coming in, had a greater chance of this error to pop up and affect their workflow.
This means that all videos that were coming in before or after were not affected. It also means that most videos during this timeframe would also have been properly processed.
What happened
We have released a small update to our processing system to the production part of our system. This is something that is known to happen and generally OK. Before it is done, we do several things. We run many different tests and validations before it can be signed off and pushed to production. All our pre-release tests were passed with flying colors.This update was made to make the transcoding better and more reliable. That said, it revealed that in some specific cases, it would cause more trouble than it would help solve.
The detection and the fix
As videos were passing through as READY it was a bit hard to notice that something was off. Thanks to a very quick report by some of you, we were able to detect and connect where the issue is coming from. By that time just a bit shy of 3 hours have passed since the update.
Since the videos were in READY state, it means that simply looking into logs or statuses for failed videos was not an option. Checking what would be the best way to approach this, our team had made a decision that we believe to have been the best one to do. That was to re-process all of the videos that came in during that 3 hour window.
Because we are running highly scalable system with many different servers operational at the time, we have decided to be safe and run the transcoding on all videos that came in since the moment we have released the update and up to 4 hours since. This covered the 3 hour window and also made sure that it covers any instances that were still running the older version of code.
Aftermath
Knowing what code caused the issue and seeing the videos that had failed, our team has prepared for analyzing everything. It is found that all videos should be fixed. We do have a note to attach to this. While it looks like all videos are processed, we are aware that there might still be few videos here and there that will show the under moderation message. We will explain about this near the end of this report.
Plans for the future
We are very happy with the way we have rolled out this update. It did result in some videos to fail, however we followed all of our own key concepts and made sure that everything works right – as far as we can tell. We have also released the update earlier on that day. Day, when we knew that we will be available for quite a lot of time if something did go wrong.
So steps wise, we do not think that there is anything that we could have done differently. What we do plan to do is to extend our tests a bit more to help further minimize the effects of what we create if they were to go down the road we do not want it to go.
Final Thoughts
As we said, a very small number of videos was affected by this. The timeframe is between 1649424600 and 1649435400 ( 1:30PM GMT+0 to 4:30PM GMT+0 ). The “healing process” script was made to run for videos between 1:30PM and 5:30PM GMT+0.
The process was automatically run and everything should be updated for you. If you do have any videos that seem like they are under moderation (and you think they should not be), you can follow the next steps to see if you can re-transcode them:
- Log into your Dashboard
- Go to Videos page
- Find and click on the video you want to check. Under its preview on the right, click on the link that says “View Single Streams”
- Right of the first stream (top most) you will see “re-transcode” option. This will need few moments and will then recreate the video for you
What would be good to keep in mind is that sometimes videos do fail to be transcoded for different reasons. This is also why it is possible that even after the fix there are still some videos that show “Under Moderation” message or are showing with FAILED status. If the re-transcode option did not work for you, please feel free to let us know of such video to check it out.
It is possible that the video was not finalized or is otherwise corrupt, so it might appear to be working, however is not. This would not be related to this incident, and we might be able to release a small update that addresses such videos.
Today, we are happy to say that we have improved it much further. By default our sizing is being seen as if you are setting it up with 100%. That is:
ziggeo-width="100%"
For most cases, this is the exact setup you want. In only some cases you might want to change that, however changing the width parameter will allow you to do just that. This makes it very simple for someone that just wants to copy paste the code and have it running nicely, filling up the entire element it was placed in.
When width and height are friends
Now this is just one part of what should be done to make it fit nicely. We needed to better understand what you are trying to do, while in the same time respect the aspect ratio of the video.
Some of you have noticed that we are adding aspect ratio to our player, however it was done in a way that did not really allow you to make changes through CSS as easily as you might want to. As of now, we will just be adding the aspect ratio information. We are leaving out the min height and other styles that were giving you issues when custom styling the player.
If you needed to sort out anything before, with this removal of styles no change should be needed on your end. It will just make it easier for you to do any other changes in the future.
The way we set the aspect ratio is by checking the exact stream that it about to be played for its resolution. Then we set it up to match the media aspect ratio exactly. By doing this, it allows your media to fit much nicer into the player.
How to test it out
To test out the changes all you would need to do is to switch to r40. It is our latest and greatest (and still in development). Soon we will be switching the stable tag to point to it, so make sure to test it out beforehand.
The easiest way to do this is by copy pasting the codes from our header page.
This would be the relevant part of the code:
<link rel="stylesheet" href="https://assets.ziggeo.com/v2-r40/ziggeo.css" />
<script src="https://assets.ziggeo.com/v2-r40/ziggeo.js"></script>
What is next?
Well, most of what we do is based on what you send our way. So check out r40 and see how it works. Have some feedback? Just reach out to our support team and that is it – you will help us help you with the setup.
If you have a suggestion, even better. We take it that you love the change and would like to see some other things being added. The best place to do so – our feedback page at https://feedback.ziggeo.com.
]]>Since that time, we have maintained those SDKs and added many more. Thus making it very simple and easy for you to add video and audio recording and playback on your mobile apps.
Ziggeo’s mobile SDKs
SDK stands for Software Development Kit. It is essentially a set of code that is designed to make it easier to add some other code into some specific framework.

This greatly reduces the number of hours for your developers because they do not need to find libraries and dependencies, build and debug to have something working.
It also means that when some dependency is updated, your SDK provider makes it all work again in same or as close manner as possible. Often you do not really need to make any changes on your side at all.
Because of that, it is common that people search for SDKs when implementing some service.
Well Ziggeo has many, so let us see which ones are there
iOS and Android SDKs to add video to native apps
These SDKs are created for frameworks that are designed to offer you a way to create apps for both iOS and Android platforms with single code base.
- React Native SDK
- Xamarin SDK
- Flutter SDK
Android SDKs to add video to native apps
SDKs for iOS to add video to native apps
- iOS Objective C SDK
- iOS Swift SDK
SDKs to add video for non native apps
What SDK should you use?

There are no wrong picks. You should always choose the SDK based on the experience your team has. Alternative option is to use what you are more comfortable with.
This makes sense, however it will make much more sense if we go through it with example.
If your team is experienced with React Native apps, then you should really go with React Native SDK. This would make it much easier for them. Now if you are a one person team and you want to turn your website into app, for that React Native might not be the best option.
Instead, you might prefer the non native apps SDK such as Ionic and Cordova. What these do is that they basically allow you to turn your HTML pages into screens on mobile app.
Looking at it as a project, if you have a mobile ready website, you are practically already done. After all these frameworks are basically a browser packaged in very small version designed to work with your pages only.
Now there is of course a reason why you might prefer the native app. This is because native apps offer much more customization options for your end users. The UX is also a bit better as everything happens in a native format.
On the other side, if your team is already working on apps in some specific language, instead of rewriting everything, just grab the SDK that matches and add media to your apps.
Can I get more details?
Of course. We always welcome any feedback or questions sent our way. There is also a lot of information added to every SDK page, so we recommend checking them out. If you prefer or can not find the info you are after, just write to us at [email protected] and let’s talk.
]]>Now, we have worked on case studies with some of our customers. One such case study was written about here. It is about a case study we had with Crowdrise in 2017. Think it does not apply? It still does!
The interesting thing about the media since 2017 to now is that the impact is far greater today. This is because all of the Tic-Toks, YouTube shorts, Instagram posts and others. While these services are different, they all highlight how people love using media to transfer their message.
Not only does it help to transfer a message, the right media also helps have that message picked up and carried into a trend.
Inspecting our case study with Crowdrise
If we take a look on the page mentioned above, we can see the following, very interesting info.
When text was added margin changed about 1.2 times
When text and images were used, this was at 1.5 times the normal
Now, when video was added present on those same pages, the conversions got to 3.2 the normal.
This is quite a huge jump and with quite a simple change – addition of video.
Media in 2022
2022 has just started, however all social platforms are focusing on video. It is not just addition of video, rather using video in various new ways.
The world today is compressed of high quality media that is served fast.
While before you might need or want to appear in news papers, many companies today want to appear in influencers video posts.
There are many companies that help with this simple process of getting you or your company to appear in a video. A great way for exposure. The same is with your website.
Adding media to your website
There are many different use cases for adding media to your website. You add images to make it easier, and for your texts to be more interesting. You can also add videos to be able to summarize a book amount of info into 10 minutes.
The images and videos also help you to show exactly where something is. After all some people will not really be able to distinguish if you say “click on green button” as it all looks gray to them.
The images and video might not always be the best though. In many cases just listening to the info can be quite a helping hand.
For example imagine a scenario where the person on your website has trouble seeing. Listening to the audio might actually prove much better experience for them.
How Ziggeo can help
your ROI and Ziggeo will likely be great friends. This is based on what we hear from our customers and let us show you how that could be true.

Adding Ziggeo is very simple. If you use some of the popular platforms, chances are we already have integrations for it.
With our integrations, you are most likely looking at just clicking around to set things up; pretty easy!
If you use your own solution or want to make specific implementation, that is possible as well. Our API is designed to be easy to add and use, while offering a great deal of ways you can modify it if you want to.
This would offer you ton of options from listening to events, to changing how player or recorder works and looks.
There is also a middle ground. Just perfect for those that need to grab the codes, yet prefer not to do any codding. All you would need is done in 3 steps:
- Create account on Ziggeo
- Copy the codes from our header page
- Modify and then copy the codes for player or recorder from our sandbox
That is it and you can already start seeing how Ziggeo helped with your UX and in turn with your ROI.
Possible use cases with Ziggeo
Here, we will list only some of the different ways you can use Ziggeo on your website.

- Sales and virtual tours – help make a sale on a house by showing it on video. Record once and show many times, avoiding the footwork and gas for every single visit.
- Video Testimonials – help your customers see how others looked when they used your product or service while they are still on the product order page
- HR Candidate Processing – help your HR team quickly go through hundreds of applications in short amount of time
- Podcasts – Add your content in audio format to make it easy to process while on the go (running, traveling, etc.)
- LMS integrations Exams – More and more students are working on exams at their homes. Adding screen recording or camera recording makes it easy to avoid cheating
- LMS integrations Content – Provide your students with text, image, audio and video of the lectures.
There are of course many more. You can find few additional ones on our use cases page.
Have any questions? Interested in doing a use case with us? Reach out and let us know at [email protected]
]]>