![]()
![]()
Request Mocking Protocol (RMP) is a specification for HTTP requests mocking in end-to-end tests. It uses declarative JSON schemas to define mocked request and response. These schemas can be serialized and sent over the network, enabling both client-side and server-side mocking (e.g., in React Server Components).
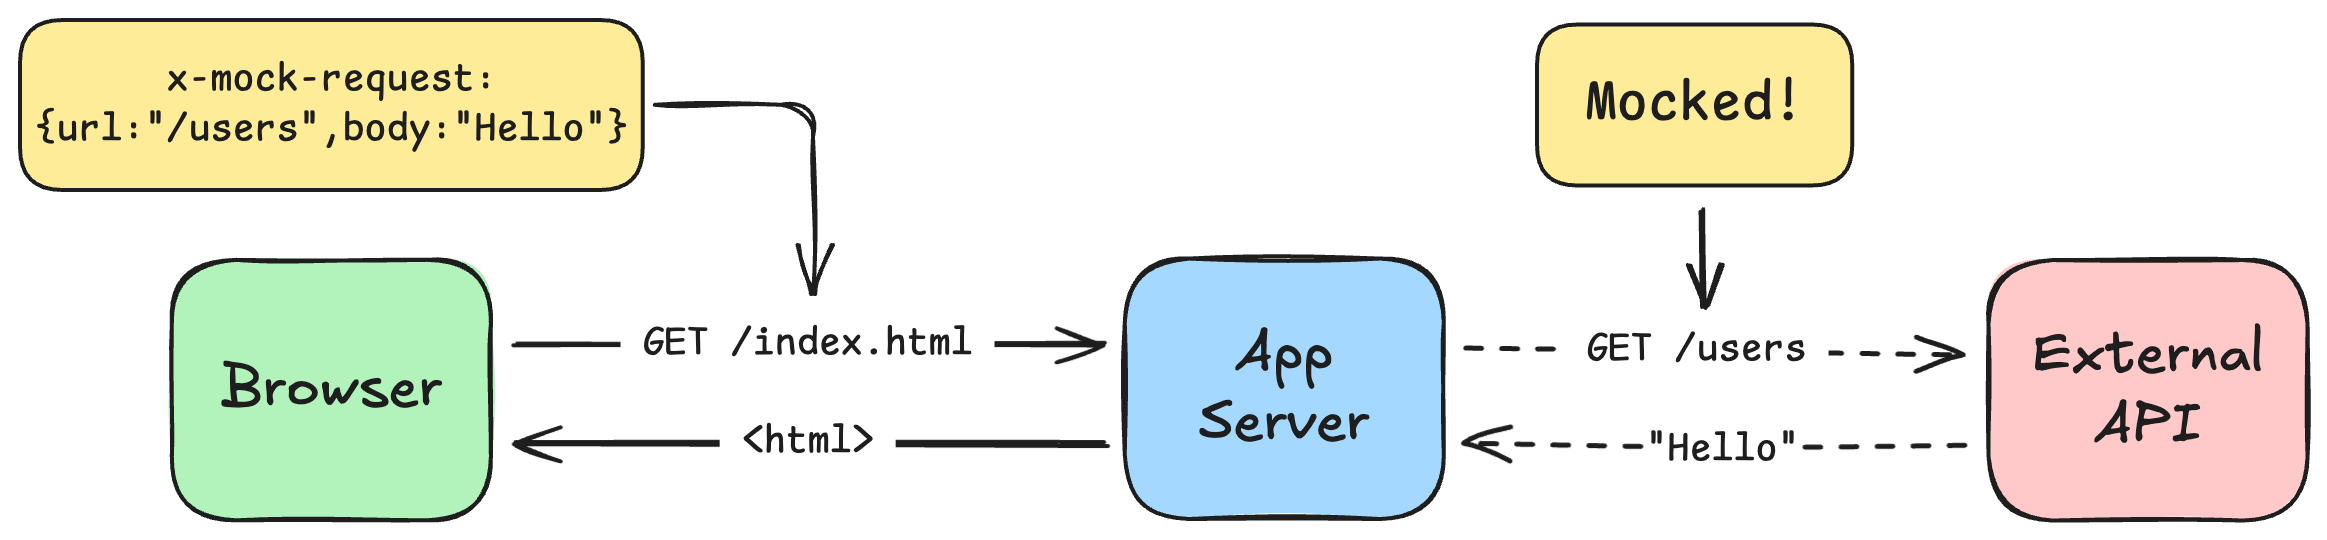
- The test creates a mock and serializes it into the page navigation request via a custom HTTP header:
x-mock-request: '{ url: "/users", body: "Hello" }'. - The server reads this header and applies the mock to outgoing API requests.
- The mocked response is used on both server and client to render the page in the desired state.
Check out the Concepts and Limitations for more details.
Click to expand
- Server-side mocking – Transmit mocks via a custom HTTP header to apply them on the server.
- Per-test isolation – Define mocks inside each test, enabling full parallel test execution.
- Test runner support – Works with Playwright, Cypress, and custom runners.
- Framework-agnostic – Built-in support for Next.js and Astro, or integrate with any framework.
- Request matching – Match requests by URL, wildcard, query, headers, or body.
- Response mocking – Mock the response with JSON/ string body or HTTP error.
- Parameter Substitution – Dynamically inject route/query values into responses.
- Response patching – Fetch real API responses and override only what’s needed.
- API – Set up mocks easily using a
MockClientclass. - Debug – Add
debug: truefor detailed breakdown of the mocking process.
npm i -D request-mocking-protocol
RMP is designed to work seamlessly with popular test runners like Playwright and Cypress, and can also be integrated with custom runners.
Each test defines its own mocks using a MockClient class. Mocks are not shared across tests, enabling per-test mock isolation and full parallelization.
-
Set up a custom fixture
mockServerRequest:import { test as base } from '@playwright/test'; import { MockClient } from 'request-mocking-protocol'; export const test = base.extend<{ mockServerRequest: MockClient }>({ mockServerRequest: async ({ context }, use) => { const mockClient = new MockClient(); mockClient.onChange = async (headers) => context.setExtraHTTPHeaders(headers); await use(mockClient); }, });
-
Use
mockServerRequestin test to define server-side mocks:test('my test', async ({ page, mockServerRequest }) => { // set up server-side mock await mockServerRequest.GET('https://jsonplaceholder.typicode.com/users', { body: [{ id: 1, name: 'John Smith' }], }); // navigate to the page await page.goto('/'); // assert page content according to mock await expect(page).toContainText('John Smith'); });
Check out MockClient API for other methods.
-
Add a custom command
mockServerRequestin support files, see example mock-server-request.js. -
Use the custom command to define mocks:
it('shows list of users', () => {
  // set up server-side mock
  cy.mockServerRequest('https://jsonplaceholder.typicode.com/users', {
    body: [{ id: 1, name: 'John Smith' }],
  });

  // navigate to the page
  cy.visit('/');

  // assert page content according to mock
  cy.get('li').first().should('have.text', 'John Smith');
});
You can integrate RMP with any test runner. It requires two steps:
-
Use the
MockClientclass to define mocks.const mockClient = new MockClient();
-
Attach
mockClient.headersto the navigation request.const headers = { ...mockClient.headers }; // ...navigate to the page with provided headers
On the server side, you should set up an interceptor to catch the requests and apply your mocks.
The Next.js setup includes two parts:
- Enable fetch interception in
instrumentation.tsfor normal server startup. - Preload fetch interception with
NODE_OPTIONSwhen runningnext devso it remains active across HMR reloads.
Create src/patch-fetch.js with the following content:
// src/patch-fetch.js
import { setupFetchInterceptor } from 'request-mocking-protocol/fetch';

setupFetchInterceptor(async () => {
  const { headers } = await import('next/headers.js');
  return headers();
});
Import the patch in src/instrumentation.ts (adjust the env variable for your project):
// src/instrumentation.ts
export async function register() {
  if (process.env.NEXT_RUNTIME === 'nodejs' && process.env.VERCEL_ENV !== 'production') {
    await import('./patch-fetch.js');
  }
}
Note
When deploying on Vercel, don't use process.env.NODE_ENV for detecting non-production environment,
because even preview deployments will have it as production.
Then adjust your package.json to require the patch when starting the Next.js dev server:
{
  "scripts": {
    "dev": "NODE_OPTIONS='--require ./src/patch-fetch.js' next dev"
  }
}
Important
Placing the fetch interceptor in layout.tsx is no longer recommended.
In dev mode, preload patch-fetch.js to keep interception active across HMR reloads.
This extra preload should become unnecessary once Next.js preserves the instrumented fetch across HMR automatically (see #92877).
Now your server is ready for testing.
See astro.config.ts in the astro-cypress example.
You can write an interceptor for any framework. It requires two steps:
- Read the HTTP headers of the incoming request.
- Capture outgoing HTTP requests.
Check out the reference implementations in the src/interceptors directory.
RMP offers flexible matching options to ensure your mocks are applied exactly when you need them:
-
Exact URL matching: Match requests by providing a full URL string.
await mockClient.GET('https://api.example.com/users', { body: [] });
-
Wildcard matching: Use wildcards with URLPattern-style syntax.
await mockClient.GET('https://api.example.com/users/*', { body: [] });
-
Regular expression matching: Match requests using JavaScript regular expressions.
await mockClient.GET(/\/users\/\d+$/, { body: {} });
-
Query parameter matching: Match specific query parameters for more targeted mocks.
await mockClient.GET({
  url: 'https://api.example.com/users',
  query: { role: 'admin' },
}, { body: [] });
-
Method-based matching: Explicitly define the HTTP method (
GET,POST, etc.) to avoid accidental matches.await mockClient.POST('https://api.example.com/users', { status: 201 });
-
Schema matching: Use
.addMock()method with full request schemas to match by method, URL, query, and optionally enabledebugmode for inspection.await mockClient.addMock({ method: 'GET', url: 'https://api.example.com/users', query: { active: 'true' }, debug: true, }, { body: [] });
RMP lets you mock any part of the response.
-
Static body: Set response body as string or JSON object.
// string
await mockClient.GET('https://example.com/*', {
  body: 'Hello world'
});

// JSON
await mockClient.GET('https://example.com/*', {
  body: { id: 1, name: 'John Smith' },
});
-
Custom headers: Set response headers.
await mockClient.GET('https://example.com/*', {
  headers: { 'content-type': 'application/json' },
});
-
Status code: Set arbitrary HTTP status code to emulate errors.
await mockClient.GET('https://example.com/*', {
  status: 500
});
-
Respond with delay: Set arbitrary delay in miliseconds.
await mockClient.GET('https://example.com/*', {
  delay: 1000
});
You can combine all options together:
await mockClient.GET('https://example.com/*', {
  headers: { 'content-type': 'application/json' },
  body: { id: 1, name: 'John Smith' },
  delay: 1000,
});You can define route parameters in the URL pattern and use them in the response via {{ }} syntax:
await mockClient.GET('https://jsonplaceholder.typicode.com/users/:id', {
  body: {
    id: '{{ id:number }}',
    name: 'User {{ id }}',
  }
});
The request:
GET https://jsonplaceholder.typicode.com/users/1
will be mocked with the response:
{
  id: 1,
  name: 'User 1',
}
Response patching allows to make a real request, but modify parts of the response for the testing purposes.
RMP supports response patching by providing the bodyPatch key in the response schema:
await mockClient.GET('https://jsonplaceholder.typicode.com/users', {
  bodyPatch: {
    '[0].address.city': 'New York',
  },
});
The final response will contain actual and modified data:
[
  {
    "id": 1,
    "name": "Leanne Graham",
    "address": {
-      "city": "Gwenborough",
+      "city": "New York",
      ...
    }
  }
  ...
]
This technique is particularly useful to keep your tests in sync with actual API responses, while maintaining test stability and logic.
The bodyPatch contains object in a form:
{
  [path.to.property]: new value
}
path.to.property uses dot-notation, evaluated with lodash.set.
You can enable debug logs globally by setting REQUEST_MOCKING_DEBUG env variable, or by setting debug: true on any request/response schema.
await mockClient.GET(
  {
    url: 'https://example.com/*',
    query: { foo: 'bar' },
    debug: true, // <-- enable debugging via request schema
  },
  {
    body: { id: 1, name: 'John Smith' },
    debug: true, // <-- or enable debugging via response schema
  },
);
When debug enabled, the server will output mocking logs to console:
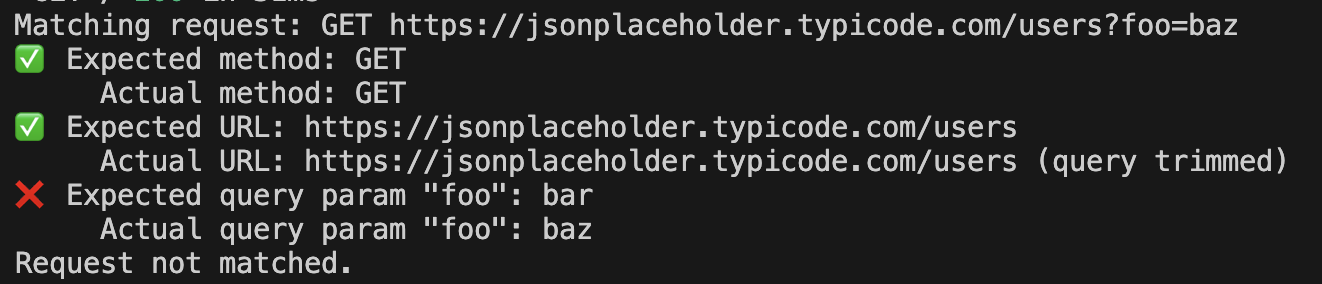
The request schema is a serializable object that defines parameters for matching a request.
Example:
{
  method: 'GET',
  url: 'https://jsonplaceholder.typicode.com/users',
  query: {
    foo: 'bar'
  }
}
This schema will match the request:
GET https://jsonplaceholder.typicode.com/users?foo=bar
The response schema is a serializable object that defines how to build the mocked response.
Example:
{
  status: 200,
  body: 'Hello world'
}Request-mocking-protocol uses a custom HTTP header x-mock-request for transferring JSON-stringified schemas from the test runner to the application server.
Example:
x-mock-request: [{"reqSchema":{"method":"GET","patternType":"urlpattern","url":"https://example.com"},"resSchema":{"body":"hello","status":200}}]
On the server side, the interceptor will read the incoming headers and apply the mocks.
-
Static Data Only: The mock must be serializable to JSON. This means you can't provide arbitrary function-based mocks. To mitigate this restriction, RMP supports Parameter Substitution and Response Patching techniques.
-
Header Size Limits: HTTP headers typically support 4KB to 8KB of data. If you need to mock larger payloads, consider Response patching or alternative techniques.
The MockClient class is used on the test-runner side to define HTTP request mocks.
Creates a new instance of MockClient.
options(optional): An object containing configuration options.debug(optional): A boolean indicating whether to enable debug mode.defaultMethod(optional): The default HTTP method to use for requests.
Returns HTTP headers that are built from the mock schemas. Should be sent to the server for mocking server-side requests.
A callback function that is called whenever the mocks are changed. Accepts headers parameter that can be attached to the browsing context and send to the server.
Adds a new mock for the corresponding HTTP method.
If multiple mocks match the same request, the most recently added matching mock is used. Mock precedence is based on registration order, not URL specificity.
-
reqSchema: string | RegExp | object– The request schema for the mock.- If defined as
string, it is treated as URLPattern for matching the request only by URL. - If defined as
RegExp, it is treated as RegExp for matching the request only by URL.
- If defined as
-
resSchema: number | object: The response schema for the mock.- If defined as
number, it is treated as an HTTP status code.
- If defined as
Examples:
// mock any GET request to https://example.com
await mockClient.GET('https://example.com/*', {
  body: {
    id: 1,
    name: 'John Smith'
  },
});

// mock any POST request to https://example.com having foo=bar in query
await mockClient.POST({
  url: 'https://example.com/*',
  query: {
    foo: 'bar'
  },
}, {
  body: {
    id: 1,
    name: 'John Smith'
  },
});Clears all mocks and rebuilds the headers.
Interceptors are used on the server to capture HTTP requests and apply mocks. Currently, there are two interceptors available.
This interceptor overwrites the globalThis.fetch function.
Basic usage:
const { setupFetchInterceptor } = await import('request-mocking-protocol/fetch');

setupFetchInterceptor(() => {
  // read and return headers of the incoming HTTP request
});
The actual function for retrieving incoming headers depends on the application framework.
If your app doesn’t use fetch, you can try the MSW interceptor, which can capture a broader range of request types:
import { setupServer } from 'msw/node';
import { createHandler } from 'request-mocking-protocol/msw';

const mockHandler = createHandler(() => {
  // read and return headers of the incoming HTTP request
});
const mswServer = setupServer(mockHandler);
mswServer.listen();
Note that MSW is used only to capture the request, while the mocks should be declaratively defined using the MockClient class.
The function for retrieving incoming HTTP headers depends on the application framework.
For Next.js, use the instrumentation.ts setup instead of layout.tsx.
While both RMP and MSW support request mocking, RMP stands out by enabling per-test isolation and parallelization for server-side mocks. It also allows mocking server-side requests when tests run on CI against a remote target.
| Feature | RMP | MSW |
|---|---|---|
| REST API | ✅ | ✅ |
| GraphQL API | ❌ | ✅ |
| Arbitrary handler function | ❌ | ✅ |
| Server-side mocking | ✅ | ✅ |
| Server-side mocking with per-test isolation | ✅ | ❌¹ |
| Server-side mocking on CI | ✅ | ❌ |
¹ Per-test isolation in MSW can be achieved via spinning a separate app instance for each test. See this example.