Shieldon is a Web Application Firewall (WAF) for PHP, with a beautiful and useful control panel that helps you easily manage the firewall rules and security settings.


- Website: https://shieldon.io
- GitHub repository: https://github.com/terrylinooo/shieldon
- WordPress plugin: https://wordpress.org/plugins/wp-shieldon/
2.x will be released at 15, Augest
composer require shieldon/shieldon ^21.x
composer require shieldon/shieldon ^1Guide: Shieldon 1.x documentation
The examples here are for Shieldon 2.
There are three ways you can choose to use Shieldon on your application.
- Implement Shieldon as a
PSR-15 middleware. - Implement Shieldon in the
bootstrap stageof your application. - Implement Shieldon in the
parent controllerextended by the other controllers.
Shieldon 2.x implements PSR-7 so that it could be compatible with modern frameworks such as Laravel, Symfony, Slim, Yii, etc. Using Shieldon 2.x as a PSR-15 middleware is the best practice in this case.
In this example, I will give you some tips on how to implement Shieldon as a PSR-15 middleware.
I use Slim 4 framwork for demonstration. This way can be used on any framework supporting PSR-15 too, just with a bit modification.
class FirewallMiddleware
{
    /**
     * Example middleware invokable class
     *
     * @param ServerRequest  $request PSR-7 request
     * @param RequestHandler $handler PSR-15 request handler
     *
     * @return Response
     */
    public function __invoke(Request $request, RequestHandler $handler): Response
    {
        $response = $handler->handle($request);

        $firewall = new \Shieldon\Firewall\Firewall($request, $response);

        // The directory in where Shieldon Firewall will place its files.
        $firewall->configure(__DIR__ . '/../cache/shieldon_firewall');

        // The base url for the control panel.
        $firewall->controlPanel('/firewall/panel/');

        $response = $firewall->run();

        if ($response->getStatusCode() !== 200) {
            $httpResolver = new \Shieldon\Firewall\HttpResolver();
            $httpResolver($response);
        }

        return $response;
    }
}For example, if you are using Slim 4 framework, the code should look like this.
$app->add(new FirewallMiddleware());For example, if you are using Slim 4 framework, the code should look like this. Then you can access the URL https://yourwebsite.com/firewall/panel to login to control panel.
$app->any('/firewall/panel[/{params:.*}]', function (Request $request, Response $response, $args) {
    $firewall = new \Shieldon\Firewall\Firewall($request, $response);

    // The directory in where Shieldon Firewall will place its files.
    // Must be the same as firewallMiddleware.
    $firewall->configure(__DIR__ . '/../cache/shieldon_firewall');

    $panel = new \Shieldon\Firewall\Panel();
    $panel->entry();
});
Note:
- The HTTP method
POSTandGETboth should be applied to your website. POSTmethod is needed for solving CAPTCHA by users who were temporarily blocked.
Initialize Shieldon in the bootstrap stage of your application, mostly in just right after composer autoloader has been included.
In this example, I use Laravel 6 for demonstration.
In your bootstrap/app.php, after <?php, add the following code.
/*
|--------------------------------------------------------------------------
| Run The Shieldon Firewall
|--------------------------------------------------------------------------
|
| Shieldon Firewall will watch all HTTP requests coming to your website.
| Running Shieldon Firewall before initializing Laravel will avoid possible
| conflicts with Laravel's built-in functions.
*/
if (isset($_SERVER['REQUEST_URI'])) {

    // This directory must be writable.
    // We put it in the `storage/shieldon_firewall` directory.
    $storage =  __DIR__ . '/../storage/shieldon_firewall';

    $firewall = new \Shieldon\Firewall\Firewall();
    $firewall->configure($storage);

    // The base url for the control panel.
    $firewall->controlPanel('/firewall/panel/');
    $response = $firewall->run();

    if ($response->getStatusCode() !== 200) {
        $httpResolver = new \Shieldon\Firewall\HttpResolver();
        $httpResolver($response);
    }
}Route::any('/firewall/panel/{path?}', function() {
$panel = new \Shieldon\Firewall\Panel();
$panel->csrf(['_token' => csrf_token()]);
$panel->entry();
})->where('path', '(.*)');If you are using a MVC framework, implementing Shieldon in a parent controller is also a good idea. In this example, I use CodeIgniter 3 for demonstration.
Let's create a MY_Controller.php in the core folder.
class MY_Controller extends CI_Controller
{
    public function __construct()
    {
        parent::__construct();
    }
}Put the initial code in the constructor so that any controller extends MY_Controller will have Shieldon Firewall initialized and $this->firewall() method ready.
class MY_Controller extends CI_Controller
{
    public function __construct()
    {
        parent::__construct();

        // Composer autoloader
        require_once APPPATH . '../vendor/autoload.php';

        // This directory must be writable.
        $storage = APPPATH . 'cache/shieldon_firewall';

        $firewall = new \Shieldon\Firewall\Firewall();
        $firewall->configure($storage);

        // The base url for the control panel.
        $firewall->controlPanel('/firewall/panel/');
        $response = $firewall->run();

        if ($response->getStatusCode() !== 200) {
            $httpResolver = new \Shieldon\Firewall\HttpResolver();
            $httpResolver($response);
        }
    }

    /**
     * Shieldon Firewall protection.
     */
    public function firewall()
    {
        $firewall = \Shieldon\Container::get('firewall');
        $firewall->run();
    }
}We need a controller to get into Shieldon firewall controll panel, in this example, we defind a controller named Firewall.
class Firewall extends MY_Controller
{
    public function __construct()
    {
        parent::__construct();
    }

    /**
     * This is the entry of our Firewall Panel.
     */
    public function panel()
    {
        $panel = new \Shieldon\Firewall\Panel();
        $panel->entry();
    }
}
Finally, no matter which way you choose, entering https://yoursite.com/firewall/panel/, the login page is suppose to be shown on your screen.

The default user and password is shieldon_user and shieldon_pass. The first thing to do is to change the login and password after you login to control panel.
This is basic concepts about how Shieldon works.

- The network-layer firewall such as CloudFlare.
- The system-layer firewall such as iptables module.
- To use firewall software in the Web application layer, we are capable of implementing Shieldon in a very early stage of your APP, mostly just after Composer autoloader.
- Shieldon analyzes all your HTTP and HTTPS requests.
- Once Shieldon has detected strange behaviors of a request, Shieldon will temporarily ban them and prompt them CAPTCHA for them to unban.
- If a request fails in a row many times (depends on your setting), they will be permanently banned in current data circle.
- If a request has been permanently banned, but they still access your page, drop them in System-layer firewall - iptables.
- SEO friendly, no impacts to SERP.
- Http-type DDOS mitigation.
- Anti-scraping.
- Limit the amount of online users.
- Cross-site scripting (XSS) protection.
- Interrupting vulnerability scanning.
- Eradicating brute force attacks.
- IP manager.
- Protecting pages via WWW-Authenticate.
- Detailed statistics and charts.
- Sending notifications to third-party services.
- A Web UI for management of iptables, the system firewall.
Here are the guides to integrating with the popular PHP frameworks.
Shieldon provides a Firewall Instance, and it's visualization UI called Firewall Panel. By using Shieldon Firewall, you can easily implement it on your web application.

Click here to view demo.
- user:
demo - password:
demo
Only a few screenshots are listed below.

You can see the real-time data here if Online Session Limit is enabled.
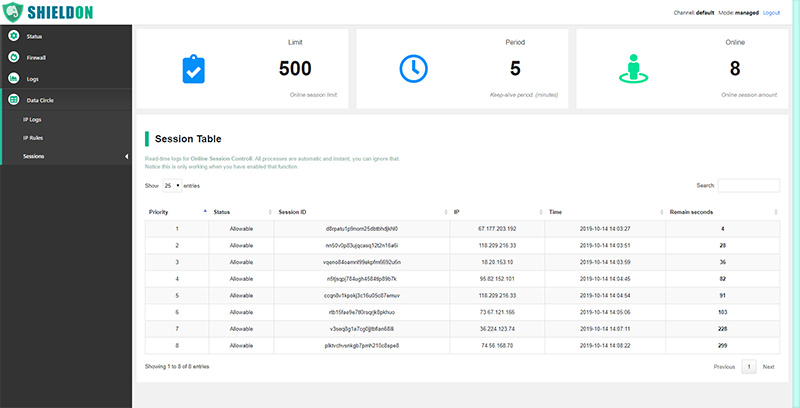
You can temporarily ban a user here.

Shieldon's Firewall Panel is fully responsive, and you can manage it when you are not in front of your computer, using your mobile phone at any time.

When the users or robots are trying to view many your web pages in a short period of time, they will temporarily get banned. Get unbanned by solving a Catpcha.

When a user has been permanently banned.


When a user has reached the online session limit.
Provided by Messenger library.

Send notification via Telegram API.
Welcome to contribute your idea to this project. Before sending your pull request, please make sure everything is tested well without errors.
- MySQL or MariaDB installed.
- Redis installed. (Also include PHP extension
php_redis)
- Run
composer updateto install required libraries.composer update
- Create a writable folder
tmp. (same level withsrcfolder.) for temporary testing files.mkdir tmp chmod 777 tmp
- Create a MySQL database
shieldon_unittestmysql -u root -e 'CREATE DATABASE shieldon_unittest;' - Create a user
shieldon'@'localhostwith passwordtaiwan.mysql -u root -e "CREATE USER 'shieldon'@'localhost' IDENTIFIED BY 'taiwan';" - Grant database permissions on
shieldon_unittesttoshieldon'@'localhost.mysql -u root -e "GRANT ALL ON shieldon_unittest.* TO 'shieldon'@'localhost';" - Install PHP Xdebug.
apt-get install php7.2-xdebug
- Run test.
composer test
Thank you very much for considering contributing to Shieldon Firewall, yet we need your help to translate our webiste, documentation and i18n files in Shieldon library. Here are the links:
Shieldon library is brought to you by Terry L. from Taiwan.
Shieldon Firewall is an open-sourced software licensed under the MIT license.