Make your VM run faster


Each time you build your code, iisexpress will reset AND then the wait begins for the page to load.
Now some machines may be better than others, but windows defender seems to interfere and scan files which can cause considerable delays.
So lets make this run faster!

Windows Defender runs in the background and any files being used can be scanned by it. Those files will only be released after the scanning is complete. You can see in Task Manager that the process for MsMpEng.exe is busy.
You can look at the files being scanned using the Powershell commands

  1. Open a Powershell terminal in Administrator mode
  2. Run the commands listed here: https://github.com/shashisadasivan/MyScripts/blob/master/D365/Powershell/envPrep.ps1
  3. Done, MsMpEng.exe will be slightly less intrusive

Visual studio – Copy all from Find Symbol Results


can-i-copy-multiple-rows-from-the-visual-studio-find-symbol-results-window

https://stackoverflow.com/questions/1173808/can-i-copy-multiple-rows-from-the-visual-studio-find-symbol-results-window

Sometimes it is probably useful to copy all the data from the Symbol results window in Visual studio. Either to process it manually or to run some analysis on it (Or whatever reason you fancy). Unfortunately Visual studio only allows you to copy one result at a time from that window which doesnt make it very friendly. I had over 600 results 😦

Bring in AutoHotKey ! This is an extremely powerful scripting language. It runs off keyboard shortcuts, so you can run this from where your cursor is pointed at.
For my scenario, i managed to make it run with Ctrl + j and it goes through all the lines so quickly that VS doesnt skip to the source reference file.
Once installed, run it in the same context as Visual studio i.e. is VS is running as an administrator then run the script as an administrator as well (So that VS doesnt capture the hotkeys and keep it to itself)

https://github.com/shashisadasivan/MyScripts/blob/master/Misc/Visual%20Studio/VSCopySymbolResult.ahk

D365 Finance – Data entities – Import images (document handling)


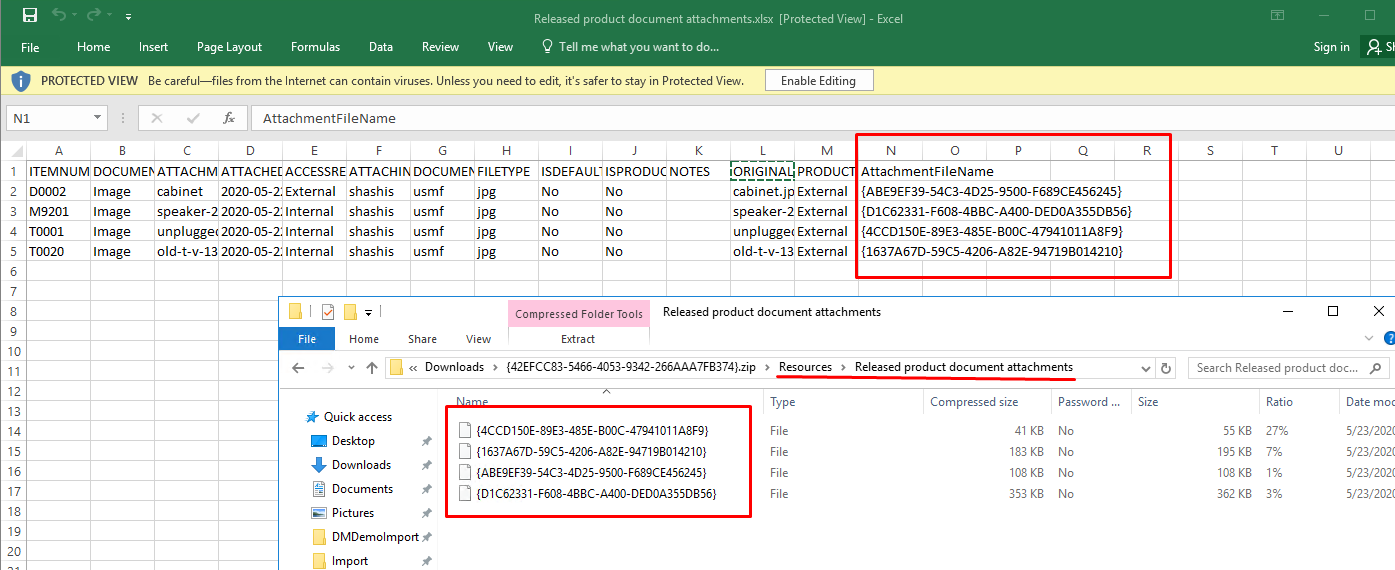
To import images in D365 can be a bit tricky, if not painstaking. If you look at the previous post for Exporting Images, we had downloaded a package which contained an excel file and a folder with the images. It also included 2 xml files.

Importing data will pretty much be done the same way using a similar zip file which includes the 2 xml files as well PackageHeader.xml and Manifest.xml . These files specify the mapping between the excel and staging table and the entity and name of the excel file.
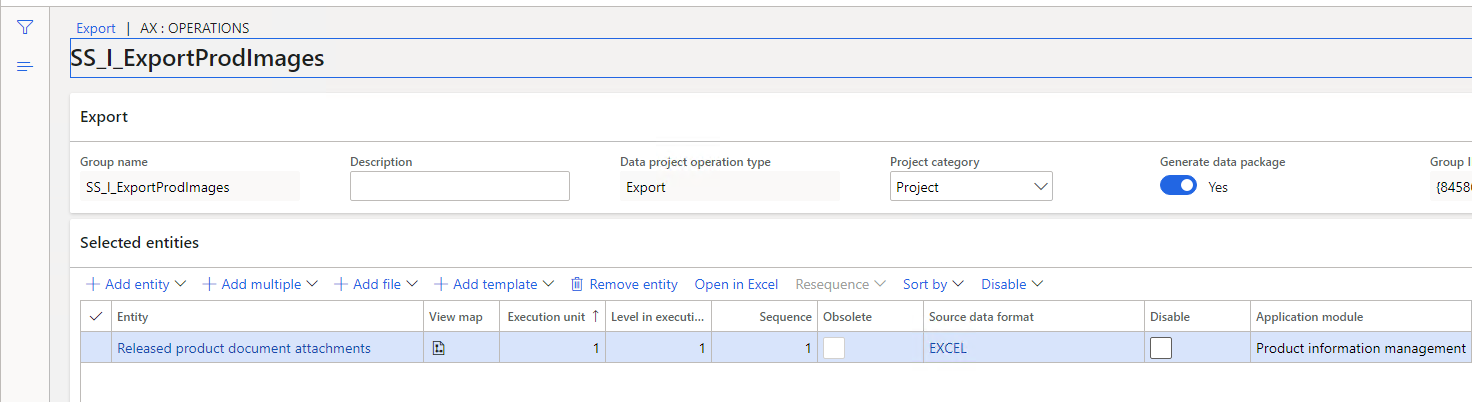
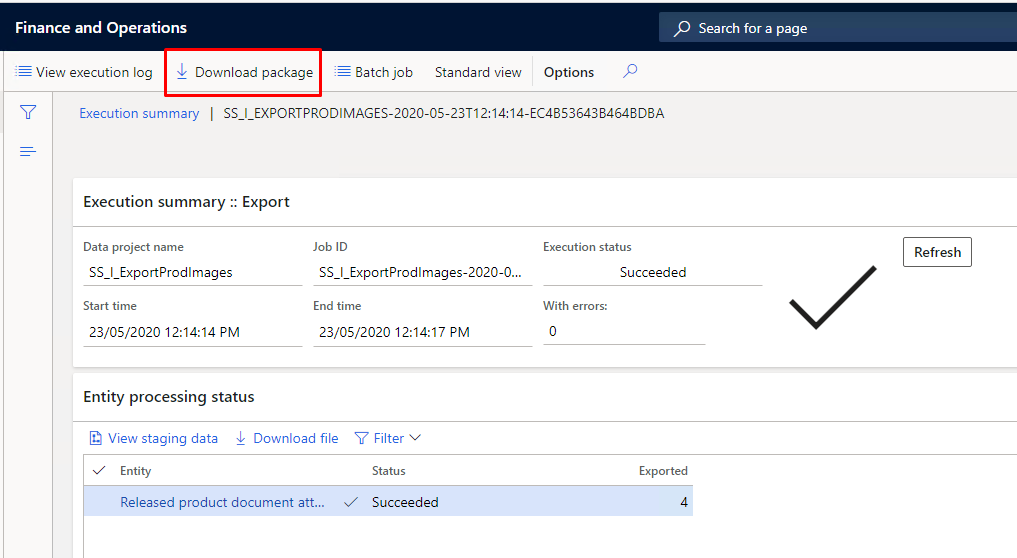
So to keep it simple, follow the Previous post and export the entity, and download the zip file.

Then you can run a powershell script which will update the filename, copy them across to a folder and rename them.

You may also want to follow this post from Munib Ahmand on importing attachments

Create your Excel file
Get the excel file and clear out the data from there. Then fill it up except for the columns FILETYPE, ORIGINALFILENAME
However, put the full path of the file into the column AttachmentFileName i.e. something like C:\myImages\MyProducts\T0001\TheProductImage1.jpg
Your excel file should now look something like this:
undefined

Run the script
Ok, so the time has come to run the script.
1. Create a new folder anywhere and copy the 2 xml files Manifest.xml and PackageHeader.xml in to the folder
2. Download the following powershell script
3. Open powershell and navigate to the folder where the above script was downloaded
4. Open the excel file that you have and find the following fields AttachmentFileName, FileType, OriginalFileName
In my case
FileType = 7
OriginalFileName = 11
AttachmentFileName = 13
Get the column number starting from 1 for these and close the excel file
5. Run the following command from powershell
PS C:\Temp\DM_Demo> .\FileUpload_ExcelResourceCreator.ps1 -ExcelFilePath “C:\Temp\DM_Demo\Import\Released product document attachments.xlsx" -TargetFolderPath C:\Temp\DM_Demo\Import\DMDemoImport -TargetEntity "Released product document attachments" -ColumnAttachmentFileName 11 -ColumnAttachmentFileType 7 -ColumnAttachmentFilePath 13
This will create a new excel file in the Target folder and update the values inside it . It will also copy the files mentioned in the excel file, rename them to the guid value assosicated in the excel file into the Resources/<entity name> folder
6. Navigate to the target folder (You have to go into the folder)
Select all the files and Zip them

Import the Images / attachments
1. In D365 navigate to Data management
2. Create a new Import Project
3. Select “Add File” and clieck “Upload and add”
Choose your zip file and click “Close”
Because your zip file contains the information about the entities it will add the entities to the project.
4. Click “Import” and your attachment / image will be against the record


What does the Script do?
The script takes the file name from the excel file, and replaces it with a GUID. The file is then copied to the target forlder under resources and renamed to the same GUID. The script also copies the file name and the type of the file (Jpg, png, txt, xlxs, etc) and places it in the excel file

D365 Finance – Data entities – Export images


With Data management in Dynamics 365 Finance (and maybe operations) you can export images the same way you export other data. The images are exported as files, however,, they are stored in a GUID name and you have to link this on.

  1. Create an Export type Data management project
  2. Add your entities that you want to export.I will use the Re;eased product attachments entity for this. Remember to check importable fields only at this stage. ( i will be using this template to import images later
    undefined
  3. Hit export and download the package
    undefined
  4. Open the zipped file and and you will see 3 files and 1 folder
    a. Manifest.xml
    b. PackageHeader.xml
    c. Release product document attachment.xlsx (This contains all the records with the file name in it.)
    d. Resource folder – this contains the files (inside the folder of the entity name) without a type. You will need to match the file name against the value in the excel file under the column “AttachmentFileName”. you will need to change the name of the file and type in order to open it.
    undefined